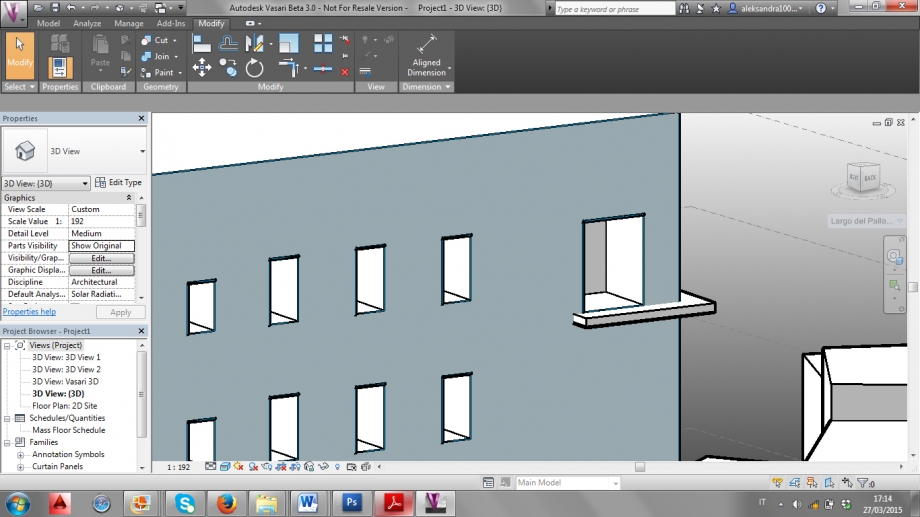
Largo del Pallaro 4_Roma
Alleghiamo qua sotto il link della prima parte della prima esercitazione svolta l'anno scorso:
http://design.rootiers.it/tecniche2012/node/2911
Segue qui la seconda parte.
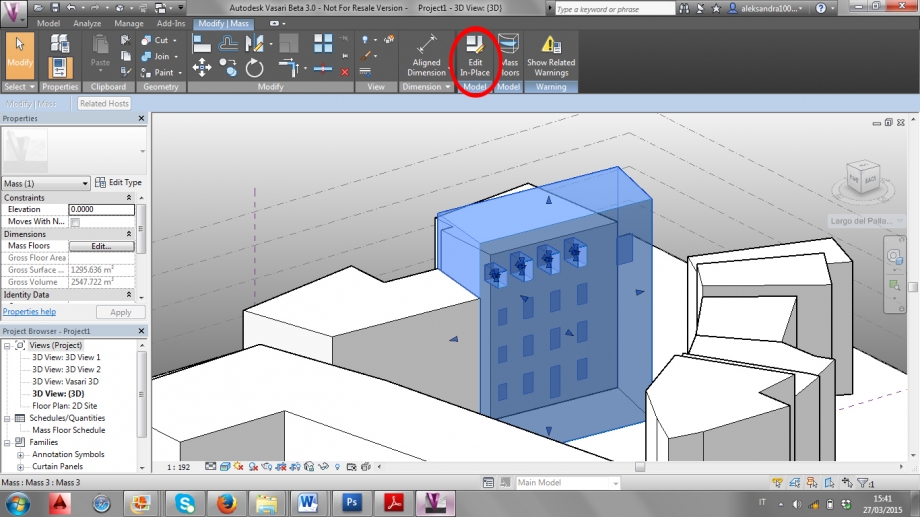
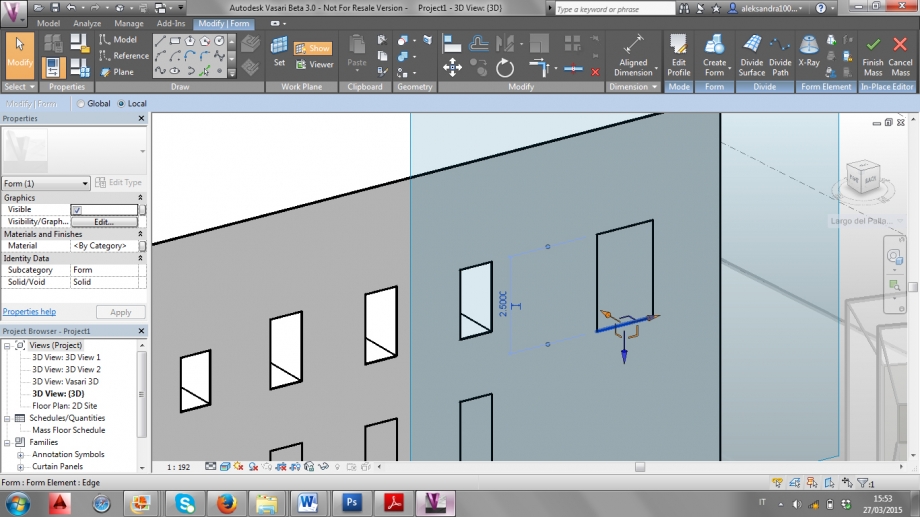
1) Aprire il progetto e selezionare un oggetto. Una volta selezionato l’edificio da modificare andare sul tab “Modify Mass” e cliccare su “Edit In-Place”.
First open the project and select the object. When you have selected the building to modify, go on the tab ''Modify Mass'' and click on ''Edit In-Place''.
Primero se abre el proyecto y se selecciona el objeto. Cuando se haya seleccionado el proyecto a modificar, ve al tab ‘’Modify Mass’’ y haz clic en ‘’Edit In-Place’’.
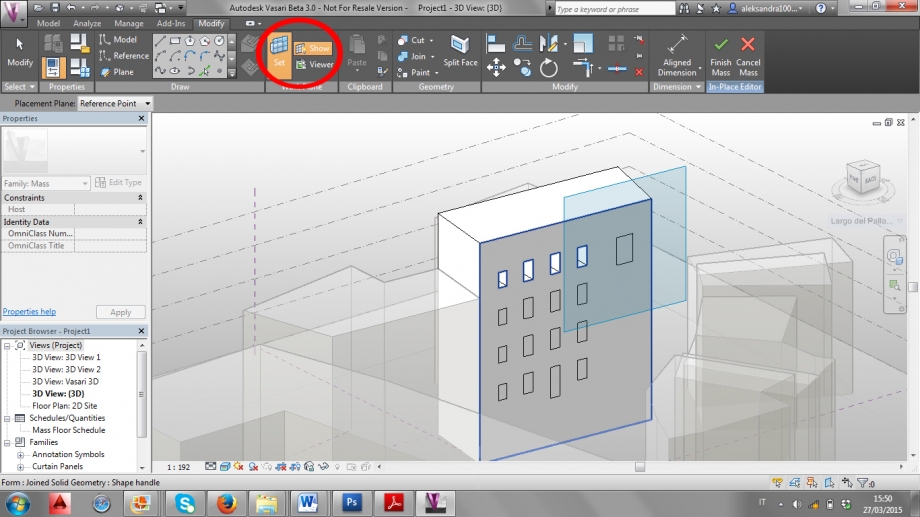
2) Per selezionare la superficie su cui si vuole lavorare cliccare sul comando “Set” nella sezione “Work Plane”. Selezionare la superficie e cliccare su “Show”.
For selecting the surface that you want to work on, you have to click on the command ''Set'' in the part of '' Work Plane''. Select the surface and click on ''Show''.
Para seleccionar las superficies en las que quieres trabajar, tienes que hacer click en el comando ‘’Set’’ en la parte de ‘’Work Plane’’. Selecciona la superficie y haz click en ‘’Show’’.
3) Per iniziare a creare le bucature che rappresentano le finestre, cliccare su “Rectangle”
For starting to create the hollow that represent the windows , click on '' Rectangle''.
Para empezar a crear el hoyo que representa las ventanas, haz click en ‘’Rectangle’’.
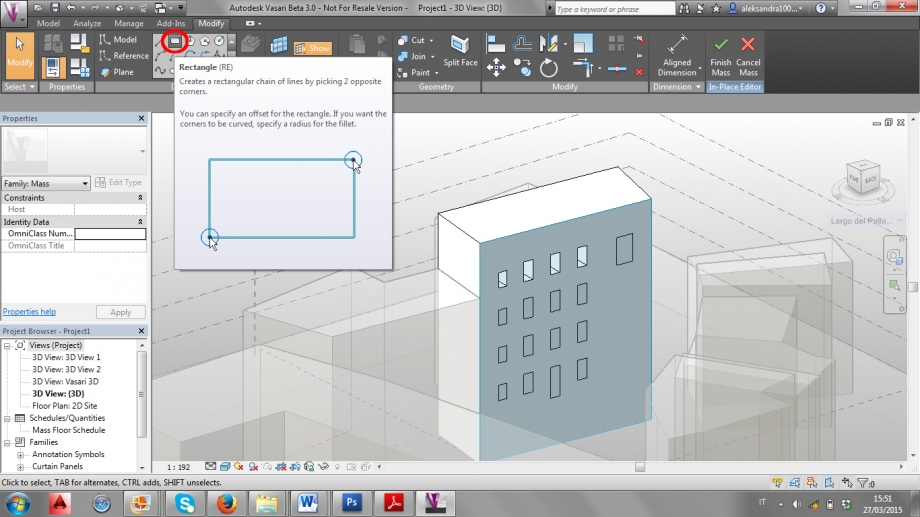
4) Creare un rettangolo con le misure corrette se possibile, altrimenti approssimarle. Per modificare le misure basta cliccare sui lati del rettangolo e scrivere quelle corrette.
If it's possible create a rectangle with the corrected or approximate measure. For modifying the measures it's enough to click a side of the rectangle and write the correct ones.
Si es posible se debe crear un rectángulo con las medidas correctas o aproximadas. Para modificar las medidas es suficiente hacer clic a un lado de el rectángulo y escribir las correctas.
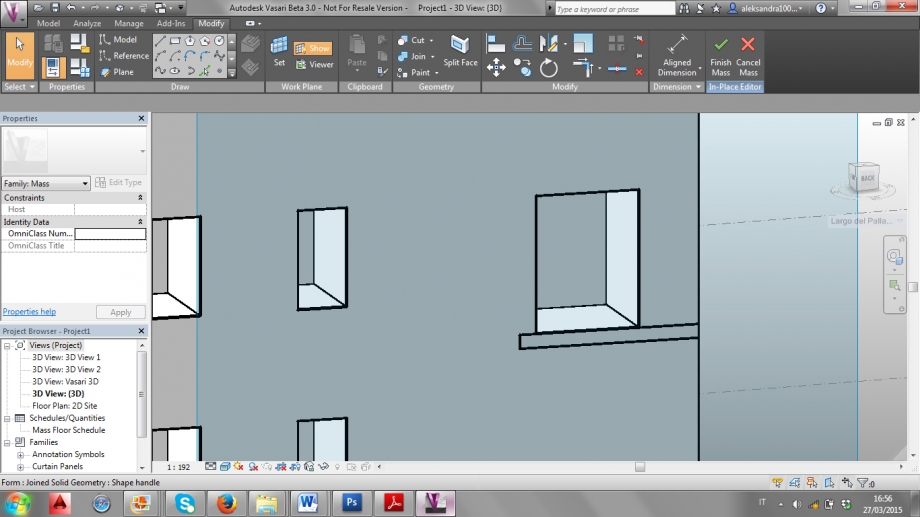
5) Per modificare la distanza del rettangolo dai bordi dell’edificio, spostare il pallino delle quote fino al bordo e modificare la misura.
For modifying the rectangle's distances go to the edge of the building, move the dot of the dimensions up to the edge and modify the measures.
Para modificar las distancias del rectángulo se debe ir al borde y modificar las medidas.

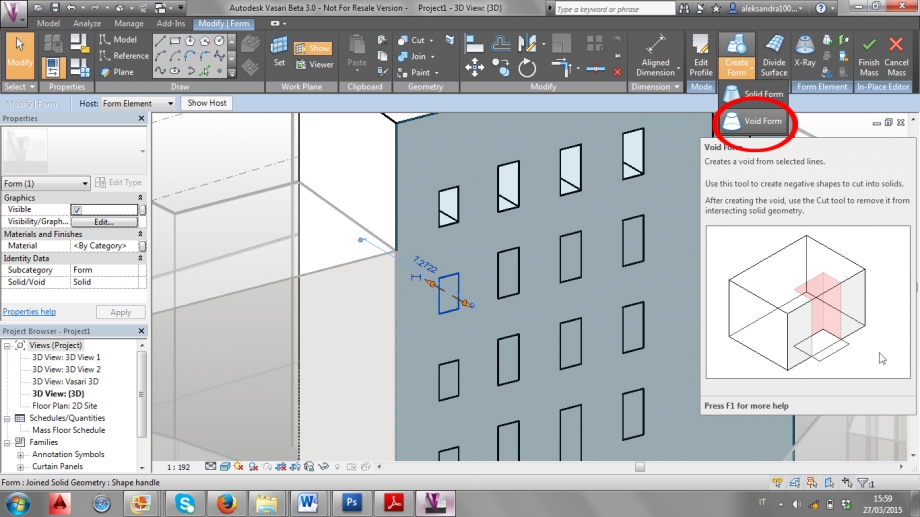
6) Per creare le bucature, cliccare all’interno del rettangolo e andare sul comando “Create Form”. Si aprirà un menù a tendina: cliccare su “Void Form”.
For creating the hollow, click inside the rectangle and go to the command ''Create form''. A drop down menu will open: click on ''Void Form''.
Para la creación del hoyo haz clic dentro de el rectángulo y ve al comando ‘’Create Form’’. Una ventana desplegable del menú se abrirá: hacer clic en''Void Form''.
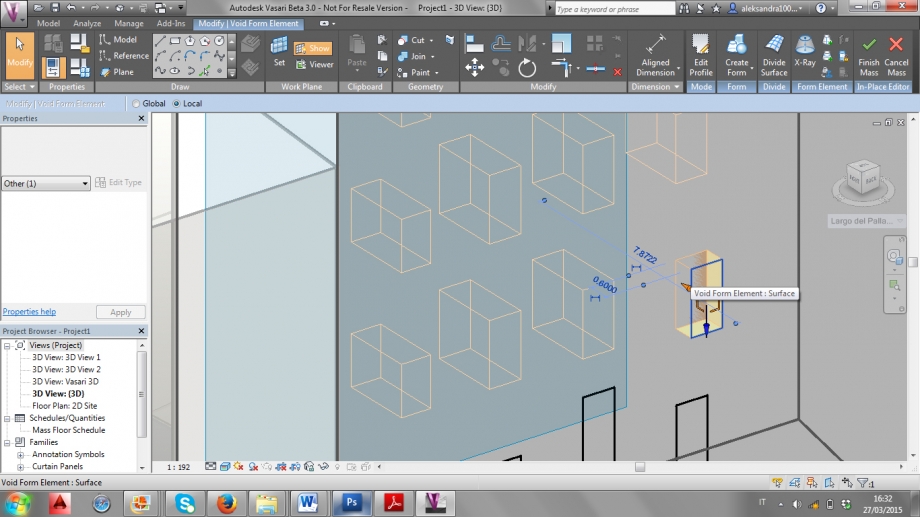
7) Attivato il comando “Void Form”, tirare la freccia arancione verso l’interno per creare la bucatura, poi cliccare sulla misura per modificarne la profondità.
When the command ''Void Form'' its activated, pull the orange arrow inside for create the hollow and then click on their measure for modifying the profundity.
Cuando el comando ''Void Form'' sea activado, hala la flecha anaranjada dentro para crear el hoyo y después haz clic en sus medidas para modificar la profundidad.
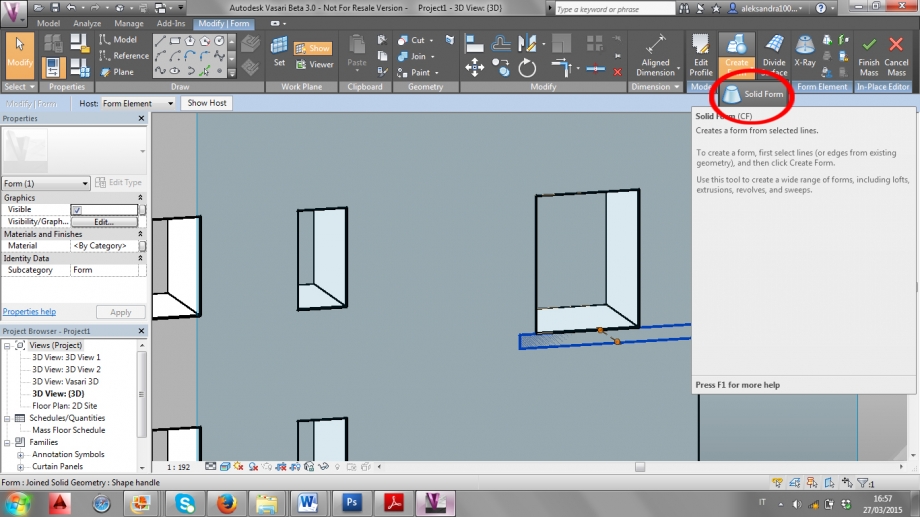
8) Per creare una pensilina, dopo aver disegnato un rettangolo e modificato le misure, cliccare al centro del rettangolo. Andare sul comando “Create Form” e nel menù a tendina cliccare su “Solid Form”.
For the creation of a shelf, after drawing a rectangle and modifying the measure, click inside of the rectangle and go to the command ''Create Form'' and in the drop down menu click on ''Solid Form''.
Para la creación de una superficie, después de diseñar el rectángulo y modificar las medidas haz clic dentro del rectángulo y ve al comando ''Create Form'' y en la ventana desplegable del menú haz clic en ‘’Solid Form’’.
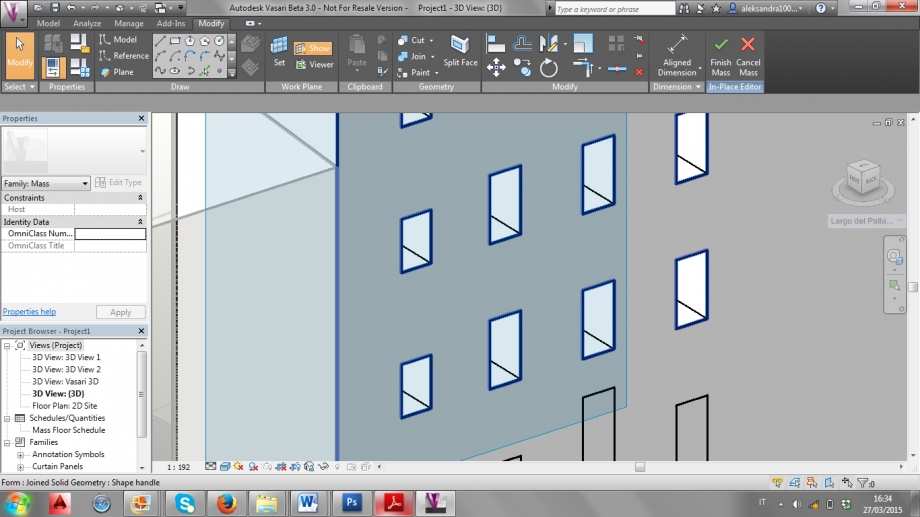
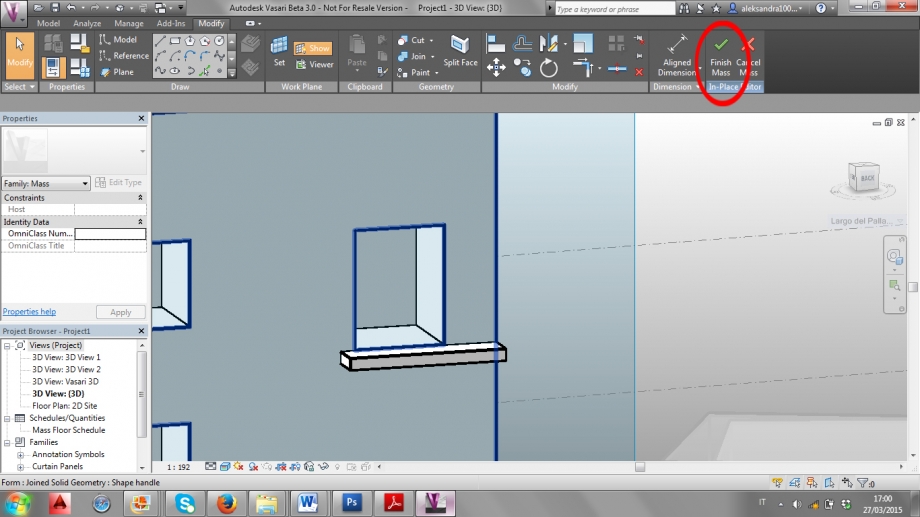
9) Tirare la freccia arancione verso l’esterno e modificare le misure. Terminate tutte le bucature e pensiline cliccare sul comando “Finish Mass”.
Pull the orange arrow outside and modify the measure. when you finish all the hollows and shelves click on the command ''Finish mass''
Poner la flecha anaranjada afuera y modificar las medidas. Cuando tu hayas terminado todos los hoyos y superficies haz clic en el comando ''Finish mass''.
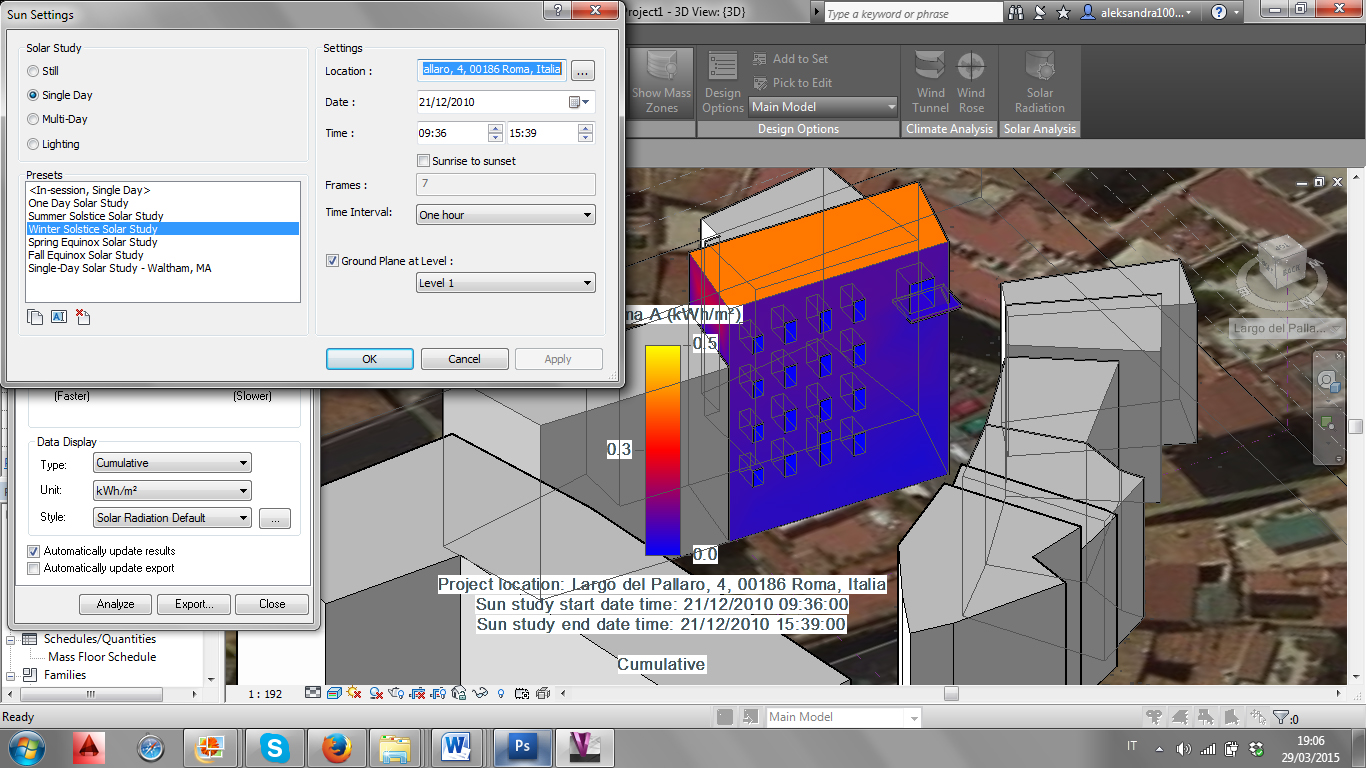
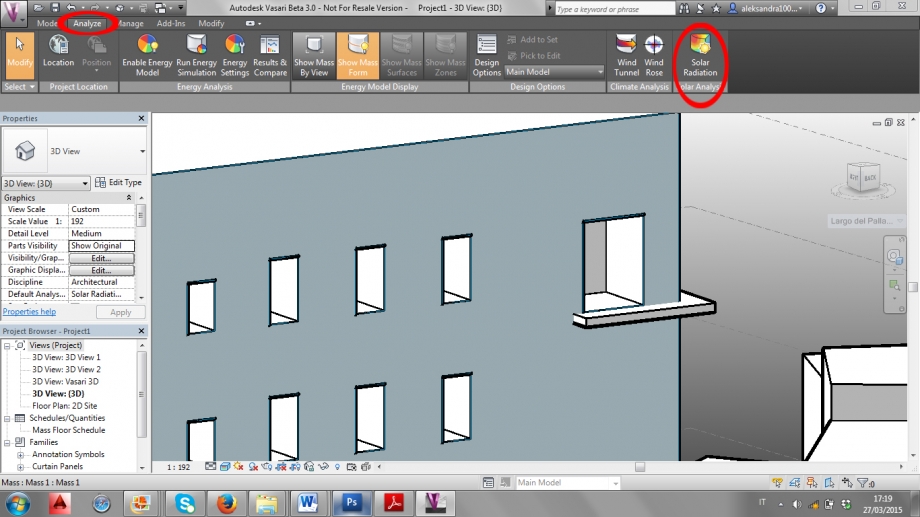
10) Andare sul tab “Analyze” e nella sezione “Solar Analisys” cliccare sul comando “Solar Radiation”.
Go on the tab ''Analyze'' and on the part ''Solar Analisys'' click on command ''Solar Radiation''.
Ve al tab ''Analyze'' en la parte de ''Solar Analisys'' haz clic en el comando ''Solar Radiation''.
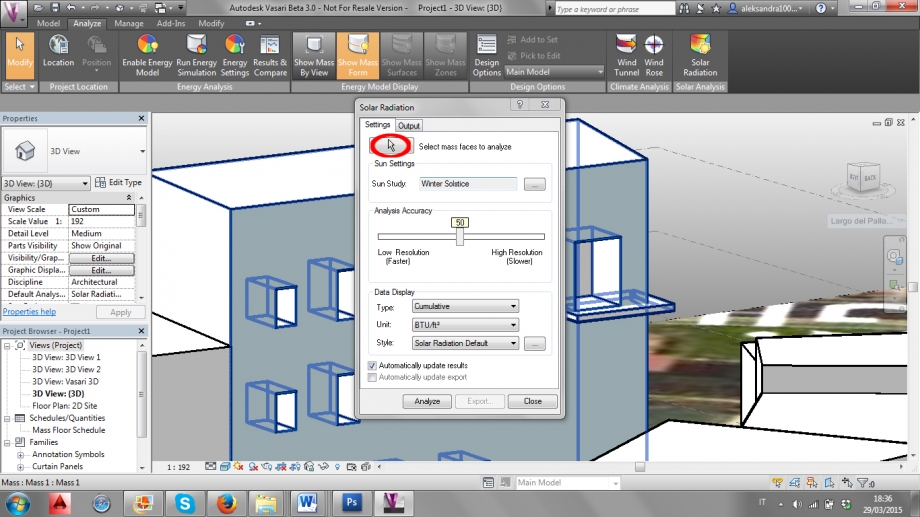
11) Una volta aperto il comando, cliccare sul tasto con la freccia per selezionare le parti dell’edificio su cui si vuole effettuare l’analisi solare.
Once the command is open, click on the button with the arrow to select the parts of the buildings in which you want to make the Solar analysis.
Una vez que el comando sea abierto, haz clic con la flecha en el botón para seleccionar las partes del edificio en las cuales tu desees hacer el análisis Solar.
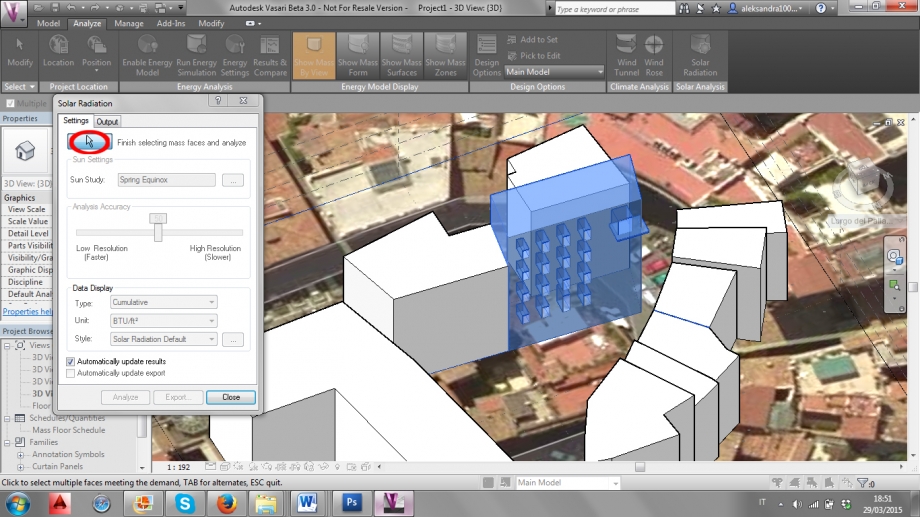
12) Dopo aver selezionato le parti dell’edificio, cliccare di nuovo sul tasto con la freccia per chiudere l’operazione di selezione.
After selecting the parts of the building, click again on the button with the arrow for closing the selecting operation.
Después de seleccionar las partes de el edificio haz clic con la flecha en el botón para cerrar la operación.
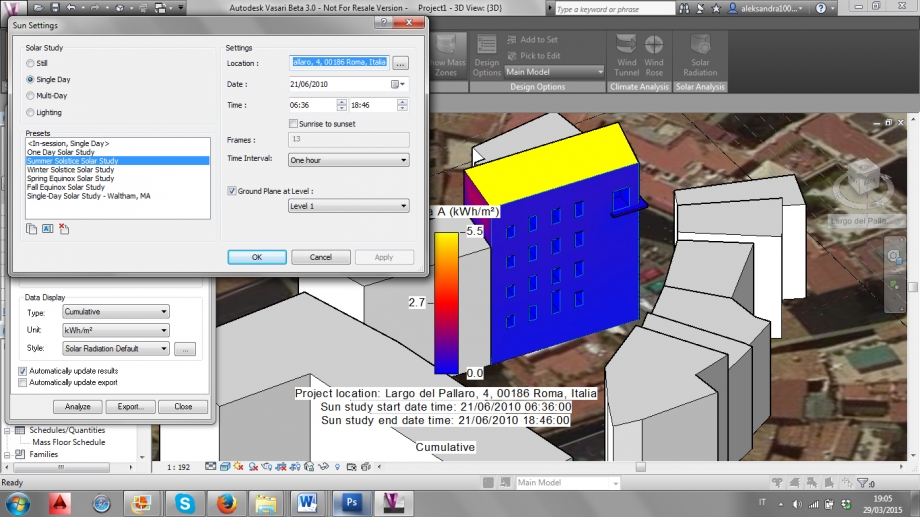
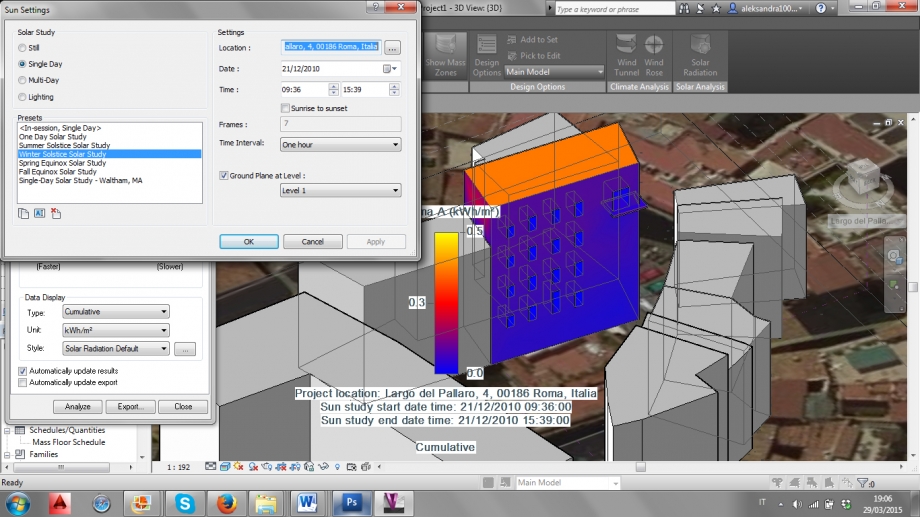
13) Nella sezione “Data Display”, cambiare le unità di misura da BTU/ft² a kWh/m². Cambiare le impostazioni dell’irraggiamento solare nella sezione “Sun Settngs”, “Sun Study”.
In the section “Data Display” change the units from BTU/ft² to kWh/m². Change the settings of the solar radiation in the section “Sun Settings”, then “Sun Study”.
En la seccion ‘’Data Display” cambiar la unidad de medda de BTU/ft² a kWh/m². Cambiar los ajustes de La Radiacion Solar en la seccion “Sun Settings”, despues “Sun Study”.
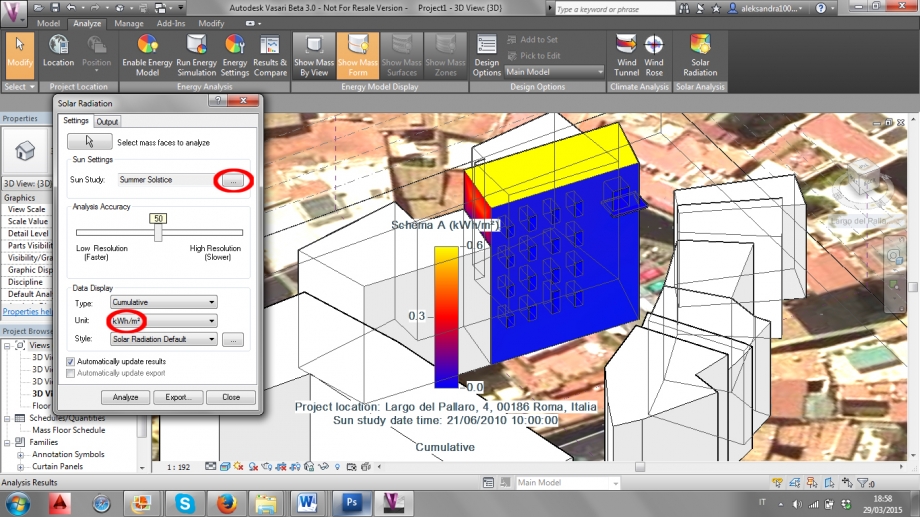
14) Per analizzare l’irraggiamento solare nella giornata del solstizio d’estate, impostare lo studio su “Single Day”, selezionare “Summer Solstice Solar Study” e modificare l’ora dalla quale e alla quale si vuole compiere l’analisi. Cliccare su “Ok” per far partire l’analisi. Per effetuare l’analisi nella giornata del solstizio d’inverno, bisogna invece selezionare “Winter Solstice Solar Study”.
For analyzing the solar radiation in the summer solstuce day, set the study on “Single Day”, select “Summer Solstice Solar Study” and modify the hours from when to when the analysis is needed. Click on “Ok” to start the analysis. For making an analysis for the winter solstice day, select “Winter Solstice Solar Study” instead.
Para analizar la radiaccion solar en el dia de solstizio de verano, selecciona “Summer Solstice Solar Study” y modifica las horas de cuando a cuando el analisis sea necesitado. Clic en “Ok” para empezar el analisis. Para hacer un analisis de el dia de solstizio en invierno, es necesario seleccionar “winter Solstice Solar Study”.
Considerazioni:
Abbiamo effetuato sia analisi solare di tipo “still” incentrata su dei momenti precisi della giornata, che un’analisi che considerasse l’intera giornata, ma la facciata dell’edificio che abbiamo preso in considerazione non riceve un irraggiamento solare diretto, è sempre in ombra. Questo fa sì che lo studio di eventuali pensiline non sia interessante, dal momento che l’intera facciata dell’edificio non si trova in una situazione ottimale.
Inoltre c’è stata qualche difficoltà nel selezionare gli elementi dell’edificio per l’analisi, in quanto durante questa azione gli elementi continuavano a deselezionarsi tutti improvvisamente. Dopo quattro tentativi abbiamo sviato il problema selezionando l’intero edificio con il rettangolo della selezione, deselezionando poi quelli elementi che non ci interessavano.
Considerations:
We made both a still solar analysis, incentrated at specific times of the day, and a single day analysis, but the facade of the building we are considering doesn’t get any direct solar radiation, it’s always in shadow. This makes pointless any kind of study of the shelves that are on the facade, since the whole facade is not in a great situation.
Moreover we had some difficulties while selecting the elements of the building for the analysis, as during this action the elements continued deselecting themselves. After four attempts we avoided the problem selecting the whole building with the rectangular selection, deselecting then the elements that we didn’t need.
Consideración:
Hemos efectuado ambos análisis solares de tipo ‘’Still’’ centrados en horas especificas del día,y de un solo día de análisis, pero la fachada del edificio que habíamos analizado no recibe una radiación directa, esta siempre en penumbra. Esto ocasiona que el estudio de la fachada y las superficies no sea interesante; desde el momento en que la fachada del edificio no se encuentra en situaciones optimas.
Además se tenido dificultadescuando seleccionamos los elementos del edificio para el análisis, tanto como duro el proceso los elementos se deseleccionaban ellos mismos. Después de cuatro intentos pudimos solucionado el problema seleccionando todo el edificio con el rectángulo de selección, deseleccionando después los elementos que no nos interesaban.