


Solar radiation's impact, Via dei Georgofili - Solar analysis of the project ideas, Trastevere
In this delivery we have studied the solar radiation on the spaces, the facades and the glass surfaces of one of the buildings of our first exercise, in order to value positive and negative aspects.
We share below the procedure followed to continue modeling through the definition of particulars on the facade and to do a more accurate solar analysis.
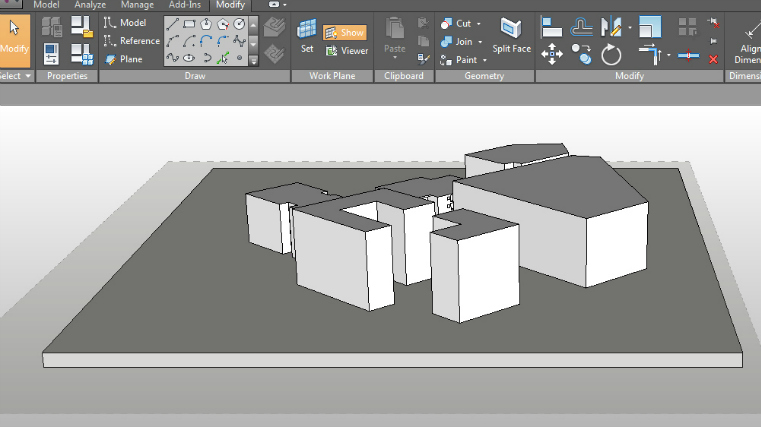
Step 1: Drawing the ground floor
Once you have created the masses that represent the buildings, now create the ground as a simple parallelepiped, which the volumes are based on. Do this in order to analyse, later, the solar radiation on the open spaces defined by the buildings.
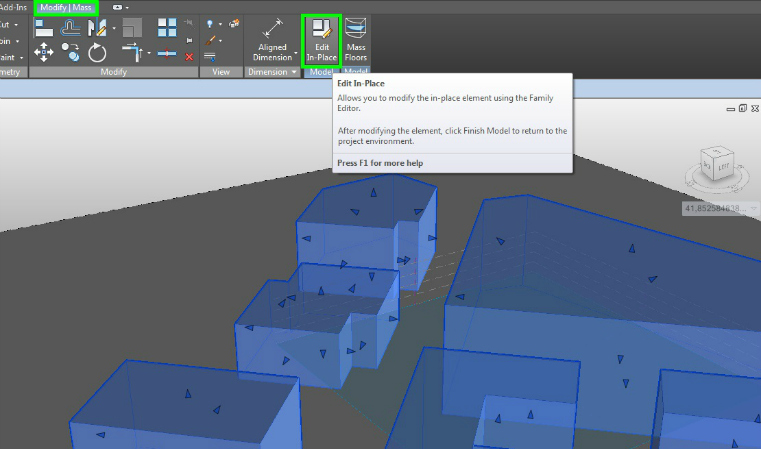
Step 2: Drawing the details
In order to add a building’s details, click on MODIFY MASS > EDIT IN PLACE.
Be sure to set the right work plane, draw the figure that you want to represent: you can move it and also adjust the dimensions by clicking on them.
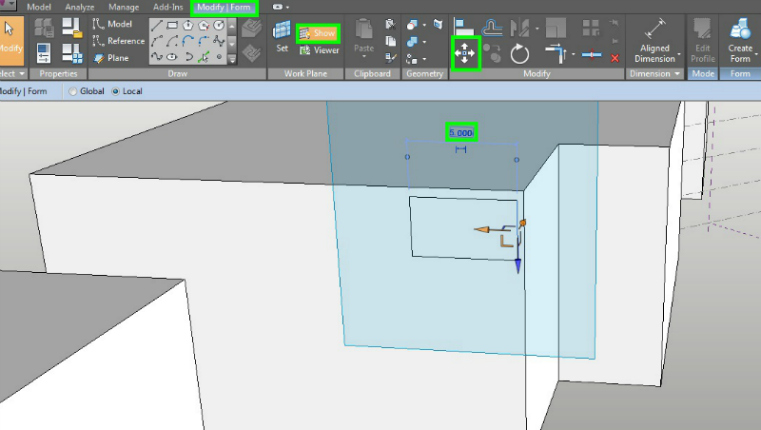
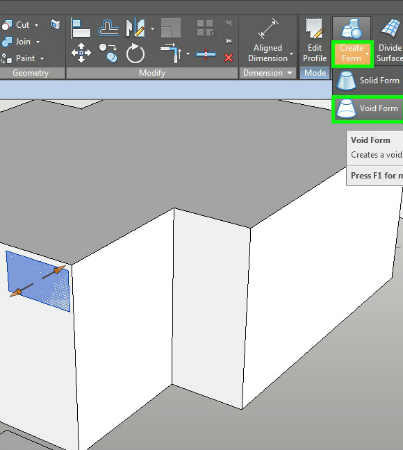
Click on CREATE FORM > VOID FORM and extrude towards the interior with the chosen measure.

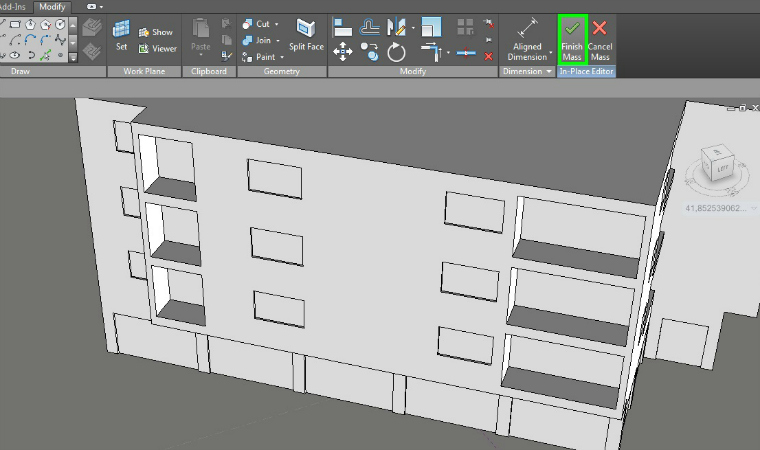
Once you have realized all the details, to complete the modeling click on FINISH MASS
Step 3: Set the solar analysis
Click on ANALYZE > SOLAR RADIATION > SETTINGS to set up all your preferences of analysis.
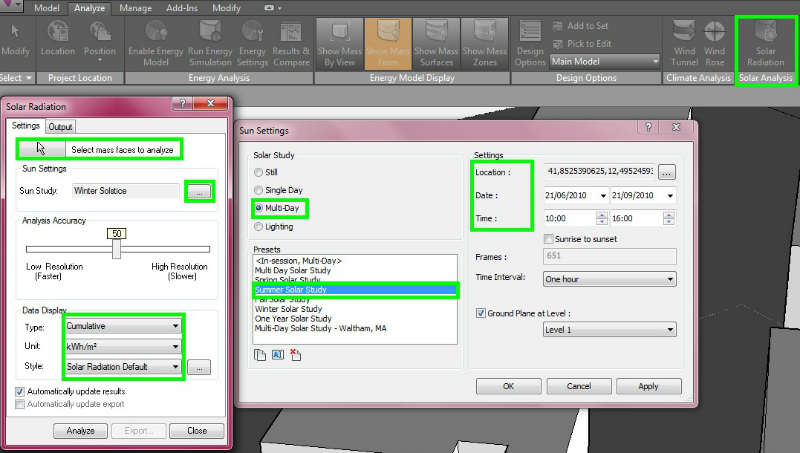
- First, select the facades you want to analyse.
- Then, set the period of the analysis (Multy Day > Summer Solar Study or Winter Solar Study) and check location, date and time.
- In DATA DISPLAY, set the type (Cumulative), the unit (KWh/m2) and the style of the analysis. You create a new style, or you can modify the default styles (for example “Ecotect style”).
Step 4: Our solar analysis of the open spaces
We’ve thought that the best way to analyze the radiation on the buildings is choosing the hottest hours of the day during the most significant and different seasons of the year, winter and summer.
Summer and winter solar study
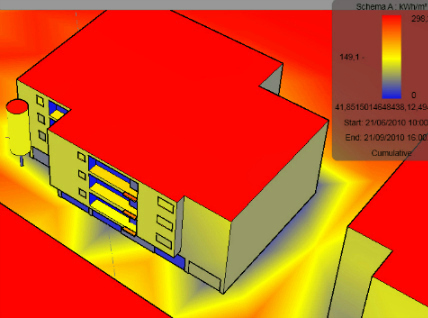
We have analyzed how many radiations our building (a) and the near ones accumulate, in order to observe if the exposition is useful for a comfortable livability of the open spaces. What we observed is that, due also to its width, Via Andrea Mantegna receives a lot of solar radiation during this period: this might be a problem during summer, because the high temperature of the asphalt can seriously influence the temperature at the street level.
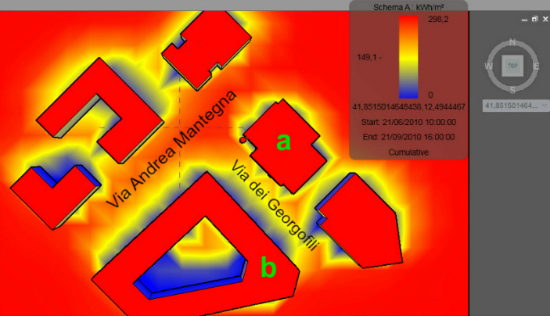 Summer
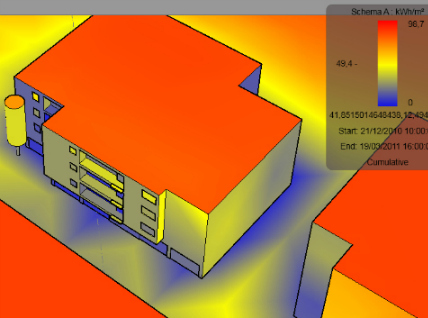
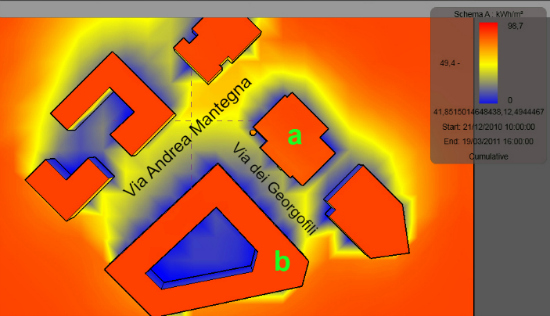 Winter
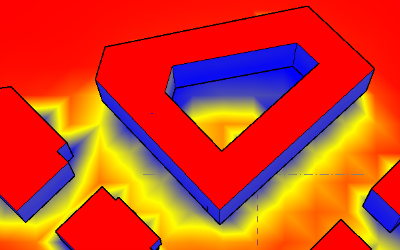
We have considered significant to analyse also the courtyard of the building we called b and the way its internal facades accumulate the solar radiation: we observed that the two facades exposed to South-East are a lot more radiated than the ones exposed to North-West; also, inside the courtyard there isn’t any tree that could cast its shadow over the walls, so probably the South-East facades become pretty hot during the days of summer.
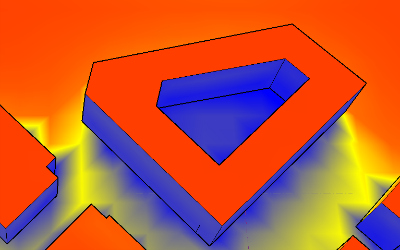
On the other hand, during winter not only the North-West facades receive little radiation, but also the first floors of the South-East facades, so the interior might result pretty cold.
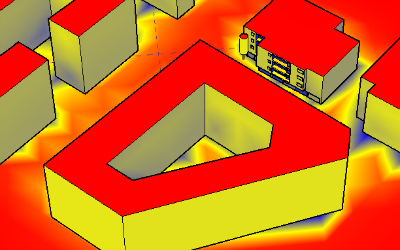
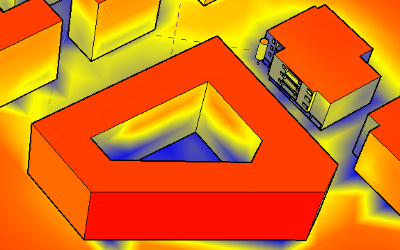
South-East facades, summer South-East facades, winter
North-West facades, summer North-West facades, winter
Focusing on our building, we have analysed the North-West facade (the one on Via Andrea Mantegna) and the South-West facade (on Via dei Georgofili): we can notice that, both in winter and summer, the first one is not really radiated because of its exposition; the balconies are very little radiated, because they are not projecting but are arrears in the volume, and also the shops’ windows on the ground floor receive little radiation because of the overhang above them.
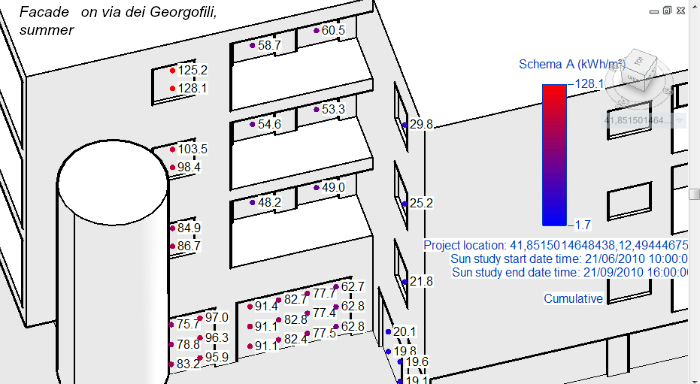
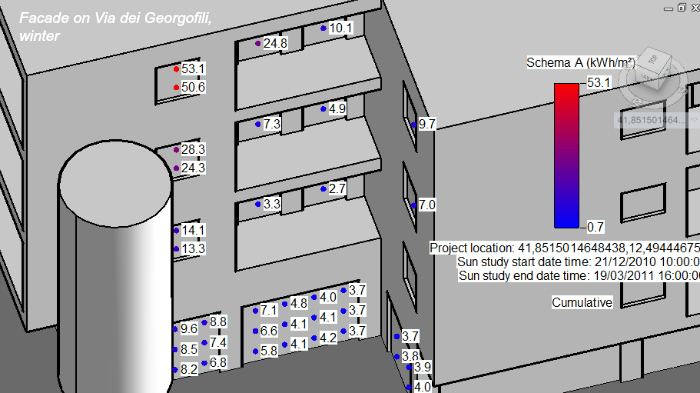
Otherwise, the South-West facade is a lot more radiated: during summer, despite the floors of the balconies are really sunny (about 160Kwh/mq), their inner walls seem to be well shielded; during winter, the portion of the facade arrear from the road is a lot less radiated than during summer, because of the shadow of the nearby wall and of the frontal tree.
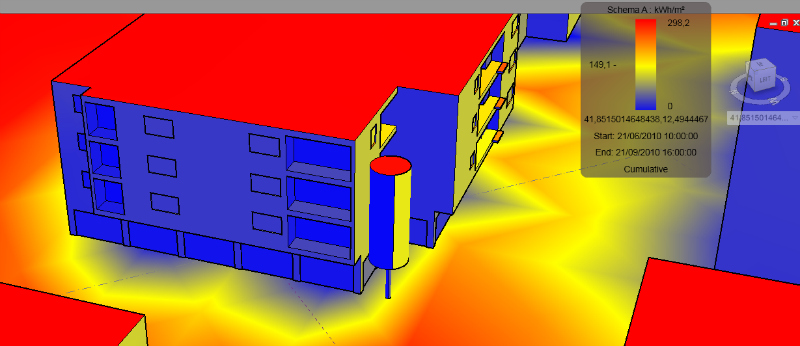
North-West facade, summer
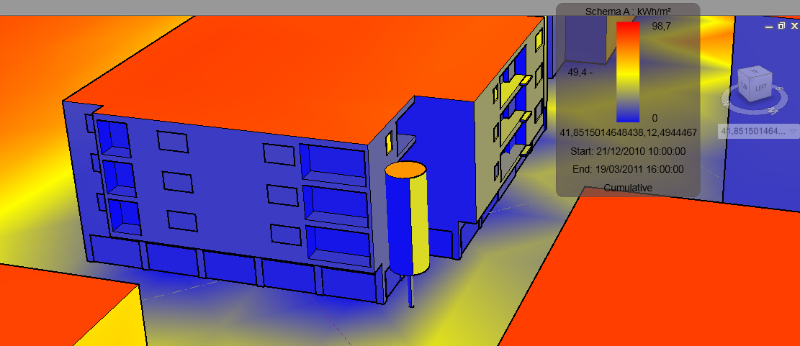
North-West facade, winter
South-West facade, summer South-West facade, winter
Step 5: Our solar analysis of the glass surfaces
Click on ANALYZE > SOLAR RADIATION > SETTINGS to set up all your preferences of analysis:
- First, select the glass surfaces you want to analyse.
- Then, set the period of the analysis (Multy Day > Summer Solar Study or Winter Solar Study) and check location, date and time.
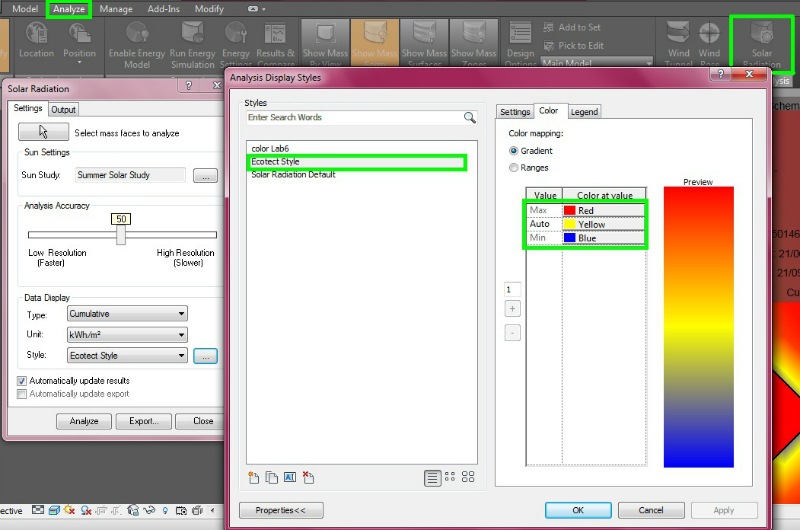
- In DATA DISPLAY, set the type (Cumulative), the unit (KWh/m2) and the style of the analysis. Create a new style setting as display stile Markers with text and giving it a name (“Numerico lab6”).
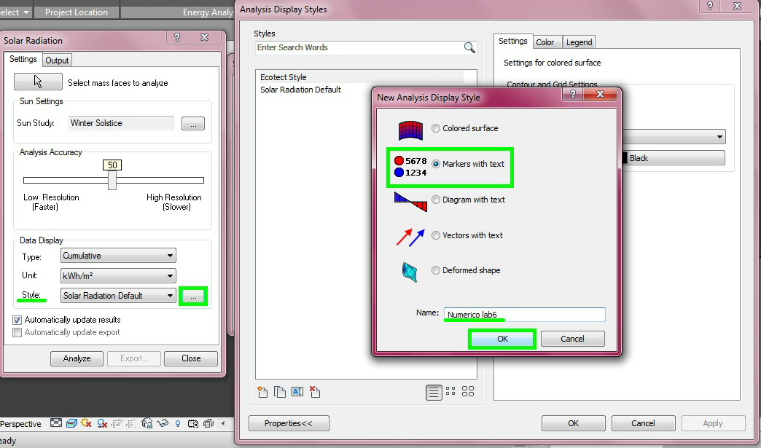
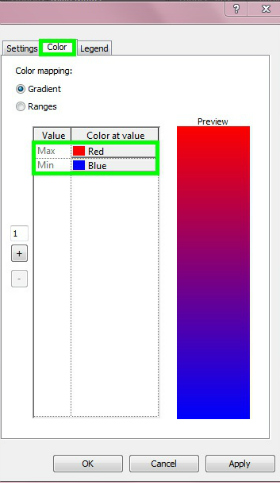
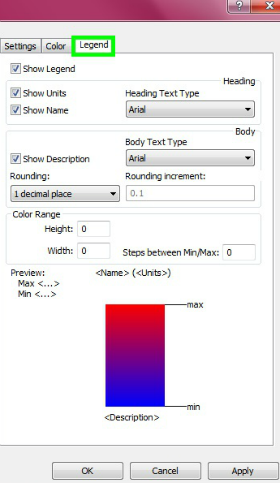
You can now modify settings, colour (max = red, min = blue) and legend of your new style.
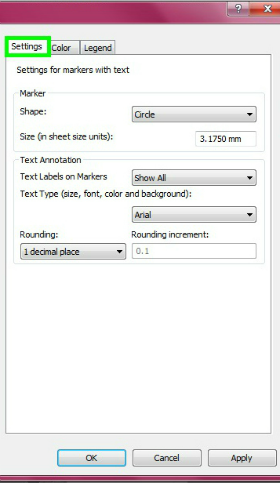
It’s possible to change the density of the numeric indicators of the radiation by setting the “Analysis Accuracy” or to change the display scale in case the informations on the model result too big (or too little).
Summer and winter solar study
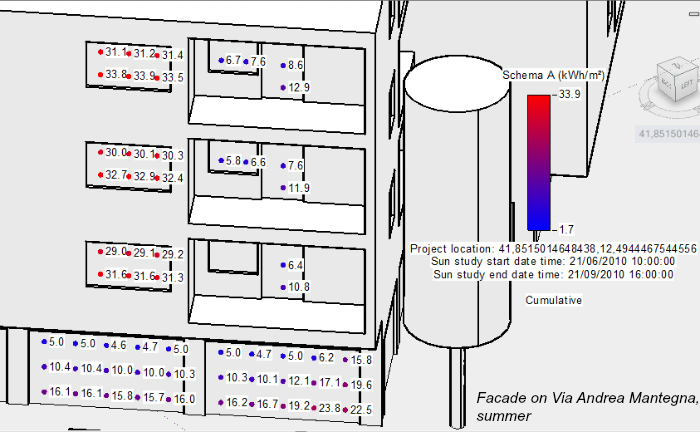
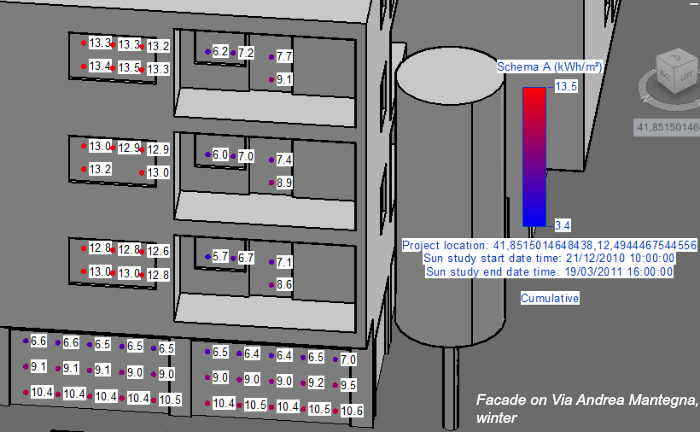
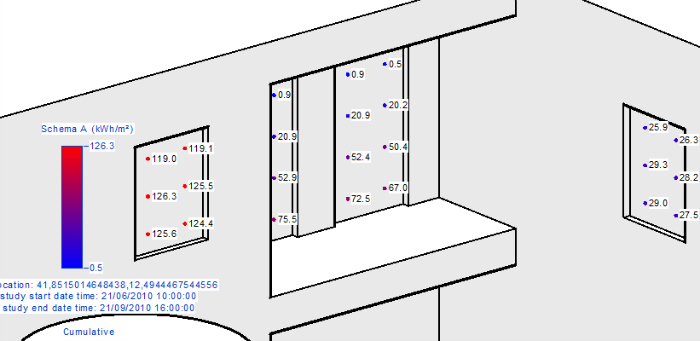
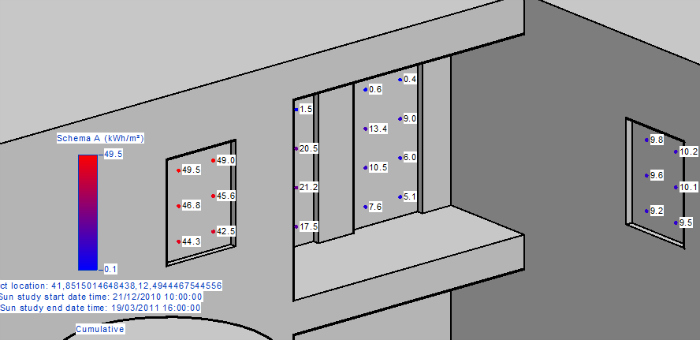
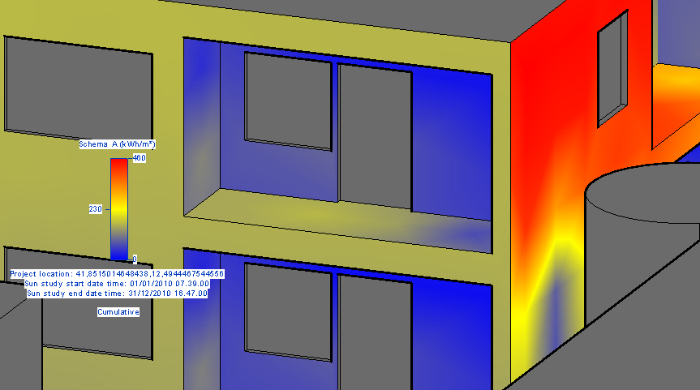
We have considered a portion of the facade of Via Andrea Mantegna. Thanks to the numeric analysis of the solar radiation on the glass surfaces, we can notice first of all that the range of values of the radiation is more restricted, because the facade is exposed to North-West (the exposure, as pointed out before, implies a lower radiation accumulated).
Also, we can see that on the shops' windows the amount of radiation decreases as we approach the overhang.
Finally, there is an important difference of radiation between the windows on the left, which don't have any overhang to protect them, and the glass surfaces on the right inside the balconies.
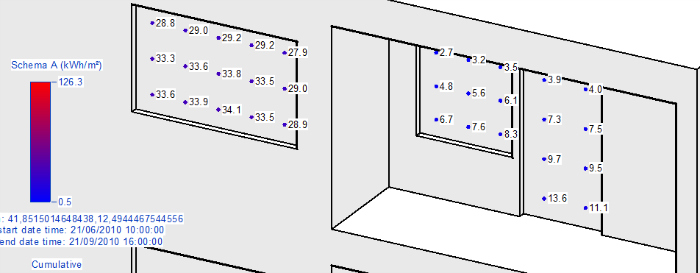
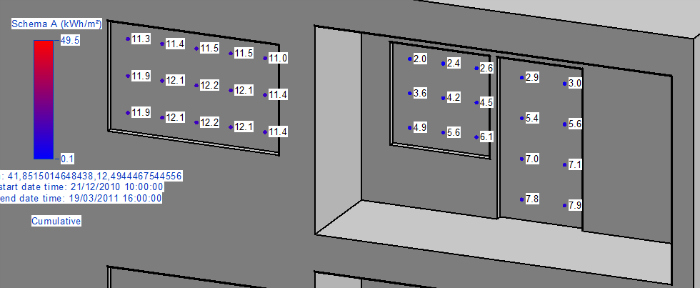
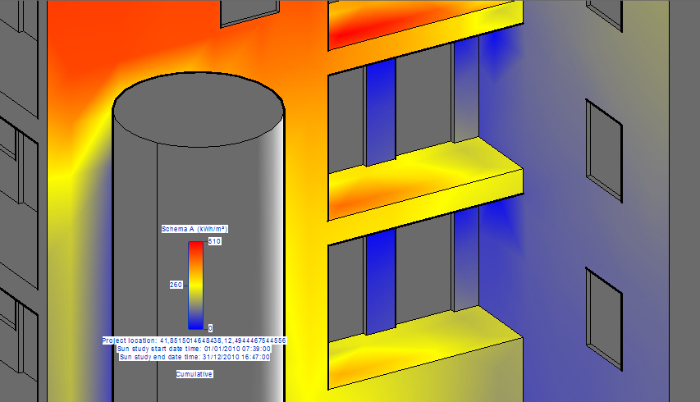
Then we have considered the portion of facade on Via dei Georgofili that is arrear from the road. First of all, the windows exposed to North-West receive a lot less radiation than the glass surfaces exposed to South-West.
Besides, also here it's significant the different amount of radiation between the windows on the left and the glass surfaces on the right inside the balconies. Lastly, we can notice the influence of the presence of the tree, whose shadow causes a remarkable decrease of the radiation on the lower windows.
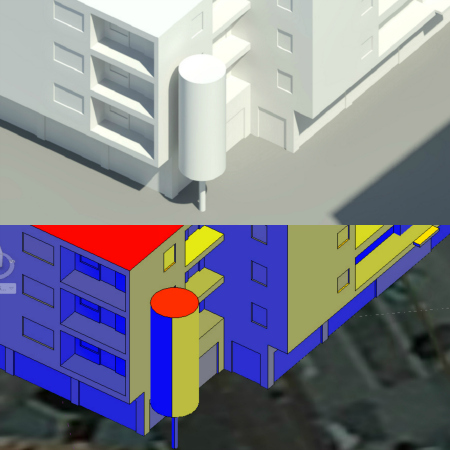
Detail - Facade on Via Andrea Mantegna, summer
Detail - Facade on Via Andrea Mantegna, winter
Detail - Facade on Via dei Georgofili, summer
Detail - Facade on Via dei Georgofili, winter
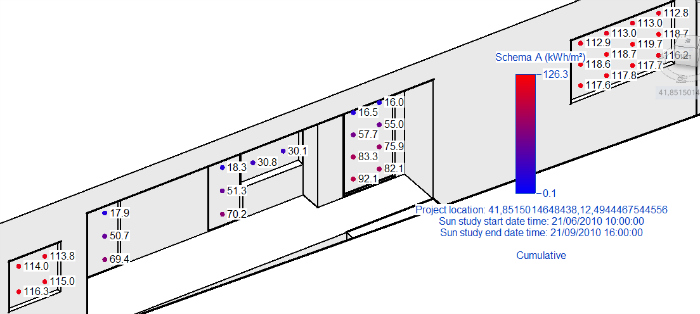
Detail - Facade on Via dei Georgofili, summer
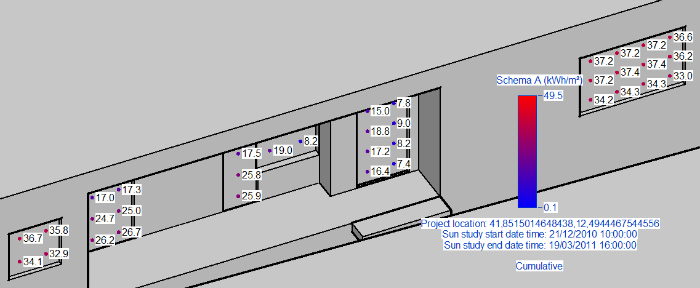
Detail - Facade on Via dei Georgofili, winter
Step 6: Final considerations about the comfort and the state of conservation of the building
To bring out the possible critical points of the building where there could be deterioration, we have clicked on ANALYZE > SOLAR RADIATION > SETTINGS, and then we've set "One year solar study" as the period, and "Sunrise to sunset" as the time of the analysis
We have selected the balconies in order to understand what parts of the walls could be subject to mold and humidity because of a bad exposition or a low radiation during the whole year.
North-West facade: the radiation scale goes from 0 and 460 Kwh/mq
South-West facade: tha radiation scale goes from 0 to 510 KWh/mq
The analysis pointed out that the most problematic areas are the ceiling and the high parts of the inner walls (as we showed in the previous study, they receive less radiation both in summer and in winter): in the specific, the balconies of the North-West facade on Via Mantegna seem to be unlivable during winter, so also the the rooms that look out on them result pretty cold. On the part of the facade on Via dei Georgofili, however, the situation is a bit different, because the balconies are still low radiated, but the whole surface of the building receives a lot more sun during the year, because it's exposed to South-West. So, it seems to be more useful having cold balconies during summer, because they can refresh the rooms inside, as also the shadow of the tree in front of that part of the wall.
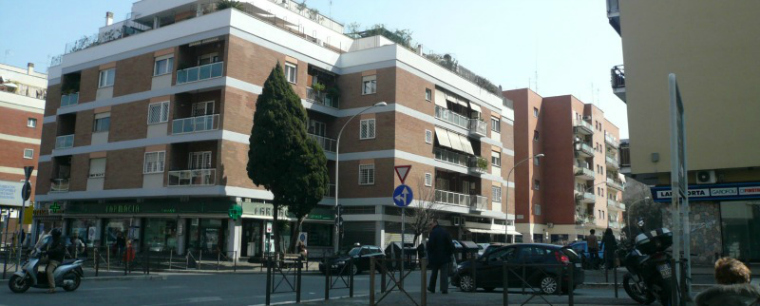
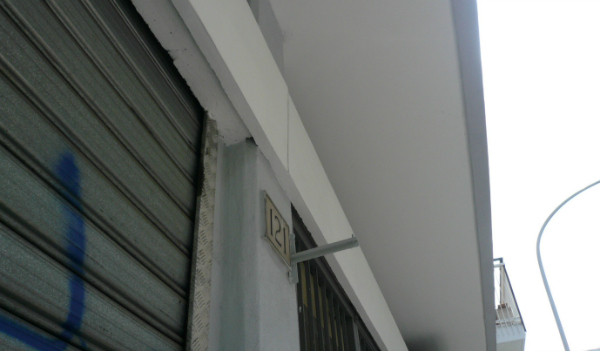
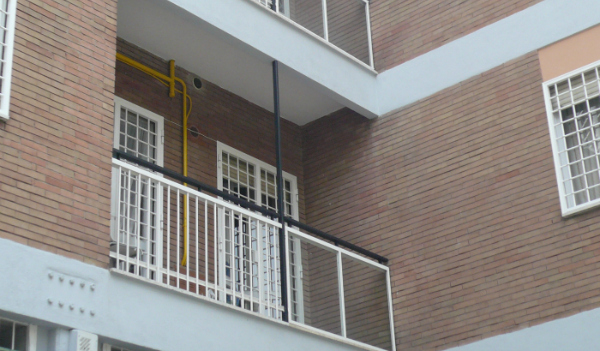
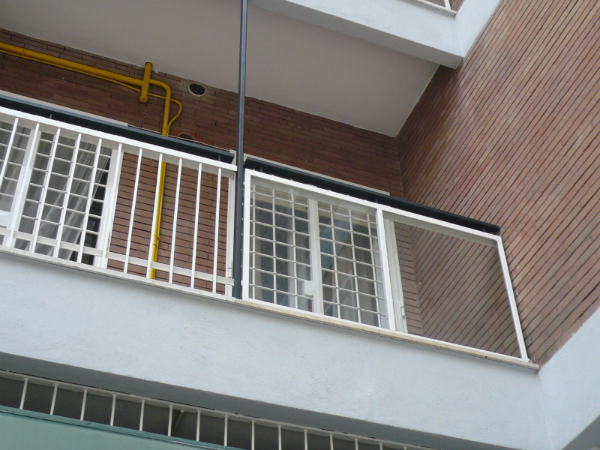
Taking some pictures of our building, we haven't founded any of the problems that we expected: our facades present curtain brick walls without dark spots and with tiny and well grouted joints, which don't allow water infiltrations. Besides, both the faceplate and the upper travertine threshold have good anti-drips which avoid the water flow along the walls.
Here some photos that show the good conservation of the building envelope.
PART 2
1. ANALYSIS OF THE PROJECT'S AREA
Our project is located next to the 13° district of Rome, Trastevere, near the First Municipio, on the West side of the Tevere and in the South of Vatican's City: it overlooks on Via Portuense on the East and Trastevere Boulevard on the West, and presents a 6 meters high drop between the two streets.
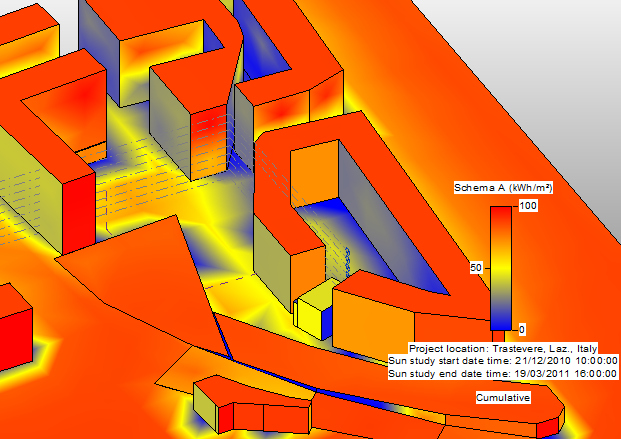
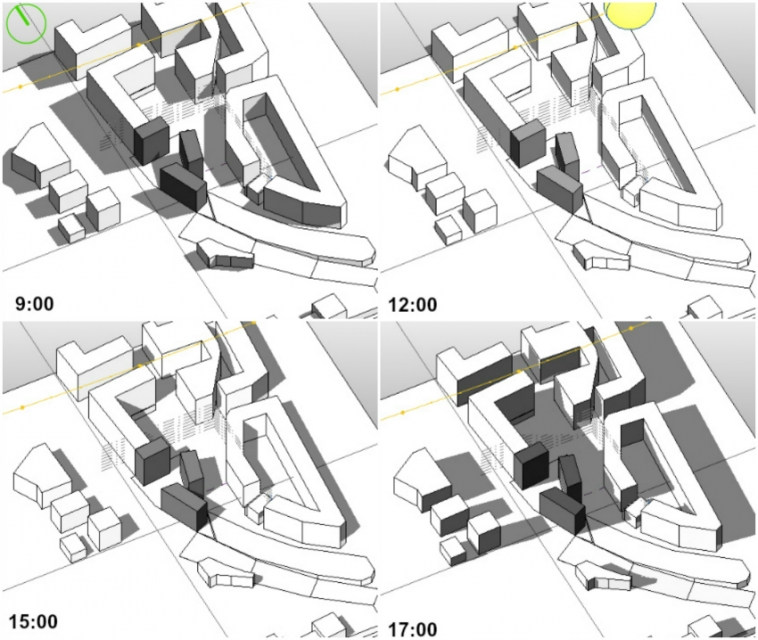
First of all, we have analyzed the shadows of the buildings around our area (that we kept at a +6meters height) without the hypothetical project inside, to understand how much sun it receives during the two most significant and different moments of the year, the summer and the winter solstice:
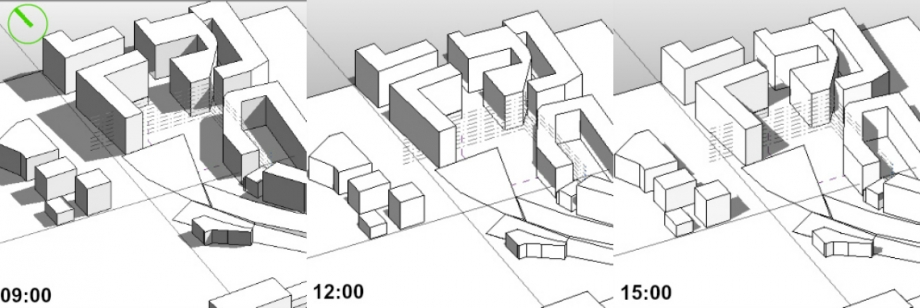 Summer solstice
We can notice how, in the central and hottest hours of the day, the area is always sunny, because none of the buildings around cast its shadow over it: this influences the solar radiation, which highlights very high values for the area, practically the highest of the zone, with peaks around 410 KWh/mq.
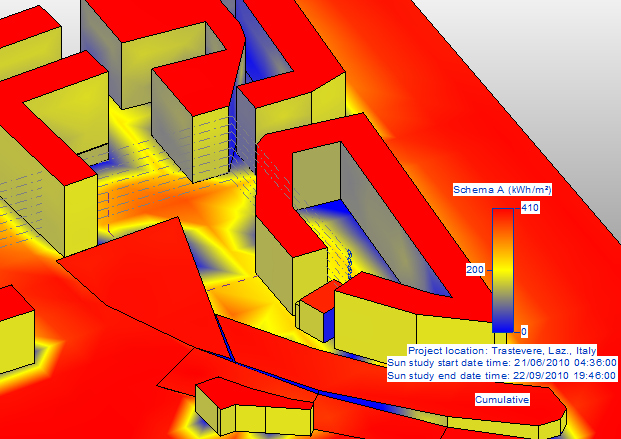 Summer solar radiation
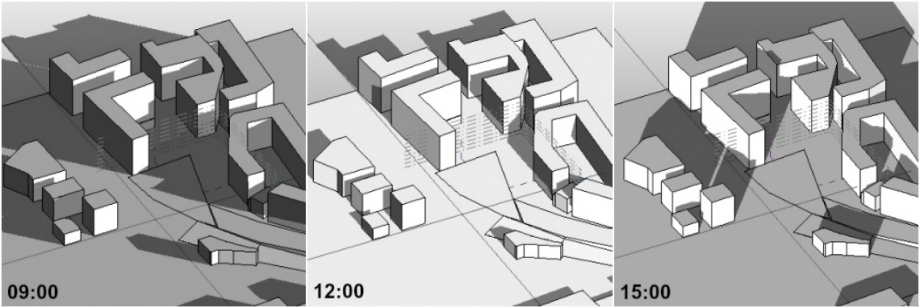
Winter solstice
In winter, we can notice that the situation is pretty different during the first hours of the morning, when the buildings on the East cast their shadows over the area (during the last hours of the afternoon the situation is probably the same because of the shadows of the buildings on the West side): whereas, the area remains sunny during the central hours of the day, as we can see from the analysis of the radiation, which highliths high values around the 80 KWh/mq.
 Winter solar radiation
We present now our two project's ideas, with the analysis of the shadows during summer and winter: infact our intention is to create open spaces which could be as livable as possible and which could represent common points of interest and meeting for the users of the project. In our opinion, the most important thing is to guarantee a good illumination and radiation for the whole area, both in summer, when you need fresh open spaces and shielding systems for the facades of the buildings, both in winter, when it's an advantage to have sunny facades and warm open spaces.
Our two ideas present both a project made by three different volumes, which create a fluid sequence of open spaces; also, we haven't solved yet the altitude difference of the area, so it's important to consider that both the projects are located at a height of +6 meters.
IDEA N°1
 Summer solstice
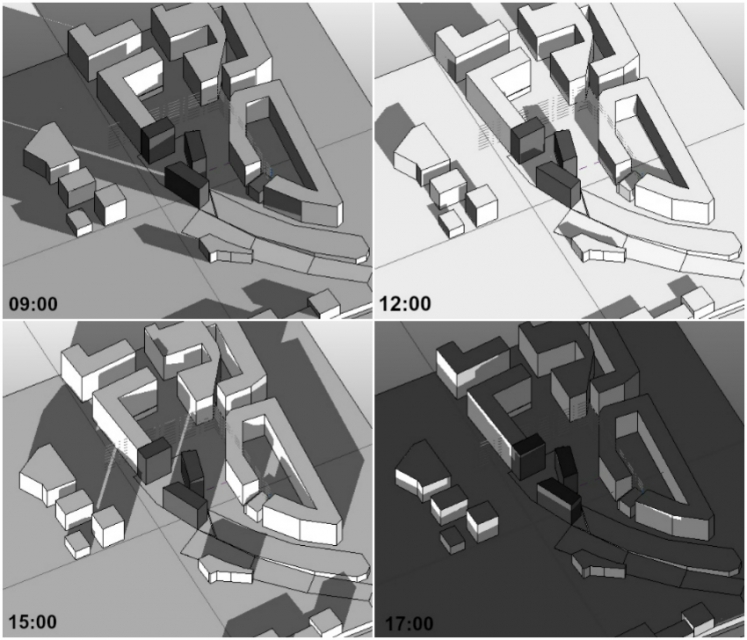
We can notice that the most significant problem of this first disposition of the three volumes is that the principal open space, which we can call the "square", is sunny for the most part of the day, even if the other smaller open spaces are shaded and probably fresh. The most exposed facades of the central bulding seem to be shades for most of the day, while the West and South facades of the other two volumes are the most problematic, because they are sunny during the hottest hours of the day: so, we are considering a good shielding system for them.
 Winter solstice
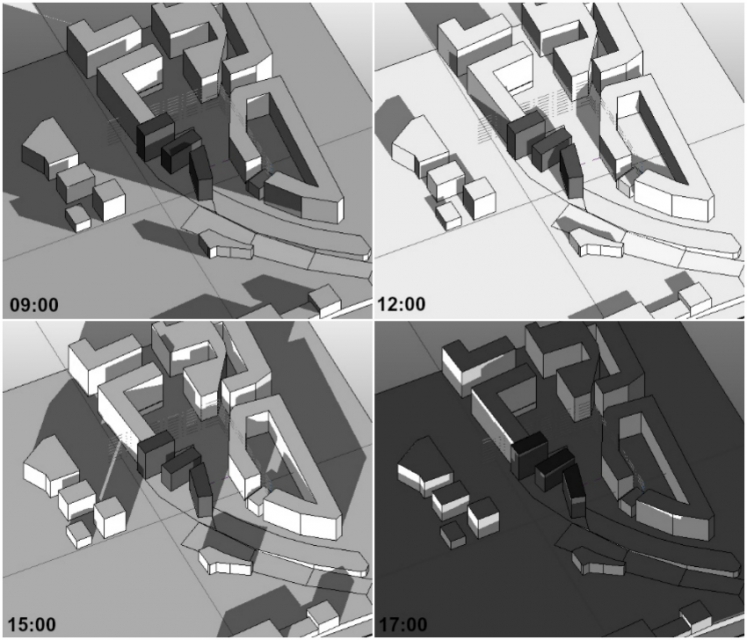
During winter, the analysis highlited an important problem of the project: the open spaces seem to be in fact shaded for the whole morning, because they receive the shadows of two of the three volumes. This could mean a pretty wet and cold outside, certailny not comfortable in winter. The situation evolves during the central hours of the afternoon: at 15:00 o' clock, in fact, a good portion of the square is sunny, because there aren't shadows from West.
For what concernes the facades of the buildings, they are pretty well exposed, with the exception of the central volume, whose West facade receives the shadows of the other one for almost the whole day. We are thinking about a different height of the three volumes to solve these problems.
IDEA N°2
 Summer solstice
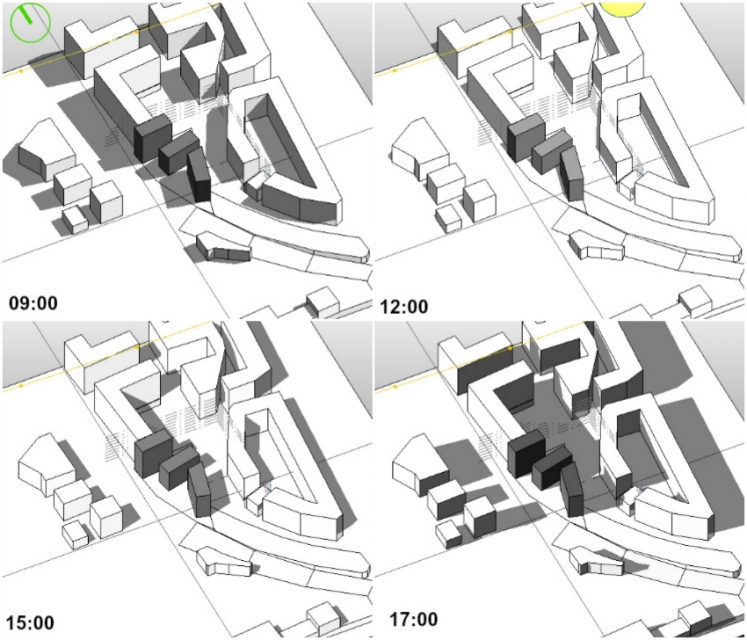
Here the three volumes are placed in a different way: the biggest problem are the open spaces during summer, sunny for the whole afternoon, and the South and West facades, which are exposed to sun for great part of the day: to avoid these problems, it could be possible to project a system of overhangs, that can articulate the outside and also create shadows on the ground.
 Winter solstice
This disposition presents instead a better solution for the winter, because here we can see that the open spaces are sunny for a good part of the day (as pictures at 12:00 and 15:00 show), so the outside is supposed to be warm and probably makes also the temperature of the surrounding air more enjoyable. Besides, also the facades seem to be well exposed and radiated, while in the other idea the central volume is more shaded for most part of the day.
2. CHECK OF THE PROJECT'S QUANTITIES
Now we can verify the dimensions of our projects and be sure that they fit the project's requirements. We have choosed the first idea to show the different steps to do the analysis.
Step 1
Go on MODYFY > LEVEL to create new levels or to modyfy the the existent ones:
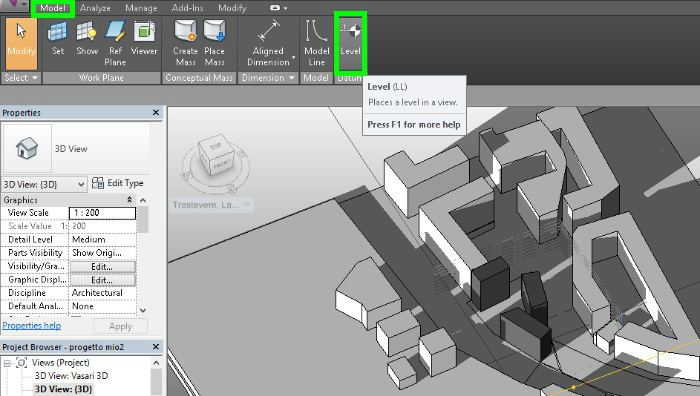
Remember that, opening the Properties of the level, you can modify his height (in "Elevation") and name (in "Identify Data").
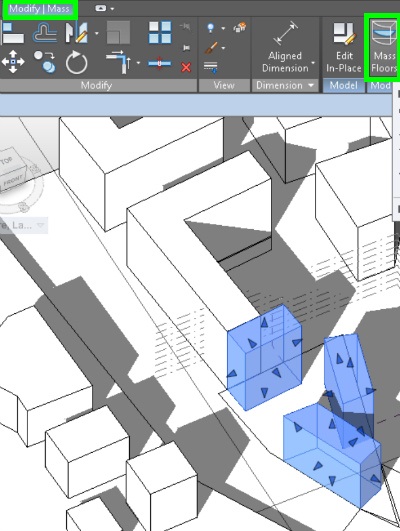
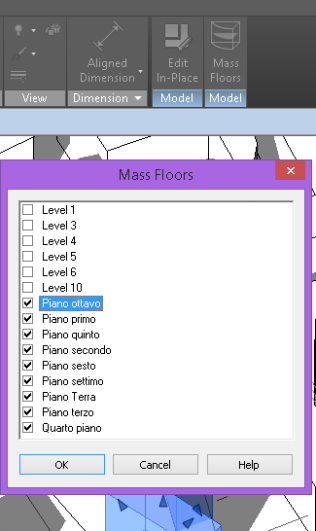
Step 2
Select the mass that you are analysing and click on MODIFY|MASS > MASS FLOORS: it will automatically open a window where you have to tick all the levels which represent the floors of your project.
Step 3
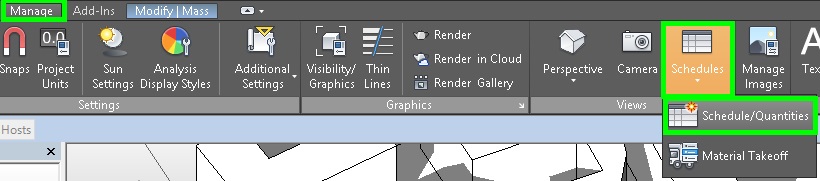
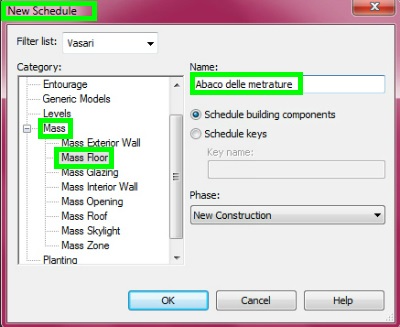
Select your mass and click on MANAGE > SCHEDULES > SCHEDULE/QUANTITIES: it will open the window NEW SCHEDULE where you can rename your schedule (for example as "Abaco delle metrature") and select MASS > MASS FLOOR.
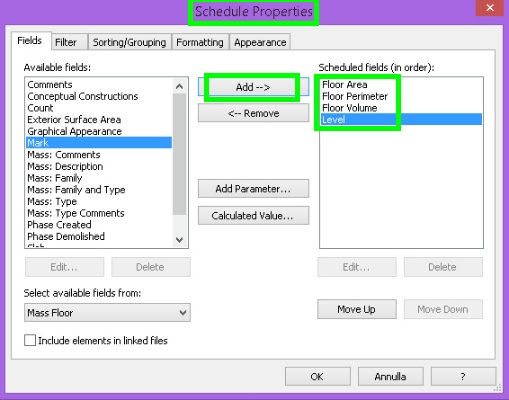
Click "OK" and on SCHEDULES PROPERTIES select the fields you want to analyse. In our study, we selected Floor Volume, Floor Area, Floor Perimeter and Level, clicking on "Add" and then on "OK".
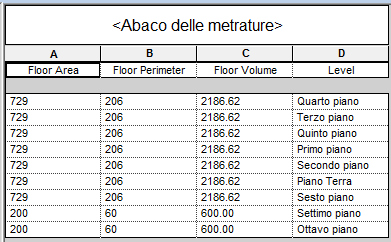
From the previous operations Vasari will elaborate a schedule with all the properties you have choosen before. In our case of study, the project has to develop a surface of about 5600 mq. The schedule highlights that the total amount of area is 5503 mq, which is an acceptable value.
Commenti
Vincenzo Panasiti
Ven, 24/04/2015 - 19:06
Collegamento permanente
Un pò più di considerazioni
Un pò più di considerazioni, ci siamo quasi