


QUARTIERE VIGNA CLARA, VIA MISURINA - SOLAR RADIATION ANALYSIS
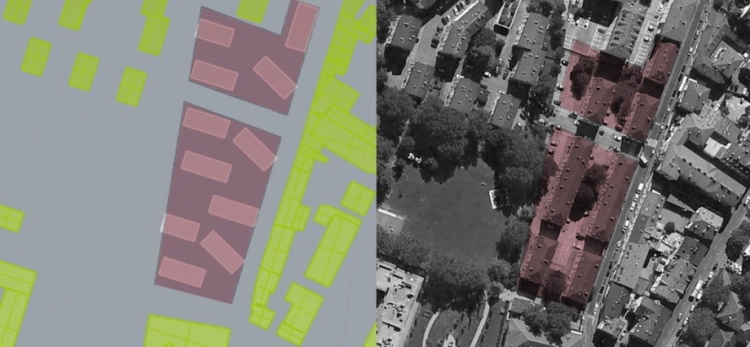
In order to develop a deeper analysis with Vasari, we decided to pick the building where we live as it was easier to make photos from the inside. The new site is very close to the public square we had chosen previously, and it’s located in Vigna Clara’s neighbourhood as well.
Part 1: Adding details to the façades
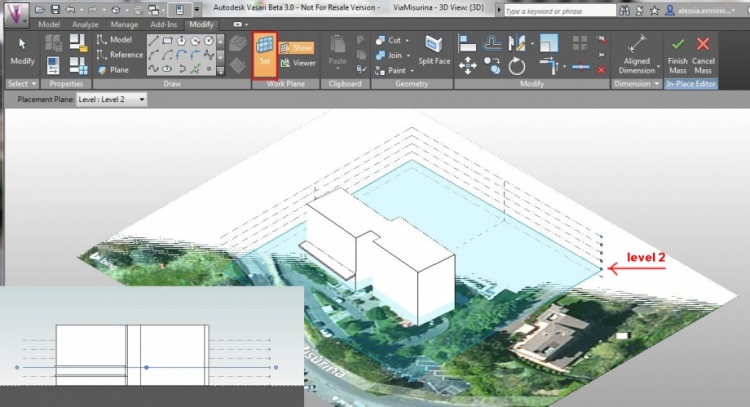
A. Working on levels and workplanes
Level are much important during the modeling process as they represent the height of items. It is advisable to create a number of levels equal to the amount of floors on our project. You can create a new level in the "Model" Menu by clicking on "Level”. In our situation we have 6 floors, each 3 meter high, so we'll need 7 levels, as a default Vasari has already 5, so we'll just add two.
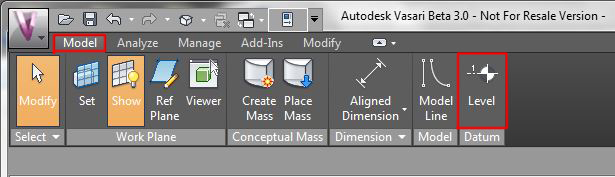
Levels are also important as they can be used as workplanes, a workplane identifies the area on which the software will place the drawing/mass you are working on, selecting the workplane is the first thing to do each time you are willing to modify or add something to your model.
It is possible to select a workplane by clicking on "set" under the "model" menu. Now you can either select a level from the list or pick a different plane directly from the model.
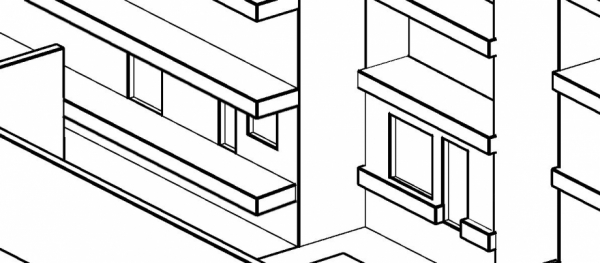
B. Shaping balconies
In order to obtain a more precise solar analysis it is important to add to the model any horizontal and vertical shading. In our case we shaped the balconies of the South facing façade and the balconies and terraces on the Northern one, as this are the façades we’re going to analyse.

C. Shaping windows
In order to evaluate the behaviour of the glass surfaces and calculate the solar radiation on them you should shape the windows by working with the modelling tools. Be sure that you’re working on the “Edit in Place” space.
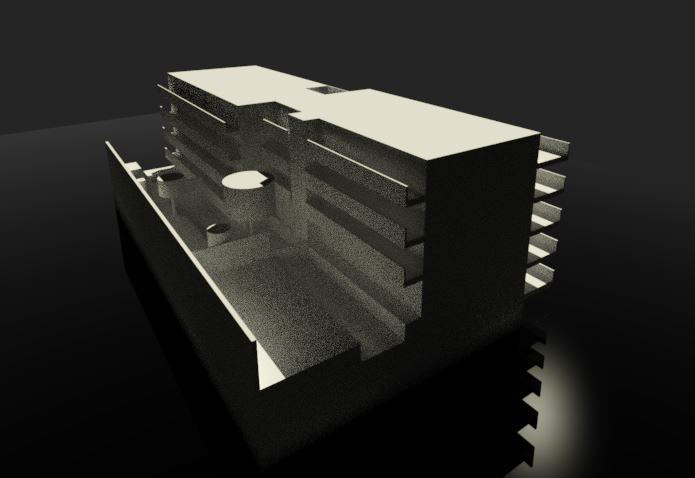
D. Adding trees and more details
It is important to consider vegetation and more details such as containment walls and fences whenever they take part to the shading of a building. We added few trees on the Northern terrace by shaping cones and fences on the balconies.
Part 2: Solar radiation – main settings
A. Performing the solar radiation analysis - basic settings
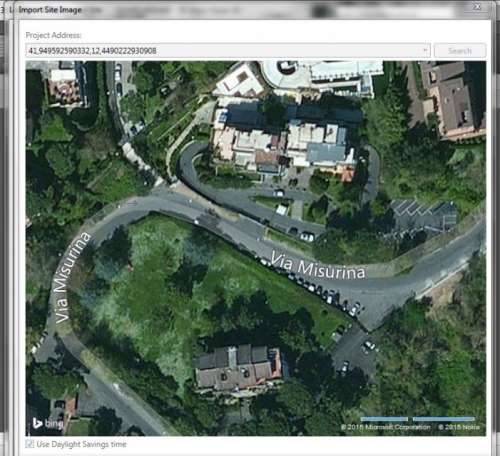
In order to begin the solar radiation analysis, be sure that you have set the right location previuosly. In our case it is “Via Misurina”, which is located in the Northern part of Rome.
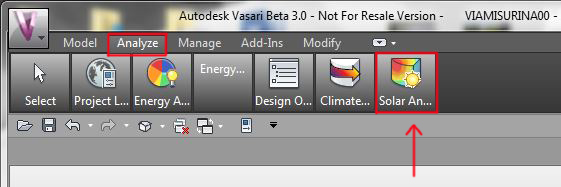
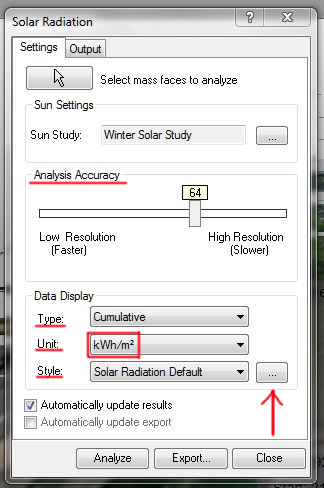
Set the “Analyze” menu from the main toolbar and then click on “Solar Radiation”.
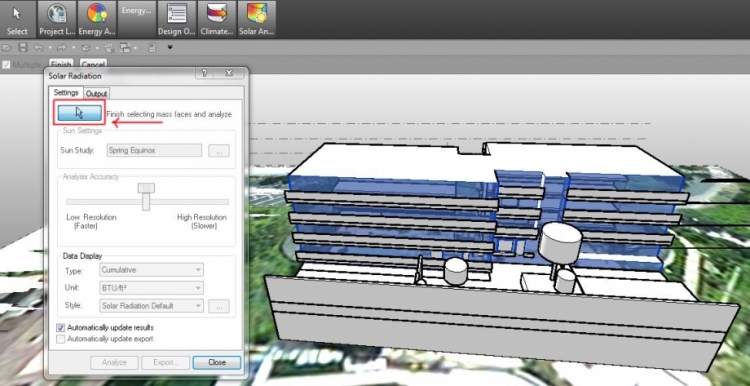
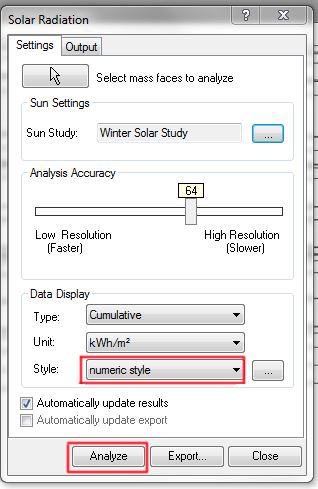
This will open up the “Solar Radiation” window. You have now to set many options:
- Firstly, you should select the faces that you want to analyse by clicking on the cursor icon.
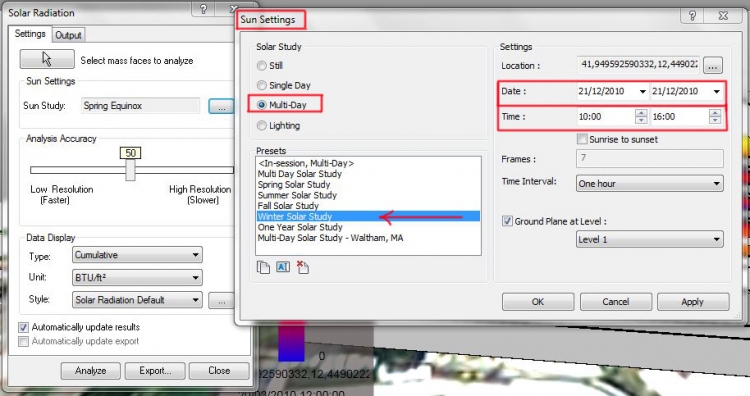
- With the “Sun Study” option, you can set the lapse of time that you want to consider. If you click on the dots icon, the “Sun Settings” window will open up. By clicking on “Multi-day” on the “Solar Study” menu you can set the days and hours that you are choosing to consider. You can choose a fixed analysis such as a seasonal one by using the “Presets” list. Otherwise you can set days and hours in the “Settings” list. You have the option to make a sunrise-to-sunset analysis as well. Be sure that you are setting the Ground Floor before starting the analysis.
- The “Analysis accuracy” bar lets you improve the accuracy of your analysis. Highest the accuracy, slower the analysis
- By clicking on the “Data Display” list you have to set the “Type” of analysis you want to make. We decided to make a “cumulative” one. Then you should set the paper unit. We’re working in KWh/m2. Finally, you can choose a certain analysis’ “Style” or use the default one.
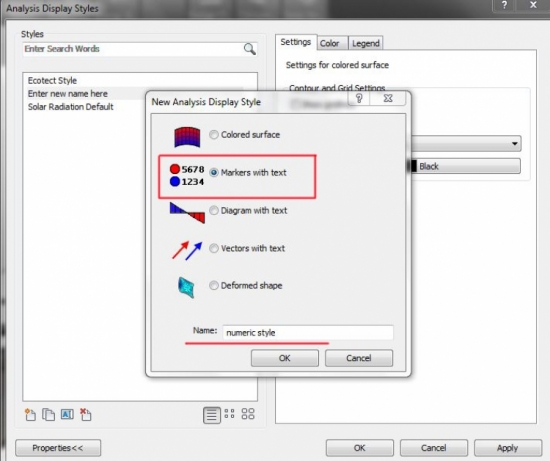
- We decided to create more appropriate styles for our analysis. We’re interested in checking the quantity of solar radiation on the windows. In this case we can’t use the default style as the colour scale is set on a single element and not on the entire building. This can lead to some analysis errors because elements with different exposition might have same colours but a considerably different solar radiation. As a result we’re introducing the numeric style. You can change the analysis’ style by clicking on the dots icon. This will open up the “Analysis Display Style” window. You can create a new style by clicking on the icon lower left. We’re choosing the “Markers with Text” type of analysis and naming it “Numeric Style”.
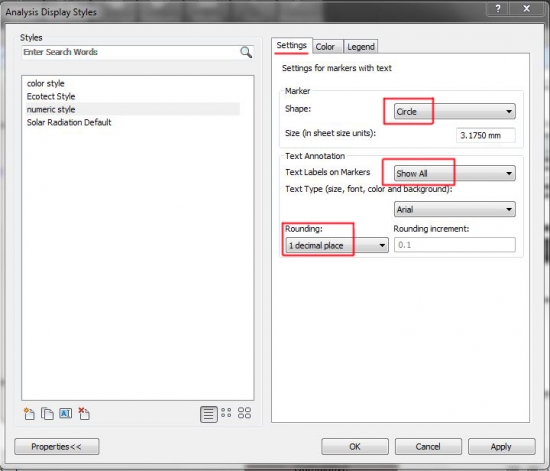
By clicking on “Ok” you will come back to the “Analysis Display Style” window. You have now to set some other options. On the “Marker” list we chose the “Circle” shape. Then we selected the “Show All” option in the “Text Annotation” menu and we set the rounding to 1 decimal place.
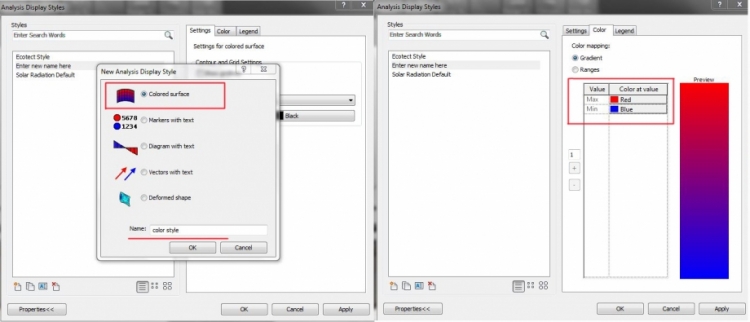
As far as the colour-based method is concerned, we decided to create a “Colour Style” in the same way as we noticed that it was easier to work with the maximum/minimum colours inverted.
- Be sure that you have set the “Automatically update result” before clicking on the “Analyze” button so that your analysis will update by itself whenever you’re changing something to your model.
Part 3: Solar radiation analysis – considerations (Via Misurina, Rome)
A. Colour-based method - evaluation of the open spaces surrounding the building
Firstly, we decided to study the outdoor space of one of the North facing terraces. The terrace develops on two levels, with a height difference of 1,40 m. On the higher level there’s a swimming pool, while the lower has a living/dining function.
We analysed the solar radiation during the different seasons and made a comparison. The analysis show that the radiation is very low for almost the whole year. As a matter of fact the values during winter reach only 0.5 KWh/mq, while they peak only during summer on the rooftop with 299 KWh/mq.
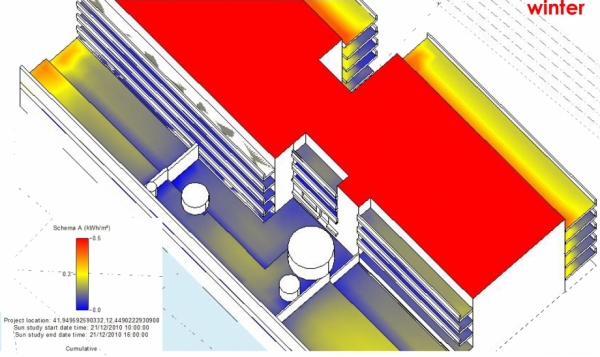
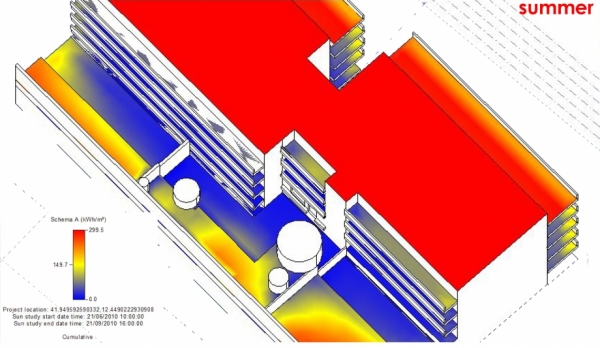
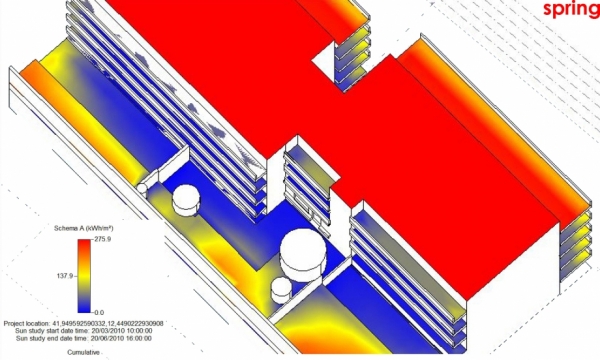
To sum up, the terrace is a very liveable place during summer. The higher level reaches 147 KWh/mq, while the lower remains stable between 0 - 50 KWh/mq. This means that you can relax in the cool living part or sunbathe near the swimming pool. As it can be seen from the pictures, the constant shadowing of the lower floor keeps it fresh, while the higher one is not too hot although it receives direct sun rays.
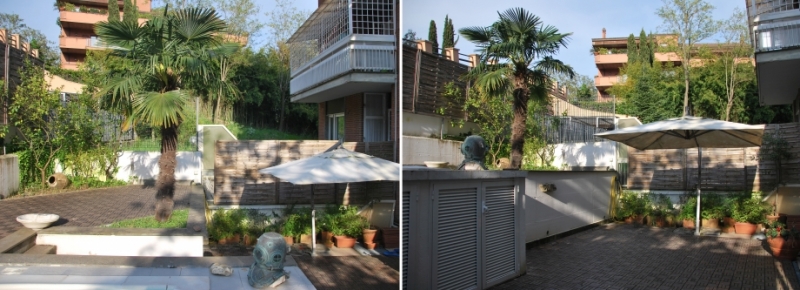
The situation is completely different on winter, when the whole terrace is very cold. As the evidences of deterioration reveal, walls and other element are moss – covered and show humidity stains.
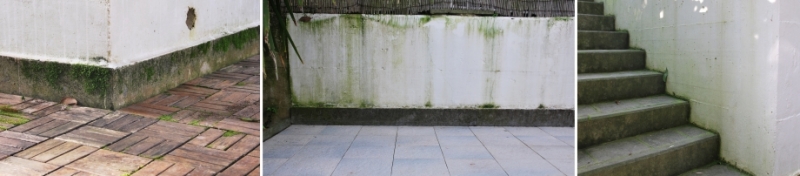
In order to avoid those deterioration evidences should be actuated some strategies such as the use of dark materials for the floor and the walls which can absorb the solar radiation, and the use of waterproof sprays to avoid humidity stains.
B. Colour-based method - checking the quantity of solar radiation on opaque walls
Our analysis focused then on the effects of the solar radiation on opaque walls of the Northern façade.
It can be noticed that the higher part of the façade seems a way more irradiated than the lower, but this is actually not truth as the solar radiation fluctuates only between 0 and 0.1 KWh/mq.
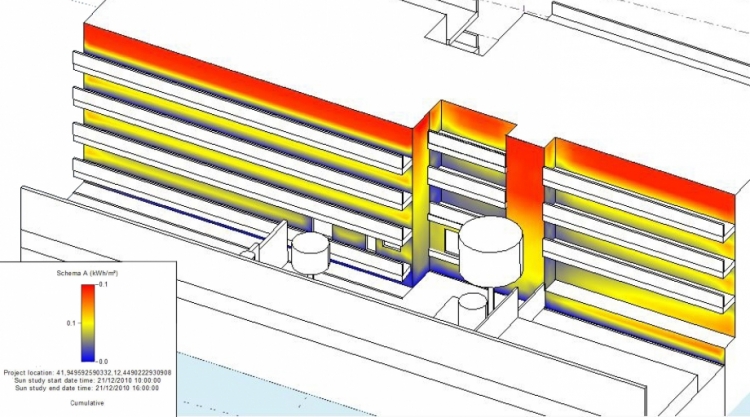
The situation is very similar during summer, where the radiation only increases slightly on the upper corners of the building.
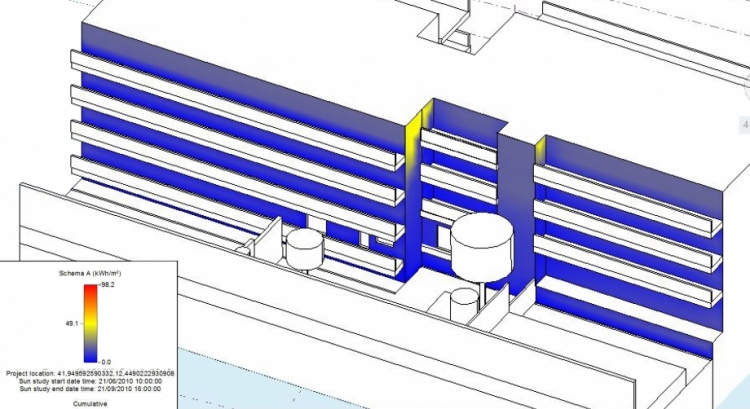
In conclusion the façade does not receive solar radiation at all and this leads to considerable signs of deterioration, as it can be clearly seen from the pictures. The deterioration is due to several reason. When it rains the water doesn’t dry quickly as it can happen to a Southern façade, so that it becomes stagnant and generates mould and efflorescence. Cantilevers are a cause as well, as they don’t let the water to drain correctly.
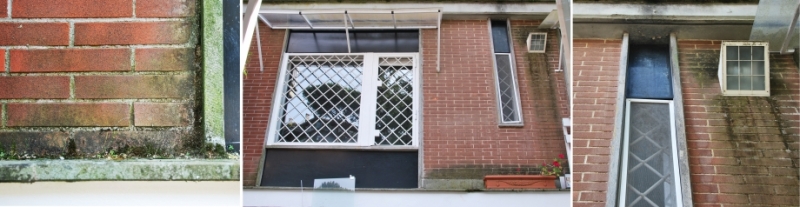
In this case can be adopted the solutions that we briefly illustrated in the outdoor analysis.
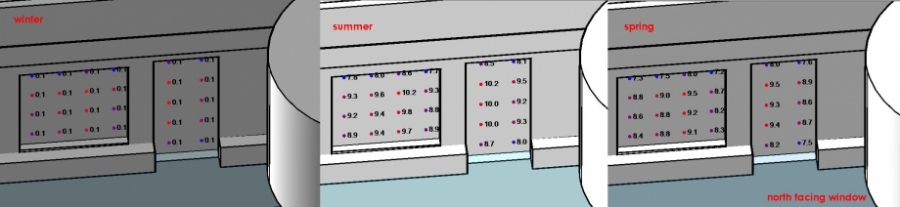
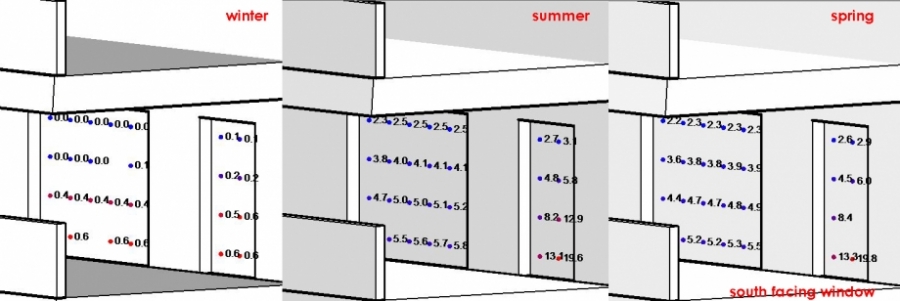
C. Number-based method - checking the quantity of solar radiation on the windows
In the end we decide to study the behaviour of a North facing window and make a comparison with a Southern one.
During winter the radiation values are slightly higher on the South facing window. As a matter of fact it reaches 0.6 KWh/mq on the lower part, while the Northern window stays constant around 0.1 KWh/mq. On the other hand, during summer it’s the North facing one to reach the seasonal peak with 10.2 KWh/mq, while the Southern remains constant between 2 – 6 KWh/mq, with a little exception of 13 KWh/mq on the lower right corner. In conclusion the South facing window comes up with the best situation as far as exposition is concerned. During summer, when the sun is quite high, it is shaded with a balcony, in order to let the light in but not the heat. During winter, when the sun is lower, sun rays warm up the house.
This analysis leads to some considerations.
With a conventional float glass, a significant amount of solar radiation passes through the window, and heat from objects within the space is reradiated back into the glass, then from the glass to the outside of the window. In order to avoid the overheating of the North facing façade during summer, it should be used a Low-emissive (Low-E) glass. It is a window glass that has been treated with an invisible metal or metallic oxide coating, creating a surface that reflects heat, while allowing light to pass through. This glass is obviously more expansive than a float one, but it’s coatings are proven to reduce energy consumption. As said before, the Southern façade as an optimal exposition, so that the Low-E isn’t necessary for it.
We can make some other considerations about the light. A North facing room catches only a restricted amount of cold light for the most of the year. In order to optimise the brightness of the room walls should be painted with warm colours, such as light red or yellow. Greyish colours should be avoided, otherwise the room will look quite dark. The Northern light is quite constant, so that the room vibe won’t change a lot during the day.
A South facing room catches a consistent amount of warm light. Painting a room like that is very easy, as it can be used either cold or warm colours. Like the Northern light, the Southern is constant as well, so that the colour used won’t appear different during the day.
Part 4: Solar radiation analysis – considerations (Via Aslago, Bolzano)
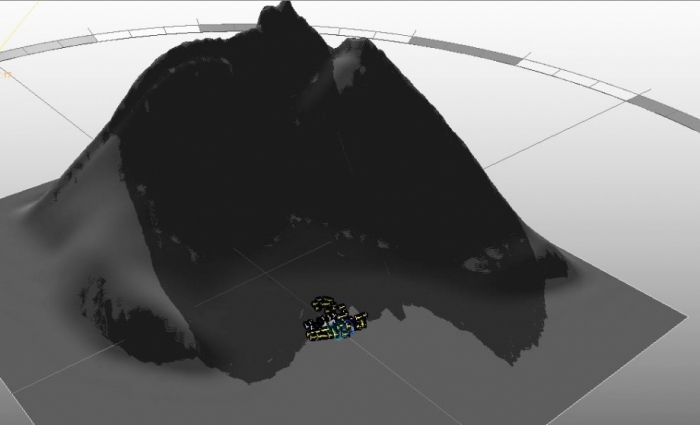
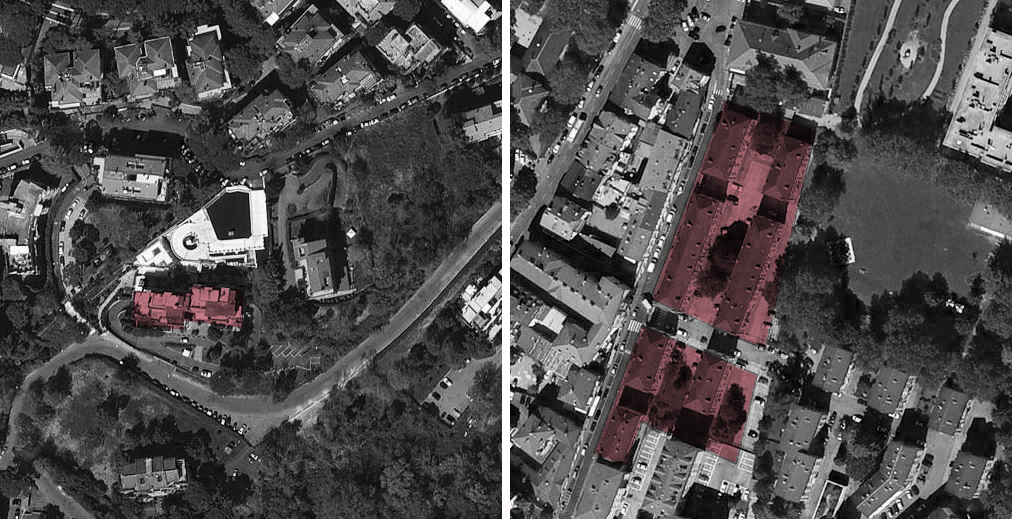
The site project is located in the Southern part of the city of Bolzano, in an area close to the Isarco river named Oltrisarco. The area is near the industrial area and it’s crossed by an highway and a railway. The site is located in Via Aslago and it’s about 7000 square meters. Actually the site consists in 7 residential buildings built during the ’40. IPES, the local authority responsible for social housing residences, planned to demolish those buildings and commissioned 80 new accommodations.
One of the main features of the area is the presence of the Kohlern mountain located East, which significantly affects the shadowing of the whole area, especially during the morning.
A. Shadows analysis
We started our studio by doing a shadows analysis in order to understand the shadowing problems of the site.
At the present moment the buildings have a North – South orientation. This means that the longest façades – where the main windows are located - are exposed East and West. As said before, the East orientation represents a significant problem because of the presence of the mountain, so that the morning sun hardly irradiates the façade. As a result, we decided to invert this orientation in order to get a more correct enlightenment of the main façades.
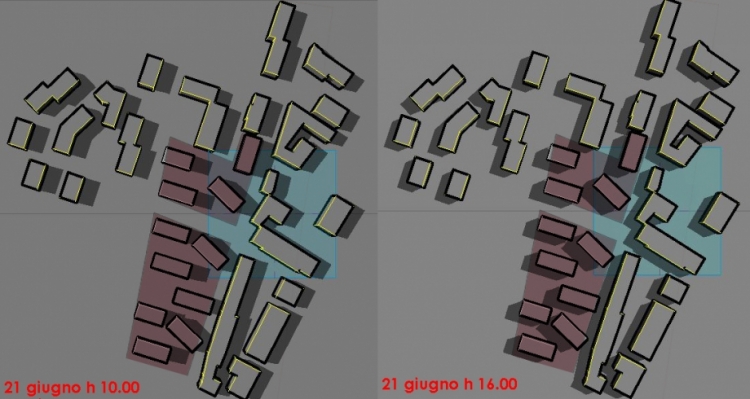
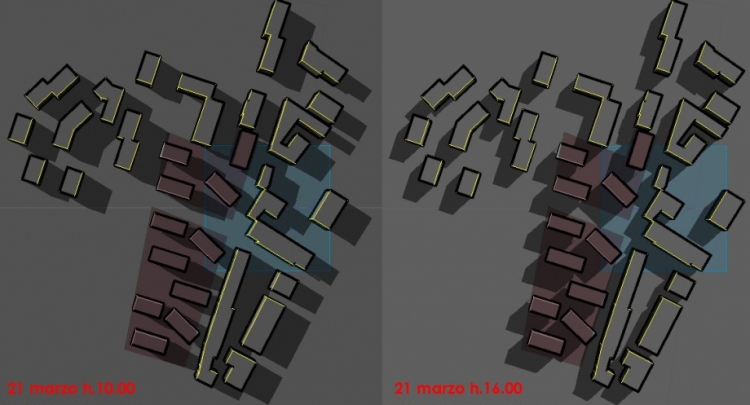
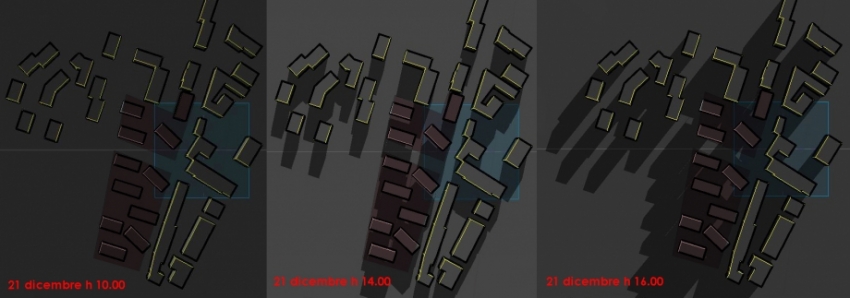
We decided to make the shadows analysis of the project site within our first design thoughts. In order to understand the solar exposition of the courtyards and squares designed we considered several situations during the year 2015. We picked up the dates of the equinoxes and solstices and 2 different moments of each day (10:00, 16:00).
During summer (21st of June) those public spaces seem to be quite liveable places. As a matter of fact the courtyards are completely enlightened at 10 am, when the sun is not that hot yet, while they are quite shadowed at 4 pm, when the sun is warmer. We can consider to plant some trees to improve the shadowing.
During spring and fall the squares will be quite nice in the morning: although the sun is not so hot, they are well enlightened. On the other hand they are quite cold and shadowed in the evening.
We decided to pick 3 different hours on the 21st of December, as we realised that the site will be very cold and shadowed. As it can be clearly seen from the analysis, the courtyards will be shadowed for almost the whole day. As a result will be necessary to figure out a new solution for public spaces during winter. We were thinking about designing indoor common spaces that can be easily heathen up in order to create a more comfortable space.
B. Solar radiation analysis
We decided to study the solar radiation during the most critical periods of the year: summer and winter.
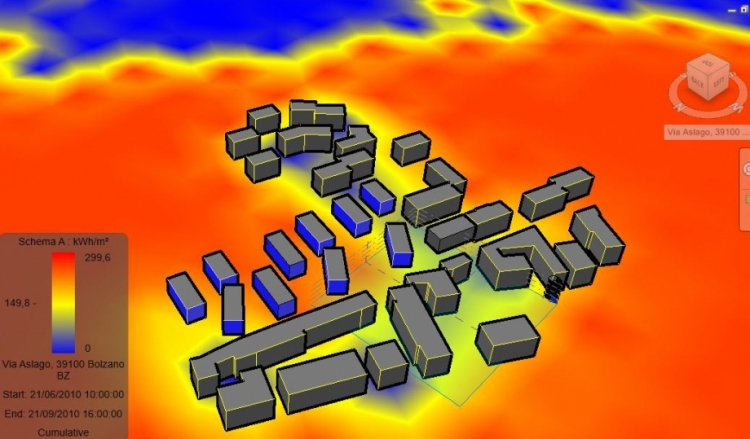
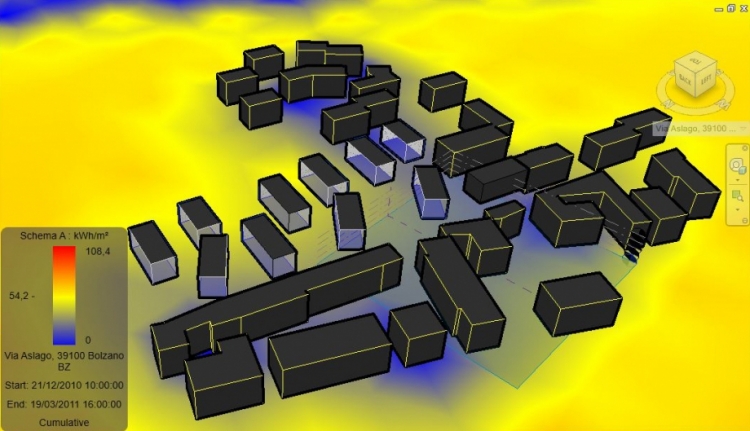
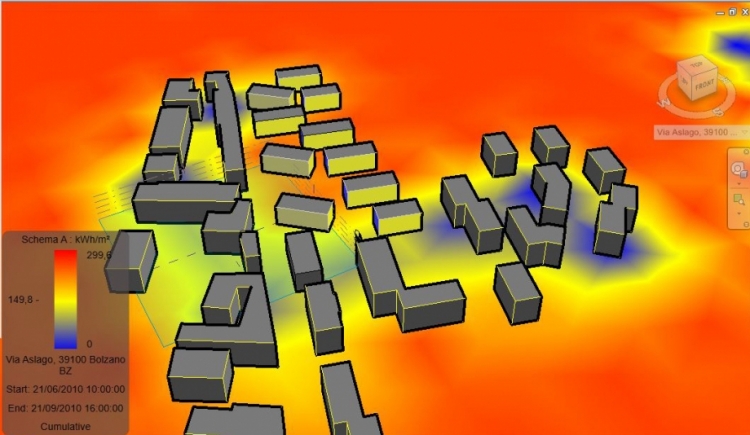
In order to make a deep analysis of the quality of public spaces, we firstly considered the solar radiation on the ground. The colour – based method analysis validates the studio we made while studying the shadowing. The solar radiation during summer is quite high – it peaks with 299 KWh/m2 – while it only reaches 54 KWh/m2 during winter. As a result we should consider to use bright paving materials and to plant some trees in order to shade the solar radiation during summer, while we can weatherize the flooring in order to avoid mould, efflorescence and humidity stains during winter.
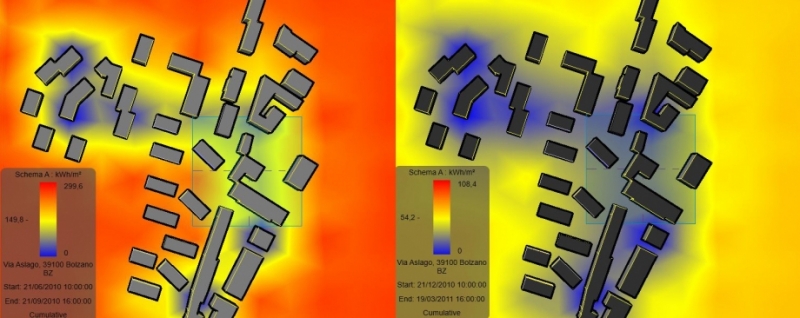
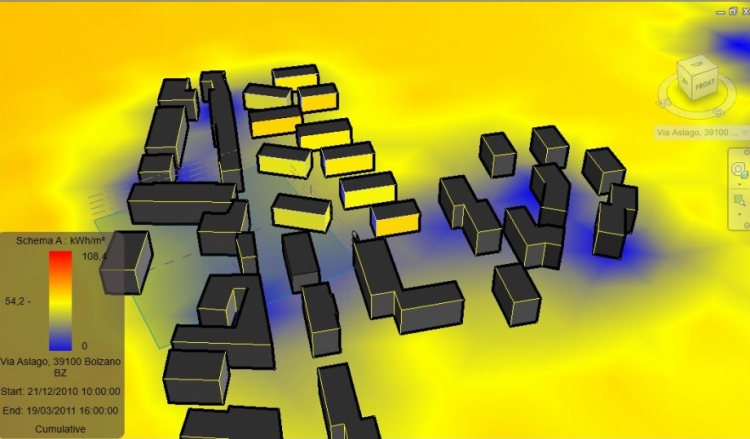
Then we chose to study the façades’ solar radiation. As it can be seen from the pictures, the Northern façades don’t receive any solar radiation at all, so that we should adopt preventive measures in order to avoid deterioration signs. We should use waterproof materials, able to absorb the slight radiation.
The Southern façades receive a quite high solar radiation during summer – which result to be around 150 KWh/m2 – while the number is not that high for winter – 50 KWh/m2. In matter of the treatment of Southern façades, we should consider the observations done previously about Via Misurina building. South facing façades come up with the best situation as far as exposition is concerned, so that we can think about opening big windows on them. During summer, when the sun is quite high, they can be easily shaded with cantilevers, in order to let the light in but not the heat. On the other hand during winter, when the sun is lower, sun rays warm up the house.
Commenti
Ermirio_Morabito
Lun, 27/04/2015 - 12:18
Collegamento permanente
mancata valutazione es.1
Non abbiamo ancora ricevuto la valutazione dell'esercitazione 1 pur avendo segnalato il problema più volte, cosa possiamo fare per risolverlo? Ci scusiamo per il disturbo, grazie.
StefanoConverso
Lun, 27/04/2015 - 17:17
Collegamento permanente
se avete mandato la risposta al post della prima consegna...
... come hanno fatto anche vostri colleghi,
non c'è problema, procederemo a valutarla.
StefanoConverso
Lun, 27/04/2015 - 14:05
Collegamento permanente
Great post!
Ciao,
your work is very accurate and an interesting read, good!
It would be cool to add picture of the difference between light coming from northern and southern windows from interior of our apartment, is that difference notable when one is inside the apartment?
We are eager to see your design thoughts.
Will ready you later!