ES_2_SOLAR RADIATION_Via Britannia_Via Degli Orti di Cesare
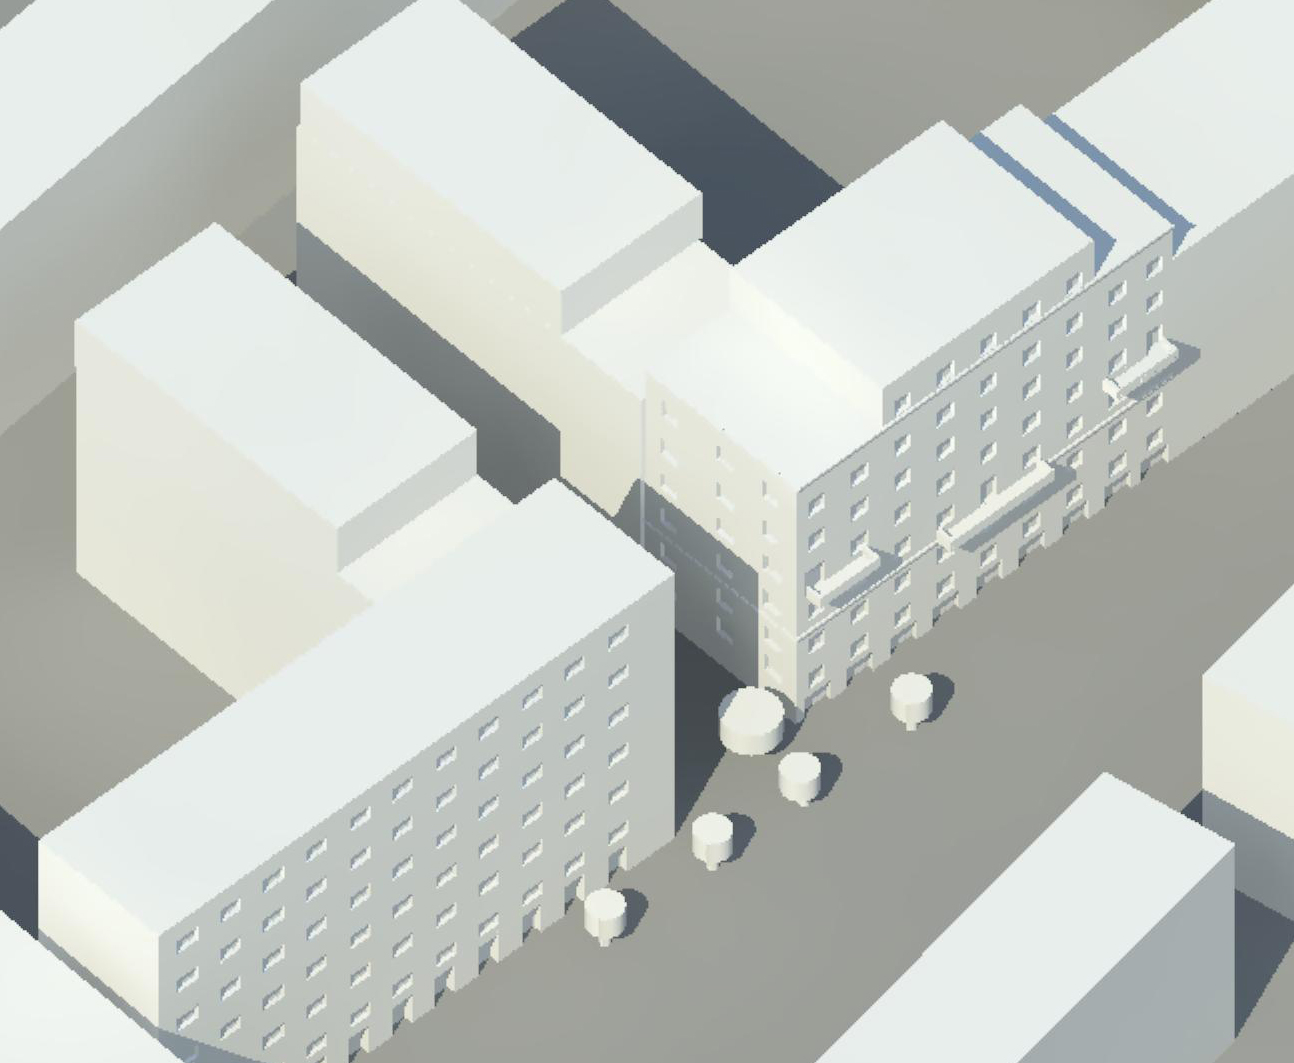
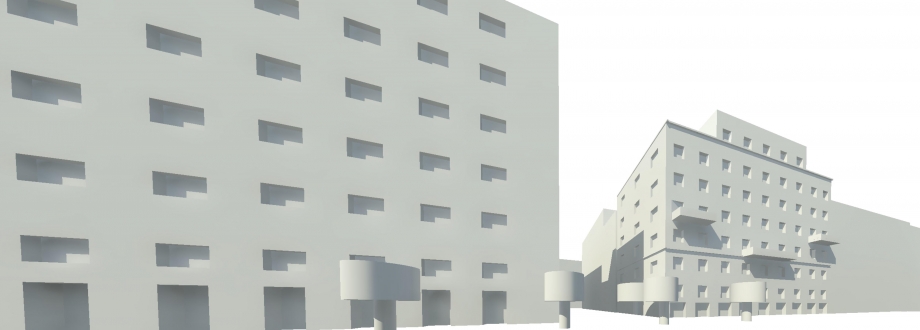
Dopo aver studiato le ombre degli edifici in via Britannia nell’esercitazione precedente, si passerà ora ad analizzare le radiazioni solari che agiscono sull’area. Per poter procedere con uno studio più efficace si è pensato di modellare meglio l’edificio e di aggiungerci le finestre, i balconi e i marcapiani in modo tale da avere un’ analisi più accurata. Inoltre si è pensato di inserire anche la vegetazione circostante l’edificio qualora risulti influente sullo studio.
Having examined the buildings in Via Britannia in the previous exercise, we will now analyze the solar radiation which affects the area. In order to do this more precisely, we have improved the modeling of the buildings and added windows, balconies and ledges between floors. We have also added the vegetation around the building in case they influence the study.
MODELLAZIONE DELLA FACCIATA
Modeling the Facade
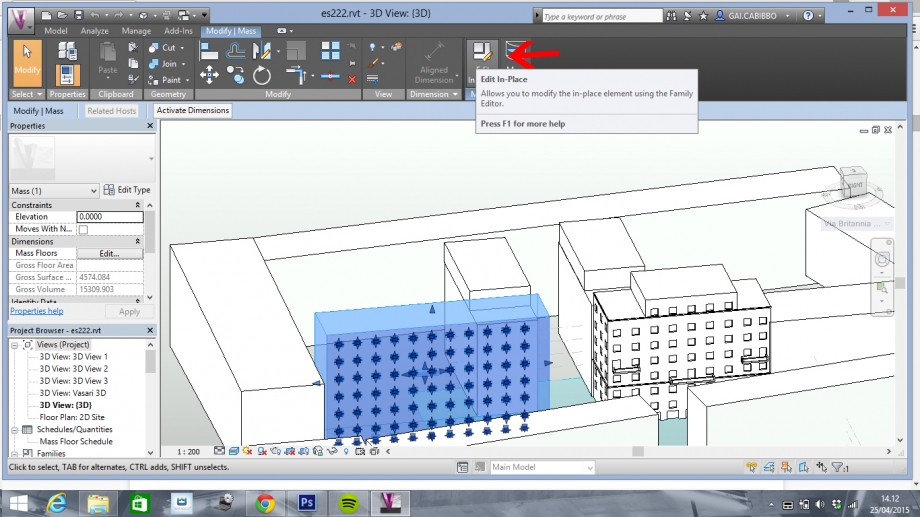
Partendo quindi dal volume dell’edificio creato, si dovrà selezionare il palazzo e premere il comando ‘edit in place’ per poterne modificare l’aspetto.
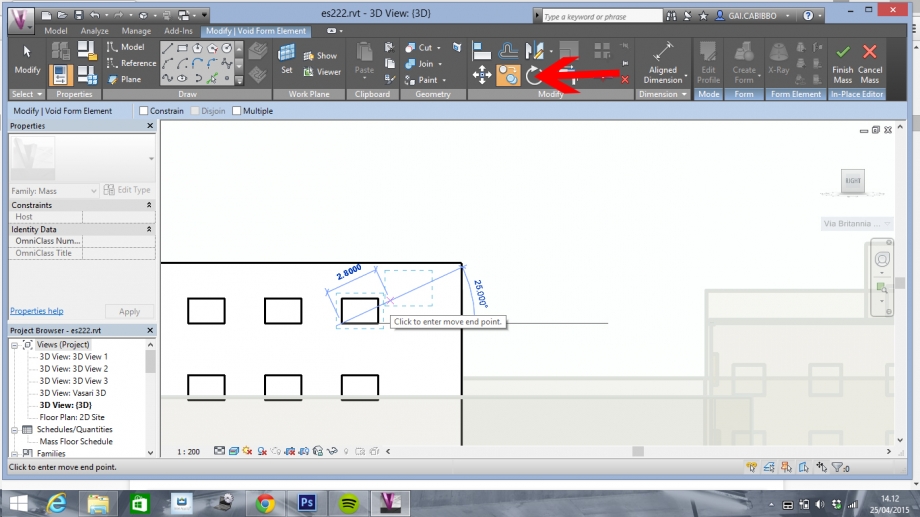
Si procederà poi creando dei vuoti (per la realizzazione delle finestre)e dei solidi (per i balconi e i marcapiani) selezionando ‘create form’; dopo aver disegnato la forma desiderata con il comando ‘line, rectangle o circle’ scegliere il comando ‘create solid o create void’ a seconda di cosa si sta costruendo. Dopo aver realizzato la forma desiderata premere ‘finish mass’ per terminare l’operazione.
Starting with the volume we created for the building, select the building and click the command 'edit in place' to modify the way it looks. Next, click on ' create form' to create empty spaces ( for the windows) and solids (for the balconies and ledges): First draw a from using the command 'line, rectangle or circle. and then the command 'create solid or create void' according to what you are building. After you have drawn your form, click on 'finish mass' to finish the operation.
E’ possibile copiare sia i solidi che i vuoti con il comando ‘copy’.
You can copy soilds by using the command ' copy'
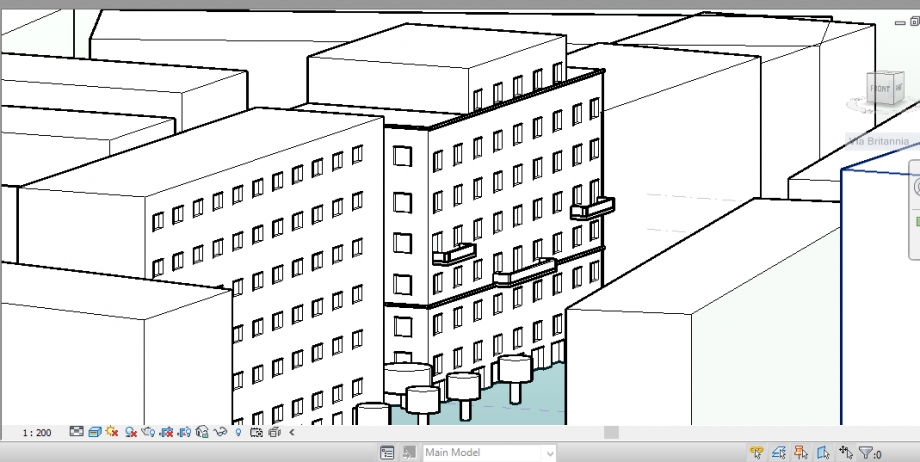
L’effetto finale sarà questo:
The final drawing will look like this:
ANALISI DELLA RADIAZIONE SOLARE.
ANALYZING SOLAR RADIATION
!PER POTER ANALIZZARE LE RADIAZIONI SOLARI E’ NECESSARIO SCARICARE UN FILE ZIP CHE PERMETTERA’ L’OPERAZIONE!
IN ORDER TO ANAYLZE SOLAR RADIATION YOU NEED TO DOWNLOAD A SPECIIFC ZIP FILE
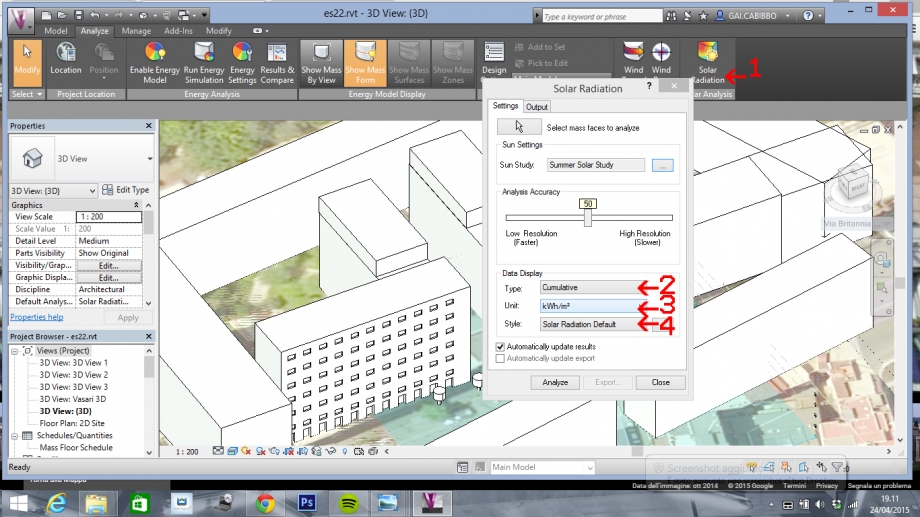
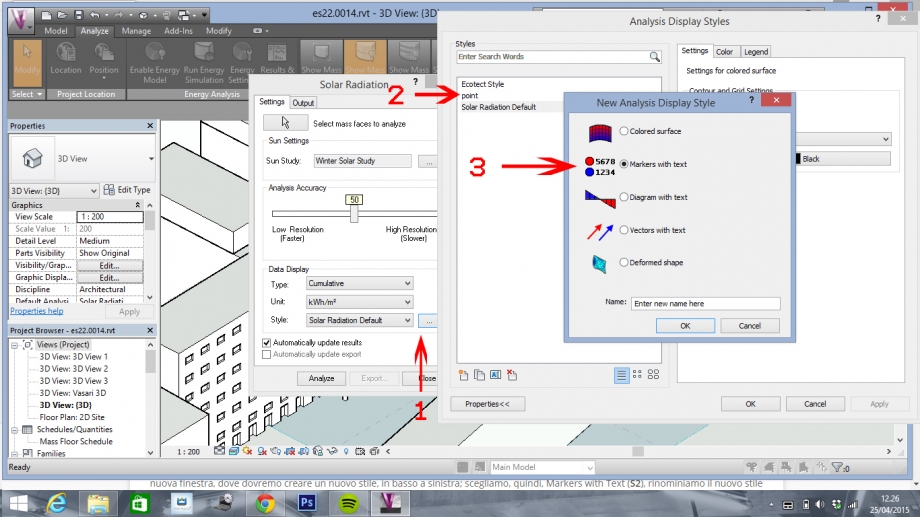
Andare quindi su ‘analyze’ e selezionare ‘solar radiation’; modificare poi i ‘data display’, scegliendo:’type: comulative’ (tipo di analisi), ‘unit: kWh/mq’ (unità di misura) e ‘style: solar radiation default’(stile di analisi).
Click on ‘analyze’ and select ‘solar radiation’; change the ‘data display’ type by choosing :’type: cumulative’ (a type of analysis), ‘unit: kWh/mq’ (measurement unit) and ‘style: solar radiation default’(analysis style).
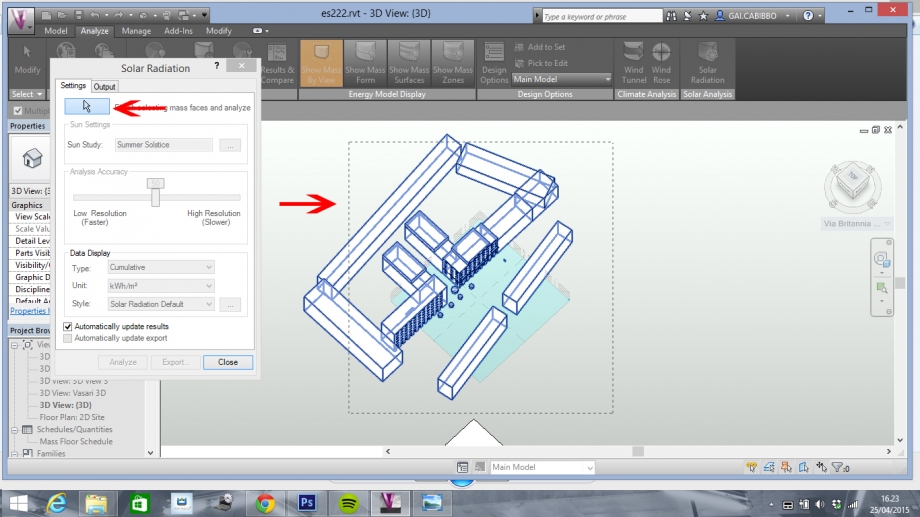
Andranno quindi selezionate le superfici da analizzare, premendo sull’immagine del cursore e quindi sulla superficie stessa.
Next, select the surfaces to analyze by clicking the cursor over the surface.
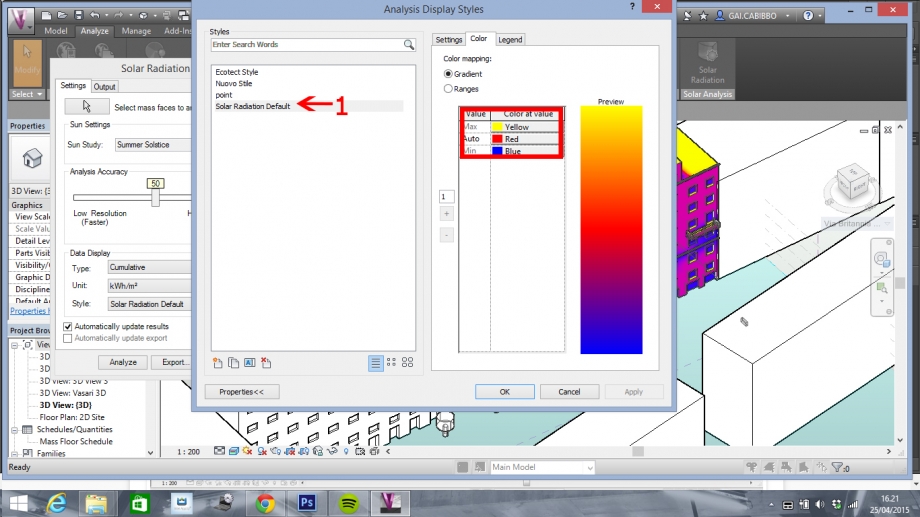
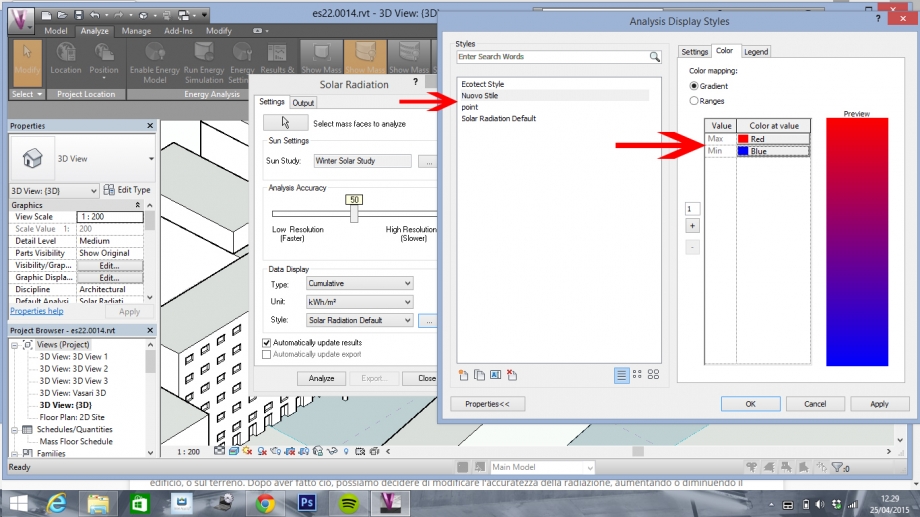
Si imposteranno ora i colori dei valori della radiazione solare: andare su ‘style’, selezionare il livello ‘solar radiation default’ andare poi su ‘color’ e scegliere i colori relativi ai valori massimi e minimi delle radiazioni.
We will now choose the colors which describe the levels of solar radiation: click on ‘style’, and select the ‘solar radiation default’ level. Next click on ‘color’ and choose the colors and maximum and minimum radiation levels.
Infine si deve impostare il ‘sun setting’; andare perciò su ‘sun study’ e selezionare il periodo che si intende studiare.
Finally choose the ‘sun setting’; click on ‘sun study’ and select the time period you wish to analyze.

Dare quindi il comando ‘analyze’.
Click on the command ' analyze'.
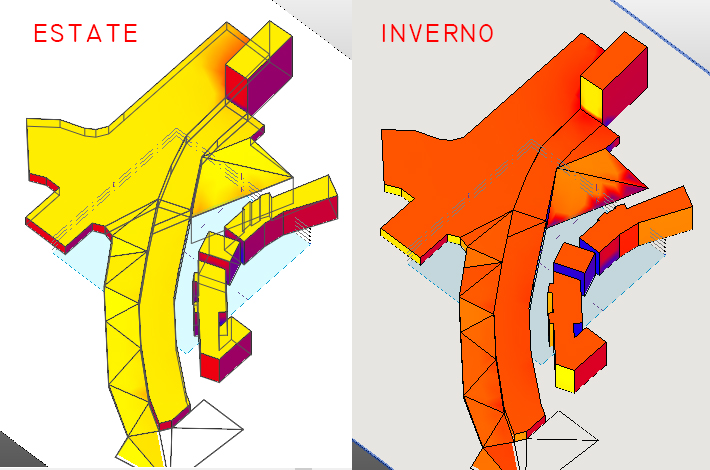
In questo studio quest’ultima operazione è stata ripetuta per tutte le stagioni in modo da poter analizzare le zone di comfort dell’edificio durante tutto l’anno.
This last step should be repeated for all seasons to understand how comfortable the building will be throughout the year.
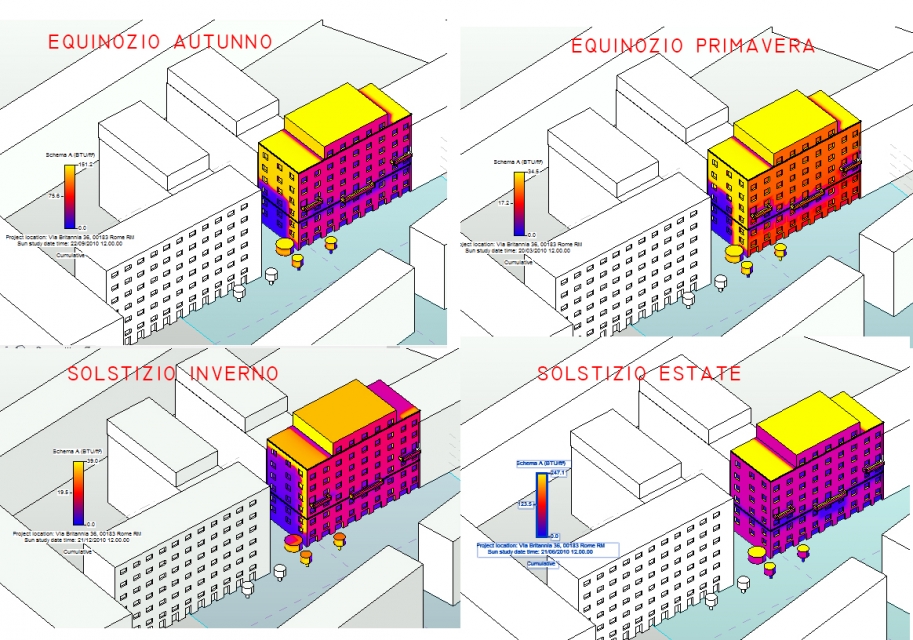
Considerando che al colore giallo corrisponde un alto valore di radiazione e al blu uno minimo si può affermare che l’edificio gode di un buon irraggiamento solare durante la primavera; si può notare anche d’estate non riceve eccessive radiazioni il che comporta un ottimo comfort interno. In inverno però l’edificio non è eccessivamente irraggiato, in particolar modo la facciata laterale che viene schermata dal palazzo adiacente, il che porterà ad avere un ambiente più umido e freddo. Risalta la differenza d'ampiezza dell'ombra sulla facciata laterale a seconda del variare delle stagioni e quindi dell'altezza del sole.
Si nota inoltre come siano presenti delle fasce blu al di sotto dei balconi della facciata su strada ad indicare una concentrazione di valori di temperatura inferiori.
Per quanto riguarda la vegetazione, l'albero più influente è quello adiacente all'edificio che in inverno scherma parzialmente i primi due piani laterali.
NB: i valori massimi relativi alle radiazioni non hanno gli stessi valori per il periodo estivo e quello invernale! In estate il valore massimo è di gran lunga superiore a quello invernale.
Per lo studio delle radiazioni oltre che il gradiente di colore è possibile impostare modificare lo stile in questo modo: tornare su ‘solar radiation’ , andare su ‘style’, creare un nuovo livello con il comando ‘layer’ e quindi scegliere ‘markers with text’
Since yellow stands for a high amount of radiation and blue indicates the minimum amount, we can assume that the building receives a good amount of solar radiation in Spring. We can also assume that it does not receive too much radiation in the Summer and will be comfortable indoors. However, in Winter the building - especially the side facing wall which is shielded by the adjacent building - will not receive much radiation and will tend to be cold and humid. The amount of shade on the side facing wall varies considerably according to the season the and the height of the sun.
The blue sections beneath the balconies on the facade facing the street indicate lower temperatures. In terms of vegetation, the tree which has the biggest impact is that adjacent to the building which partially shields the first two floors on that side.
Note: The maximum levels of radiation are not the same during winter and summer! In summer, the maximum level is much higher than in winter.
When studying radiation it is possible to modify the style in addition to the color by: going back to ‘solar radiation’, clicking on ‘style’, creating a new layer with the ‘layer’ command and finally selecting ‘markers with text’.
ANALISI NUMERI DI DETTAGLIO
ANAYSING NUMBERS IN DETAIL
Si può anche in questo caso modificare i colori e la dimensione del testo come in precedenza
As with the previous example, it is possible to change the color and size of the text.
Selezionare quindi le superfici che si desiderano studiare sempre come illustrato prima e dare il comando ‘analyze’.
Click on the surface you wish to analyze and click on ' analyze'.
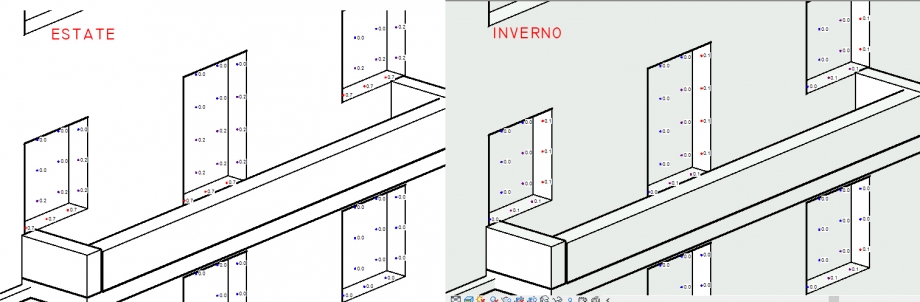
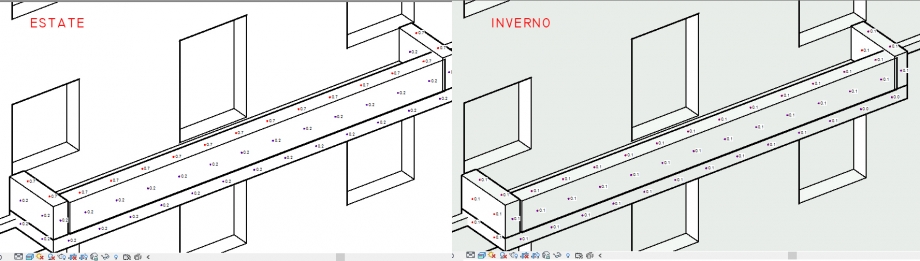
Si è analizzato separatamente le superfici vetrate e i balconi. Per quanto riguarda le finestre dall'analisi si vede come i valori oscillino tra inverno e estate da 0.0 a 0.7 e come le bucature al di sotto dei balconi abbiano in entrambe le stagioni valori inferiori rispetto a quelle superiori.
The glass surfaces and balconies have been analyzed separately. For the windows, the values oscillate in winter and summer between 0.0 and 0.7, while the openings under the balconies have lower levels than the top surfaces in both seasons.
La situazione risulta analoga anche per i balconi.
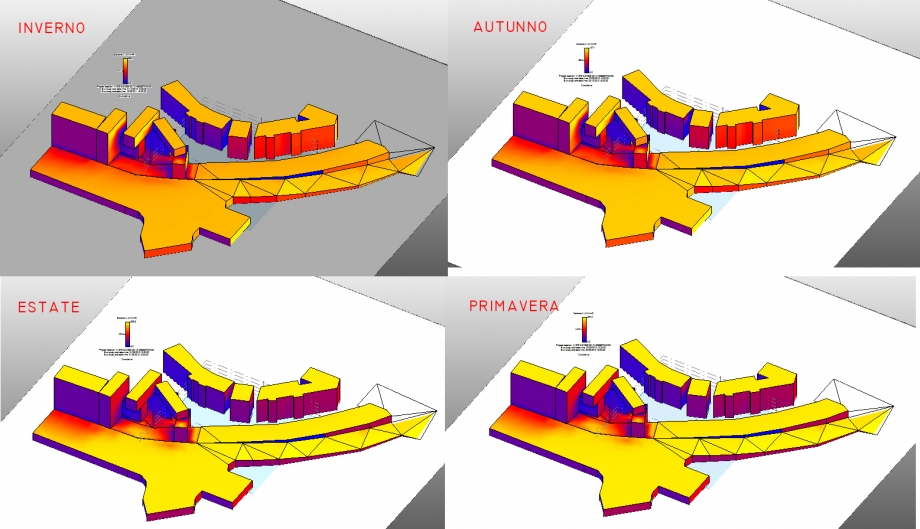
ANALISI AREA LIMITROFA
AN ANALYSIS OF THE SURROUNDING AREAS
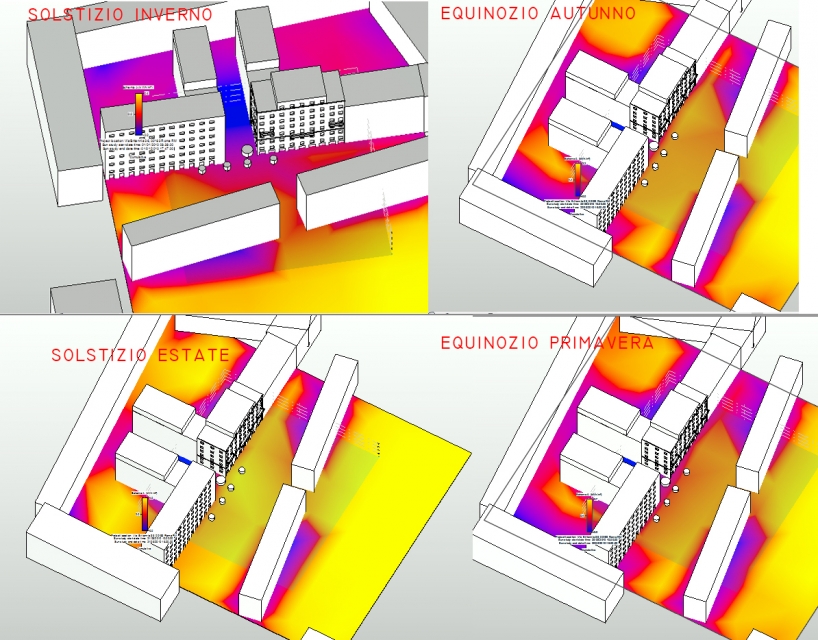
Da queste immagini si nota come durante l’estate il suolo sia particolarmente irraggiato al contrario della stagione invernale, come d’altronde era prevedibile. Inoltre nella fascia tra i due edifici paralleli si riscontra un valore molto basso di radiazione in tutte le stagioni, poichè il suolo non risulta essere mai irradiato dal sole. La situazione opposta invece si verifica lungo la via principale (Via Britannia) che gode per tutto l'anno di un ottimo irraggiamento.
In these images one can see how the ground receives a great deal of radiation in summer as compared to winter. The ground in between the parallel buildings receives little radiation in all seasons. The opposite situation occurs along the main street (Via Britannia) which receives a high amount of radiation all year long.
ANALISI EDIFICI CIRCOSTANTI
ANALYSIS OF SURROUNDING BUILDINGS
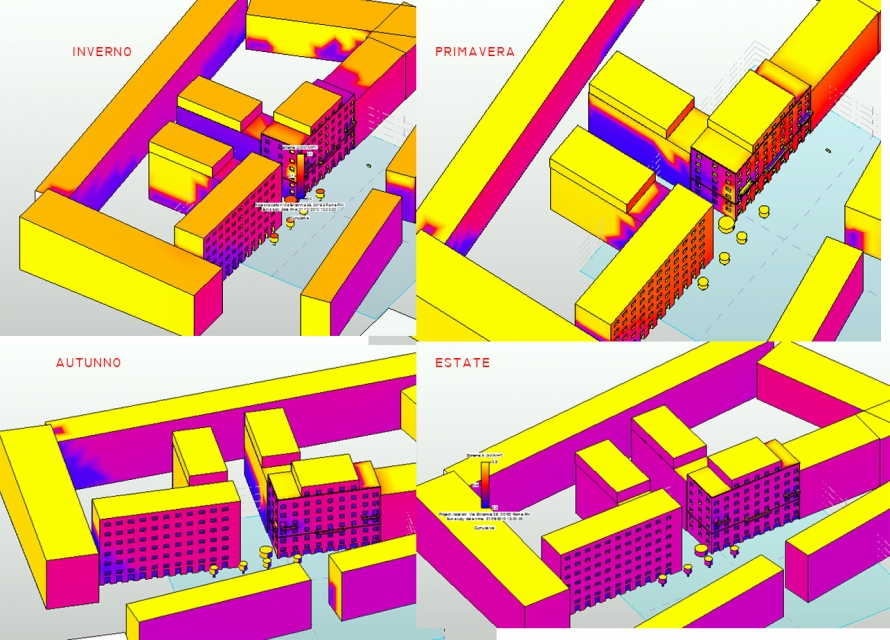
Come si può vedere i palazzi adiacenti all’edificio circostante godono delle stesse radiazioni della struttura analizzata. Si ha quindi una radiazione maggiore in estate rispetto all’inverno; le facciate sul lungo strada non sono particolarmente intaccate dalle radiazioni durante tutto il periodo annuale il che comporterà una situazione di comfort nel periodo estivo mentre in inverno sarà più freddo e umido. In particolare risente di questa situazione l'edificio perpendicolare a quello analizzato, in quanto sempre schermato dal palazzo di fronte.
Adjacent buildings receive the same pattern of radiation as the building we are analyzing. They all receive more radiation in summer than in winter; the facades along the main street do not receive excessive amounts of radiation year round which will make them more comfortable in summer but more humid and cold in winter. This situation is accentuated in the building adjacent to the one being studied which is always shaded by the building in front of it.
Si procederà ora con lo studio dell’area di progetto.
Il lotto da analizzare si trova a Roma, nel quartiere Portuense (XII municipio), in via Orti degli Cesare, proprio di fronte alla stazione Trastevere.
Sono stati ricreati il dislivello del lotto (6m) e gli edifici circostanti come spiegato in precedenza.
We will proceed with an analysis of the area of the project.
The lot we are analyzing is in Rome's Portuense neighborhood ( XII Municipality) on via Orti degli Cesare, in front of the Trastevere train station. We have recreated the difference in level of 6 meters of the lot and surrounding buildings.
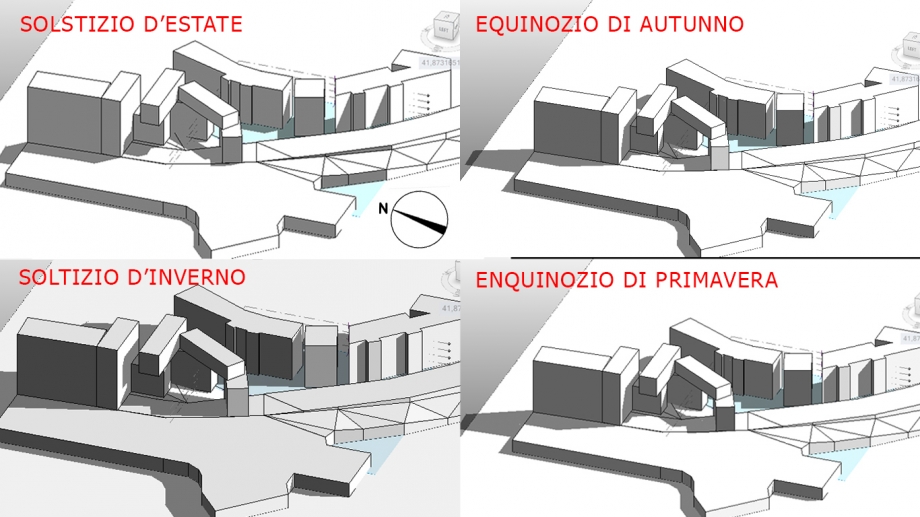
ANALISI OMBREGGIATURA AREA PROGETTO
ANALYSIS OF THE SHADED AREA OF THE PROJECT
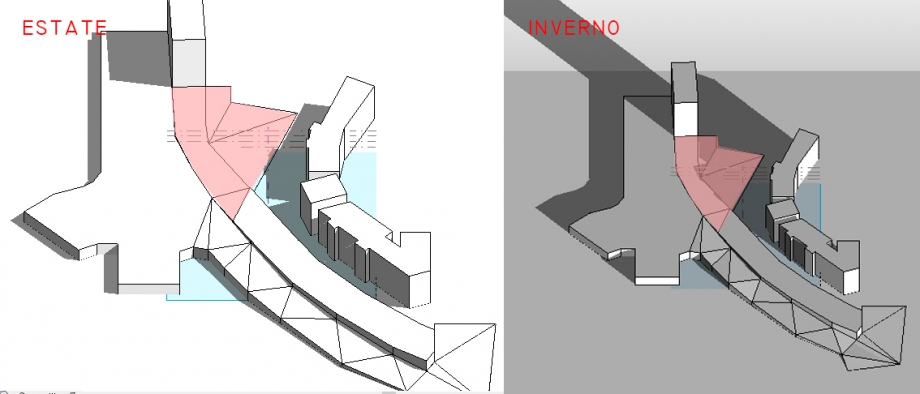
Anzitutto analizziamo l'area di progetto sgombra da edifici: come si può notare durante l'estate il lotto è completamente soleggiato; in inverno invece risente dell'ombra degli edifici limitrofi poiché essi presentano altezze rilevanti e il percorso del sole è basso.
We will begin by analyzing the part of the project without buildings: during summer the lot is entirely in the sun, while in winter it receives some shade form the buildings which are high and partially block the lower winter sun.
Analizzando invece l'area con all'interno la nostra ipotesi di progetto notiamo che gli edifici generano molte ombre portate. Ciò comporterà una situazione di comfort estivo mentre in inverno la situazione sarà più critica. Fortunatamente però la piazza interna che si viene a creare dal nostro complesso riesce comunque ad avere un'illuminazione diretta in inverno in modo tale da rendere più accogliente l'ambiente. Ci sono delle facciate che però risultano sempre in ombra sia a causa del dislivello sia a causa dell'orientamento sia per le consistenti altezze degli edifici adiacenti. Non siamo sicure che questa sarà la disposizione definitiva degli edifici: cercheremo infatti di migliorare il più possibile l'esposizione di tutti i palazzi e di distribuire all'interno di essi le diverse funzioni affinché ogni servizio riceva la quantità di luce a lui più congeniale.
Per quanto riguarda le facciate maggiormente esposte provvederemo a munirle di sistemi di schermatura avanzate.
Analyzing the internal side of the project, we note that the buildings cast shadows. This will bring comfort in summer but could be problematic in winter. Fortunately, the piazza we will insert into the project will also receive direct illumination in winter and will make the environment more hospitable. However, there are facades which will always be in the shade because of the difference in levels, their orientation and the surrounding high buildings. We are not sure if this will be the final layout of the buildings: indeed we will try to improve the layout of the buildings to make sure they receive adequate amounts of light. We will provide an advanced system for shading highly exposed facades.
Per avvalorare questo discorso inseriamo l'analisi delle radiazioni solari dell'area e dell'ipotesi di progetto.
To begin, we will insert an analysis of solar radiation in the area of the project.
ANALISI DELLE DIMENSIONI
ANALYSIS OF THE DIMENSIONS
Impostiamo quindi i livelli tramite il comando "Model>Level"
We will first create levels using the command "Model>Level".

Ad ogni livello corrisponderà quindi un piano di progetto, sarà quindi possibile modificare il nome del level.
Each level will correspond to a floor and we can name each one accordingly.
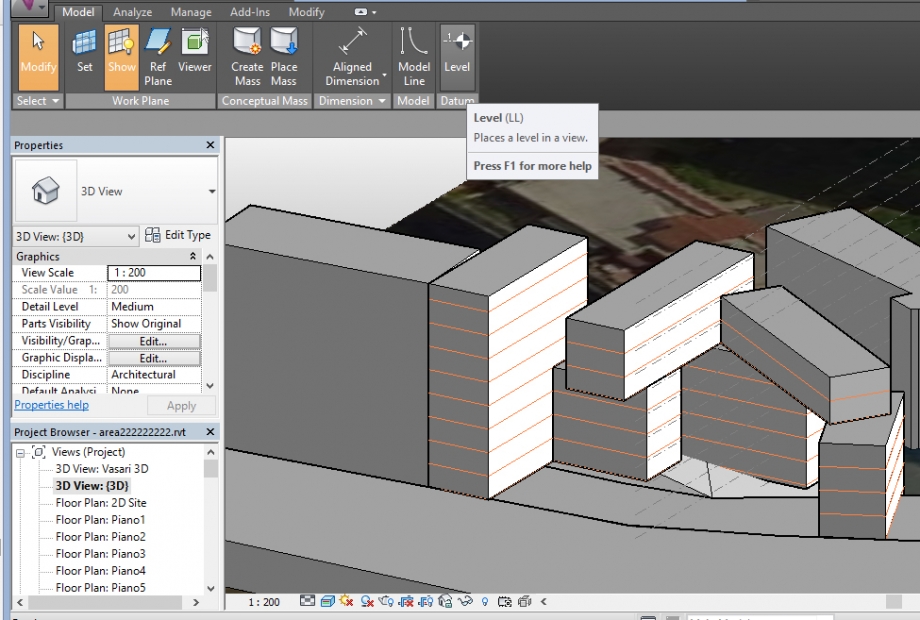
Premendo dunque i comandi "Modify|Mass> Mass Floors" selezioniamo i livelli di interesse per ciascun edificio.
Clicking on "Modify|Mass> Mass Floors" we can select the levels we are interested in analysing for each building.

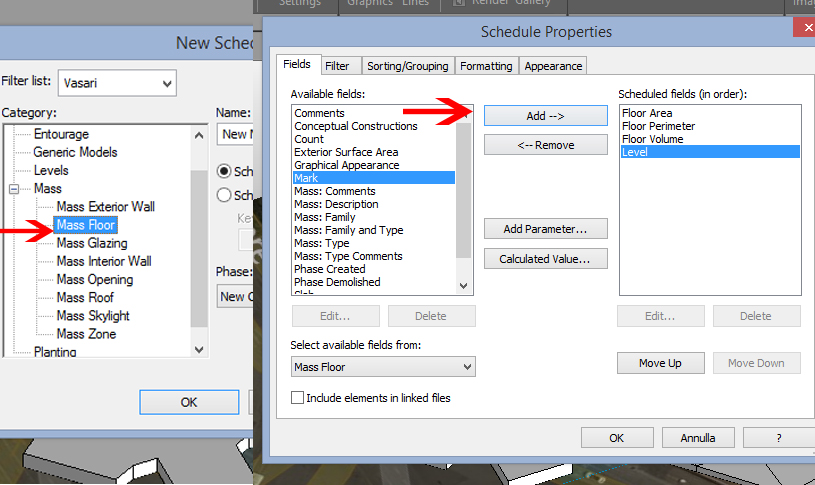
A questo punto possiamo utilizzare i comandi "Manage>Schedules>Mass>Mass Floor". Nella nuova finestra che si aprirà potremo quindi scegliere le caratteristiche della Schedule e in particolare i dettagli da analizzare. In particolare selezioniamo "Floor Area, Floor Perimeter, Floor Volume, Level"
We can now press on "Manage>Schedules>Mass>Mass Floor". In the window that opens we can choose the characteristics of the schedules and the details to analyse. In particular we can select "Floor Area, Floor Perimeter, Floor Volume, Level,Mass:Family".
Premendo "ok" si aprirà questa finestra. La schedule riporta i valori dei level delle masse analizzate.
Pressing 'ok' a new window opens. The schedule contains the values of the levels of the analyzed masses.
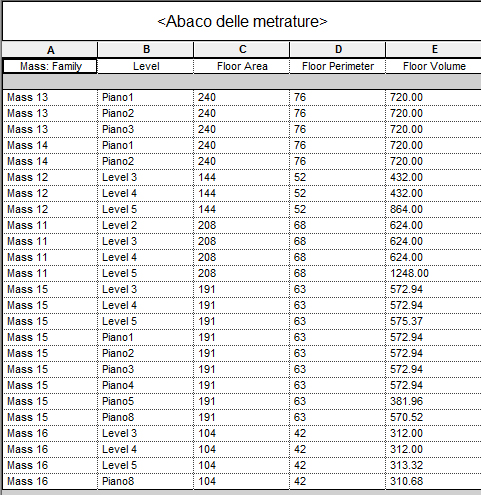
Il nostro progetto prevede la realizzazione di 5000mq circa tra residenziale e servizi. Come si può vedere dall'analisi i mq di progetto ad oggi sono 4400, ma verranno ampliati in futuro.
Our project requires the amount of 5000 square meters including residencial and common areas . As you can see from our analysis our square meters are 4400. We will expand them very soon.