Cristiano Piagn...
Mar, 11/03/2014 - 19:25
Cristiano Piagn...
Mar, 11/03/2014 - 19:25
pagina del github dedicata all’apprendimento di Dynamo.
serie di video tutorial per partire da zero con dynamo. Soprattutto i primi sono molto utili per conoscere l’interfaccia e capire qual è la logica del programma. Ad esempio molte delle cose che in Revit e Vasari spesso usiamo implicitamente, come coordinate cartesiane nello spazio e codici ID degli oggetti, spesso con Dynamo sono più esplicite, essendo i principali strumenti di dialogo tra i due software.
blog di Zach Kron, uno degli sviluppatori: c’è una lunga serie di post su Dynamo, la maggior parte riguarda la creazione di geometrie complesse.
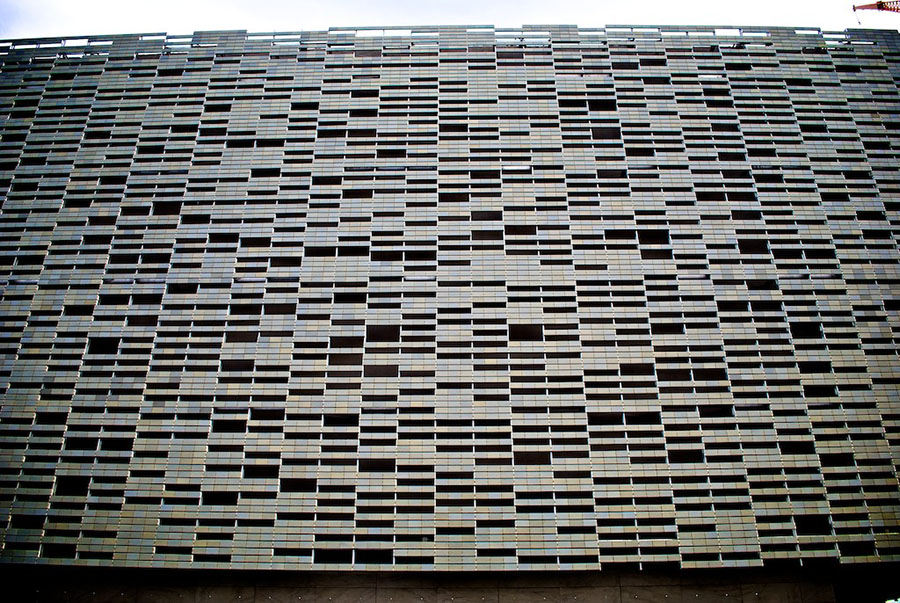
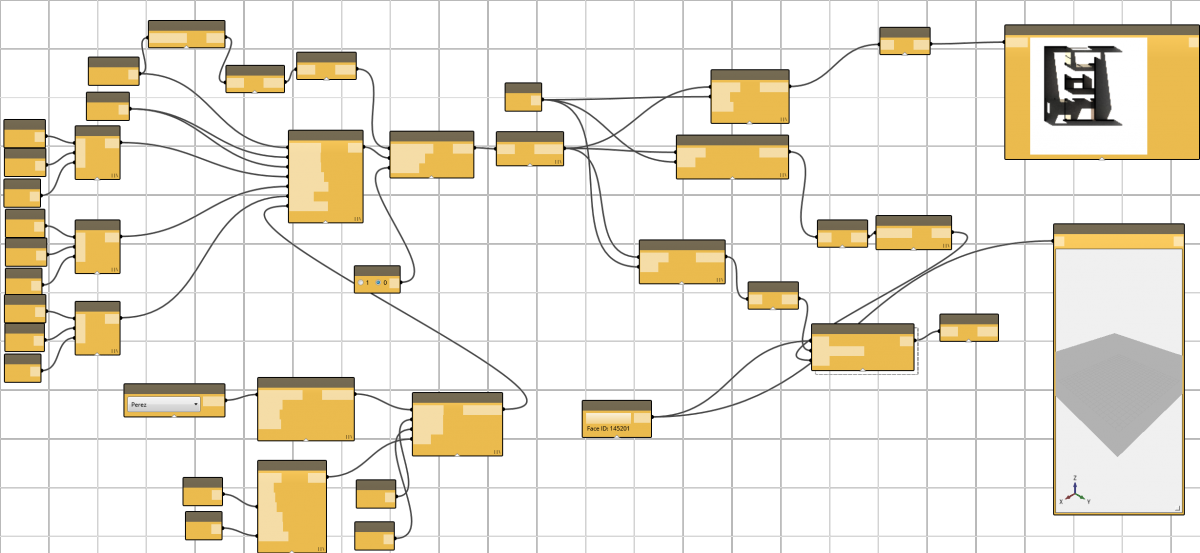
FACCIATA CONTINUA CON VUOTI CASUALI:
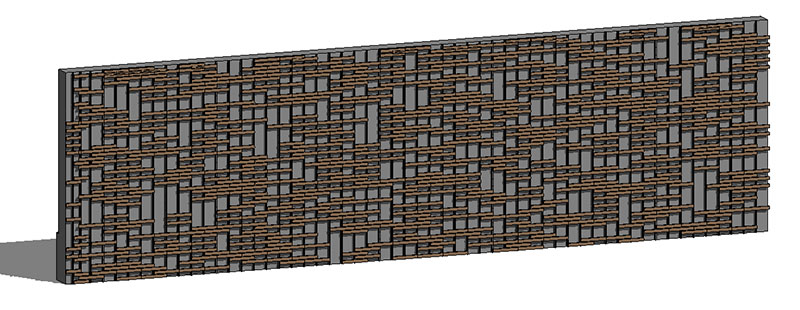
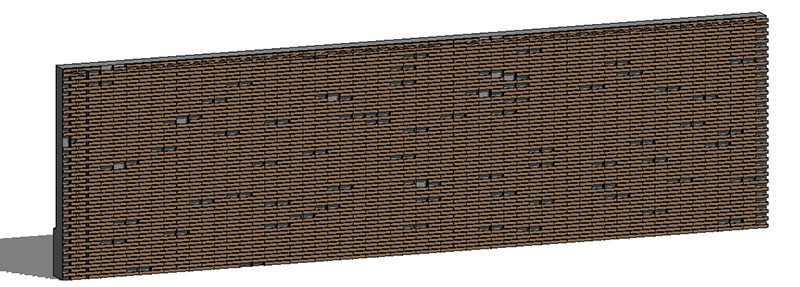
Ho voluto modellare una facciata continua simile a quella del nuovo teatro dell’opera di Firenze dello studio ABDR, con doghe di laterizio disposte a giunti verticali alternati, ma mancanti di alcuni elementi con una logica casuale.

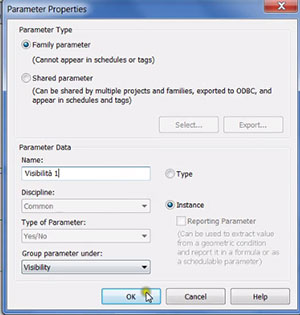
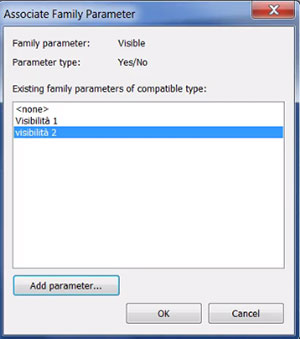
Poi ho assegnato il parametro di istanza “visibilità 1” alla doga superiore e “visibilità 2” alla doga inferiore.
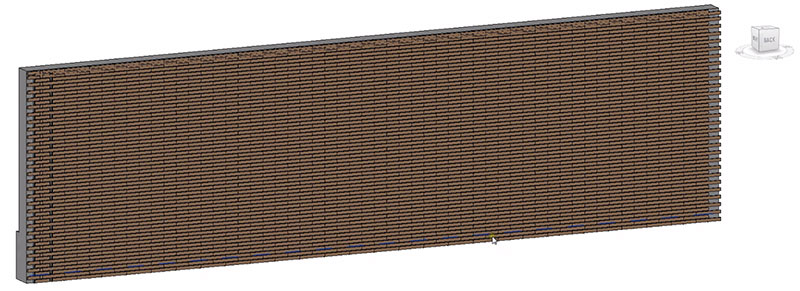
Una volta caricato nel progetto il risultato è questo, con le doghe tutte visibili e quindi il rivestimento di facciata pieno:
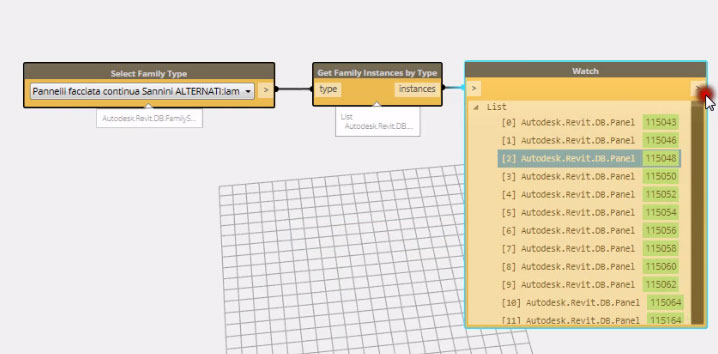
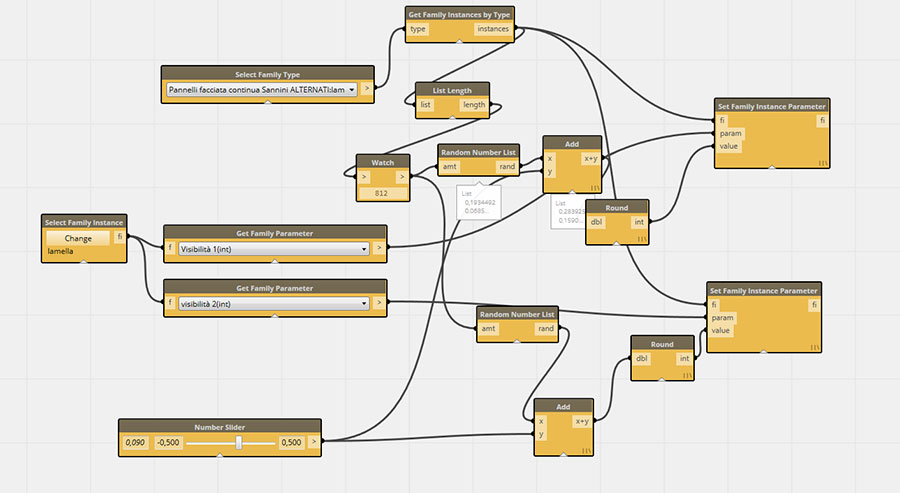
A questo punto ho aperto il plug-in Dynamo dal pannello add-in. Per prima cosa ho selezionato tutte le istanze dello stesso tipo con il nodo “get family instances by type”, in questo modo le modifiche successive saranno assegnate a tutte le istanze.
Poi ho usato il nodo “Random number list”, ripetuto tante volte quante sono le istanze. In questo modo ho creato una lista di numeri casuali compresi tra 0,00 e 1,00 e, applicando il nodo “round” li ho arrotondati e trasformati in numeri interi, cioè in una serie fatta di numeri 1 oppure 0. 1 e 0 corrispondono a Yes or Not e quindi ho potuto assegnare questi valori al parametro “visibilità 1”, con il nodo “set family instance parameter” (notare come questo nodo e anche gran parte degli altri nodi può essere assegnato sia ad un singolo oggetto sia ad una lista di oggetti, come in Grasshopper).
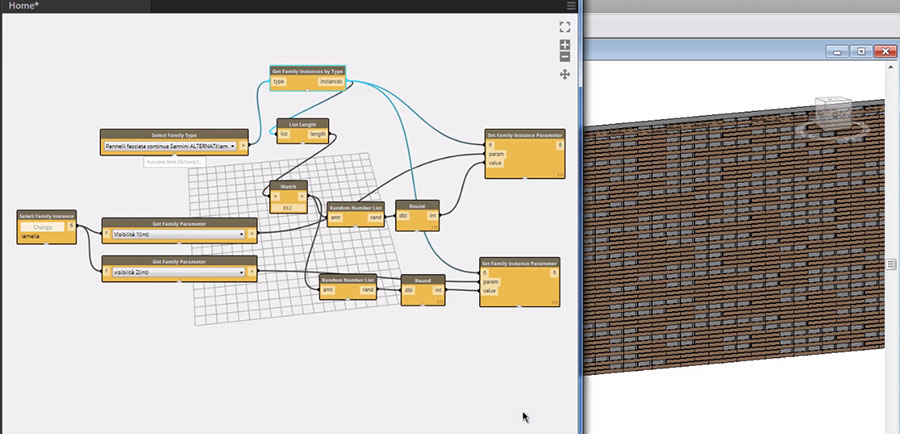
Pur non conoscendo l’algoritmo che genera i numeri casuali, posso notare che il numero di pieni e vuoti si equivale, ma non ho ancora modo di agire sul grado di apertura del rivestimento di facciata. Per farlo aggiungo un “number slider” con un dominio compreso tra -0,5 e 0,5 e poi lo sommo alla lista di numeri generati dal “random number list”. in questo modo facendo scorrere lo slider posso decidere di aumentare la quantità di 1 rispetto a 0 e viceversa. Cioè posso decidere di aumentare o diminuire il numero di vuoti.
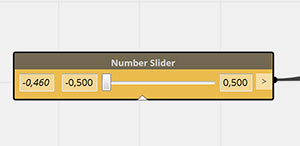
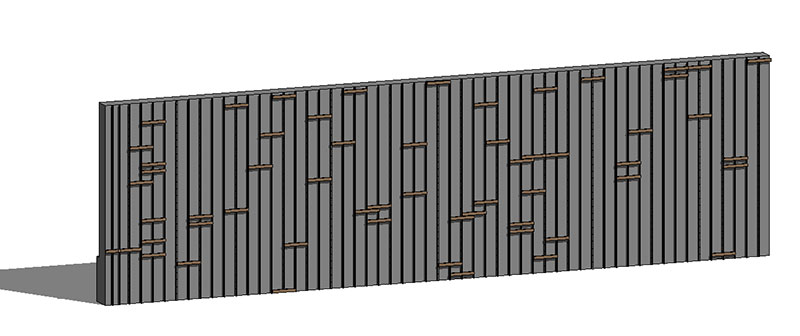
Slider almost to a maximum:

 Cristiano Piagn...
Lun, 14/01/2013 - 19:10
Cristiano Piagn...
Lun, 14/01/2013 - 19:10
Ciao,
Ho fatto delle prime piccole sperimentazioni con Dynamo, che vorrei condividere con voi.
Dynamo è un progetto open source sviluppato da Ian Keough ( http://iankeough.com/wordpress/?cat=3 ), ed è tutt’ora in fase di sviluppo. E’ un’interfaccia (nato per project Vasari, ma adesso disponibile anche per Revit), che - attraverso l’uso di nodi e connessioni - consente di creare relazioni parametriche e di svolgere funzioni. E’ molto simile a Grasshopper per Rhino.
Da qui è possibile scaricare l’ultimissima versione che viene continuamente aggiornata: https://github.com/ikeough/Dynamo
Purtroppo non sono ancora riuscito a installarla, perché, essendo in fase di sviluppo, bisogna convertire alcuni file .cs in .dll (o almeno credo che sia questo il problema). C’è qualcuno che lo sa fare?
Quindi ho dovuto ripiegare su una versione più vecchia, dove mancano la maggior parte dei nodi, scaricabile da qui:http://wikihelp.autodesk.com/Vasari/enu/Community/Works_in_Progress/Dynamo_for_Vasari/Installation_and_Getting_Started
Un aspetto molto interessante di Dynamo è la sua interfaccia intuitiva in grado di compiere operazioni complesse senza dover ricorrere ai linguaggi di programmazione. E, ancora più importante, grazie alla visualizzazione grafica dei nodi e delle connessioni, è possibile condividere e replicare i lavori di altri anche solo attraverso uno screenshot. Ad esempio è così che si fa la tassellazione di una superficie:
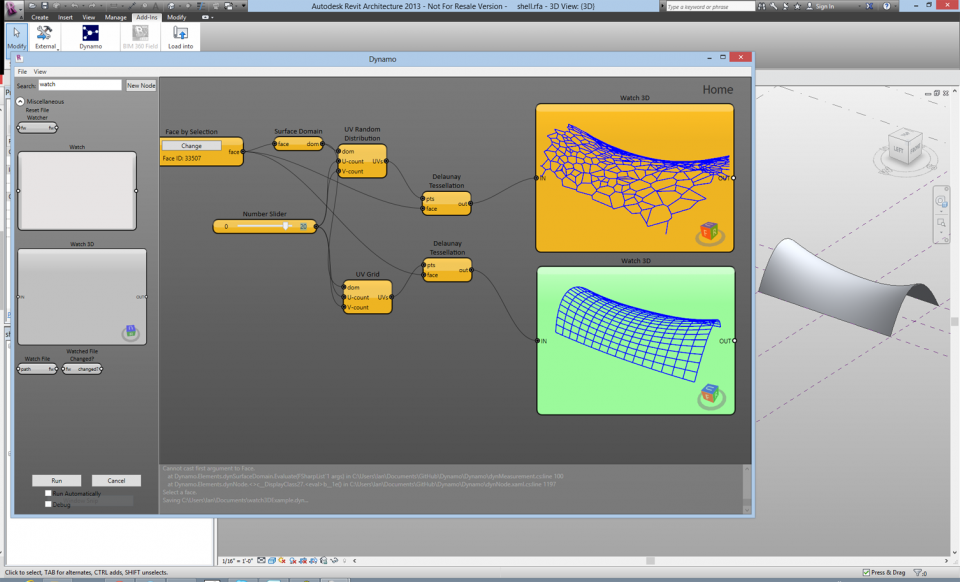
Immagine presa da: http://autodeskvasari.com/forum/topics/watch-3d
Sono stati creati anche dei nodi che ci consentono di mettere in relazione i nostri modelli con Arduino, sia in input che in otput ( http://www.youtube.com/watch?v=IyLq6ZnHzDA ). Sarebbe molto interessante fare qualche prova!
Per lanciare dynamo si deve andare nel pannello Add-Ins e si può utilizzare sia nell’ambiente di progetto, sia nelle famiglie, sia nelle conceptual mass.
Questi sono i miei primissimi passi con Dynamo (sia per la mia inesperienza, sia per il fatto che in questa versione mancano un sacco di nodi, ho potuto fare solo cose molto semplici):
Questo è un array disposto lungo una spline:

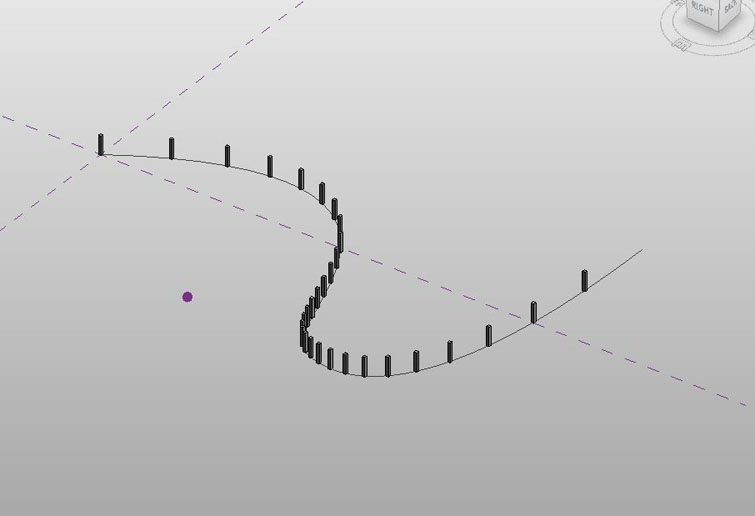
Quando cambio il numero degli elementi (number) o modifico la spline, basta che poi clicco su RUN e il modello si aggiorna.
Qui invece ho disposto automaticamente delle istanze della stessa famiglia su una griglia di punti:
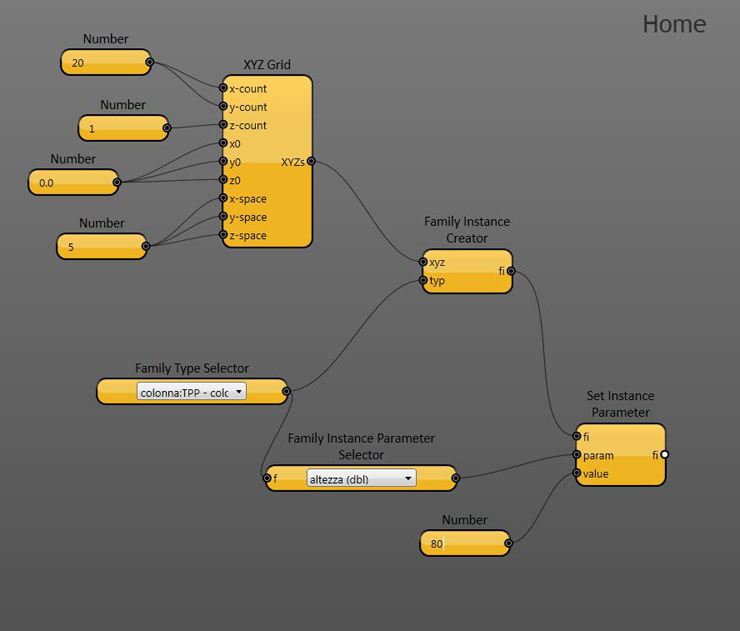
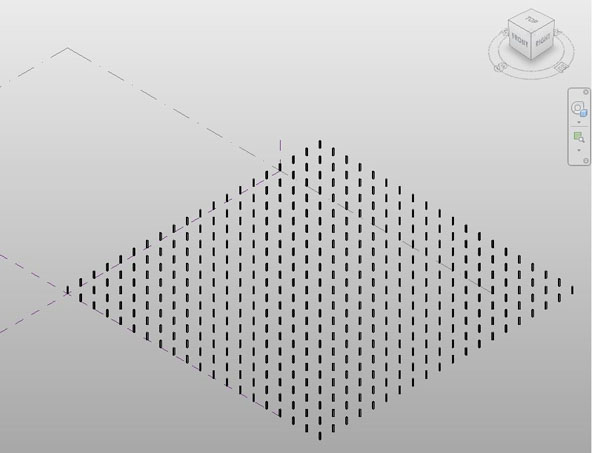
Se avessi avuto una versione aggiornata, avrei voluto mettere in relazione - attraverso una funzione matematica - il parametro di istanza “altezza” di tutti gli elementi, in maniera che fossero tutti di altezze diverse, ma non casuali.
Mar, 21/10/2014 - 19:18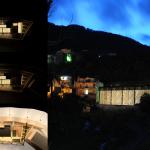 Vincenzo Panasiti
Mar, 21/10/2014 - 19:15
Vincenzo Panasiti
Mar, 21/10/2014 - 19:15
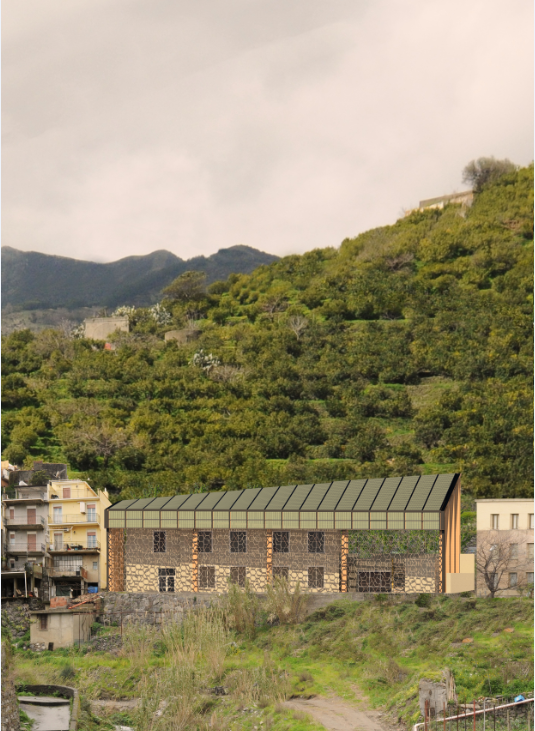
Innovation and tradition, technology and tectonics, energetic and structural design, they are the pairs we have condensed to develop our project. This abstract will depict a design for the architectural requalification of a schoolhouse located in Altolia, a small village in the surroundings of Messina (Sicily). By mean the energetic requalification of the existing building, the design of a new enclosure and the addition of a public space, we aim to create a place of aggregation for the community to fill the gap coming from the loss of identity suffered by people living in the rural areas of Italy.
Requalification of a schoolhouse in the area of Messina (Sicily), towards an high efficiency mediterranean architecture.
Candidates: Vincenzo Panasiti, Nicolas Ombres.
Supervisor: Prof. Arch. Gabriele Bellingeri
Assistant Supervisor: Prof.ssa Ing. Ginevra Salerno, Prof. Arch.Stefano Converso.

Nowadays, the major problems about civil buildings in Italy are the strong emissions of CO2, as 70% of them were built before the introduction of any regulation about energy saving, and the depopulation of the rural villages leading to the loss of that cultural diversity which is a specific peculiarity of Italy.
Altolia is the typical italian rural village, which history and tradition, culture and landscapes represent a valuable cultural asset which we intend to preserve and valorize to contribute to keep high the quality of life of the residents.

A recent report of the National Trust for Historic Preservation has highlighted that requalification should be preferred to rebuilding, as the lower environmental impact and the benefits for employment
We have decided to work on the schoolbuilding as, besides being a traditional meeting point for local population, it was the operations headquarter during the 2009 flood emergency, thus becoming a symbol of the village identity.

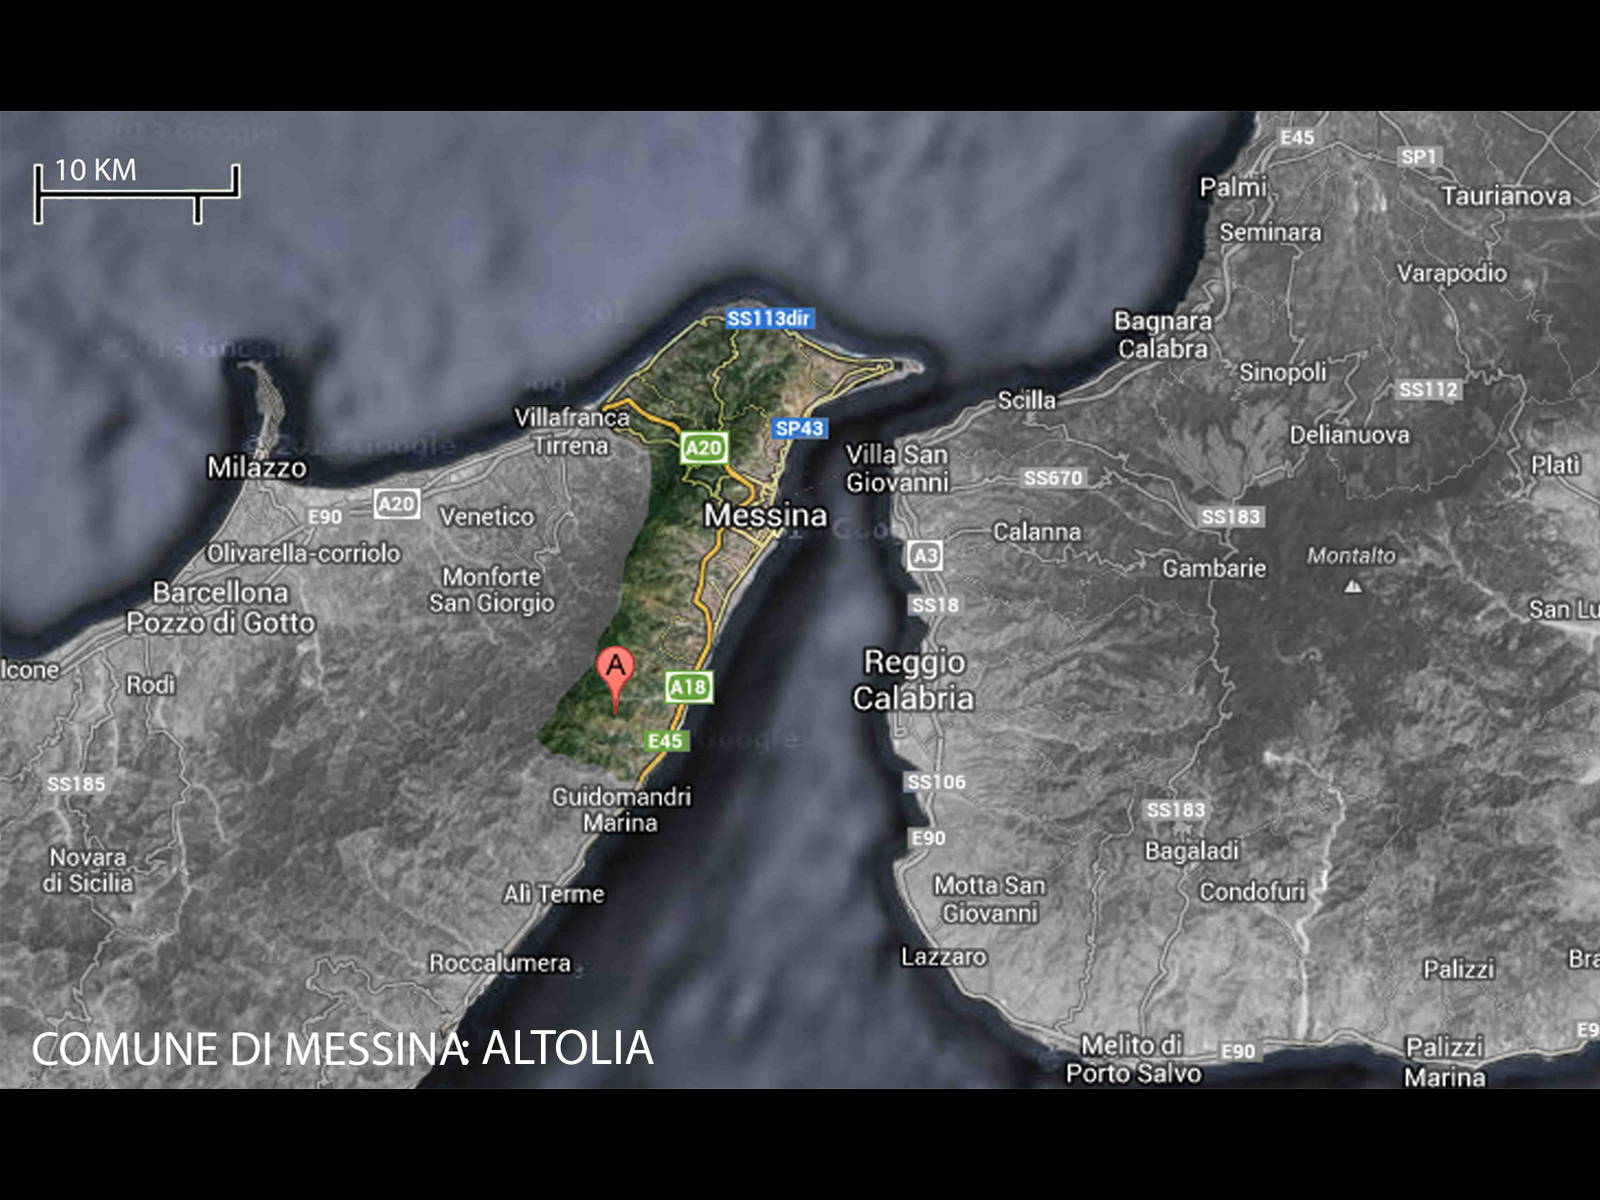
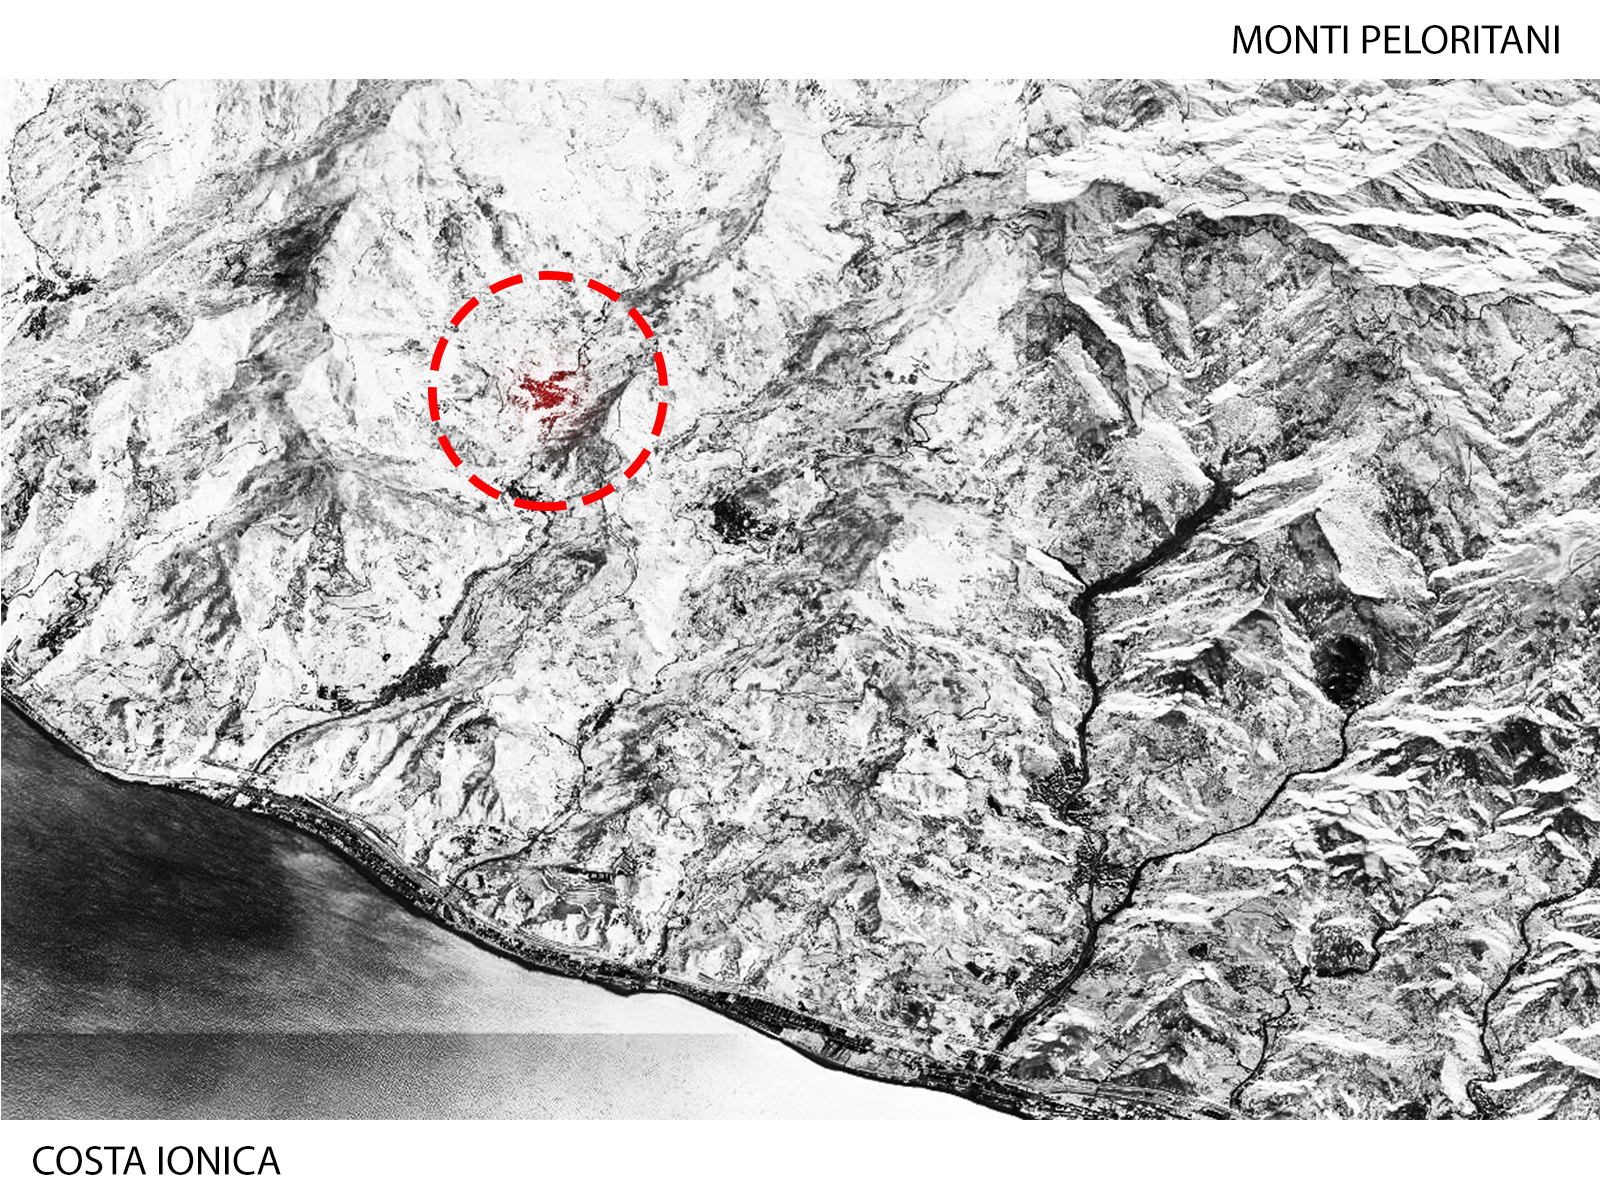
Altolia is a small village near Messina (Sicily) located among vineyards, citrus and olive tree grooves on the hills over the Giampilieri creek. The village name changed several times during the centuries (Actilia, Artilia, Artalia, Lartilia, Artolia, Altolia) which ancient meaning is “a place far away from the sea”.

The most aged portion of the village is located on the north side of the hill, which is the best from an hydrogeological and climatic standpoint. The modern side, which also includes a small settlement on the N.W. hillside, has grown along the main road to Messina.
In the 70s an housing project was build downline of the main road, near to the creek. Those buildings have been almost completely destroyed by the 2009 flood. The schoolhouse instead, even if built in the 50s in the same area, suffered just minor damages.

The schoolhouse is a two-floor building with a bricks bearing walls structure. It is located on the southern hillside (classrooms on S.E. hillside) thus absence of an efficient thermal insulation requires a large amount of energy for climatization. The large courtyard cannot be comfortably used by people as the absence of kind of shading.


The buildings are currently not only the part that produces more CO2, it is also the sector where the emissions reduction potential is greater.

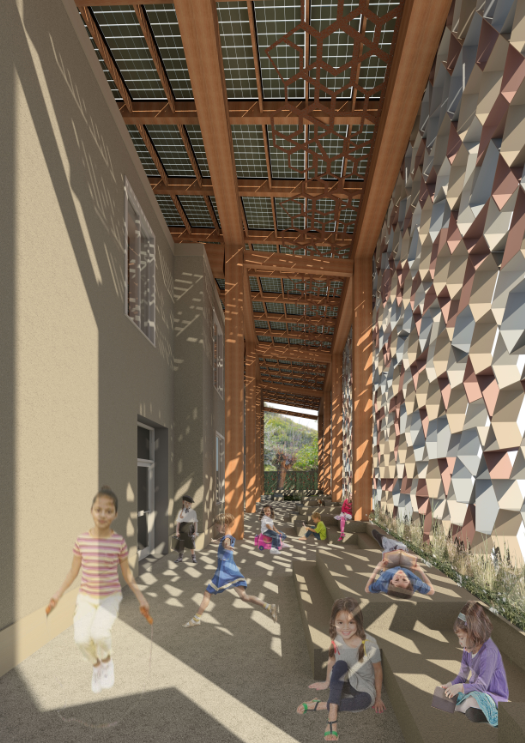
We adopted several solutions, early introduced along the past centuries, to make the building comfortable in the mediterranean climate, where cooling is the most important and energy-consuming goal. The strategies are: protecting the interiors from sun radiation adopting very thick walls, integrate internal spaces with external shaded spaces, as obtaining an appropriate external microclimate is an important step towards the hygrotermal wellness.
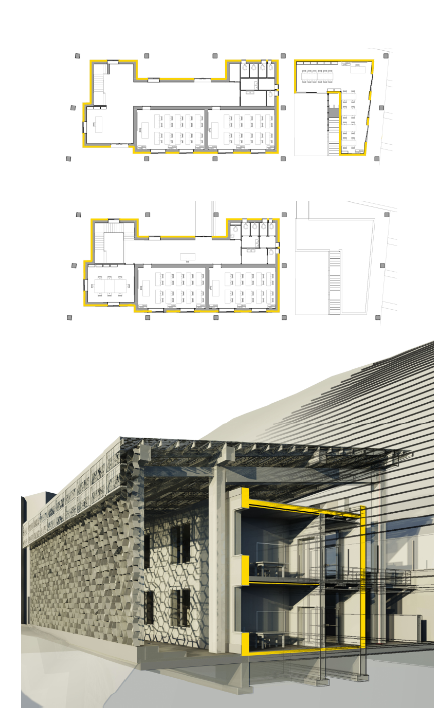
We decided that the best approach to an existing building was the adoption of an external shell, preserving the building statics from any impact.
The design process adopted is composed by an innovative network of multi-discipline platforms based on advanced digital technologies. That approach could lead to the risk of developing several independent and inconsistent models. Thus the first step was the creation of a core parametric model to share information obtained by analysis (energetic, structural, etc.)
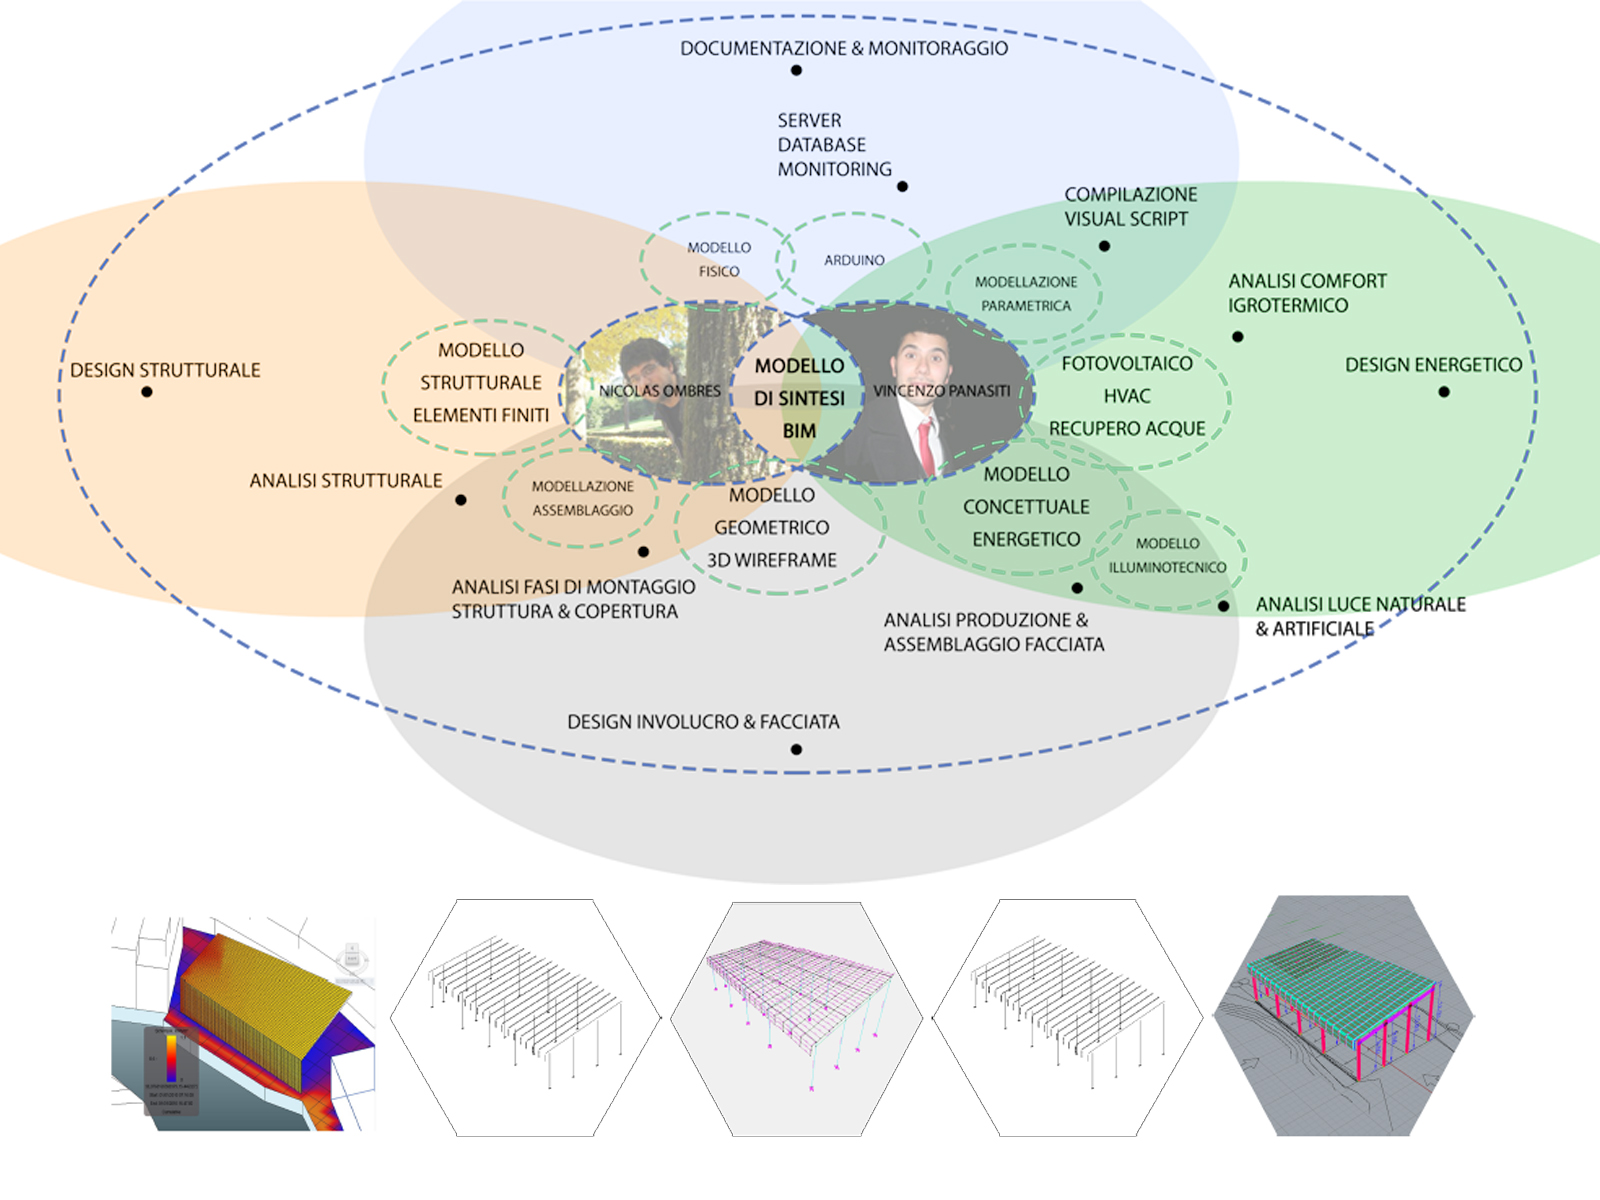
To develop the core model we decided to use Revit, a software for BIM (Building Information Modelling) produced by Autodesk. The decision was driven both by the large diffusion of the software, and from a positive usage experience during the Solar Decathlon Europe 2012 competition.
The adoption, from the beginning of the design stage, of a parametric model allowed us to a strong teamwork, work in parallel on the structural and energy efficiency aspects.

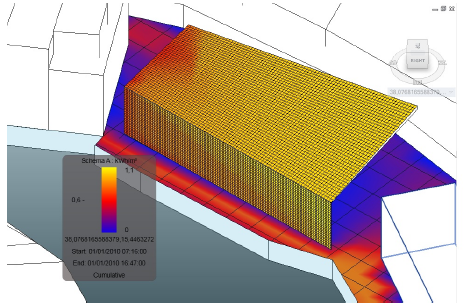
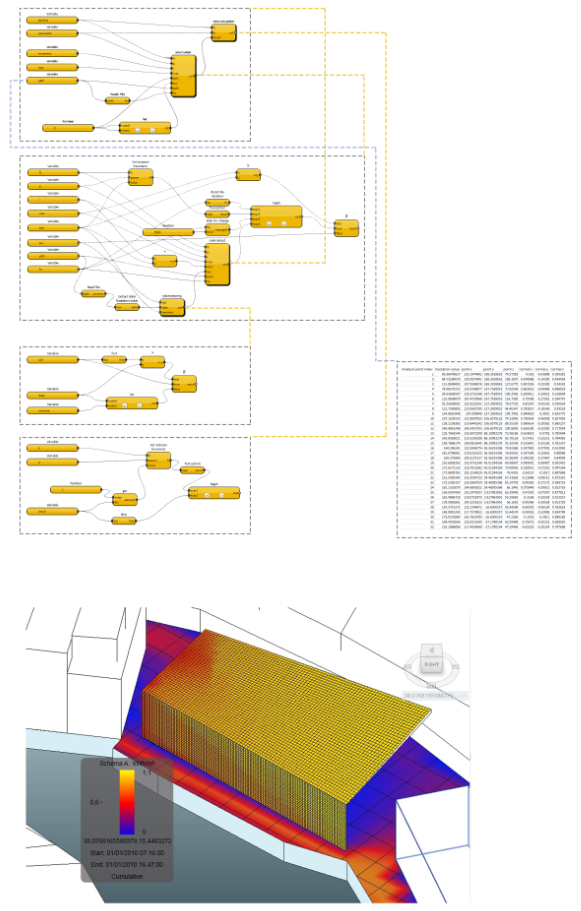
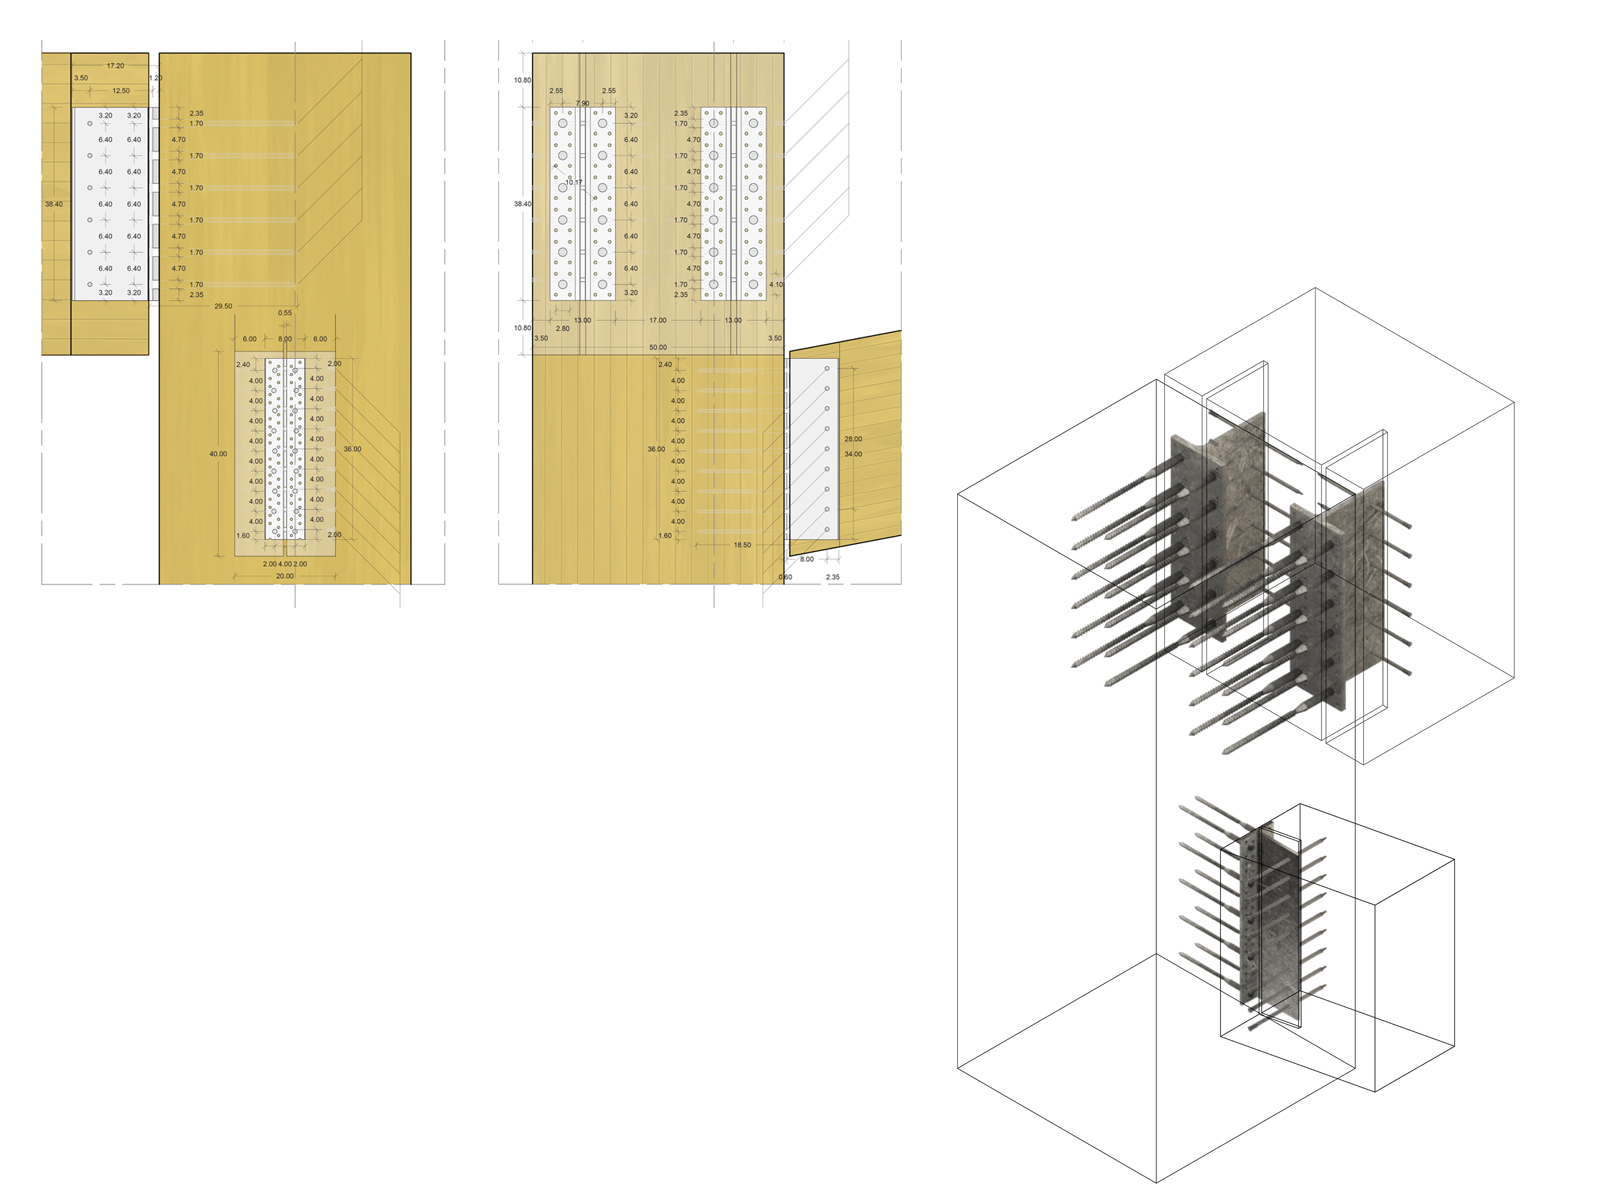
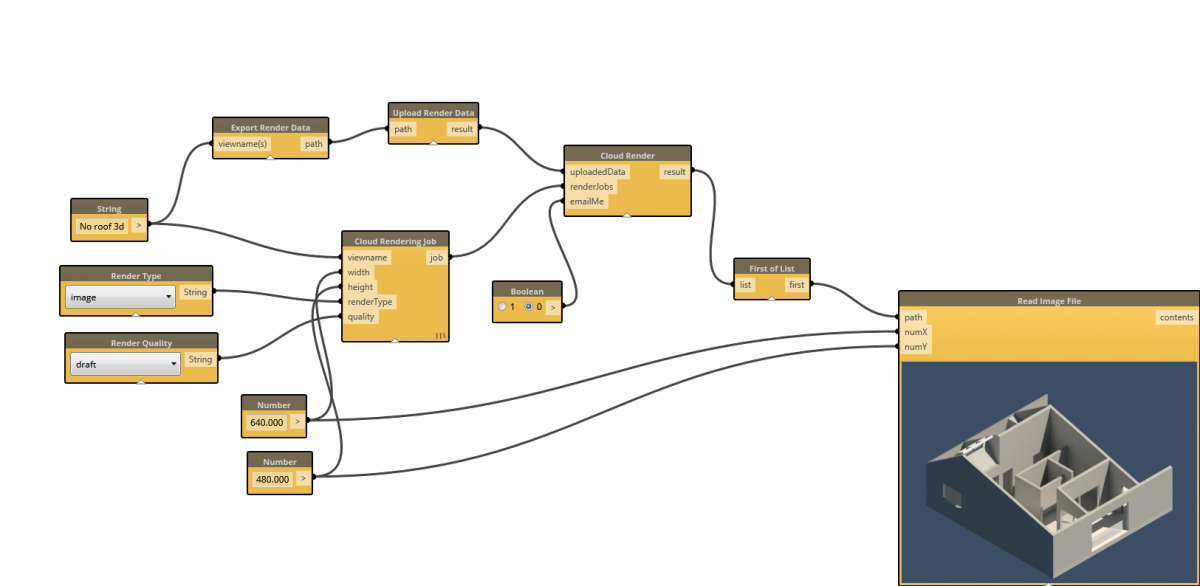
Using a geometric 3D wireframe we have implemented the data interchange process between the graphic modelling software (triangular meshes model) and the FEM software.
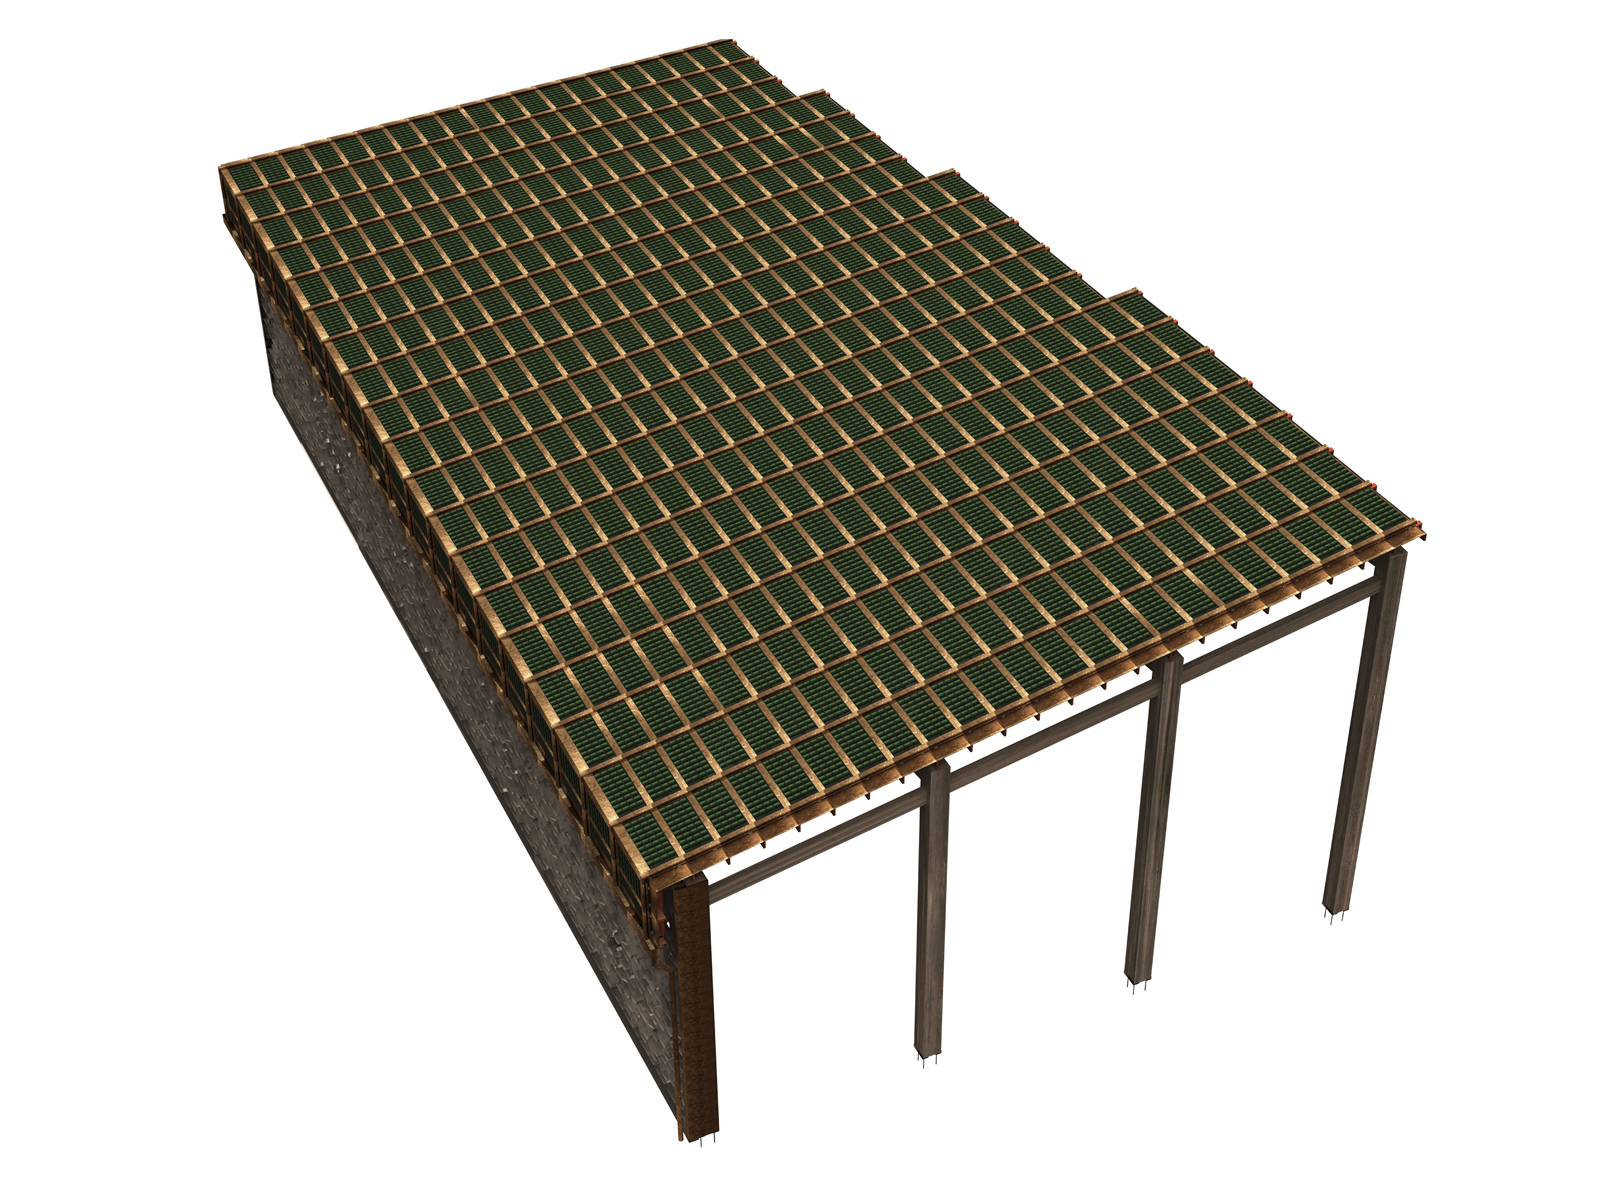
The roof has been modeled using Vasari, esporting data to the FEM model using a visual scripting tool. In that way we have been able to optimize the roof surface energetical performances.
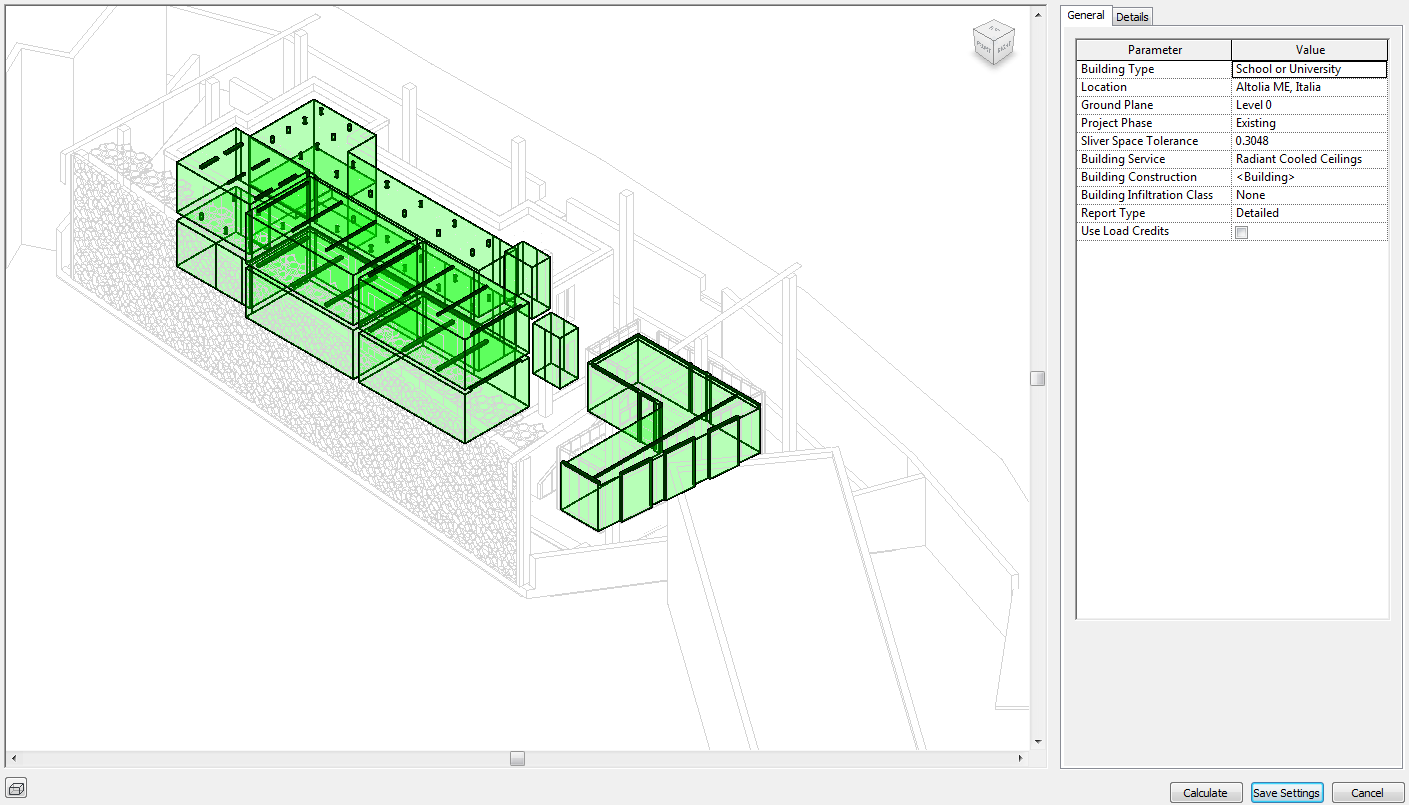
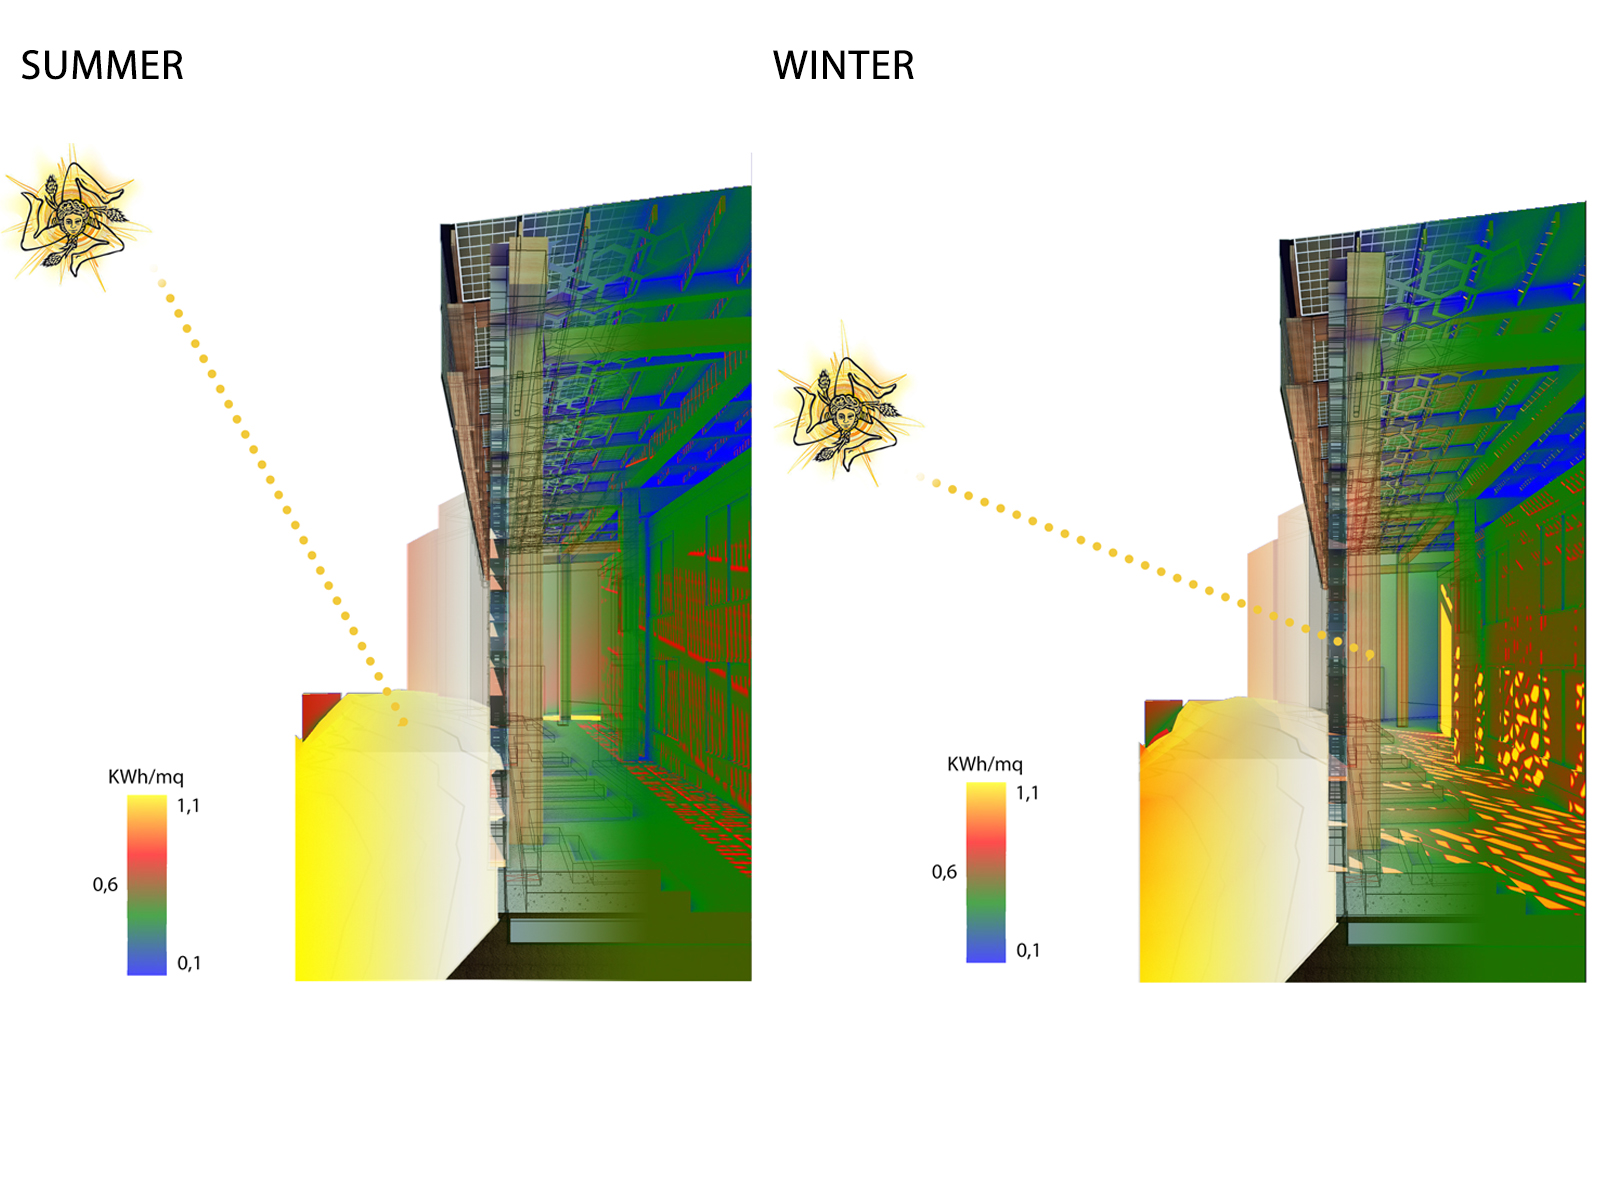
At the beginning of the design process we have studied the climatical conditions.
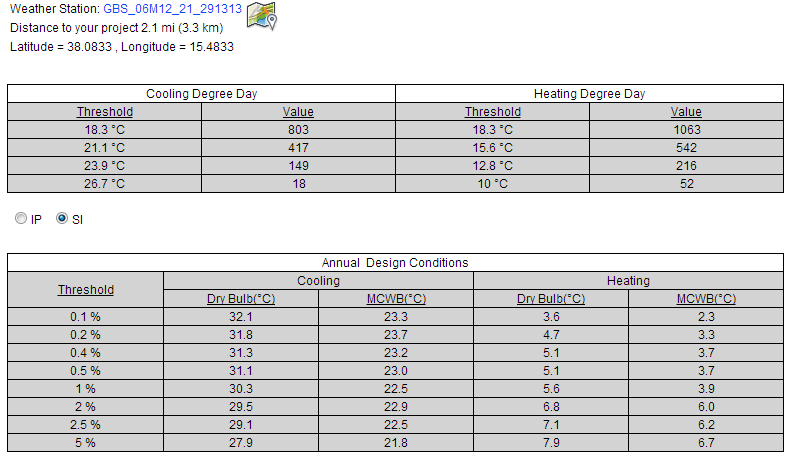

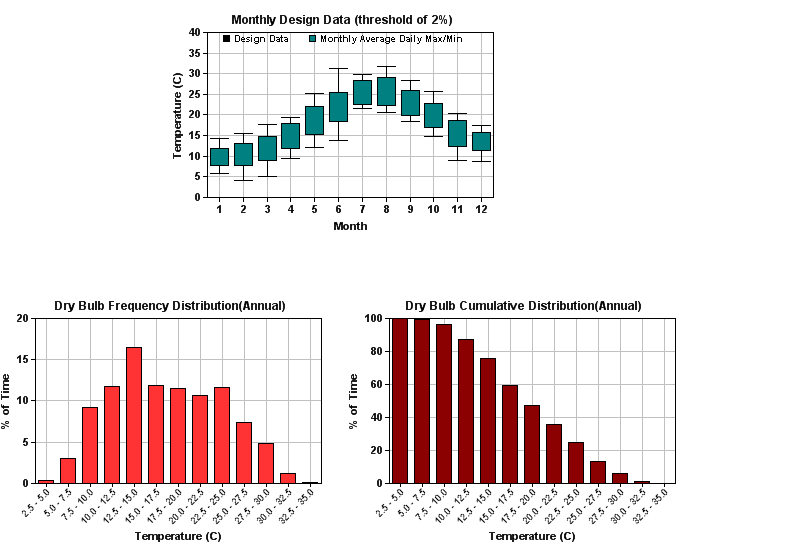
Our goals were to reduce the thermal loads on the building, improve ventilation assuring to have an acceptable thermal behaviour in the winter as well. The process was iterative, starting from assuptions based on qualitative behavioural patterns to be verified by software analysis and eventually revised.
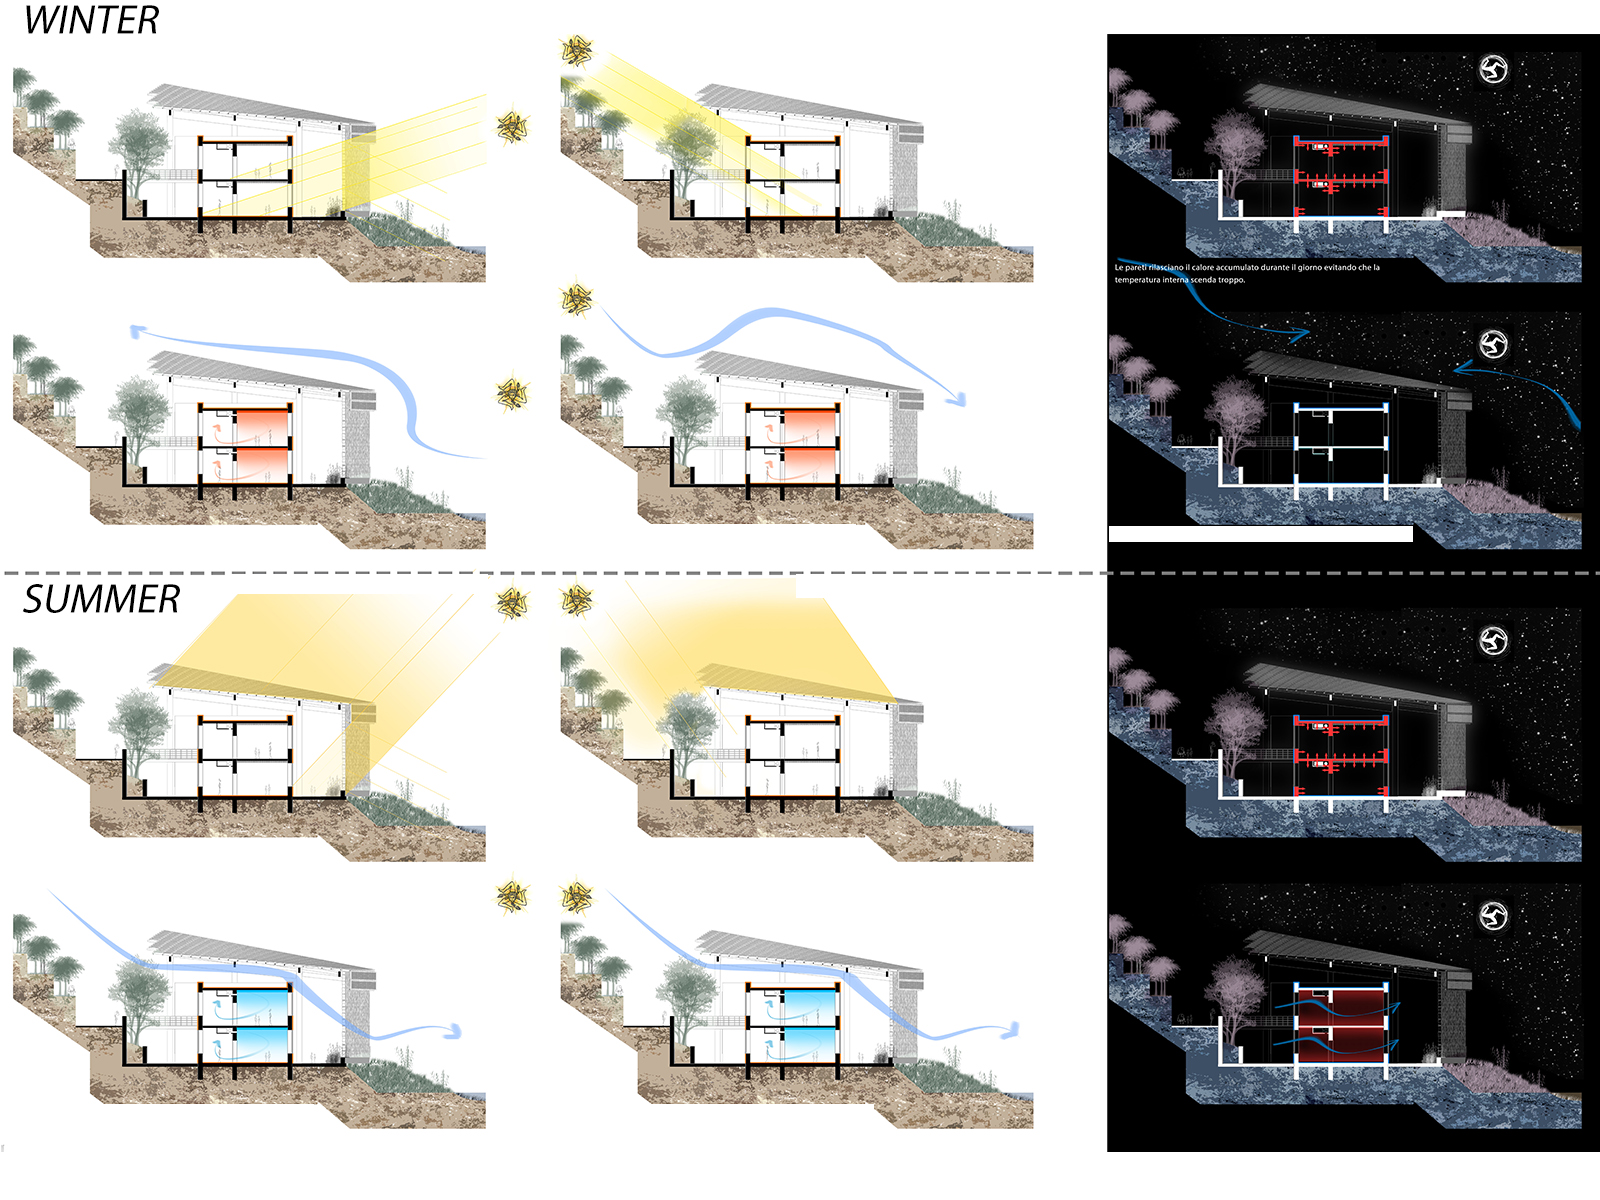
Specific attention has been devoted to thermal insulation, taking advantage of the thermal inertia of existing walls.

We designed the enclosure using a fluid dynamics software (Autodesk CFD Simulation) with the goal to take advantage of natural ventilation

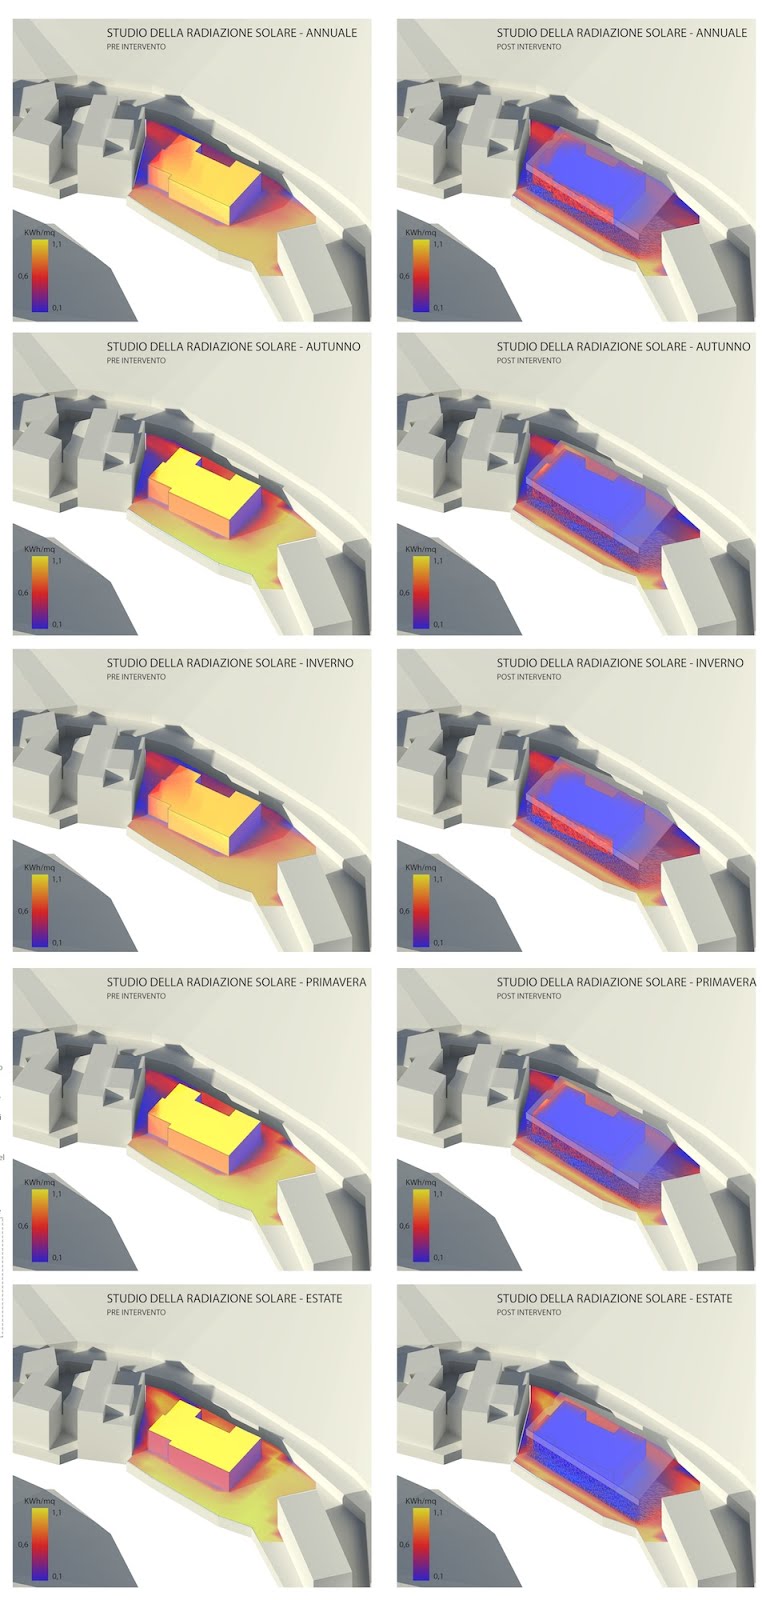
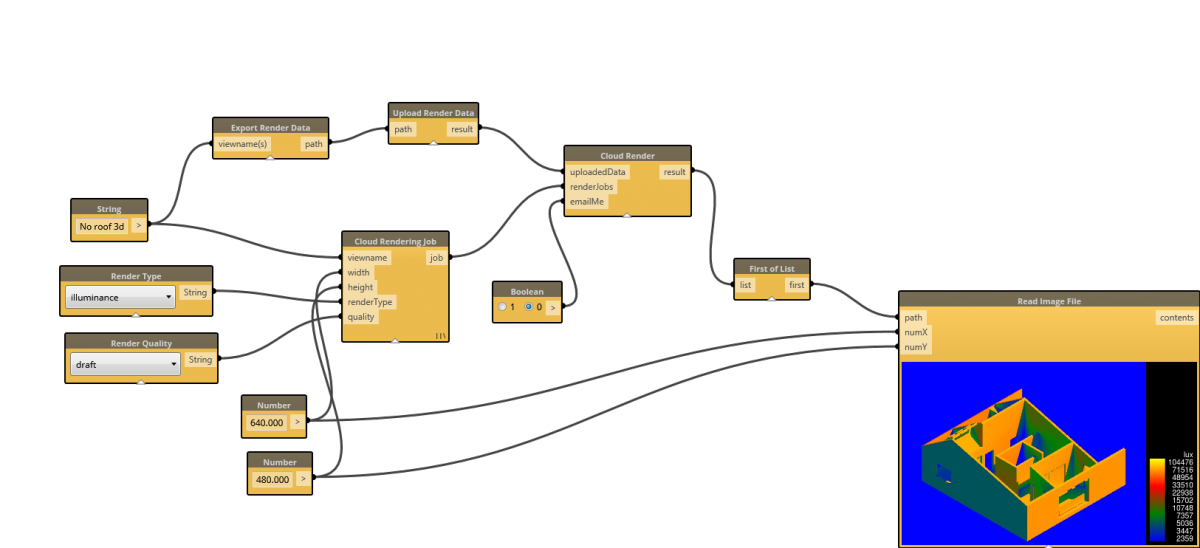
As far as the sun radiation is concerned the goal was to protect the building with a shield to absorb as much sun radiation as possible, We used the Vasari plugin: Dynamo, (a software that combines the calculation of incident solar radiation and the ability to manage and vary geometries parametrically), to implement an iterative algorithm driven by geometry paramethers to optimize the orientation of the facade and the roof, as well as the performance of the photovoltaic panels.

The climatization system has been designed and optimized using CFD Simulation, having the goal to avoid sudden temperature changes or excessive air flow.


Quality of lighting was one of the central themes of the design, which has been developed taking in account perception considerations (Juhani Pallasmaa, “Through vision we touch …”)

We adopted for each building zone the most appropriate artificial light, replacing existing lamps with dimmerable LED lamps. Infact the work of M.R. Bradley “Advanced Sensors and Controls for Building Applications: Market Assessment and Potential R&D” shows that adoption of dimmering, besides reducing children visual stress, can lead to 58% of cost reduction inside a schoolbuilding classroom,.


The design of shading elements has been driven by an accurate sun radiation analysis. The facade shades the direct sun radiation and diffuse it towards the building. Adopting the software Revit to perform the simulations, we have mixed diffused radiation with artificial lighting (using dimmering) to create the optimal equilibrium for the different daytimes.
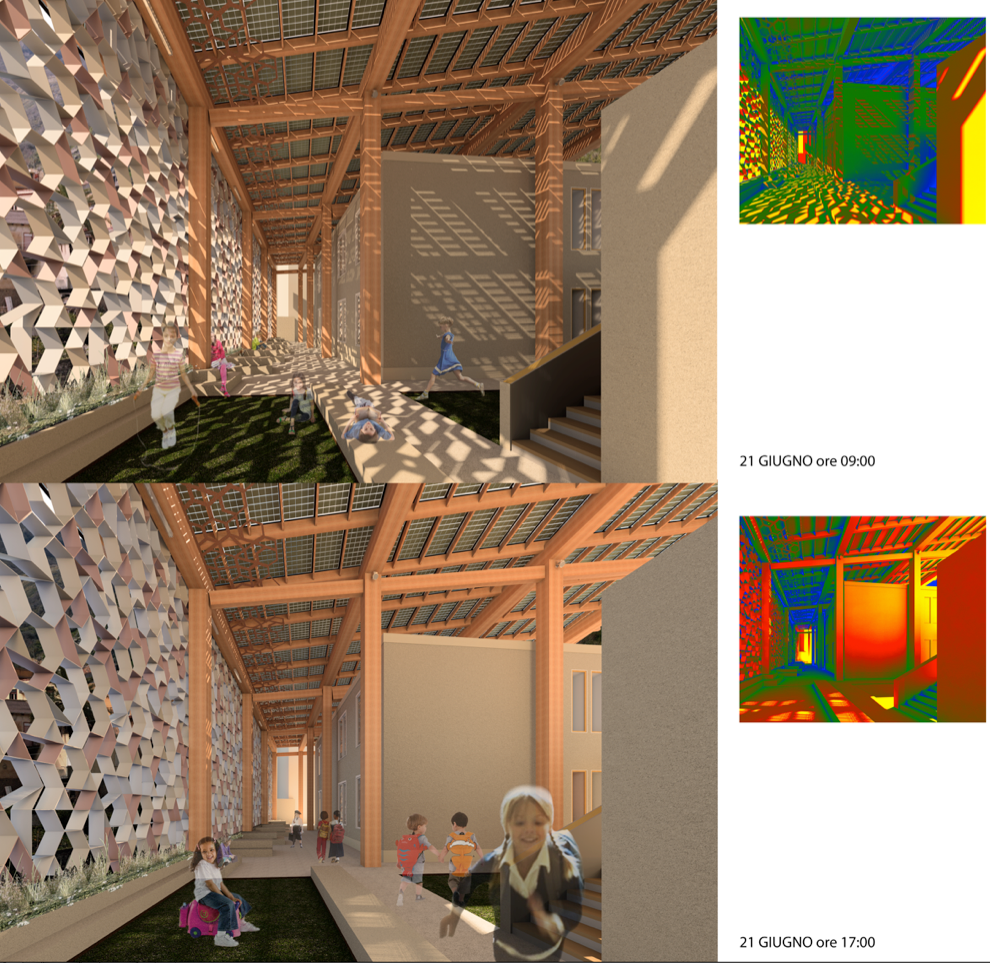

To perform these analyzes we have made full use of the Revit model, which as we have already said, it combines the features of architectural lighting to the model. From this analysis we were able to perform the mixed dimming artificial light according to our needs.

Or for emergency scenario.

We have chosen to use wood for the roof structure, as it is a natural material which behaves well in the high sismic risk environment of Altolia.
The facade is inspired to Buro Happold’s ‘dragonfly’. It is composed by cells of aluminium connected by rivets.

The facade has been verified, according to Italian law, the deformation and stress to shear, moment and axial tension through the importation of a wireframe from the shared model.

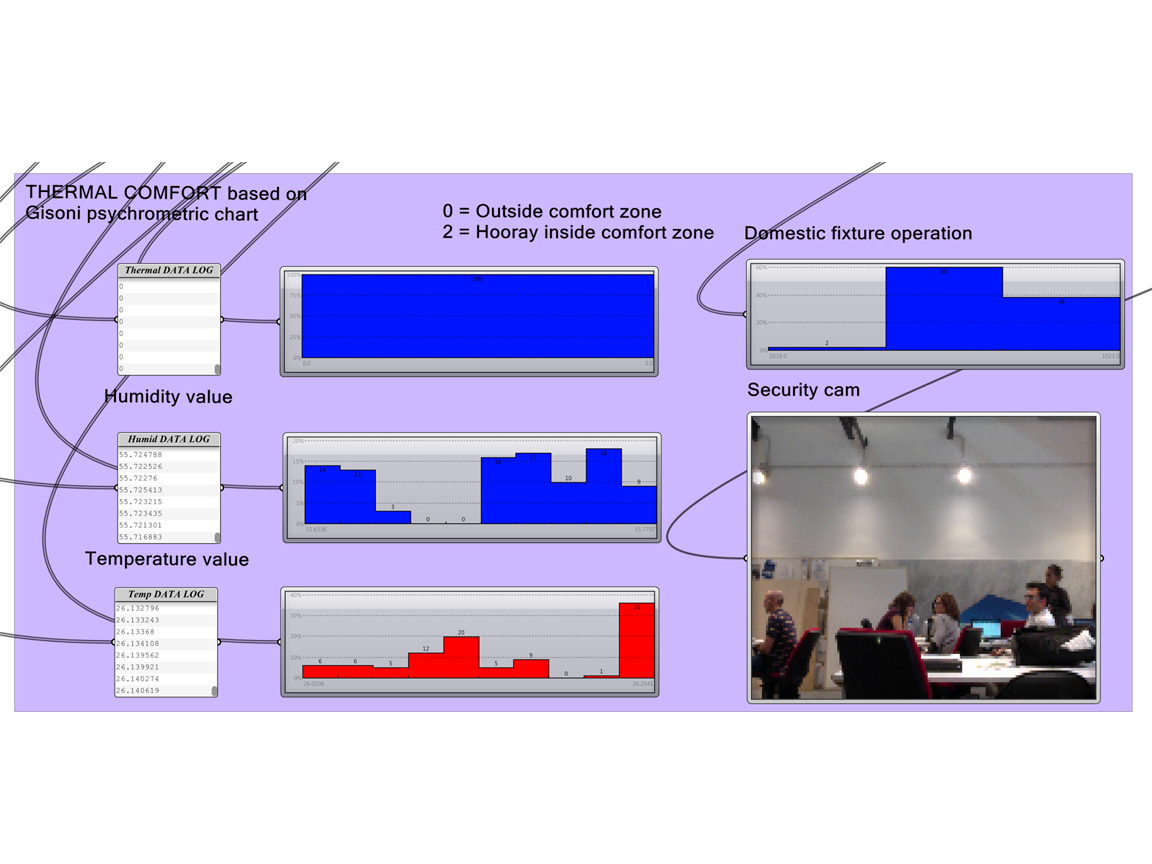
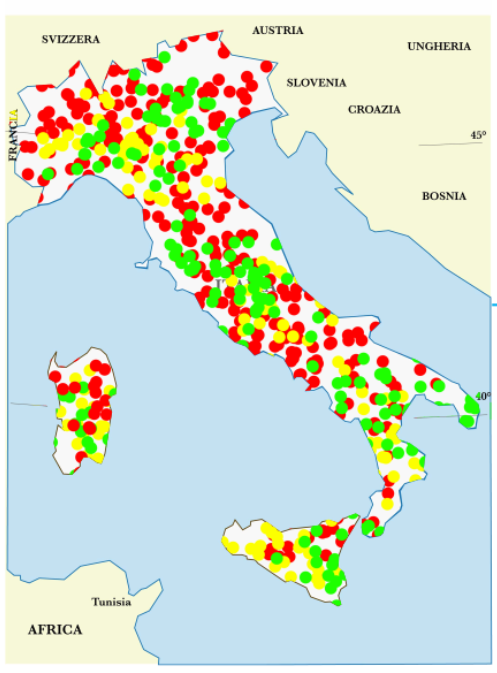
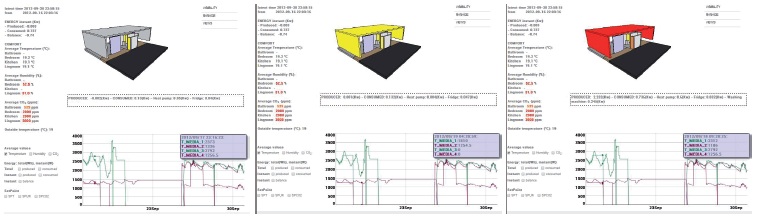
In order to get a feeling of the actual design choices we thought it was necessary a real-time monitoring of energy consumption of the building and bioclimatic conditions. Usman Haque Director dell'Haque + Research, has developed a platform for sharing data called Pachube (now Xively).


Pachube allows you to send data collected from sensors all over the world, after the earthquake in Japan in 2011 Pachube was used by volunteers to connect all of the Geiger counters to study the fallout of Fukoshima radiottiva. Based also on the design of the environment ministry "the sun to school" initiative for the dissemination of knowledge for the sustainable use of energy and use of renewable resources devoted to secondary school. Increased awareness of different sources of energy production and environmental consequences of their use by citizens, built since the time of the school, may in fact contribute to the achievement of commitments undertaken by the country to national and international level on emission reductions greenhouse gas emissions and other environmental challenges.

The building will be provided with an Energy Manager System based on the Arduino open source framework, The Energy Manager will collect real-time data from a network of temperature sensors, monitoring both energy used by the building and produced by the fotovoltaic system.

The Energy Manager data will be available online to the building energy usage.


In the future, sharing Energy Manager data and requalifications actions about multiple schoolhouses in a nationwide database could create an effective tool for Public Administration for monitoring and prioritise requalification initiatives, as well as a learning tool for designers.

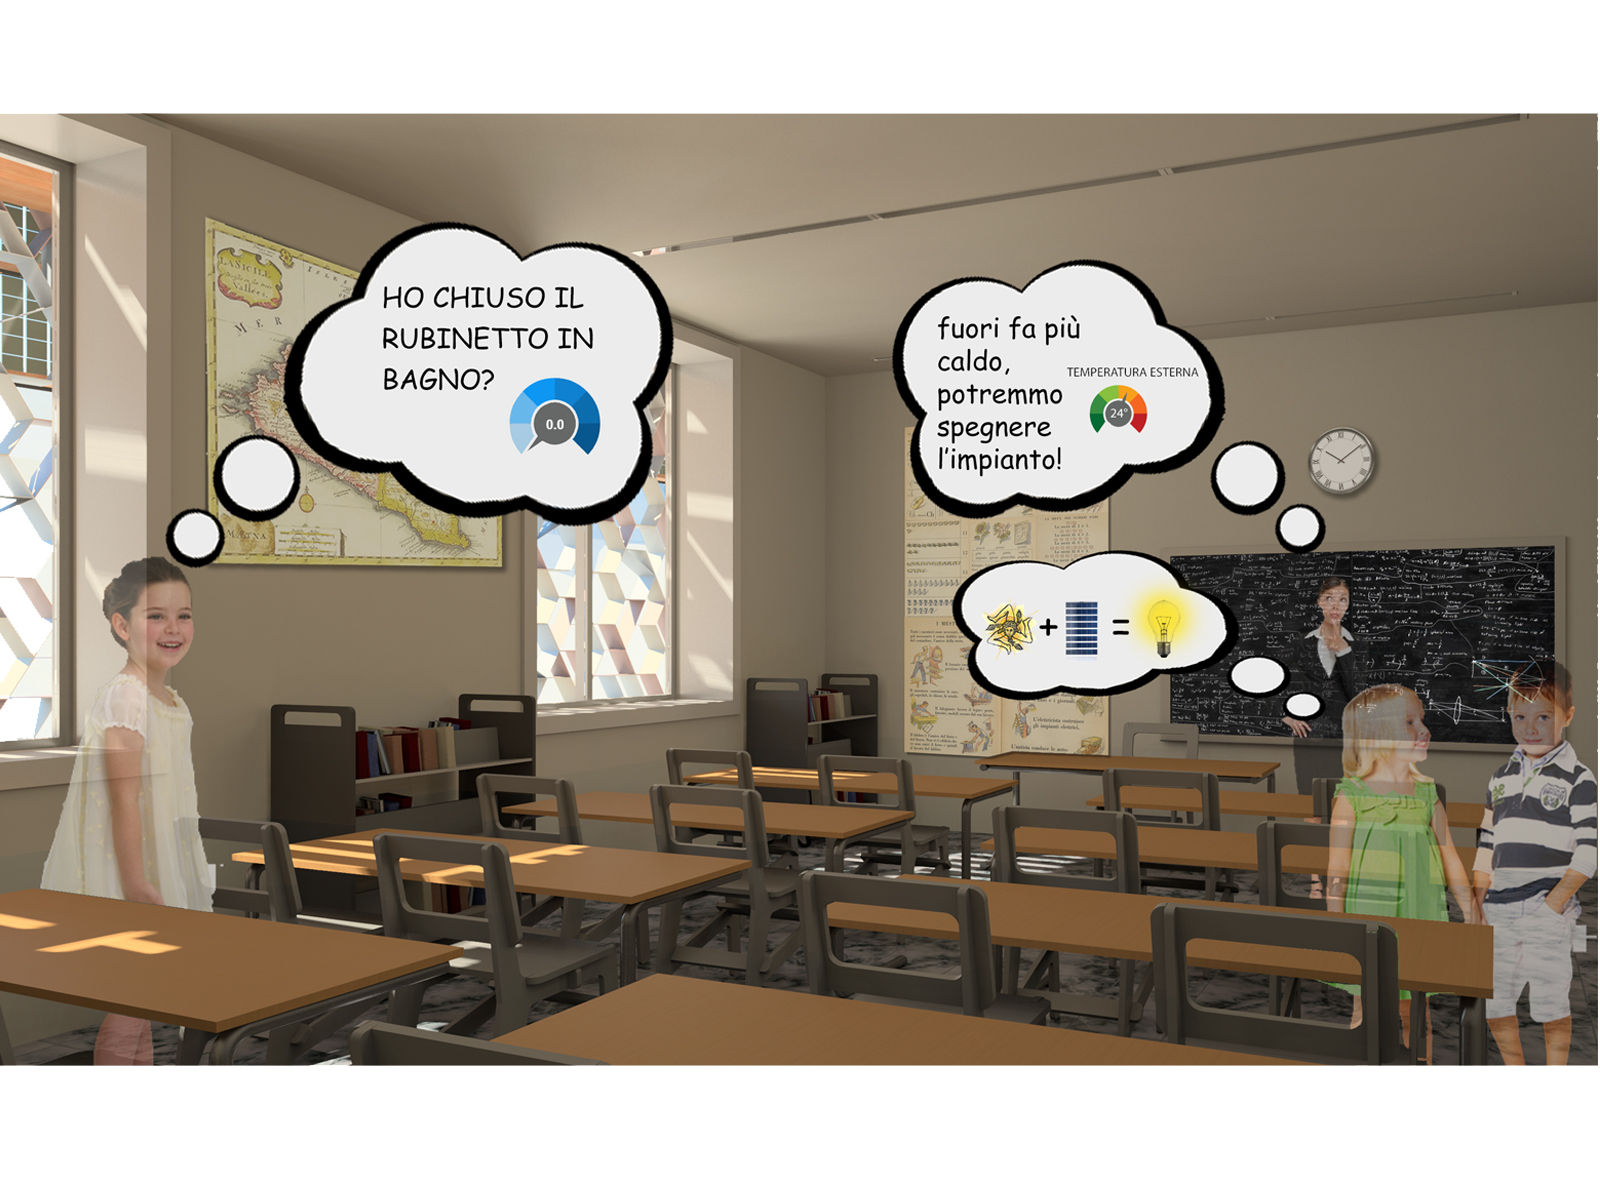
We have purposely decided to automatize only the monitoring leaving to human operators the choice about reactions. Infact automatization of reactions would be quite expensive. Moreover leaving to users freedom about the reaction to adopt in any specific case (open the windows, turn off some lights, …) would be educative for pupils.
We thank the architect Augusto Cesare, for help with the land records and plans of the school, the accountant Giuseppe Micali for logistics and local contacts, a forester in the province of Messina for the mapping and documentation air and finally but not least, the whole community of Altolia for the availability, advice and enthusiasm for this work.
Mar, 21/10/2014 - 19:17 Vincenzo Panasiti
Mer, 21/05/2014 - 19:15
Vincenzo Panasiti
Mer, 21/05/2014 - 19:15
 Vincenzo Panasiti
Sab, 21/09/2013 - 19:10
Vincenzo Panasiti
Sab, 21/09/2013 - 19:10


Life Digital Mirror
Introduction
Our experience part by the excellent results obtained at the Solar Decathlon Europe 2012 in Madrid Team MED in Ital. In this prototype was attributed considerable importance to monitoring and data storage. In order to get a feeling of the actual design choices we thought it was necessary a real-time monitoring of energy consumption of the building and bioclimatic conditions.
During the competition, team members could access via a web interface, a comprehensive database of dynamic 3D model and realize the trend of everything that happened inside the house, deciding, for example, when he should to turn appliances on the basis of the electrical output of the PV system.
Our philosophy
RhOMEfordenCity house will mostly rely on an efficient passive behaviour, and this would be useless, without people. That’s why we want to recall the know-how that our Grandmothers had. They knew very well, from instinct, but mostly from tradition, if and how to open curtains, let the air pass through, and so on.
There is no more need to exclude users, in order to introduce technology and intelligence in these systems. The new digital consciousness can marry, in our approach, the environmental awareness. The behaviour should always be available, and people should be able to share it, or parts of it, in a social platform. We imagine the house as a node of a network of homes, all connected between them. Social involvement today is crucial in technology, and energy saving systems have to become part of this scenario.
We have purposely decided to automatize only the monitoring leaving to human operators the choice about reactions. Infact automatization of reactions would be quite expensive. Moreover leaving to users freedom about the reaction to adopt in any specific case (open the windows, turn off some lights, …) would be educative for pupils.
It will be a great opportunity for students at the end of their academic careers with a lot of formative and educational purposes. They will be able to prove their knowledge and to put into practice many learnt subjects with the advantage of having detailed data about what they’re studying and the flexibility of such a powerful board.
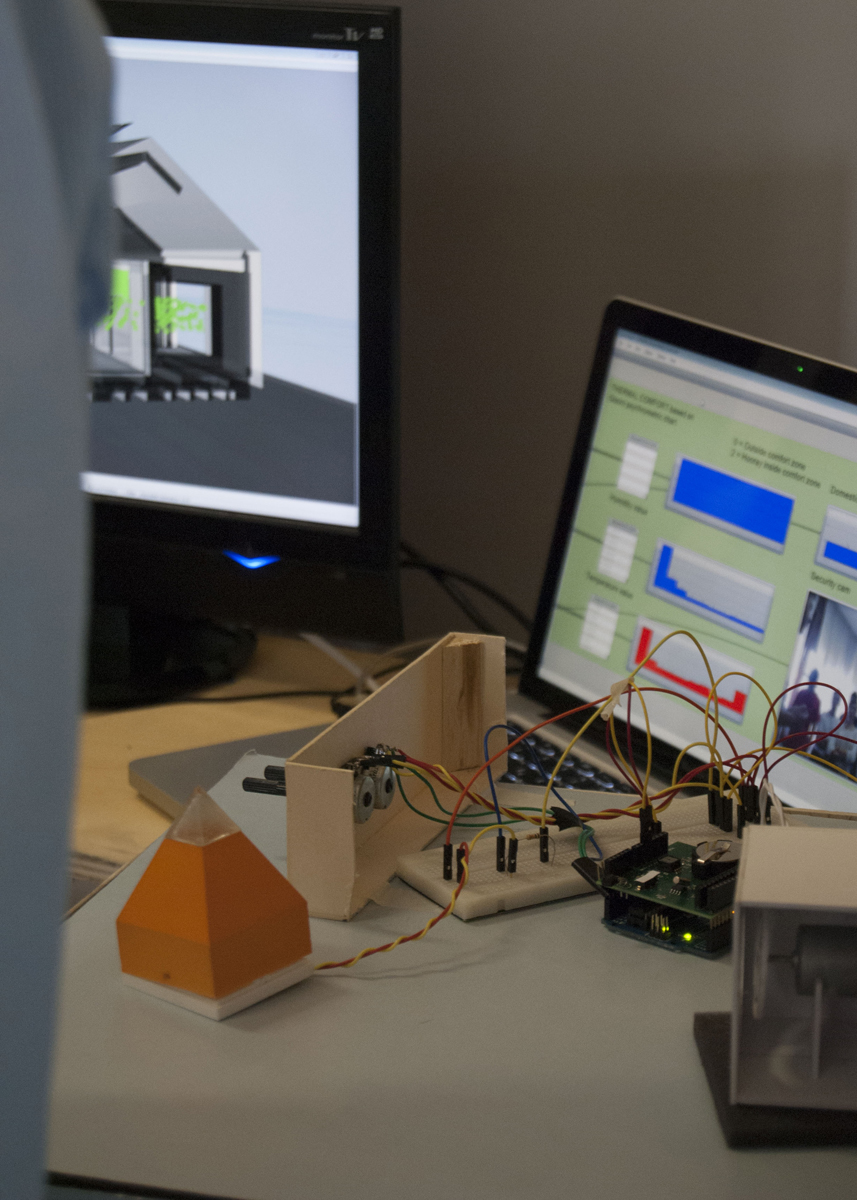
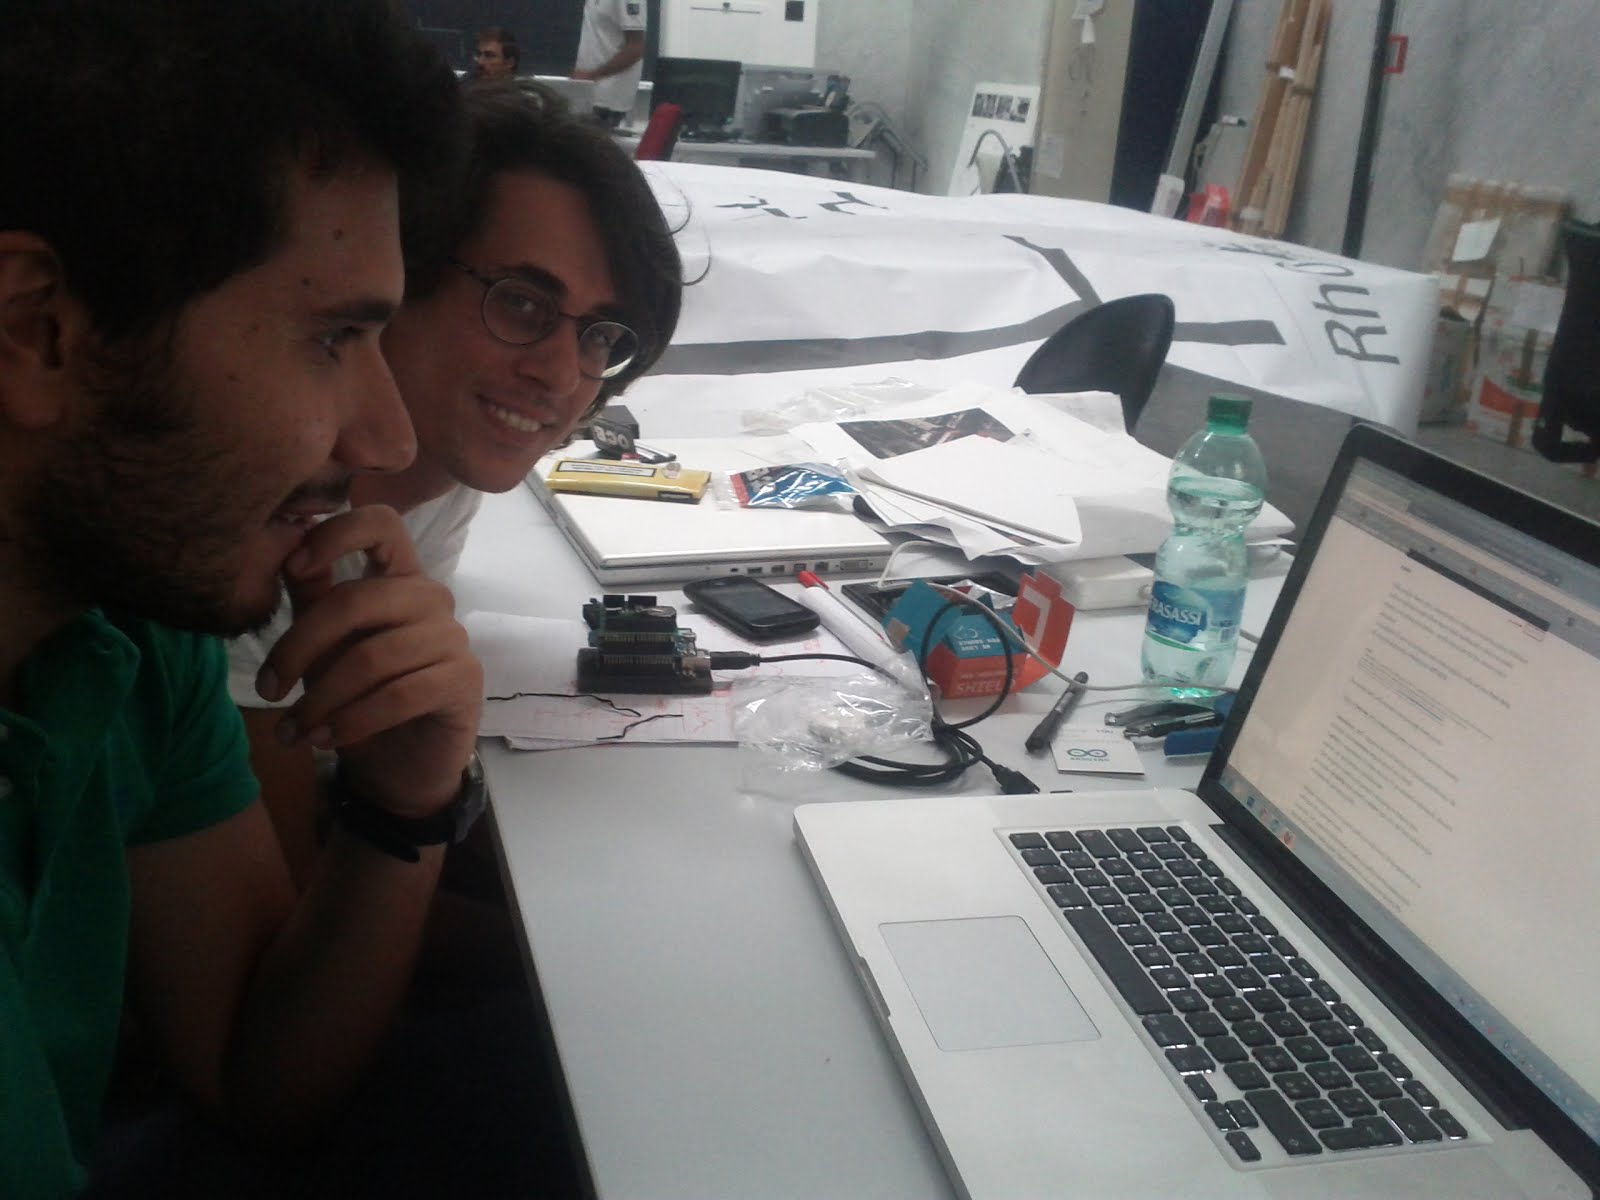
First steps

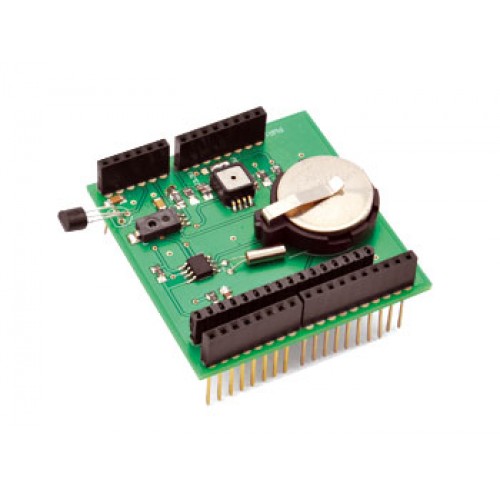
Arduino Uno WiFi Shield Meteo Shield
-
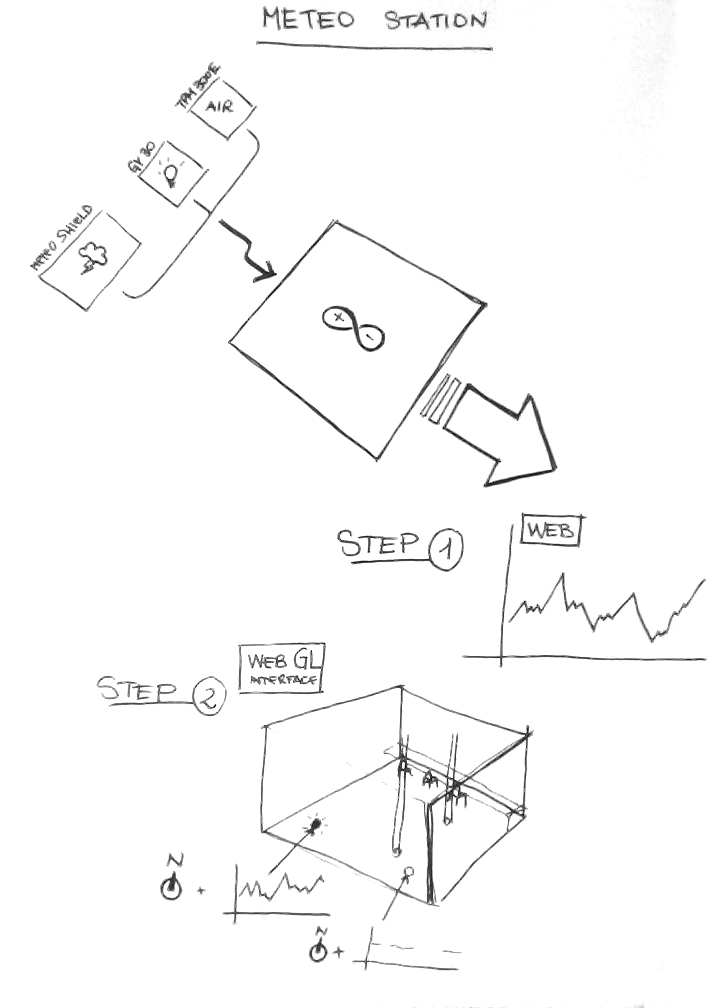
METEO SHIELD: - building
- scripting: send data to PC
-
WIFI SHIELD: - building
- scripting: send data from meteo shield to web API/XML
-
LIGHT SENSOR: - building on auxiliary Arduino board
(gy30) - scripting: send data to pc
-
JOIN SENSORS: - link gy30 to meteo shield
- scripting: send data to pc
-
AIR QUALITY: - building on auxiliary Arduino board
SENSOR - scripting: send data to pc
(tpm300e)
-
JOIN MORE: - link tpm300e to meteo shield
SENSORS - scripting: send data to pc
-
SHARE DATA: - set up Emoncms Dashboard
- scripting: send data to web API/XML
-
WEBGL : - build a BIM model of our work room
INTERFACE - export BIM model to WEBGL interface
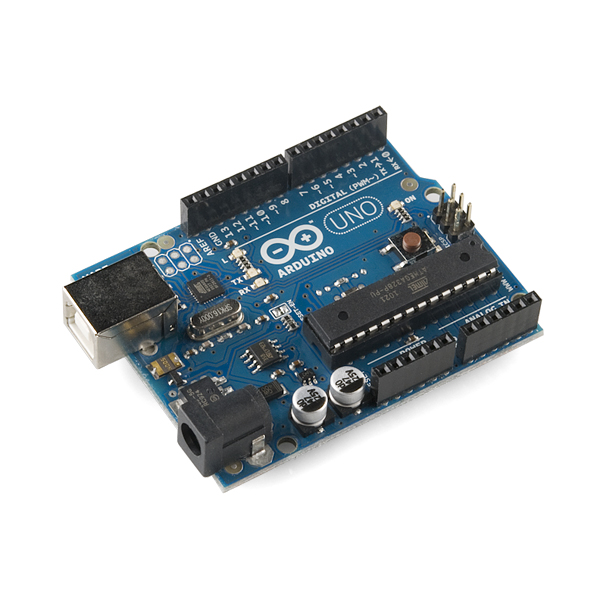
Arduino and Firefly
Arduino is an open source framework that enables rapid prototyping and learning fast of the basic principles of electronics and programming. It consists of a hardware platform for physical computing developed at the Interaction Design Institute, a postdoctoral training based Ivrea, founded by Olivetti and Telecom Italy. The tab name is derived from that of a bar Ivrea (which in turn invokes the name of Arduino d'Ivrea, King of Italy in 1002) attended by some of the founders of the project. The Arduino team is composed of Massimo Banzi, David Cuartielles, Tom Igoe, Gianluca Martino, and David Mellis. The project began: in Ivrea in Italy 2005 with the aim to make available, interaction design projects created by students, a control device that was cheaper than prototyping systems then available.
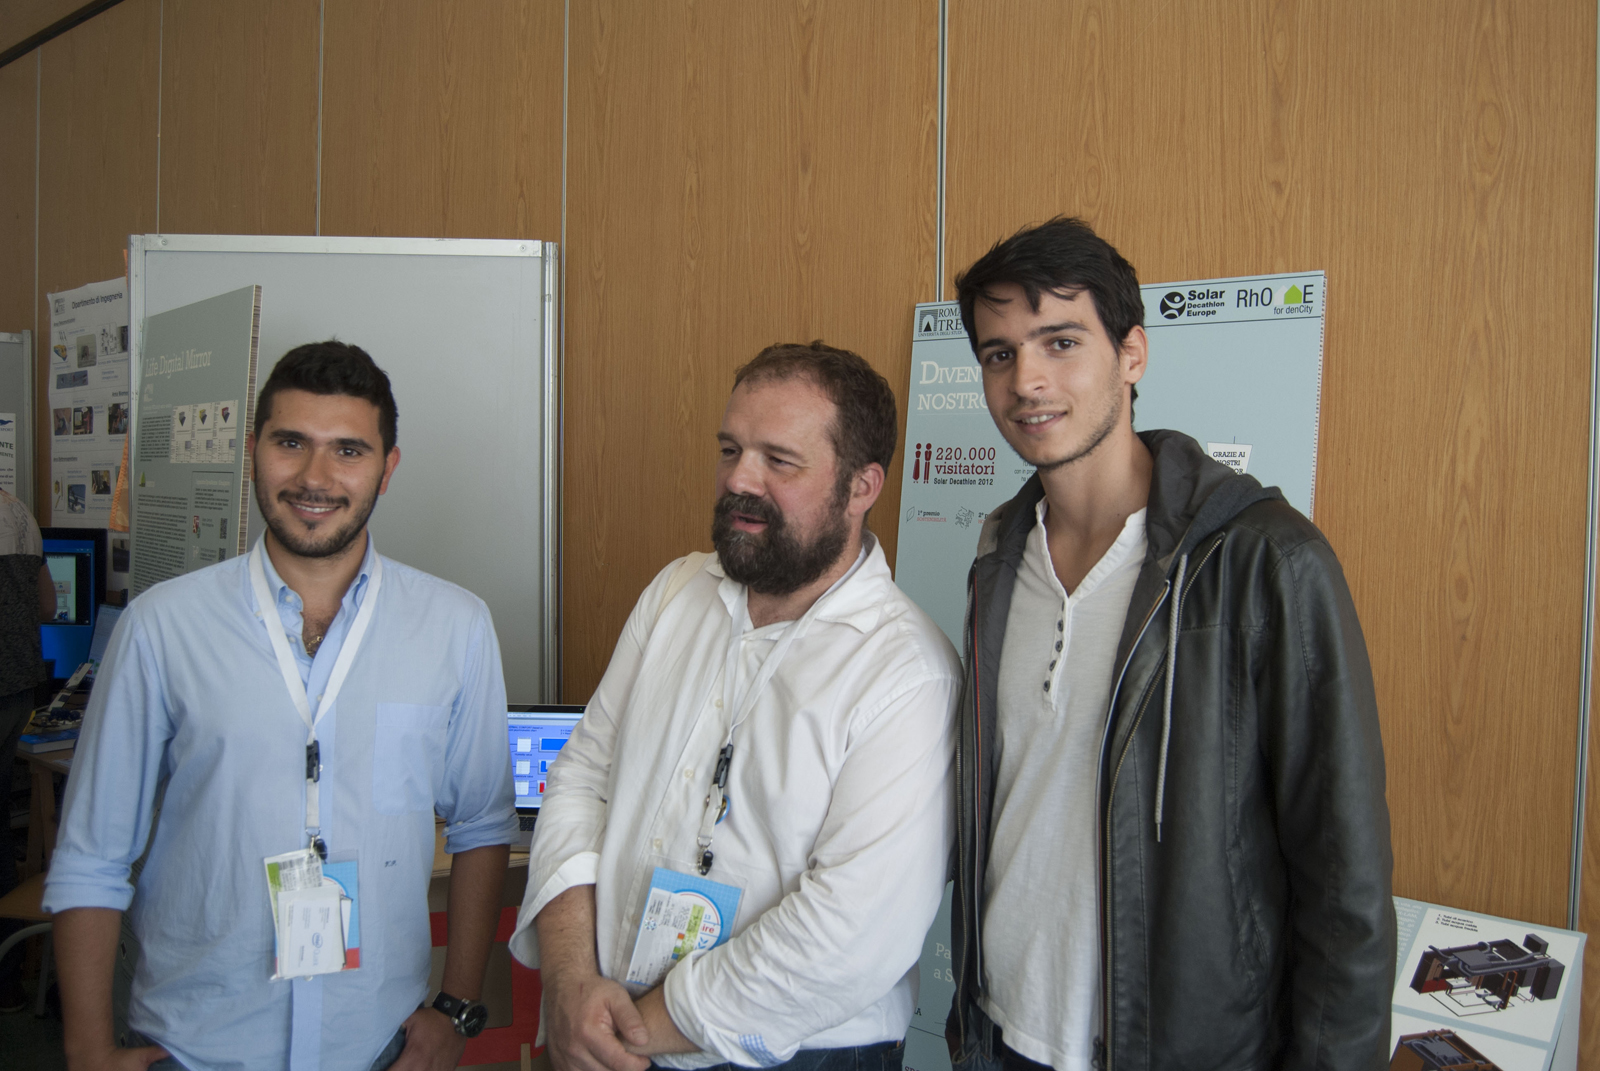
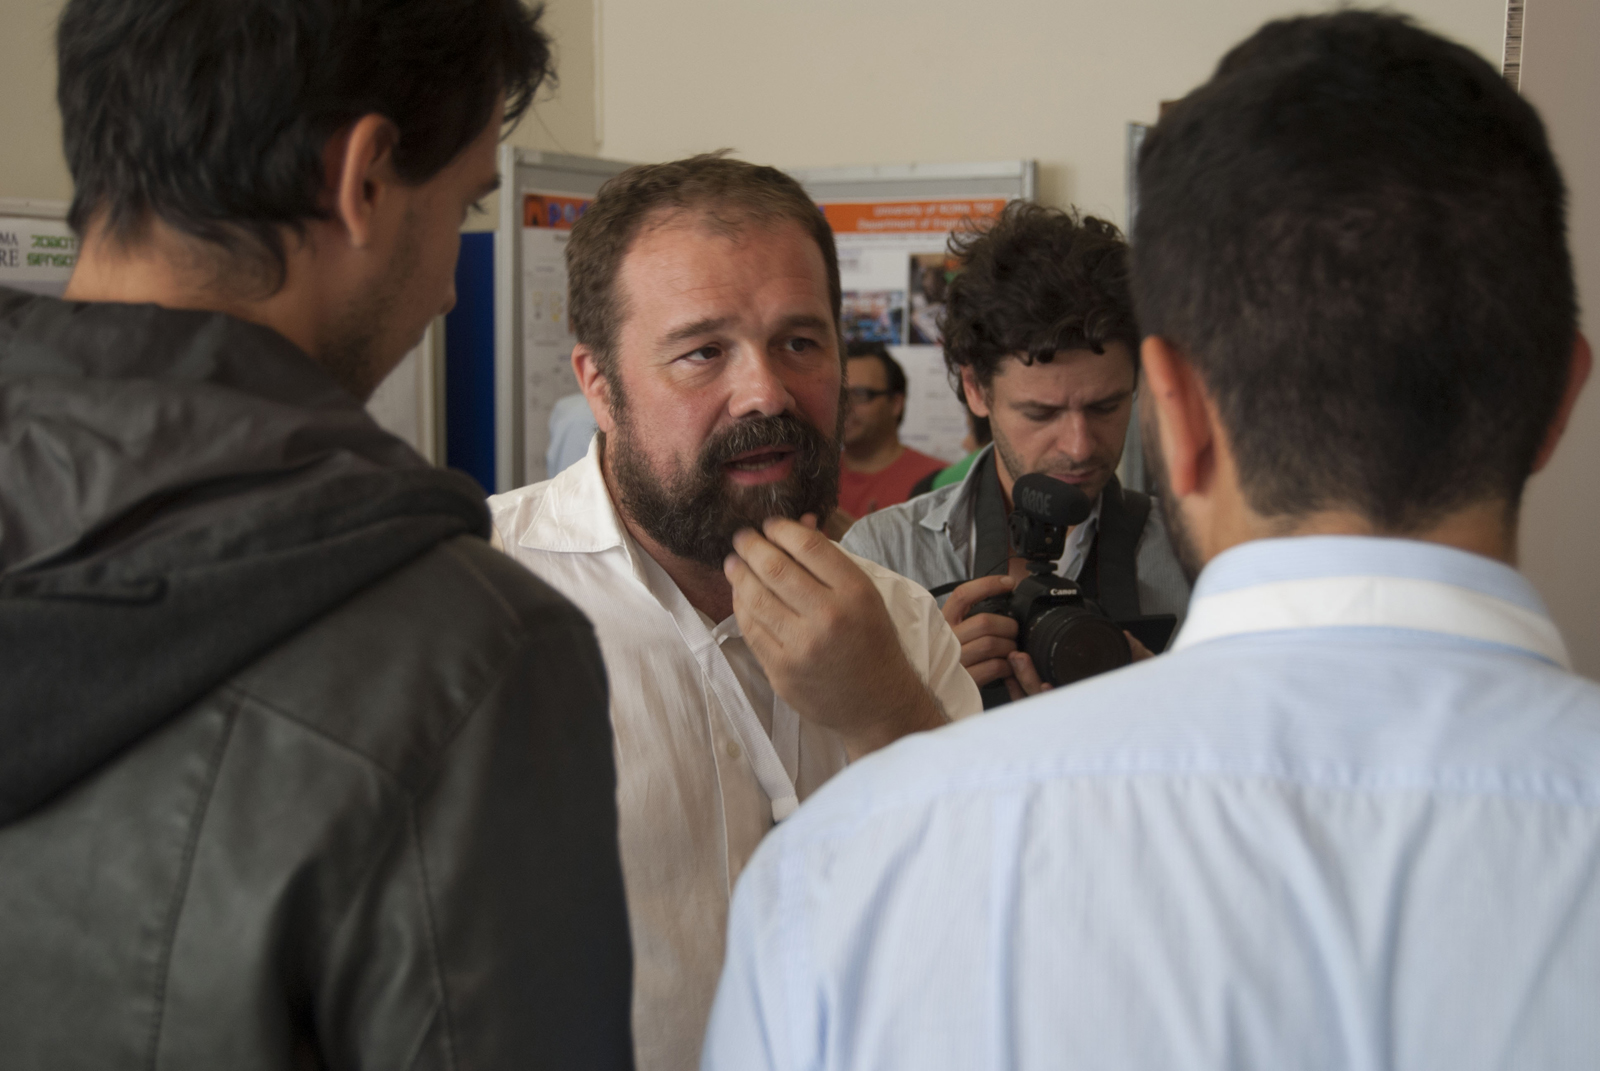
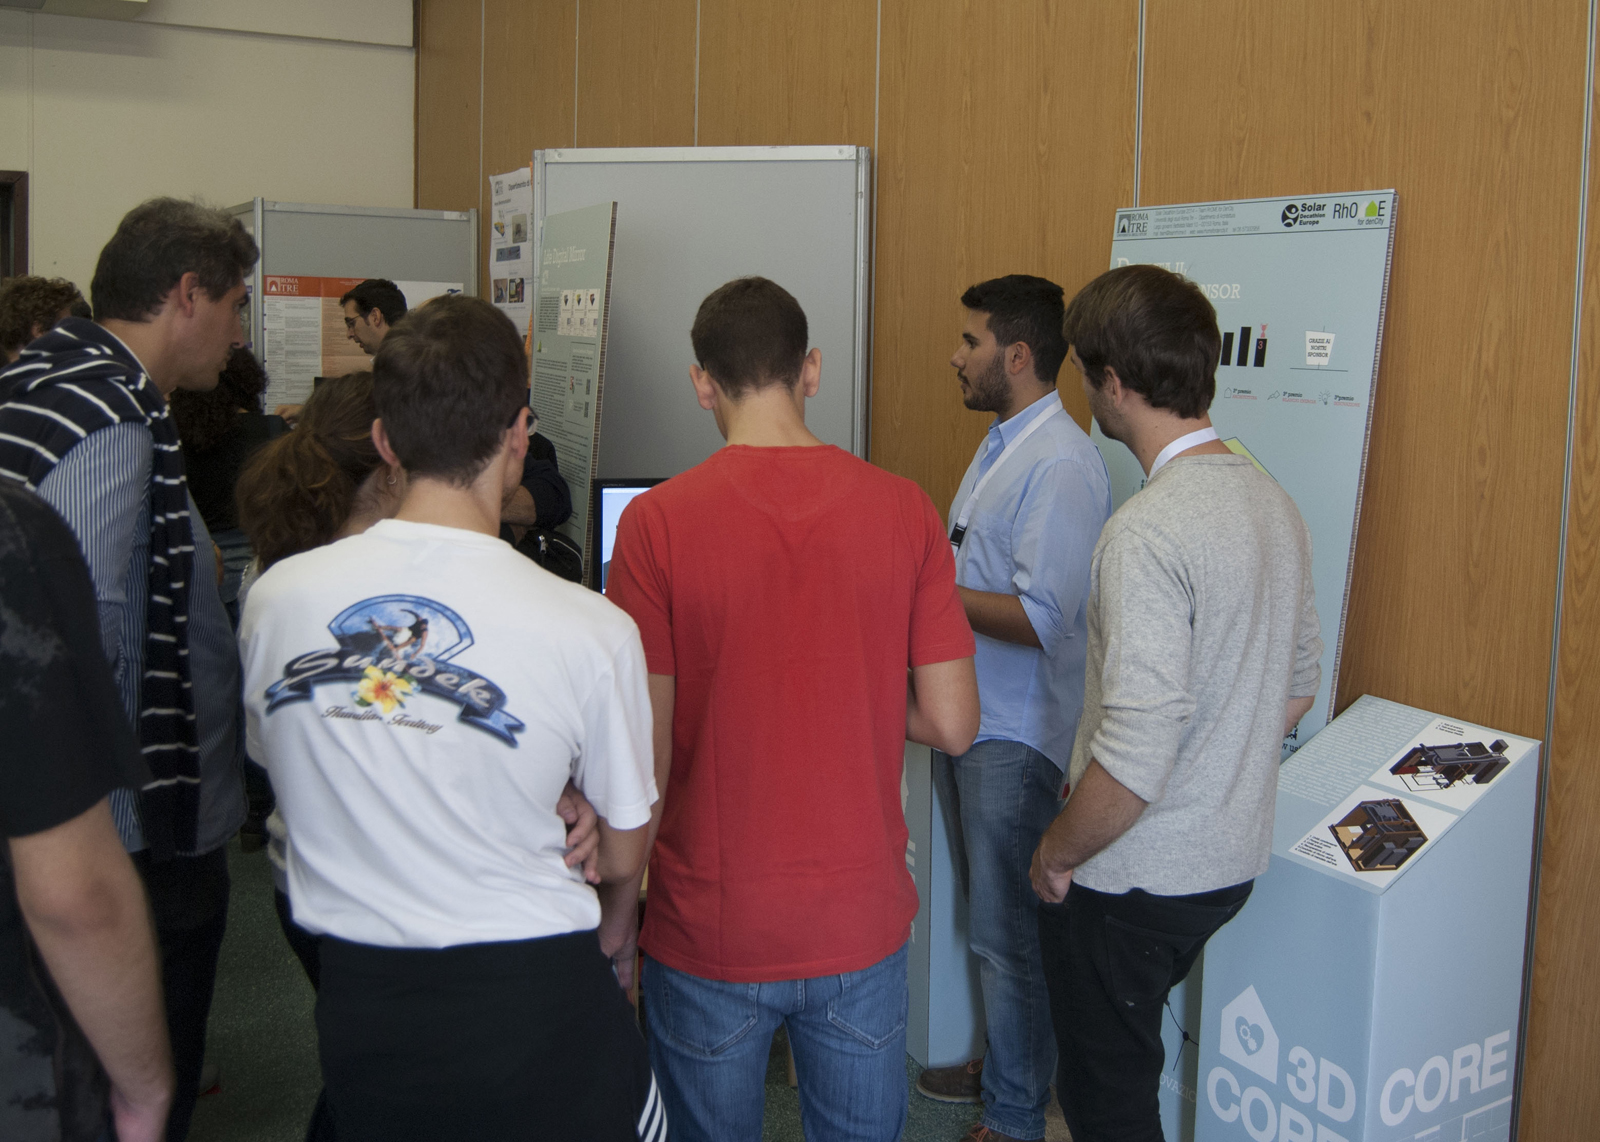
Life Digital Mirror at MakerfaireRome
Next steps
For these reasons, the house is designed to hold two different monitoring configurations called “Digital Life Mirror” (DLM) and “Discovery Digital Mirror” (DDM). During the competition we will install both systems that will use two independent control units situated in the 3D core, or otherwise there will be only the first of them in the aggregated version of the dwelling. The purpose of these solutions is not to replace humans in the house management, but to provide exhaustive information to let the dweller have an aware and guided use of the environment in which he lives. People should be let free to be wrong and make mistakes! But be in control of their life. The introduction, in cars, of the simple display showing instant and cumulative fuel consumption, had a demonstrated great impact on the driver savings, but there is no system that limitates directly their possibility to go fast if they want. Life is complex and rich, every attempt to de-humanize it, will definitely fail.
Life Digital Mirror (LDM) is a simple but complete monitoring system for the best end-user awareness about what’s going on in the house.
The LDM system will record all consumption information in a complete way. Among these, it’s interesting to analyze the overall water demand divided into clear water and grey water. We will install flowmeters near the tanks in order to detect the actual consumption and to highlight how much grey water it’s possible to recover. For the future we are considering to put flowmeters in the terminals of each appliance which use water to have a more detailed view of the usage.
LDM will also monitor doors and windows so the end user knows if they are closed or open and he could be advised about what to do for the best dwelling temperature. For this purpose we will use reed sensors placed on every window and on the most significant doors.
Other important informations are related to the photovoltaic system, a key component of the house, that will be carefully monitored. There will be information about the real time production of electricity that will be recorded in order to have an easily consultable history online.
Thanks to these data and to measurements on the appliances, the control unit will show in real time the amount of external power needed by the dwelling. It will also be interesting to evaluate the panels’ performance changing their tilting for best efficiency according to the environmental conditions of the solar radiation.
ddm
Discovery Digital Mirror is a more complex monitoring system designed to collect data for scientific and educational purposes.
We will install temperature sensors on the windows, on the surface and inside the walls and in each room placed at different heights to evaluate the uniformity of the environmental conditions and the effectiveness of air conditioning .
In the same way of LDM system, DDM will monitor if doors and windows are open or closed in order to understand the relationship between these and the dwelling temperature.
In this way we can have a complete view of what’s going on in the house, like the mechanic when it reads the data from our car and runs a diagnostic.