Ciao,
Innanzitutto vorrei segnalare qualche link utile:
Hello,
istruzioni e buone pratiche per diventare sviluppatori di Dynamo, come ad esempio le indicazioni su come si crea un nodo. Infatti attraverso il github chiunque può copiare il codice, fare delle modifiche e condividerle, utilizzando i linguaggi C# ed F# in Visual Studio.
instructions and best practices to become Dynamo developers, such as directions on how to create a node. In fact, through the github, anyone can copy the code, make changes, and share it, using C# and F# languages in Visual Studio.
github page dedicated to Dynamo learning.
serie di video tutorial per partire da zero con dynamo. Soprattutto i primi sono molto utili per conoscere l’interfaccia e capire qual è la logica del programma. Ad esempio molte delle cose che in Revit e Vasari spesso usiamo implicitamente, come coordinate cartesiane nello spazio e codici ID degli oggetti, spesso con Dynamo sono più esplicite, essendo i principali strumenti di dialogo tra i due software.
series of video tutorials to start from scratch with dynamo. Especially the former are very useful to know the interface and understand what is the logic of the program. For example, many of the things that we often use implicitly in Revit and Vasari, as Cartesian coordinates in space and objects ID numbers, often with Dynamo are more explicit, being the main instruments of dialogue between the two softwares.
http://buildz.blogspot.it/:
blog di Zach Kron, uno degli sviluppatori: c’è una lunga serie di post su Dynamo, la maggior parte riguarda la creazione di geometrie complesse.
Zach Kron's blog: there are many posts on Dynamo, most of them concerns the creation of complex geometries.
Acosa serve Dynamo?
Dynamo estende le capacità parametriche di Vasari e Revit, consentendo di utilizzare algoritmi anche complessi e soprattutto di stabilire nuovi tipi di relazioni, esplicitate graficamente. Infatti fa parte della famiglia dei software di visual programming, cioè programmazione effettuata manipolando graficamente gli elementi invece che utilizzando il linguaggio scritto, attraverso l’uso di nodi (Nodes) e connessioni (Wires) di input e output.
Dynamo è uno strumento molto flessibile, quindi è difficile elencare tutti i possibili impieghi, è difficile anche solo immaginarli tutti. Cercando di sintetizzare, queste sono le principali categorie di nodi:
Trasformazioni geometriche: sia trasformazioni rigide (disposizione geometrica di componenti ed elementi nello spazio), sia deformazioni di masse e di componenti adattive (architetture con superfici complesse).
Input e output: nodi che consentono il dialogo tra Revit e file esterni come ad esempio immagini raster e file excel; tra Revit e tra Revit e Hardware esterni, come Arduino.
What is Dynamo?
Dynamo extends the parametric capabilities of Revit and Vasari, allowing to use complex algorithms and to establish new types of relationships, explained graphically. It is part of the family of visual programming softwares: programming done graphically manipulating the elements instead of using the written language , through the use of nodes and wires of input and output.
Dynamo is a very flexible tool, so it is difficult to list all possible uses, it is hard even to imagine them all. Trying to summarize, these are the main categories of nodes:
Geometric transformations: both rigid transfomation (geometric arrangement of components and elements in space), and deformation of masses and adaptive components (architectures with complex surfaces).
Analysis: complex geometric analysis (such as calculation of the area of surfaces) and other types of analysis, as the study of the solar radiation. The interesting thing about the analytical tools is that the data can be put in direct relation with the parameters and then generate transformations themselves, to minimize or maximize the results (for example, relationship between sun path and parameters of shading components:http://www.youtube.com/watch? v = Ek8kTNU0Imw, http://www.youtube.com/watch?v=8U15Q4FqCgw&list=PLk-weHTE00P3m-yK-UlLa_h...).
Input and output: nodes that enable dialogue between Revit and external files such as raster images and excel files; between Revit and external hardware such as Arduino.
Uno degli aspetti che più mi interessano è la possibilità di mettere in relazione e manipolare matematicamente i parametri di istanza delle famiglie direttamente nel progetto. In questa prima sperimentazione ho quindi voluto tentare di ampliare le potenzialità del curtain wall, uno degli strumenti più utili di Revit, ma che spesso si rivela troppo rigido.
One of the most interesting things is the ability to relate and manipulate mathematically the family instance parameters in the Revit project file. In this first experiment, I wanted to expand the potential of the curtain wall, one of the most useful tools in Revit, but often too rigid.
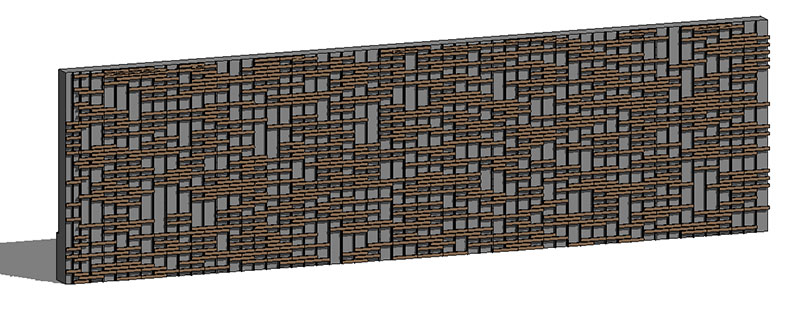
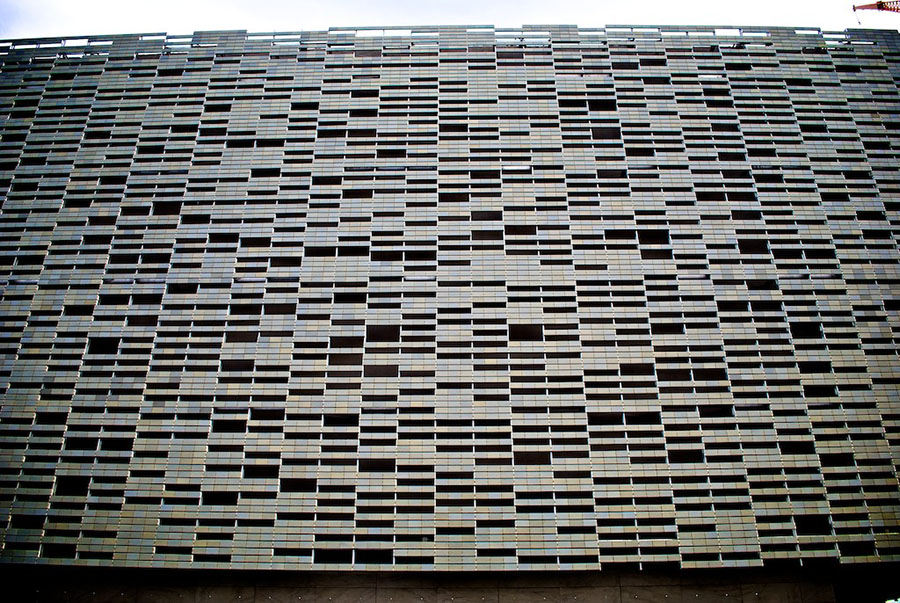
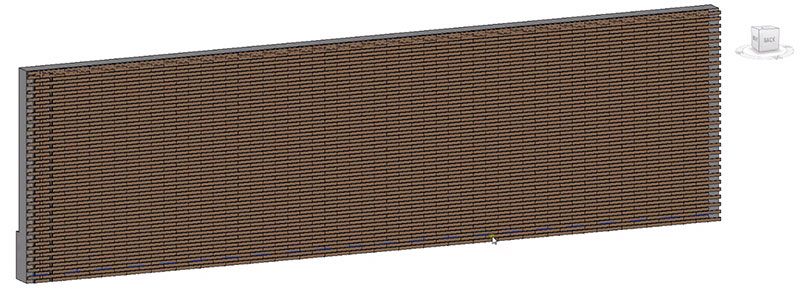
FACCIATA CONTINUA CON VUOTI CASUALI:
Ho voluto modellare una facciata continua simile a quella del nuovo teatro dell’opera di Firenze dello studio ABDR, con doghe di laterizio disposte a giunti verticali alternati, ma mancanti di alcuni elementi con una logica casuale.
CURTAIN WALL WITH RANDOM VOIDS
I wanted to model a facade similar to that of the new opera house in Florence, a project by ABDR architects, with slats of bricks arranged in alternating vertical joints, but missing some elements with a random logic.
Per prima cosa ho modellato la famiglia di pannello composta da due doghe sfalsate di un quarto rispetto alla dimensione del pannello, in maniera che si sovrappongano con giunti verticali alternati, ad imitazione della muratura.
First I modeled the family of panel composed of two slats staggered by one-fourth the size of the panel, so that they overlap with alternating vertical joints, in imitation of masonry.

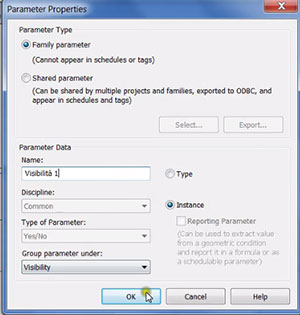
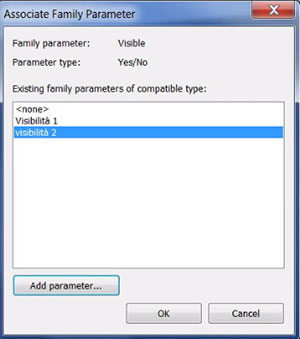
Poi ho assegnato il parametro di istanza “visibilità 1” alla doga superiore e “visibilità 2” alla doga inferiore.
Then I assigned the instance parameter "visibility 1" to the top slat and "visibility 2" to the slat below.
Una volta caricato nel progetto il risultato è questo, con le doghe tutte visibili e quindi il rivestimento di facciata pieno:
This is the result, with all the slats visible.
A questo punto ho aperto il plug-in Dynamo dal pannello add-in. Per prima cosa ho selezionato tutte le istanze dello stesso tipo con il nodo “get family instances by type”, in questo modo le modifiche successive saranno assegnate a tutte le istanze.
At this point I launched Dynamo from the add-in panel. First I selected all instances of the same type with the node "get instances by family type", so that subsequent changes will be assigned to all instances.
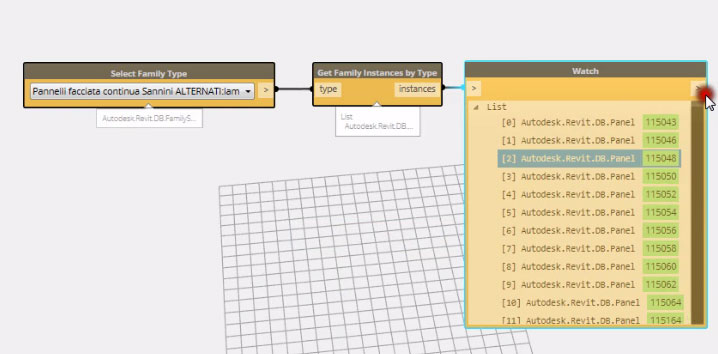
Poi ho usato il nodo “Random number list”, ripetuto tante volte quante sono le istanze. In questo modo ho creato una lista di numeri casuali compresi tra 0,00 e 1,00 e, applicando il nodo “round” li ho arrotondati e trasformati in numeri interi, cioè in una serie fatta di numeri 1 oppure 0. 1 e 0 corrispondono a Yes or Not e quindi ho potuto assegnare questi valori al parametro “visibilità 1”, con il nodo “set family instance parameter” (notare come questo nodo e anche gran parte degli altri nodi può essere assegnato sia ad un singolo oggetto sia ad una lista di oggetti, come in Grasshopper).
Then I used the node "Random number list", repeated as many times as the number of instances. In this way I created a list of random numbers between 0.00 and 1.00 and, then using the node "round", I've rounded and converted these numbers into integers, creating a series of numbers 1 or 0. 1 and 0 are equal to Yes and Not, and then I was able to assign these values to the parameter "visibility 1" using the node "set instance parameter family" (note that this node and also most of the other nodes can be assigned both to a single object or to a list of objects, such as in Grasshopper).
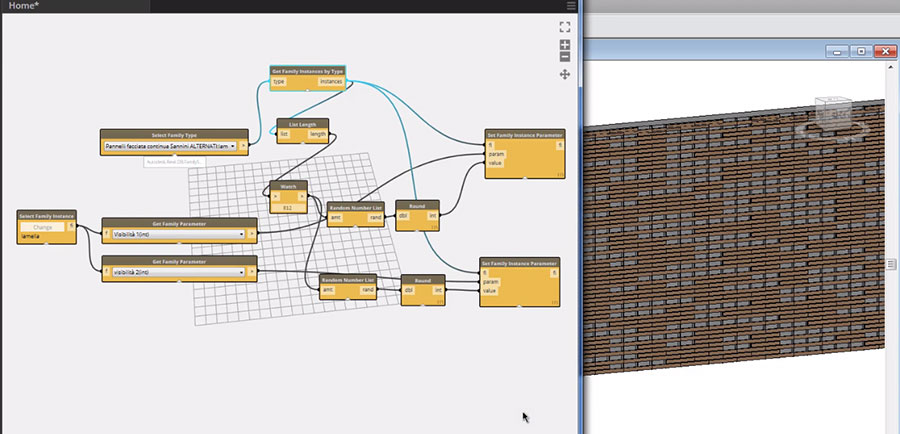
A questo punto, premendo il tasto Run, automaticamente in molti pannelli disposti casualmente sparisce la doga superiore.
Poi ripeto lo stesso procedimento anche per le doghe inferiori.
At this point, pressing the Run button, automatically in several panels the higher slat disappears. Then I do the same for the below slats.
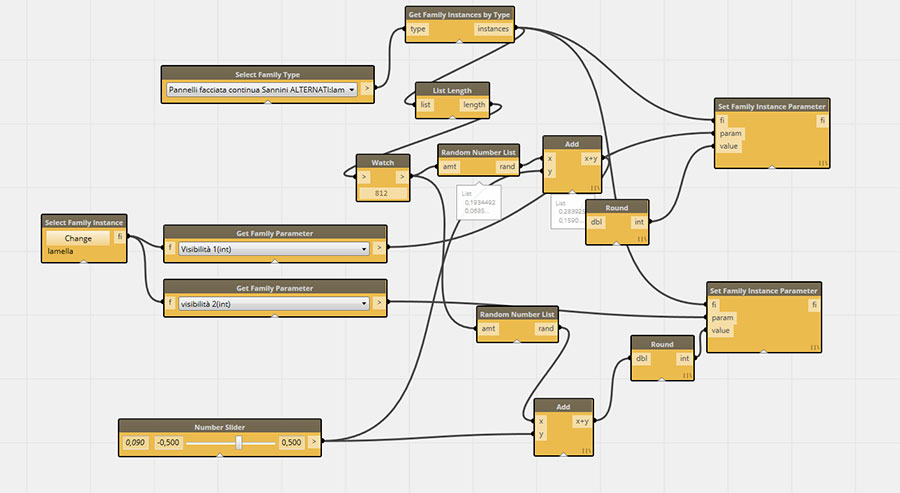
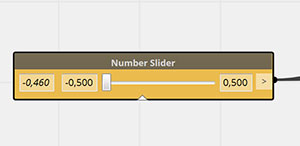
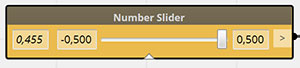
Pur non conoscendo l’algoritmo che genera i numeri casuali, posso notare che il numero di pieni e vuoti si equivale, ma non ho ancora modo di agire sul grado di apertura del rivestimento di facciata. Per farlo aggiungo un “number slider” con un dominio compreso tra -0,5 e 0,5 e poi lo sommo alla lista di numeri generati dal “random number list”. in questo modo facendo scorrere lo slider posso decidere di aumentare la quantità di 1 rispetto a 0 e viceversa. Cioè posso decidere di aumentare o diminuire il numero di vuoti.
I can see that the number of full and empty spaces is the same, but I have no way yet to change the amount of voids in the facade. To do so, I used the "number slider" node with a domain between -0.5 and 0.5 and then I added this number to the list of numbers generated by "random number list". In this way by sliding it I can decide to increase the amount of number 1 or number 0. That is, I can decide to increase or decrease the number of voids.

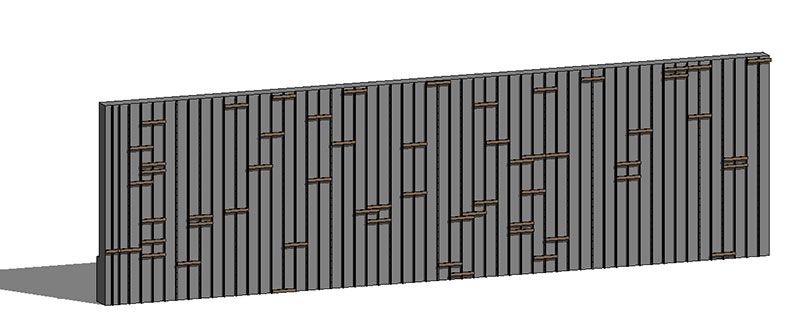
Slider quasi al minimo:
Slider almost to a minimum:
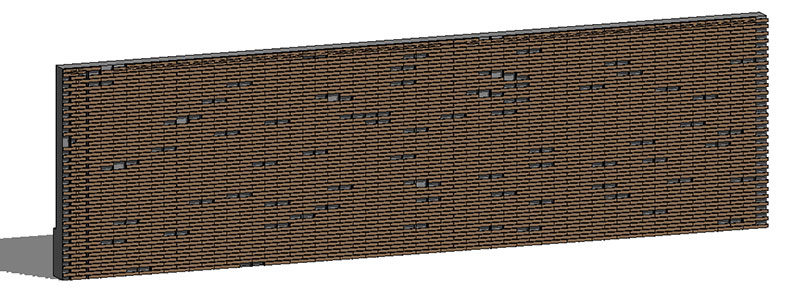
Slider quasi al massimo:
Slider almost to a maximum:
Questo è il video di tutto il procedimento:
And this is the video tutorial: