


 Eleonora Marced...
Mar, 24/05/2016 - 11:45
Eleonora Marced...
Mar, 24/05/2016 - 11:45
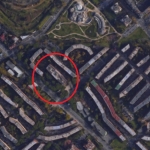
L'albero da noi analizzato si trova in viale Camillo Sabatini, nel quartiere di Roma Decima-Torrino.
E' un pino domestico (pinus pinea), diffuso nel bacino del Mediterraneo. In media è alto tra i 12 e i 20 metri; è riconoscibile dalla grande chioma simile ad un ombrello.
Con l'aiuto del software FormIt 360 realizziamo l'albero e lo poniamo nel suo contesto.


Passiamo poi all'analisi solare, realizzata con e senza vegetazione.
Marzo


Giugno


Settembre


Dicembre


La presenza della vegetazione contribuisce, soprattutto nel periodo estivo, al raffrescamento della facciata Ovest. Nei mesi invernali invece schermano il calore, lasciando la facciata fredda.
Abbiamo inserito la consegna con lo "Student Tags" Delivery 4 in quanto non è presente il tag Delivery 5.
Mar, 24/05/2016 - 12:16
 Fiocchetti_LeoneC
Lun, 23/05/2016 - 15:12
Fiocchetti_LeoneC
Lun, 23/05/2016 - 15:12
L'abitazione analizzata si trova a Roma Sud, precisamente a Santa Maria delle Mole in via Martiri di Belfiore.
L'abitazione non presenta recenti interventi di rifacimento delle facciate per questo è possibile vedere tutti quegli effetti che la radiazione solare, le ombre ma anche l'acqua hanno generato.
Abbiamo analizzato, per tre porzioni di facciate diverse, le ombre nel mese di Giugno (nel primo caso alle ore 14:00 e negli altri due casi alle ore 17:00), la radiazione solare sempre nel mese di Giugno, in quanto le zone fredde (quindi in ombra) sono più evidenti rispetto ad un analisi fatta in Dicembre ed infine abbiamo inserito una foto che ci dimostra quali sono gli effetti che le ombre e la radiazione solare portano sulle facciate. Nell'ultima immagine invece analizziamo nel dettaglio una porzione di facciata pienamente esposta alla radiazione solare.
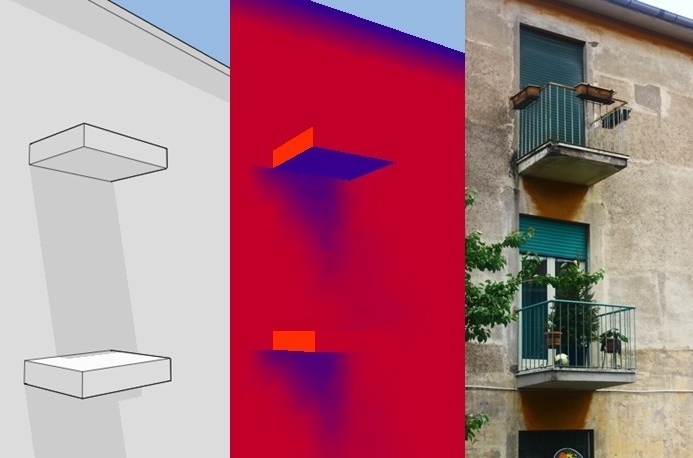
Nel primo caso notiamo come, nelle zone sottostanti gli aggetti, abbiamo una forte presenza di umidità in quanto, essendo zone dove la radiazione solare non riesce ad arrivare, l'acqua che bagna la facciata, per via di precipitazioni, non viene asciugata. Inoltre essendo zone quasi del tutto in ombra non subiscono gli effetti dovuti alla forte radiazione solare che si generano su tutto il resto della facciata, per questo risultano più scure rispetto a quelle colpite dalla radiazione solare. Ciò succede anche al di sotto dell'aggetto della copertura.
Nel secondo caso succede lo stesso sia sotto l'aggetto del balcone sia sotto quello della copertura, l'umidità non viene asciugata dal sole e queste zone risultano più scure perchè non subiscono gli effetti dovuti alla radiazione solare che anche in questo caso troviamo sul resto della facciata. Qui però, essendo la facciata più calda rispetto a quella analizzata nel primo caso, la presenza di umidità è minore infatti queste zone risultano meno scure rispetto al primo caso.
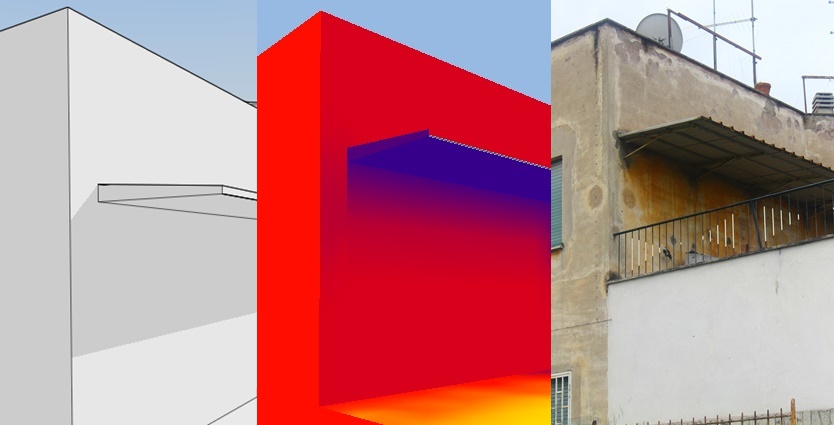
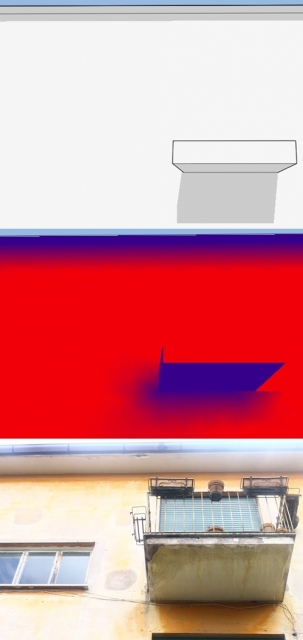
Anche nel terzo caso, per le stesse motivazioni, abbiamo la zona sottastante l'aggetto più umida e scura rispetto al resto della facciata.
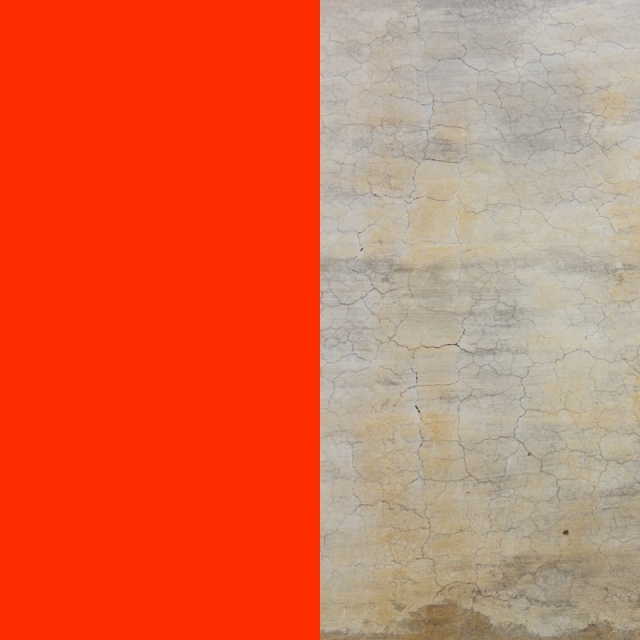
Qui invece abbiamo analizzato una porzione di facciata non in ombra, ma fortemente investita dalla radiazione solare (come vediamo dalla Solar Analysis). Nella foto vediamo quali sono gli effetti che questa forte radiazione genera sulla superficie intonacata.
Conclusioni - Notiamo quindi come gli aggetti proteggono parti di facciata dalla forte radiazione solare che genera come visto un forte degrado ma tendono anche a far ristagnare l'umidità portata dalle precipitazioni.
Lun, 23/05/2016 - 15:13 Fiocchetti_LeoneC
Lun, 23/05/2016 - 15:10
Fiocchetti_LeoneC
Lun, 23/05/2016 - 15:10
L'area di progetto è situata nel quartire di Ostiense ed è delimitata a Nord da Via del porto fluviale, a Ovest da Via del commercio, a Sud da Via dei Magazzini Generali e ad Est da edifici esistenti.
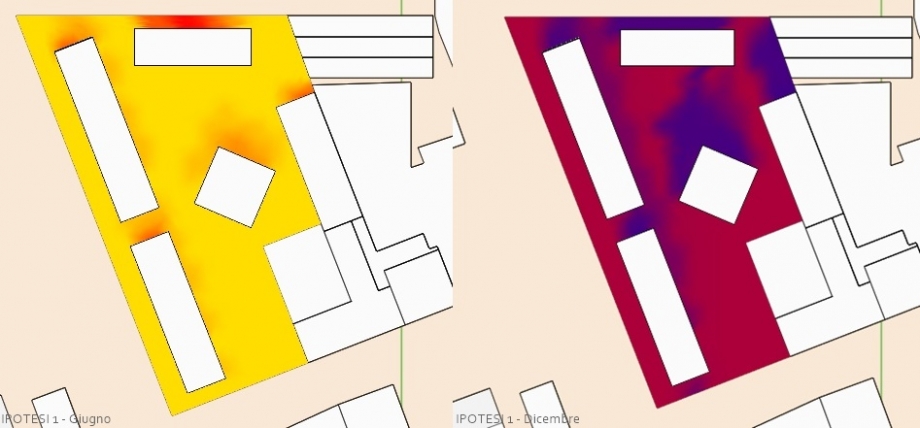
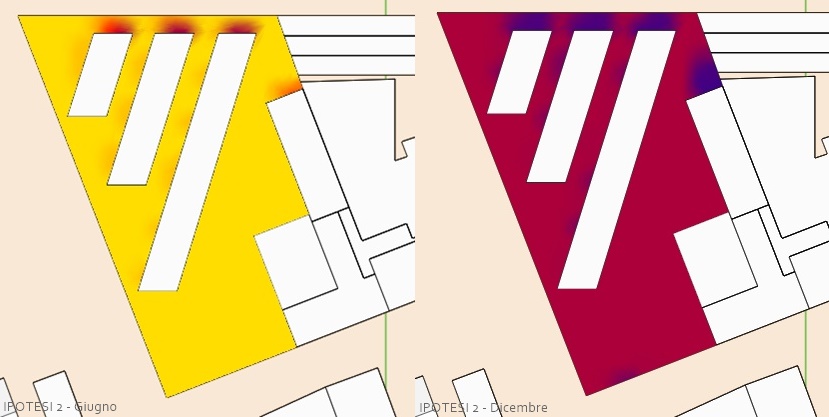
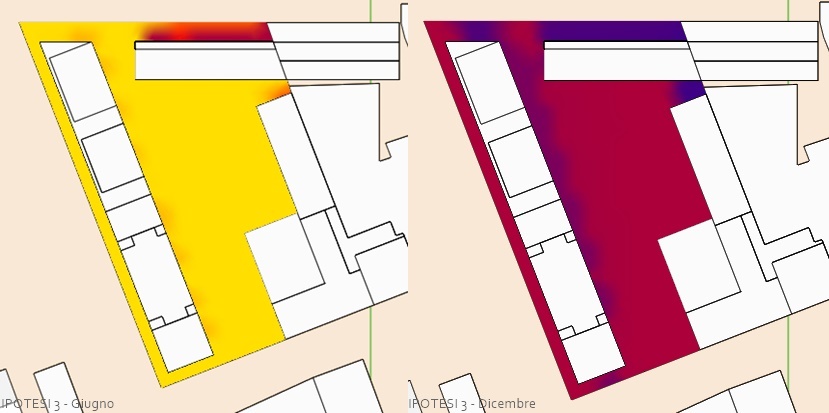
Sono state analizzate con la funzione "Solar Analysis" di Formit 360 tre ipotesi di progetto, sia nel mese di Giugno che nel mese di Dicembre.
La prima analisi riguarda le facciate degli edifici.
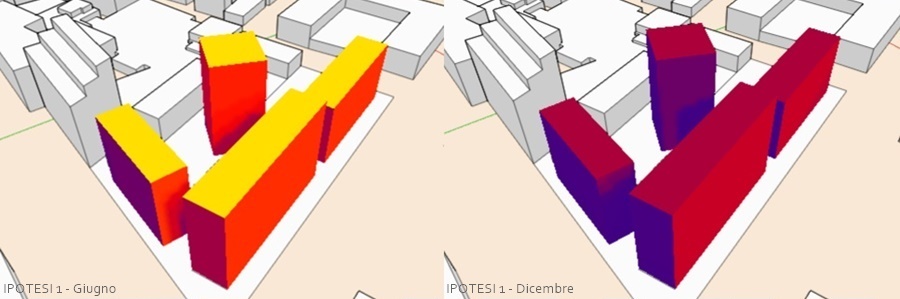
Ipotesi 1 - Notiamo come mentre in estate l'edificio a torre viene investito ampiamente dalla radiazione solare, come i due edifici in linea che lo precedono, invece in inverno, i due edifici in linea che lo precedono, essendo il sole più basso, contribuiscono a rendere le facciate dell'edifico a torre più fredde rispetto a quelle dei due edifici in linea. Per questo in estate l'edificio a torre risulta molto caldo mentre in inverno risulta molto freddo, quindi la disposizione usata non ottimizza assolutamente il comportamento dell'edifio a torre. I due edifici in linea risultano molto caldi sulle facciate principali quindi potremmo prevedere degli aggetti o comunque degli elementi in grado di schermare queste facciate, mentre solo delle facciate molto ridotte risultano fredde poichè esposte a Nord e non presentano quindi un problema. La facciata pricipale dell'edificio restante risulta invece fredda essendo l'edifico esposto a Nord. Questa disposizione non risulta quindi buona, in quanto l'edificio a torre e quello sul lato corto non presentano un buon funzionamento, solamente i due edifici in linea, con le adeguate aggiunte, risulterebbero soddisfacenti.
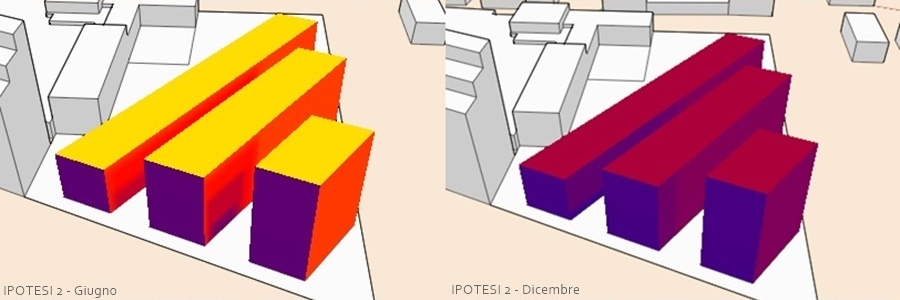
Ipotesi 2 - In questo caso le facciate esposte a Nord sono di dimensioni ridotte, per questo in inverno non si presentano problemi di grandi porzioni di facciate degli edifici eccessivamente fredde. Le facciate principali dei tre edifici risultano calde sia in estate che in inverno, in estate potremmo quindi prevedere degli aggetti o degli elementi che vadano a schermare queste facciate. Le ombre che gli edifici generano l'uno sull'altro in estate ci aiutano a rendere le facciate meno calde ma in inverno contribuiscono a rendere le facciate più fredde però sono comunque di dimensioni molto ridotte per questo non presentano un vero problema. Il funzionamento complessivo degli edfici risulta quindi buono.
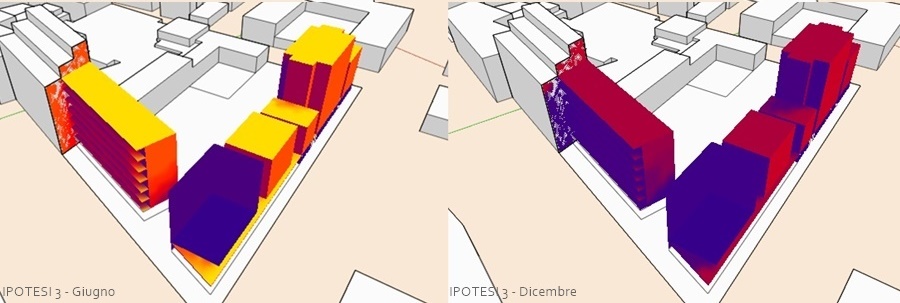
Ipotesi 3 - Abbiamo riscontrato un problema con il software che evidentemente non ci riporta la corretta analisi del primo blocco (partendo da sinistra) dell'edificio posto sul lato lungo del lotto, probabilmente perchè il modello di quest'ipotesi risulta moto più dettagliato e complesso rispetto ai primi due che sono solamente volumetrici e non presentano aggetti o rientranze come in quest'ipotesi. Possiamo però analizzare tutti gli altri elementi. L'edificio a ballatoio, sul lato corto, essendo esposto a Nord e presentando il ballatoio sulla facciata a Nord contribuisce a renderla ancora più fredda, per questo, forse, sarebbe più opportumo spostare il ballatoio sulla facciata esposta a Sud in modo tale da schermarla, essendo questa una facciata molto calda in estate e abbastanza calda in inverno. In questo modo la facciata esposta a Nord non risulterebbe eccessivamente fredda e quella a Sud eccessivamente calda. Per problemi però di disposizione interna degli ambienti forse questo non sarà possibile, in quanto in questo modo i servizi risulterebbero esposti a Sud mentre invece gli ambienti principali come la zona giorno risulterebbero esposti a Nord. L'edificio composto da più blocchi, posto sul lato lungo del lotto, presenta le facciate principali molto calde in estate e abbastanza calde in inverno potremmo quindi porre delle schermature che vadano ad agire in estate per rendere le facciate meno calde. Le facciate esposte a Nord risultano ridotte quindi non presentano un problema. In sintesi possiamo dire che l'edificio a ballatoio risulta più problematico mentre quello posto sul lato lungo del lotto ha un buon funzionamento.
La seconda analisi, invece, riguarda gli spazi esterni.
Ipotesi 1 - Notiamo come mentre in estate gli spazi esterni risultano eccessivamente caldi, in inverno questi risultano eccessivamente freddi, in quanto le ombre portate a terra dagli edifici occupano gran parte degli spazi esterni, in modo particolare l'edificio a torre. Nuovamente, quindi, questa disposizione è sfavorevole in quanto tende a creare ampie zone d'ombra in inverno ma non in estate.
Ipotesi 2 - Gli spazi esterni in questo caso risultano soleggiati in inverno e molto soleggiati in estate, poichè le ombre portate a terra dagli edifici risultano molto ridotte. In inverno, quindi, abbiamo un ottimo comportamento degli spazi esterni mentre per migliorare il comportamente degli spazi esterni in estate basterebbe inserire della vegetazione per creare delle zone d'ombra.
Ipotesi 3 - Anche in questo caso gli spazi esterni risultano molto soleggiati in estate e soleggiati in inverno, date le ridotte zone d'ombra generate dagli edifici. Ma la zona esposta a Nord, anche se di ridotte dimensioni, risulta molto fredda soprattutto in inverno. Essendo però una zona di solo passaggio, questo non risulta un problema rilevante. In inverno, quindi, abbiamo una condizione ottimale metre in estate, anche in questo caso, basterà inserire della vegetazione per creare delle zone d'ombra.
Lun, 23/05/2016 - 15:12 Fiocchetti_LeoneC
Lun, 23/05/2016 - 15:08
Fiocchetti_LeoneC
Lun, 23/05/2016 - 15:08
L'anilisi è stata effettuata il 6 Aprile alle ore 15:00.
L'area di studio è un area residenziale ed è situata nalla zona dei Castelli Romani, precisamente a Castel Gandolfo in Via delle Molette.
L'area è pianeggiante e gli edifici che vi troviamo sono tutte abitazioni abbastanza distanti l'una dall'altra, di altezza contenuta (massimo 3 piani) e presentano coperture a falda, di conseguenza generano ombre abbastanza ridotte che non vanno a coprire gli altri edfici per un ampio arco della giornata (dalle ore 8:00 alle ore 17:00 circa, in Aprile). Sono state studiate con Formit 360 le ombre portate a terra e le ombre che le falde, in aggetto, generano sulle facciate alle ore 15:00, andando poi a verificare con delle foto che le ombre che troviamo nel modello generato con Formit 360 corrispondano a quelle che effettivamnete si generano alle ore 15:00 sulle facciate degli edifici e a terra.
Lun, 23/05/2016 - 15:09