 Guegan_de Monserrat
Dom, 24/05/2015 - 19:45
Guegan_de Monserrat
Dom, 24/05/2015 - 19:45
In questa esercitazioni si mostra come modelare un albero. La vegetazione è un elemento veramente importante per quanto riguarda alle ombre e alla radiazione negli spazi. La scelta del tipo de vegetazione e la sua posizione è primordiale per creare diversi tipi di ambienti.
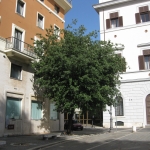
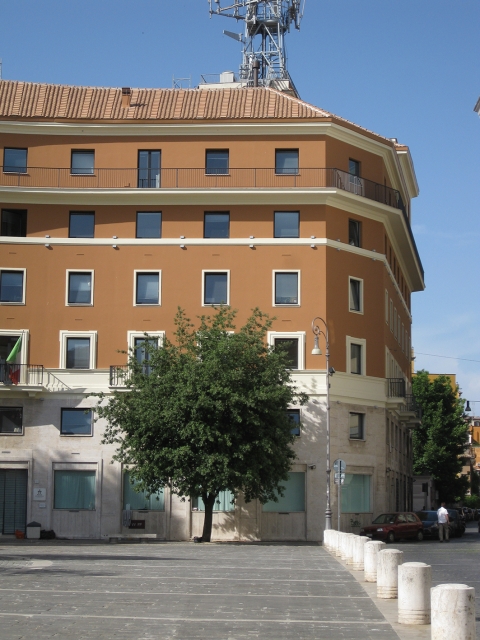
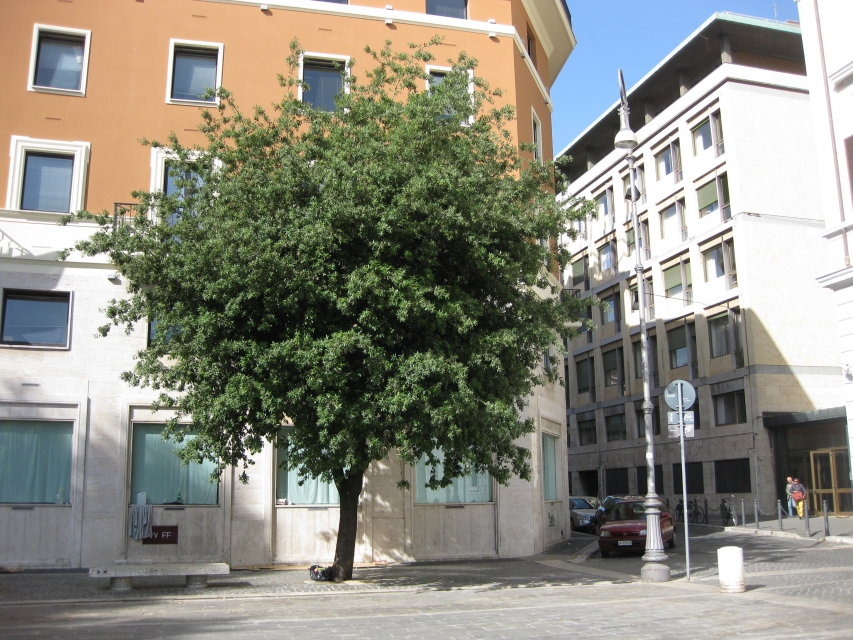
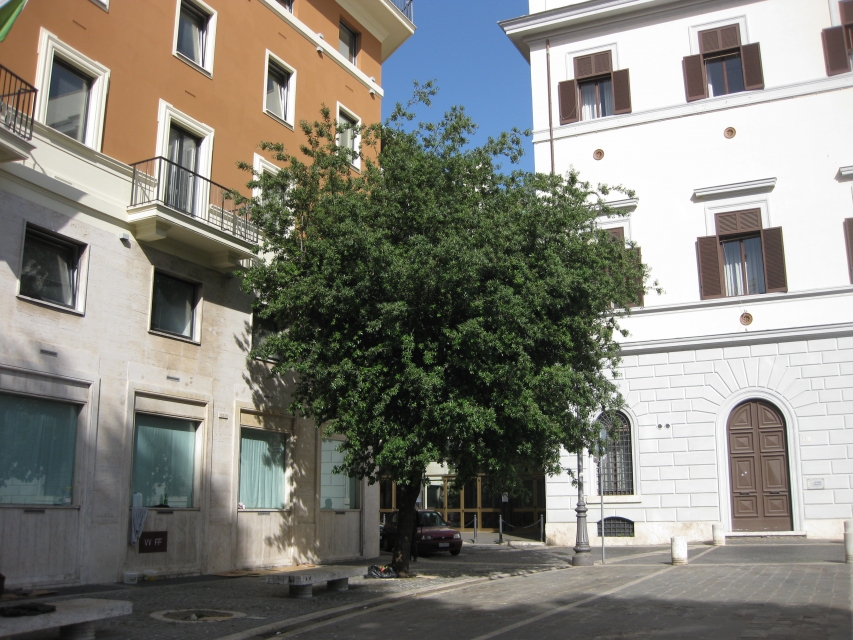
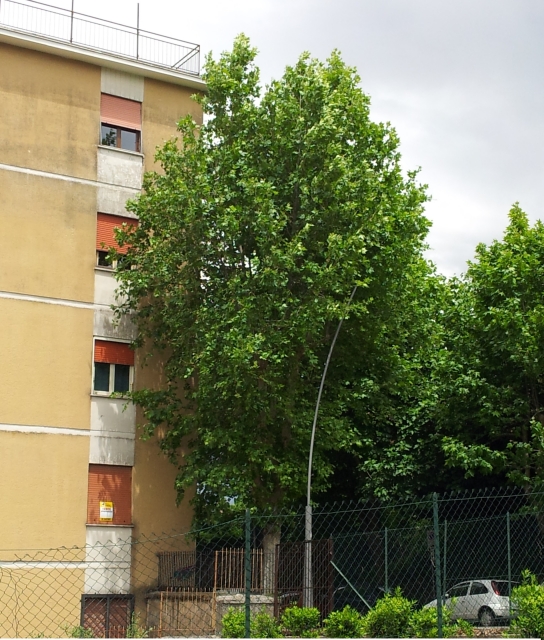
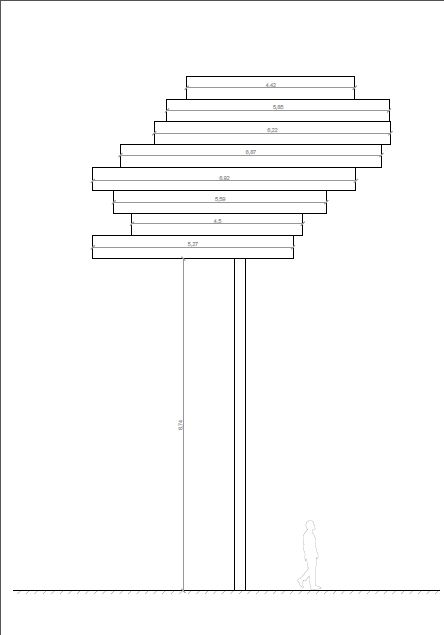
Abbiamo scelto un albero isolato situato nella piazza Mastai (Trastevere). Questo albero appartiene alla famiglia di alberi e arbusti chiamata Quercus. In particolare sembra éssere una giovane Quercia di clima umido. È un albero di foglia perene originario della regione mediterranea e di media/bassa dimensione.
MODELLAZIONE
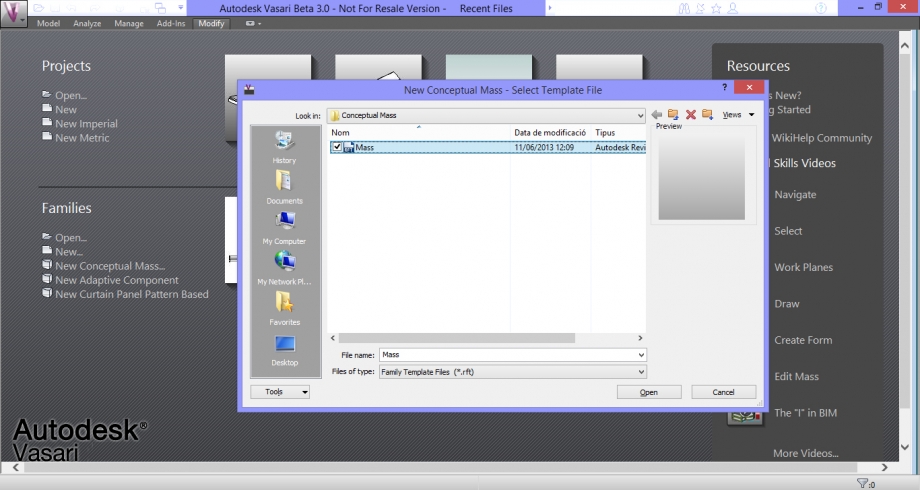
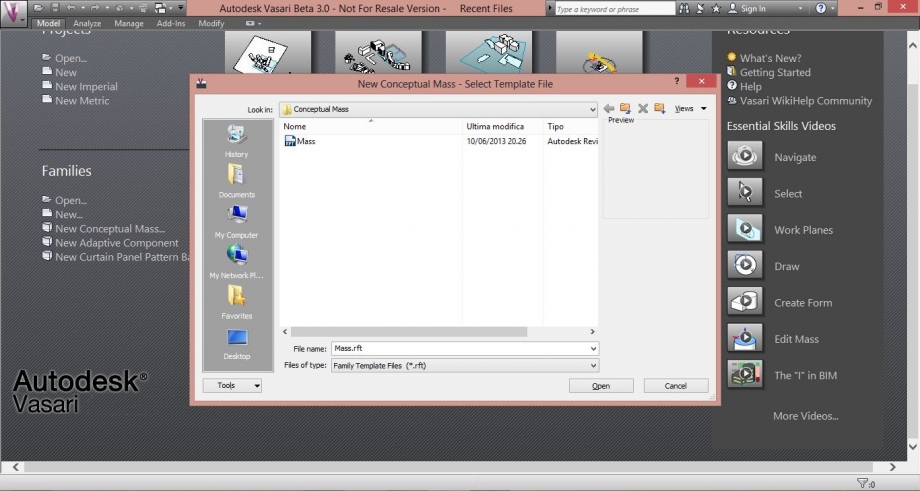
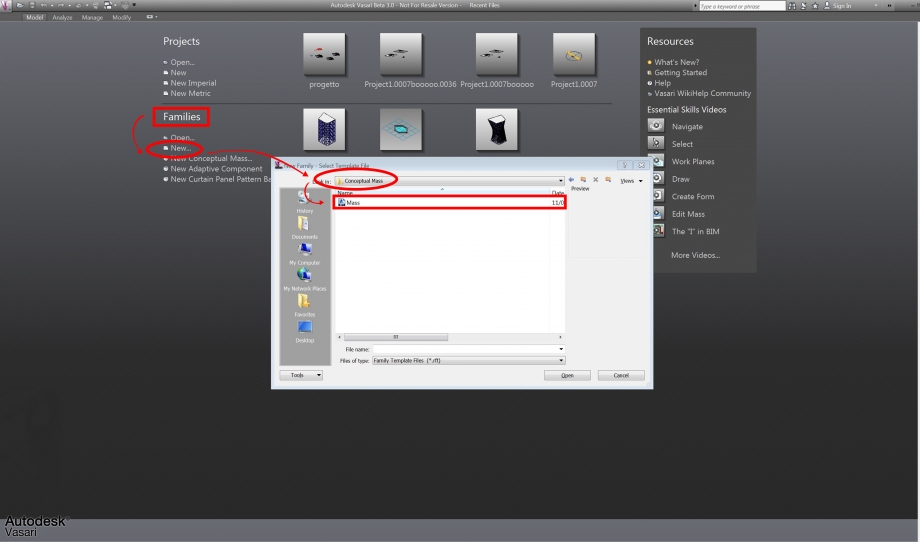
Aprire il programma > Families > New conceptual mass > Mass.rft > Open
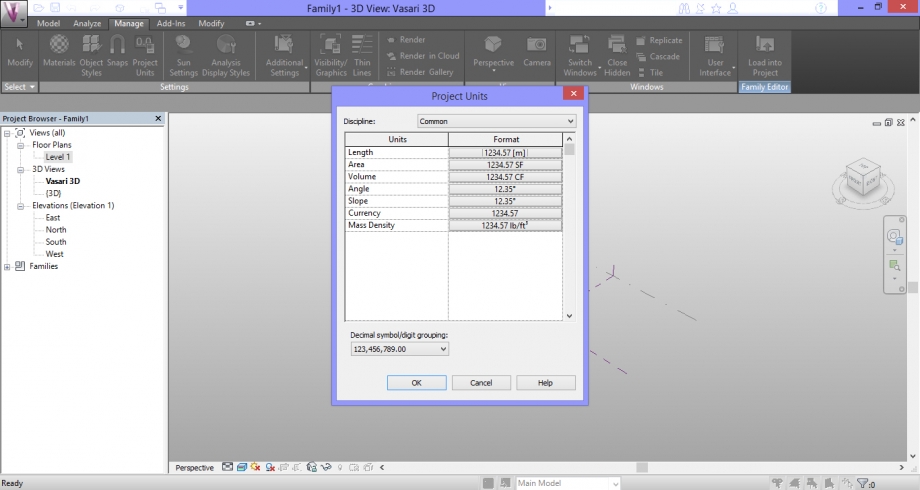
Mettere a posto le unità di misura: Manage > Project units
Creazione dei livelli (dove si devono disegnare le superficie per modelare il tronco e la chioma): Model > Level
Si deve mettere ogni livello a la altezza giusta.
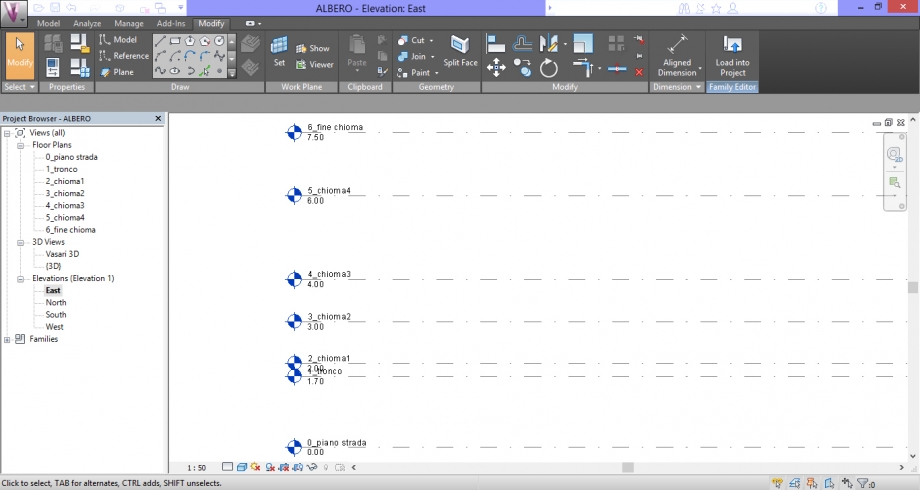
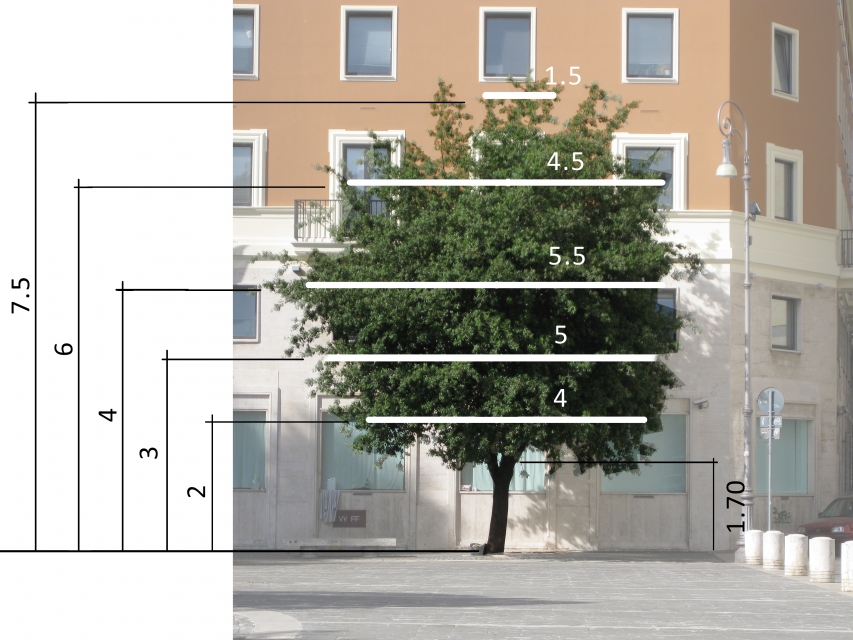
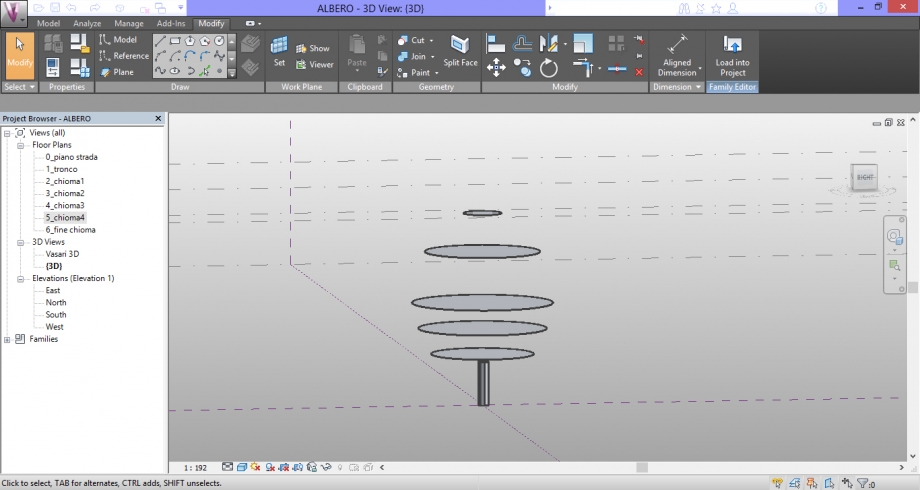
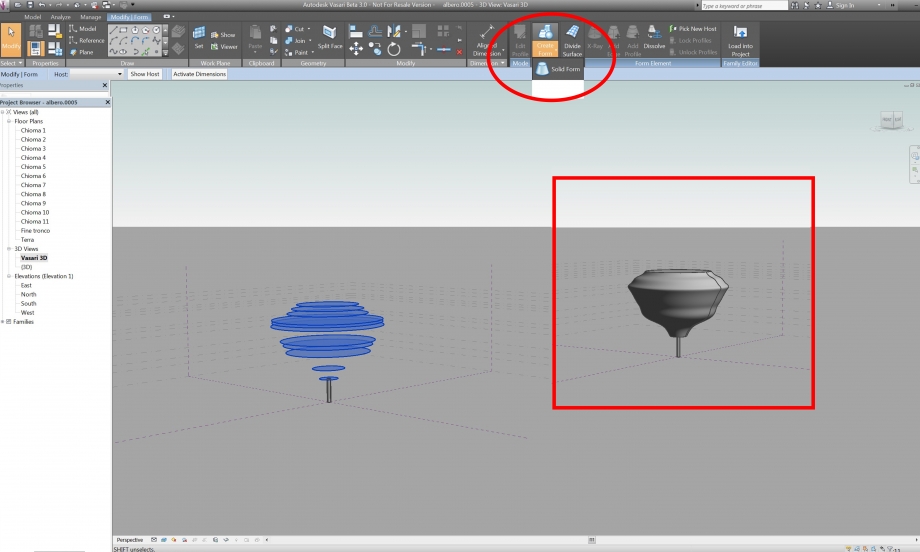
Disegnare in ogni livello un cerchio per potere creare la massa dopo (secondo le misure dell’albero scelto).
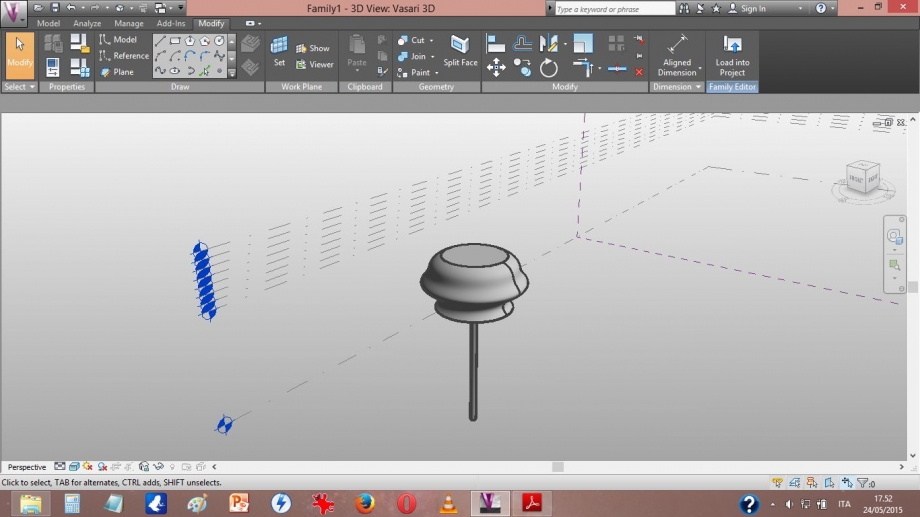
Modellare la chioma: Selezionare tutti i cerchi > Modify > Create Form > Solid Form
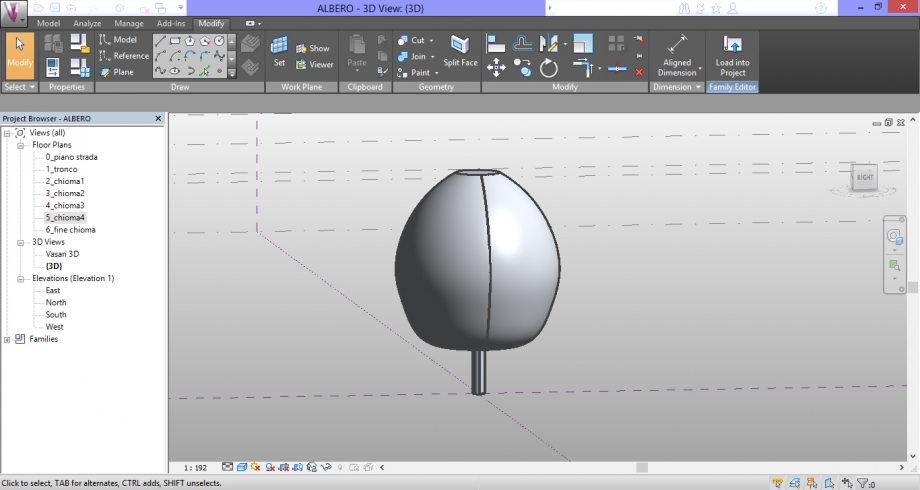
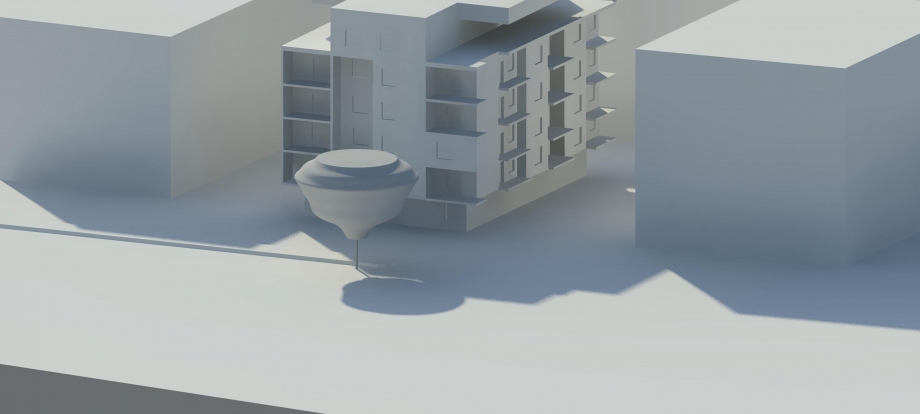
La modellazione dell’albero è finita in questo punto. Adesso dobbiamo introdurre l’albero nel suo intorno e vedere la sua affettazione sull spazio.
INTRODUZIONE DELL’ALBERO NELLA PIAZZA
Aprire il documento dov’è disegnato l’intorno della piazza con la sua locazione corretta
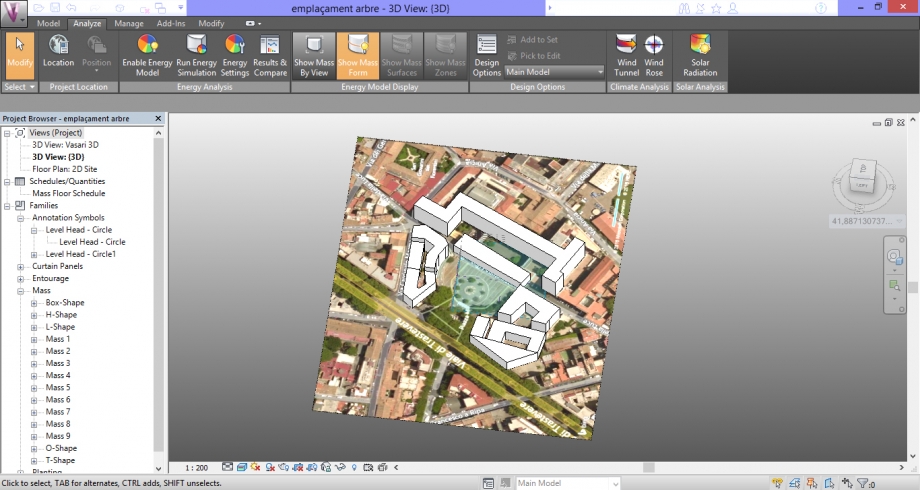
Caricare l’albero sull’entorno: Model > Place Mass > Load Family
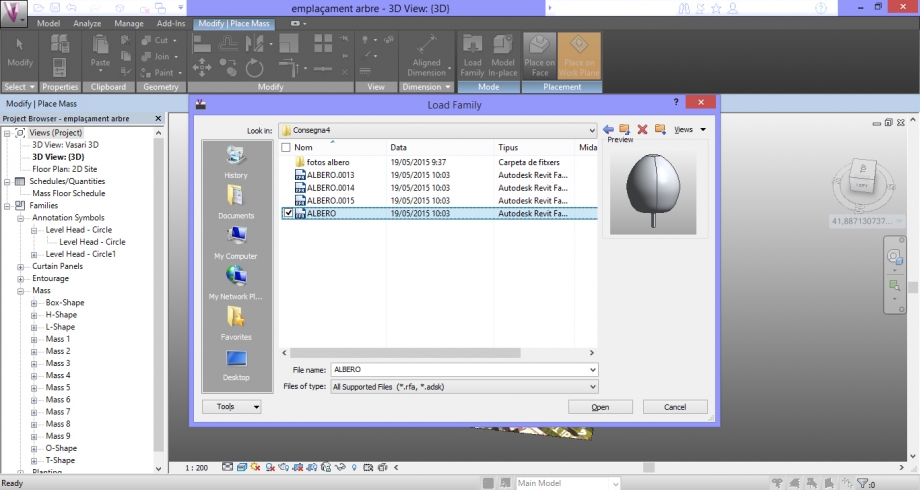
Posizionare l’albero

Comparazione de ombre nello stesso giorno e stesso momento (18/05/2015 alle 16.30h):
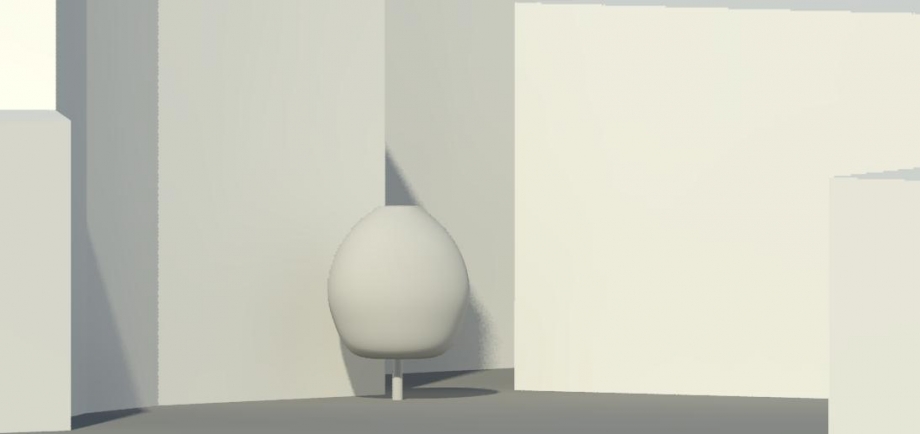
L’affettazione dell’albero nella facciata in questo caso non è molto importante perchè non è un albero molto alto e è situato nell estremo dell’edificio. Ma la sua chioma è densa, quindi l’ombra creata risponde a questa caracteristica.
Dom, 24/05/2015 - 20:29 Simone Del Conte
Dom, 24/05/2015 - 19:30
Simone Del Conte
Dom, 24/05/2015 - 19:30
Abbiamo scelto questa essenza perchè è vicina sia all' edificio analizzato nella prima consegna, sia all' area di progetto.
La sua presenza nelle vicinanze di entrambe le aree analizzate dimostra come negli ultimi decenni sia stato largamente utilizzato a Roma e provincia. Abbiamo notato tuttavia che è presente praticamente in tutta Italia, in città come Milano o Palermo; ma il suo areale (area di distribuzione geografica) , in realtà si estende in tutta Europa.
In foto, Platanus Acerifolia nelle vie centrali di Londra

La forma della chioma è spesso frutto di un'attenta ed efficiente potatura, che a Roma può prevenire tra l' altro la caduta di ramaglie durante temporali o forti raffiche di vento; sempre più frequenti negli ultimi anni e che possono danneggiare lievemente automobili o arrecare danni a persone di passaggio. Nelle altre città europee è una connotazione estetica importante .
Platanus Acerifolia attentamente potato: il verde diventa un elemento fondamentale del paesaggio urbano.

Una delle caratteristiche principali è la grande resistenza meccanica dell' albero stesso dovuta al grande apparato radicale che sviluppa.
Tale aspetto permette a questa specie di non schiantarsi al suolo con facilità (sempre con le dovute eccezioni) , fenomeno che invece avviene ad esempio per il pino domestico ( Pinus Pinea, negli ultimi anni a Roma si sono verificati molti episodi, con danni a cose,edifici, persone), specie anch' essa molto utilizzata in ambito urbanistico sin dai primi del '900.
A livello del terreno tuttavia, come già detto, questa essenza, tende a sviluppare un grande apparato radicale superficiale,capace di rompere o comunque rialzare lo strato di asfalto più vicino al tronco, questo problema è molto frequente a Roma e crea difficoltà e pericolo nel camminare soprattutto alle persone più anziane, persone con disabilità motoria , persone con carrozzine per neonati al seguito.

Questa tipologia di albero ha tuttavia anche notevoli qualità come la rapida crescita, la facile manutenzione, ma soprattutto ha la caratteristica di generare una grande ombra durante il periodo estivo grazie alle grandi e numerose foglie palmate che la caratterizzano. Foglie che, come tutte le specie decidue, ovviamente perde d' inverno e permette quindi alla radiazione solare diretta di raggiungere edifici e strade. L' albero è paragonabile quindi ad una vera e propria massa che scherma totalmente le facciate degli edifici dalla radiazione diretta.
E' un errore quindi, continuare a progettare non tenendo in considerazione le chiome degli alberi decidui in estate, e, al contempo, le chiome dei sempreverdi in inverno.
Un altro errore frequente è scegliere essenze che hanno caratteristiche magari estetiche molto gradevoli, come il colore dei fiori, ma che sono caratterizzate da una lentissima crescita.
Il software Vasari, ci permette di modellare una massa e dargli la forma dell' albero che vogliamo, di considerare questa massa durante il periodo estivo o invernale, di prevedere l' ombreggiamento durante le varie fasi di crescita.
Possono passare infatti decenni prima di arrivare all' ombreggiamento pensato dal progettista, durante questo tempo quindi la facciata del nostro edificio o lo spazio all' interno della nostra piazza , rimangono totalmente assolati.
Per creare un albero con il software Vasari :
_FAMILIES> NEW CONCEPTUAL MASS> MASS
_MANAGE> PROJECT UNITS
_MODEL> LEVEL
_ studiando precedentemente l' albero, creiamo dei cerchi a varie altezze, aiutandoci con un software come Autocad per la deduzione indiretta delle misure : 
_MODIFY> CREATE FORM> SOLID FORM
otteniamo la massa dell' albero :

_ LOAD FAMILY , importiamo l' albero in qualsiasi file Vasari.
Nel nostro caso, ci siamo chiesti come sarebbe stata ombreggiata la facciata del nostro progetto, se affianco al lotto ci fossero stati dei platani.

 ENEA_CERVONE
Dom, 24/05/2015 - 20:00
ENEA_CERVONE
Dom, 24/05/2015 - 20:00
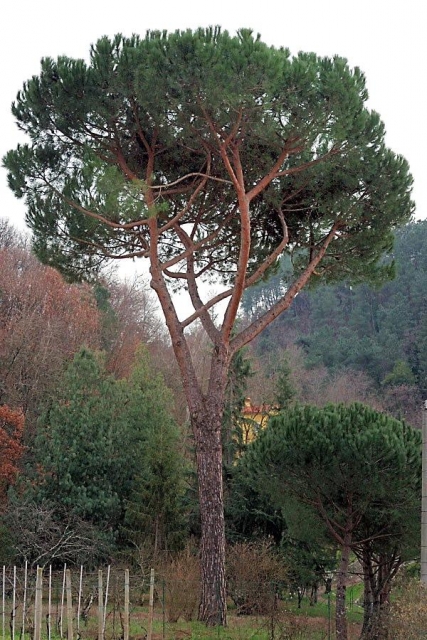
PINUS PINAE o PINO DOMESTICO
ANALISI DELLA PIANTA:
Luoghi in cui si può incontrare: è diffuso nel bacino del Mediterraneo, in particolare sulle coste settentrionali, dove forma vasti boschi
Dimensioni: Arboreo; alto fino a 25 metri, solitamente 12-20 m. Ha un portamento caratteristico, con un tronco corto e una grande chioma espansa a globo, che col tempo diventa sempre più simile a un ombrello.
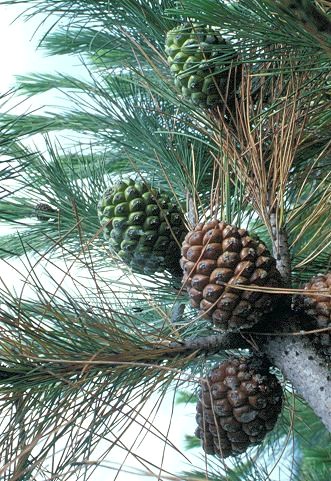
Sporofilli: Le gimnosperme tutte, e così il Pino domestico, non producono fiori, ma sporofilli. Il Pino domestico vede maturare gli sporofilli tra aprile e maggio.
Per prima cosa andiamo a disegnare le dimensioni di massima dell'albero su autocad, quindi la larghezza del fogliame a diverse altezze e la dimensione del tronco (Autocad)
Andiamo adesso ad analizzarlo con vasari; Apriamo "New Conceptual Mass" nel menù principale, questo ci permetterà di inserire l'albero in qualunque file Vasari
La prima cosa da fare, come sempre, è inserire la giusta unità di misura: andiamo quindi nel menù "Manage" e selezioniamo "Units"
Creiamo poi i vari livelli in base ai quali inseriremo le misure trovate precedentemente. Nel nostro caso ogni livello è alto 60 cm
Disegnamo vari cerchi alle diverse altezze, con larghezza e centro diversi, possiamo vedere ora il profilo dell'albero.
Selezionando tutti i cerchi ai vari livelli, clicchiamo su "Create Form">"Solid Form"
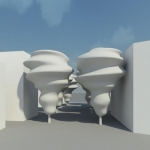
Ecco dunque creati il modello 3d del nostro pino:
Andiamo ora ad inserire il pino nel contesto da cui è stato preso, per osservare se l'ombreggiamento prodotto dal modello 3d corrisponde a quello della foto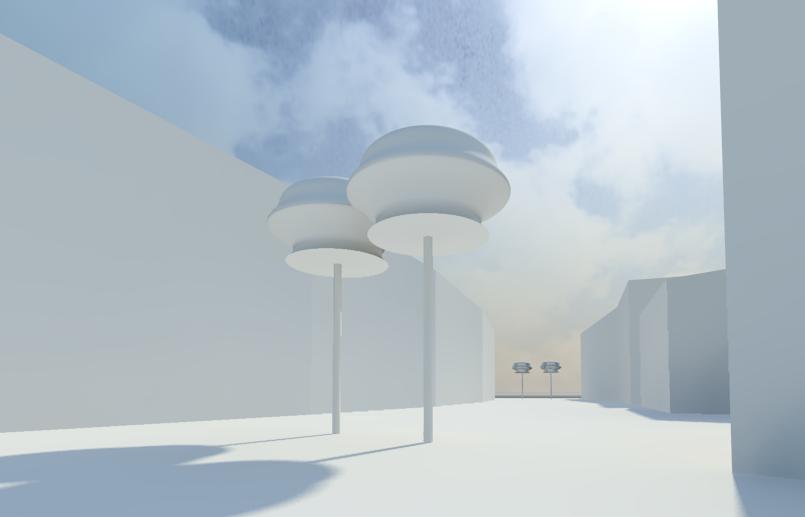
ed ecco la foto da cui è stato preso: possiamo vedere come l'ombra corrisponda. L'ombreggiamento è stato calcolato alle ore 13:00
Dom, 24/05/2015 - 20:11
 Antognozzi_Sposato
Dom, 24/05/2015 - 18:57
Antognozzi_Sposato
Dom, 24/05/2015 - 18:57
Il Platano è un albero che si trova facilmente in parchi, viali e giardini, ma anche nelle strade urbane, in quanto piuttosto resiliente all'inquinamento.
Ha la caratteristica di essere alto circa 20 o 30 metri, con un tronco eretto e robusto, una corteccia a chiazze, a volte con alcuni rigonfiamenti. La crescita della pianta è molto rapida, la sua vita è molto lunga, può addirittura superare i quindici secoli e quindi sviluppare un tronco dalla circonferenza che va dai 6 agli 8 metri. La sua chioma ha forma piramidale, ma diventa sempre più tondeggiante con gli anni, i rami sono numerosi e disordinati, le foglie sono ampie e palmate, misurano circa 15 o 20 centimetri.In primavera genera infiorescenze dalla forma tondeggiante di colore rossastro o giallastro, mentre durante l'inverno presenta piccoli frutti rotondi che, una volta maturi, sprigionano abbondanti semi.
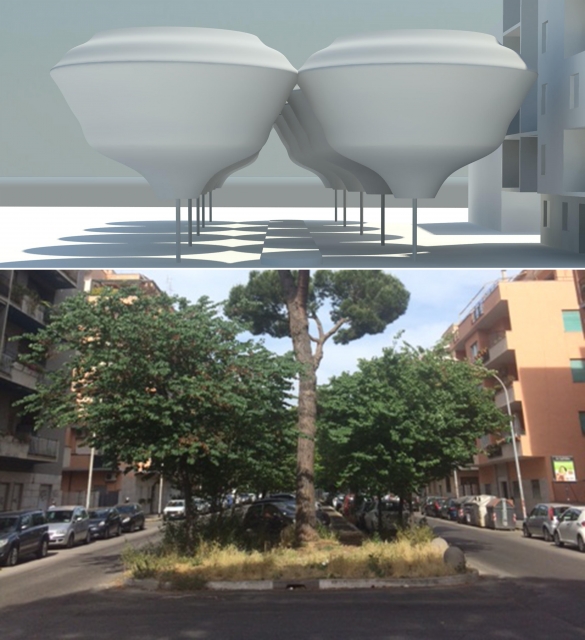
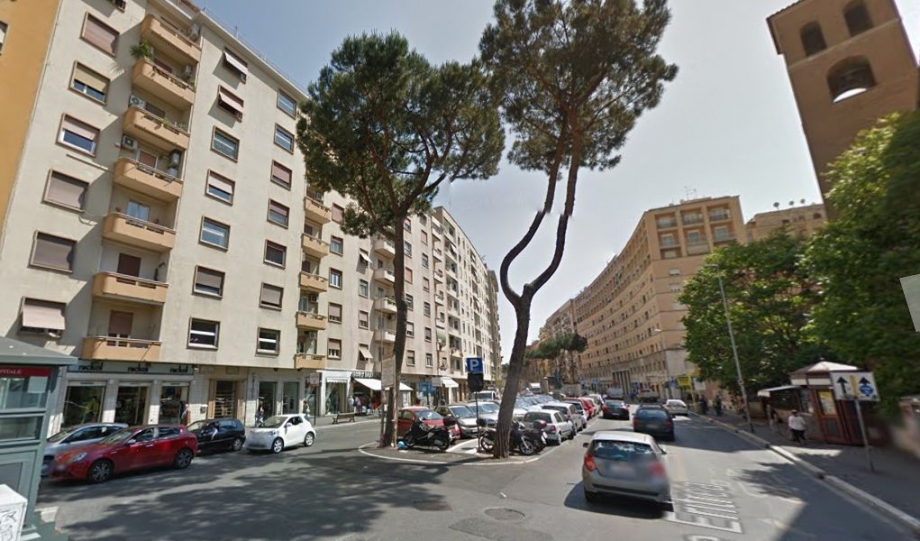
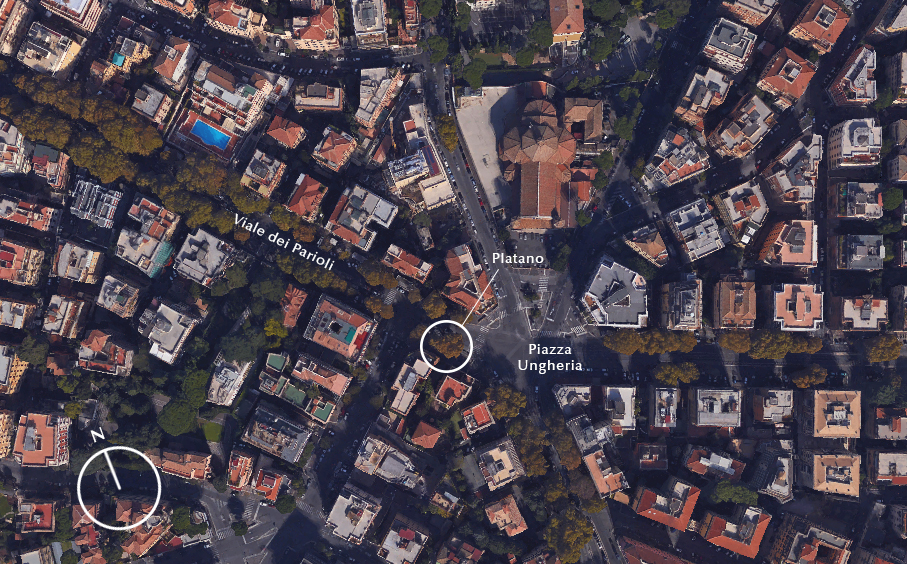
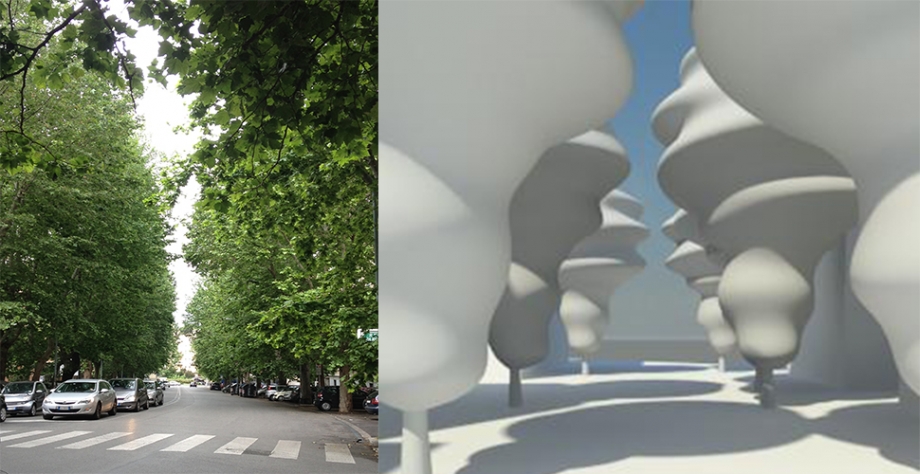
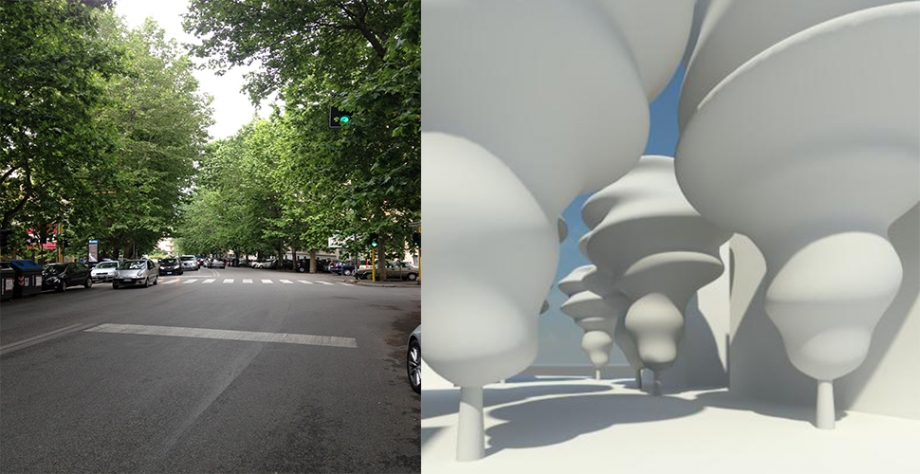
Noi abbiamo scelto di analizzare il primo dei platani che si trovano in Viale dei Parioli, poichè ci sembrava interessante studiare l'effetto di due filari continui su tutta la via e non il singolo evento. I platani di Viale dei Parioli sono piuttosto alti, 20 metri all'incirca come i palazzi che si affacciano sulla strada.
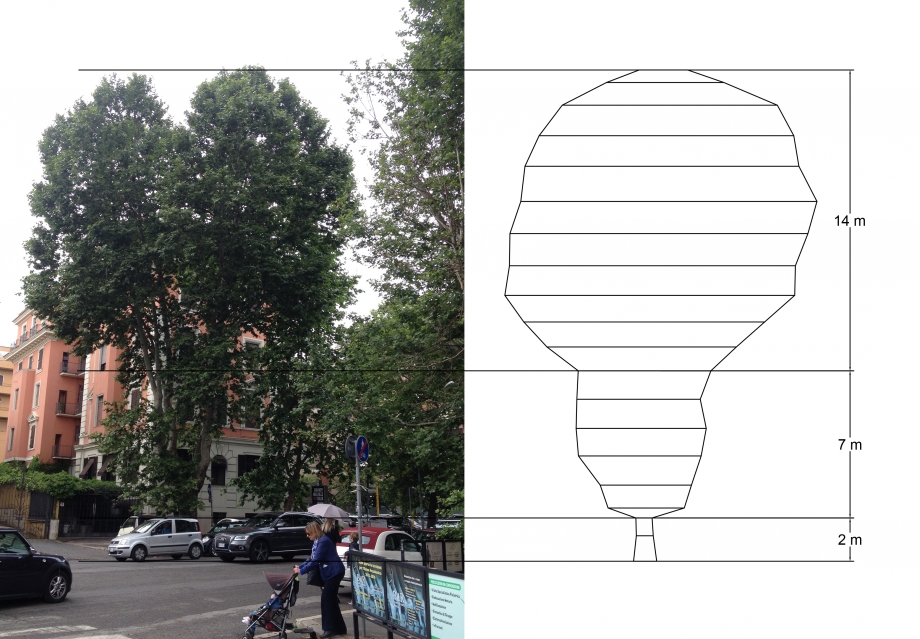
Con questa foto abbiamo potuto fare una misurazione approssimata delle varie porzioni dell'albero, scalando la foto con AutoCad in base a delle misure reali prese sul posto.
Procedimento
- Apriamo un nuovo documento "Family", al fine di creare un oggetto inseribile nei "Project" come parte di un database.
- In base alle misurazioni in larghezza e altezza dell'oggetto, creiamo dei piani orizzontali ad altezze diverse che vanno a comporre l'albero.
- Per rendere l'insieme di questi piani orizzontali una massa intera, li selezioniamo tutti e usiamo "Create Mass"
- Impostiamo un parametro che simula la caducità invernale delle foglie (select mass>properties>visible>add parameter>instance>ok)
- Clicchiamo su "Load into Project" per usare l'oggetto nei progetti.
Qui possiamo fare una breve analisi spaziale del viale alberato. Purtroppo dato il cattivo tempo non abbiamo trovato il momento per fare delle fotografie con la luce diretta e di conseguenza senza ombre definite, però possiamo comunque capire dall'analisi dell'ombreggiamento che il viale è parzialmente oscurato dall'elevata altezza dei platani che lo caratterizzano. Infatti la strada è in ombra nella maggior parte della sua lunghezza.
Analisi dell'ombreggiamento in estate
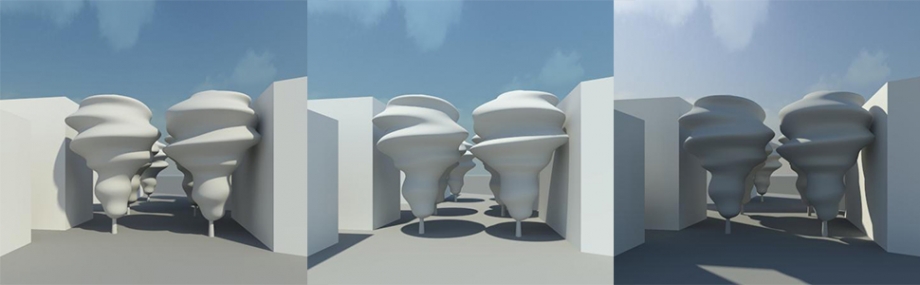
09:00 12:00 16:00
Dall'analisi più approfondita del solstizio d'estate notiamo come i vari alberi presenti facciano ombra lungo il viale e anche sulle facciate dei palazzi adiacenti alla strada in alcuni momenti della giornata, costituendo un enorme vantaggio per quanto riguarda la temperatura degli appartamenti che danno sulla strada.
Analisi dell'ombreggiamento in inverno
09:00 12:00 16:00
In inverno invece consideriamo che il fogliame sia caduto e vediamo come i palazzi ricevono la stessa luce che riceverebbero se gli alberi non fossero presenti (anche se non abbiamo modellato i rami). Questa caratteristica dei platani ci permetterebbe di creare dei luoghi con un'illuminazione solare diminuita in estate e buona in inverno.
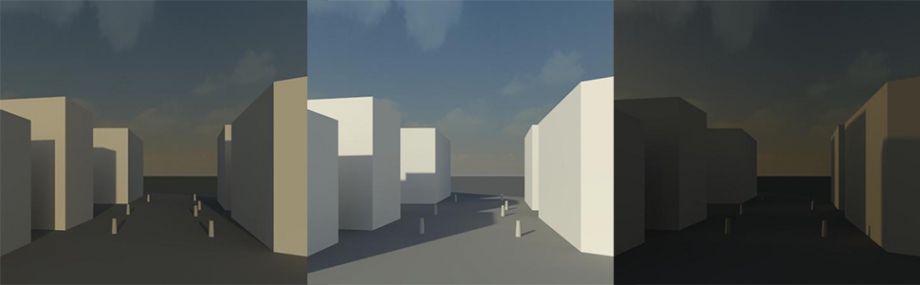
Analisi della radiazione solare in estate
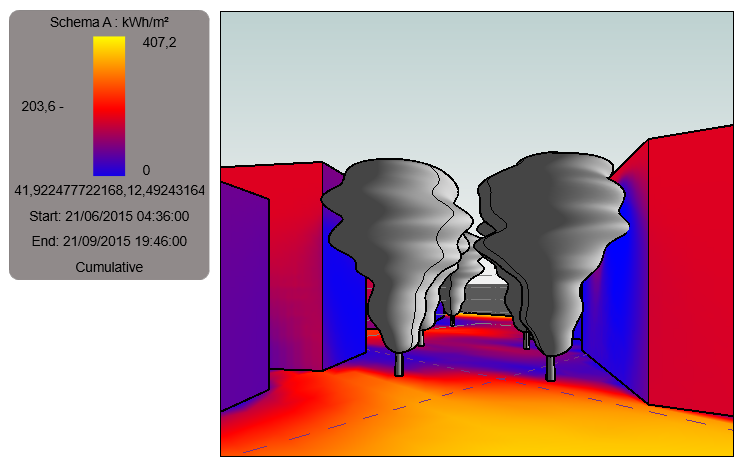
Con l'analisi della radiazione solare si nota come le facciate adiacenti alla strada abbiano un valore di irraggiamento bassissimo, e inoltre si nota la differenza tra le porzioni di suolo al di sotto degli alberi e quelle invece più vicine (Piazza Ungheria) che presentano un livello di irraggiamento molto più alto.
Analisi della radiazione solare in inverno
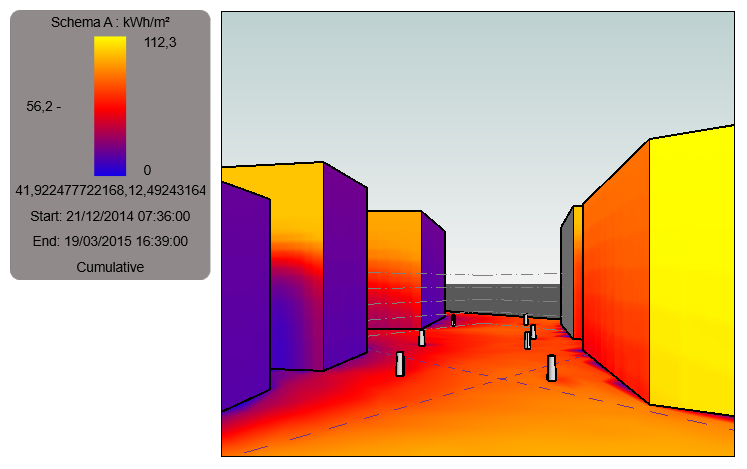
In inverno la caratteristica della perdita del fogliame favorisce l'irraggiamento del suolo e delle facciate, che raggiunge livelli piuttosto alti.
In conclusione tramite questo studio approfondito del filare alberato di Viale dei Parioli siamo sicuri che a livello progettuale l'uso di un'essenza arborea che si comporti come questa (cioè una pianta che perde le foglie in inverno, che raggiunge altezze elevate, che resiste all'inquinamento cittadino) sia adeguato in zone come quella di Roma, dove le temperature cambiano fortemente durante l'anno ma soprattutto cambiano con la presenza e l'assenza del sole, che incide fortemente sulle temperature all'interno di un edificio.
Osservando questo lunga successione di platani, ormai insediati nella realtà urbana di una via da moltissimo tempo, possiamo riconoscere come la strada, gli alberi e i palazzi esistono allo stesso modo di un progetto di housing odierno, dove il compito di schermare la luce è affidato agli alberi, che offrono un vantaggio sia nel periodo estivo che in quello invernale.
Dom, 24/05/2015 - 20:10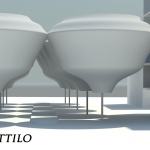 Chillemi_Dattilo
Dom, 24/05/2015 - 18:12
Chillemi_Dattilo
Dom, 24/05/2015 - 18:12
1. Premessa
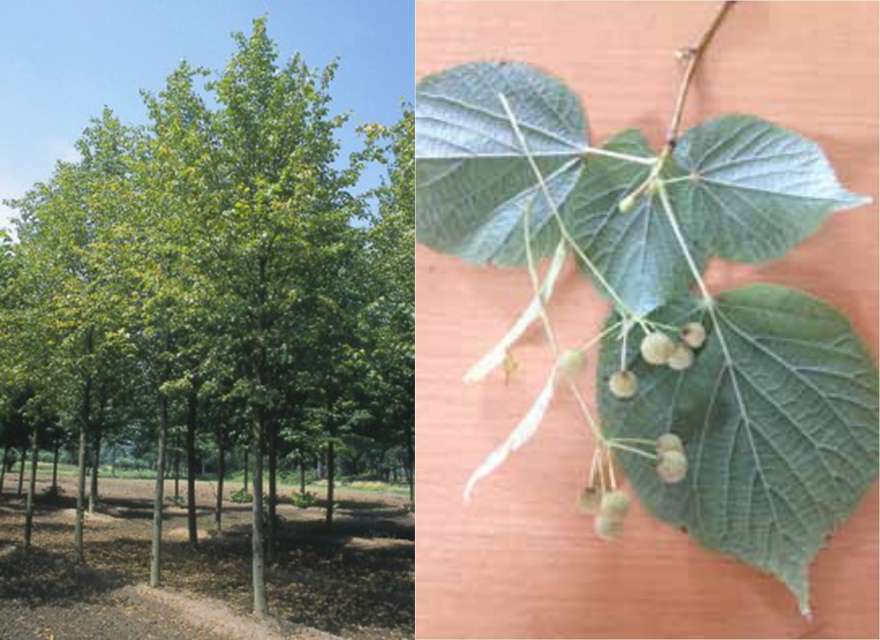
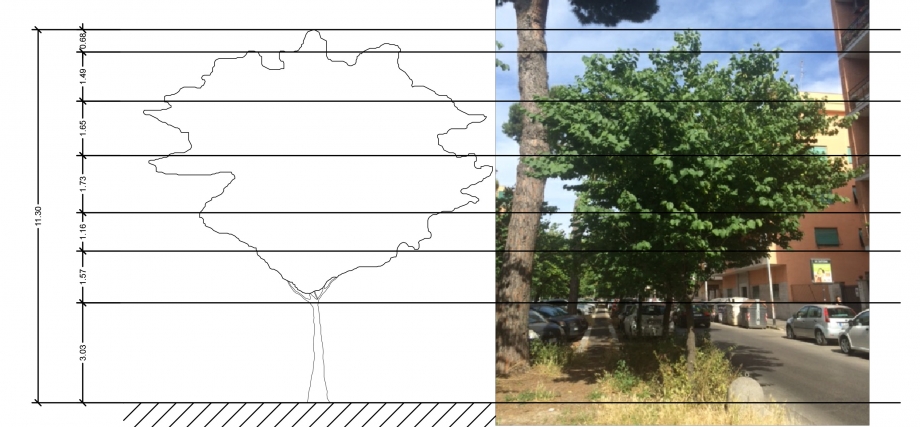
Nel quartiere Ardeatino, lungo Viale Sartorio, nei pressi dell'edificio analizzato nella Delivery 1, vi sono piantati ad intervalli regolari degli alberi di tiglio. Ne riportiamo il profilo e le caratteristiche della specie in questione:
Nome: Tilia Europaea Pallida;
Famiglia: Tiliaceae;
Altezza: 20-30m;
Foglie: fogliame verde a forma di cuore con un lato di colore giallo-verde;
Fiore: fiori gialli-bianchi in grappoli;
Corteccia: grigia-marrone scanalata;
Frutta: piccoli frutti arrotondati ricoperti di peluria;
Altre informazioni: adatto alla maggior parte delle condizioni e tipi di suolo, tollerante dell'inquinamento urbano. La Tilia europea si trova naturalmente ed è un ibrido tra la Tilia Cordata e la Tilia Platyphyllos.
Per iniziare la modellazione riportiamo prima il rilievo eseguito:
2. Modellazione
Apriamo il programma Vasari e creiamo una nuova "Families"; prima di tutto ricordiamo di modificare l'unità di misura come già proposto nella Delivery 1 e impostiamo la lunghezza in metri, per evitare di avere problemi una volta che andremo ad importare il file in un progetto precedentemente creato.
Families --> New --> Conceptual Mass --> Mass
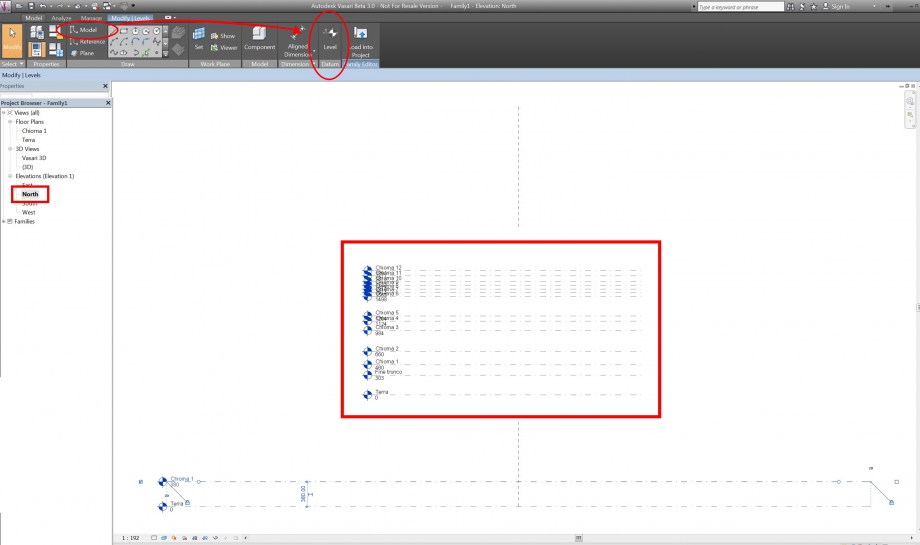
Nella finestra di lavoro impostiamo una delle viste "elevation" che si trovano nella casella "Project Browser". Ora dalla barra di comando andiamo a creare nuovi livelli riportando le quote prese in precedenza e rinominiamo i livelli (es. fine tronco, chioma 1 ecc.).
Project Browser --> Elevation --> North
Model --> Level --> New Level
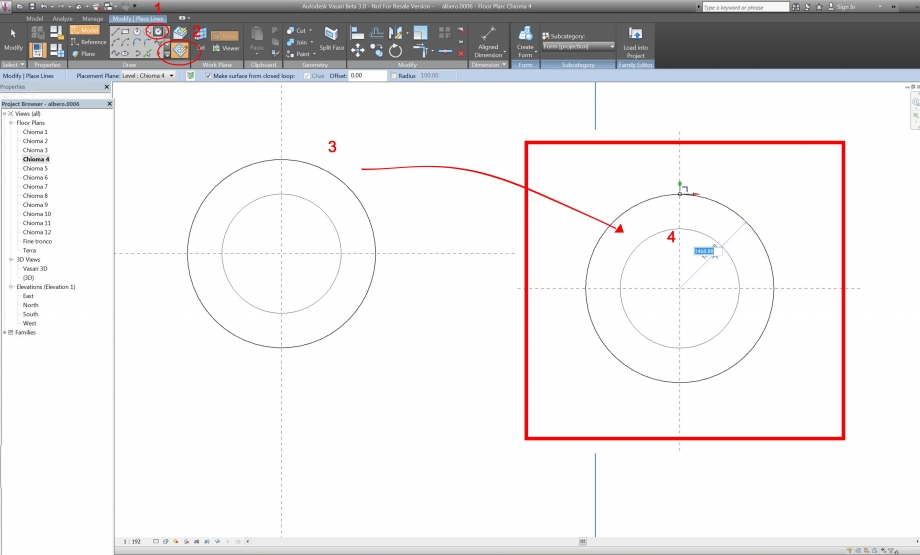
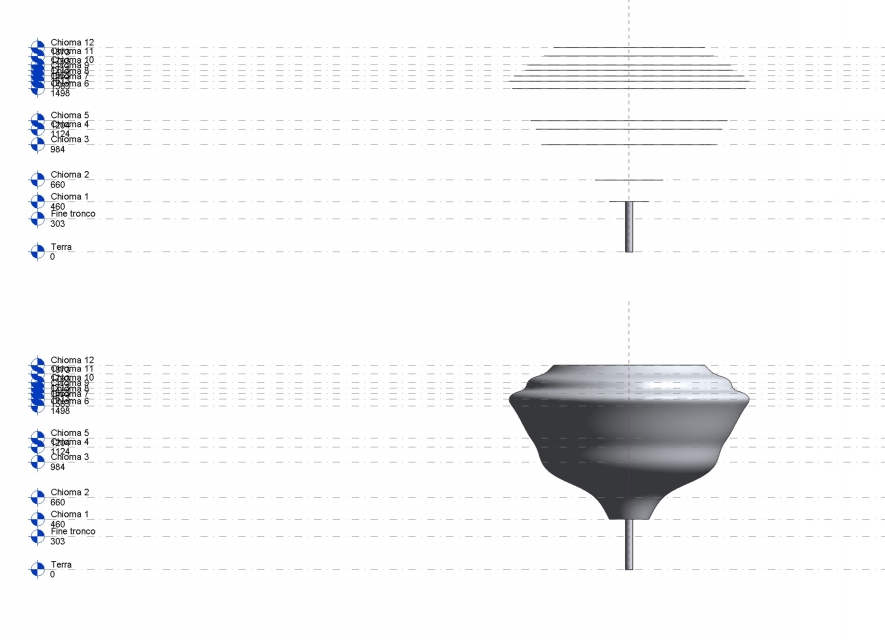
Adesso possiamo creare le sezioni (circolari) che formano il nostro albero; con il comando "circle" disegnamo dei cerchi con l'origine nel centro, e cambiamo il raggio in base alla dimensione della sezione che stiamo riportando. Ricordiamo di selezionare prima il livello sul quale si vuole disegnare e cliccare sempre su "work on workplane" come riportato in figura, per non incorrere in errori di quote.
Circle --> Work on Workplane --> Raggio
Passando ad una vista 3D, selezionare solamente le sezioni che compongono la chioma dell'albero e creare una massa. Per il tronco basta selezionare il cerchio corrispondente ed estruderlo come fatto nelle esercitazioni precedenti.
Model --> Create Form --> Solid Form
Questa operazione può essere eseguita anche da una delle viste elevation.
 Tornando alla vista North andiamo ad "ancorare" i livelli con le sezioni appena create in modo tale da poter successivamente modificare in modo uniforme i parametri della crescita e dell'altezza che verranno impostati. Per fare questo basta selezionare "align" dalla barra di comando, cliccare prima il livello, poi la sezione ed infine chiudere il lucchetto. Ora siamo pronti per andare ad impostare i parametri.
3. Parametri
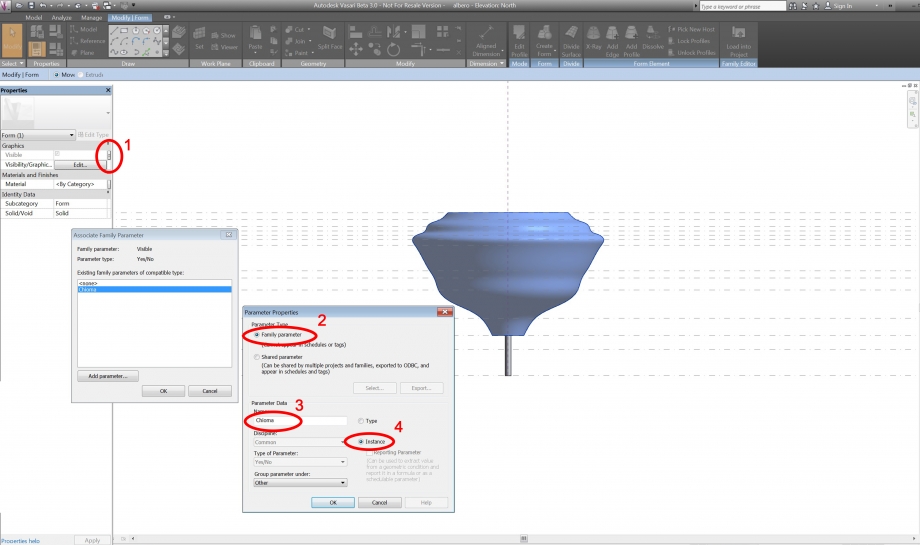
Il primo parametro che andiamo ad impostare è quello d'istanza che andrà a modificare la chioma e la caducità delle foglie; selezioniamo quindi la massa che rappresenta la chioma, nella casella delle proprietà clicchiamo sul quadratino vicino a "Visible", diamo un nome al parametro e selezioniamo Istance.
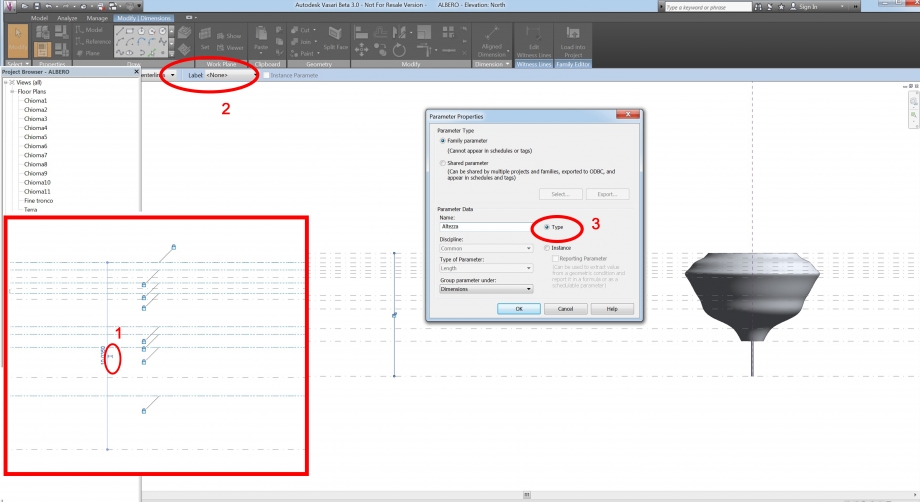
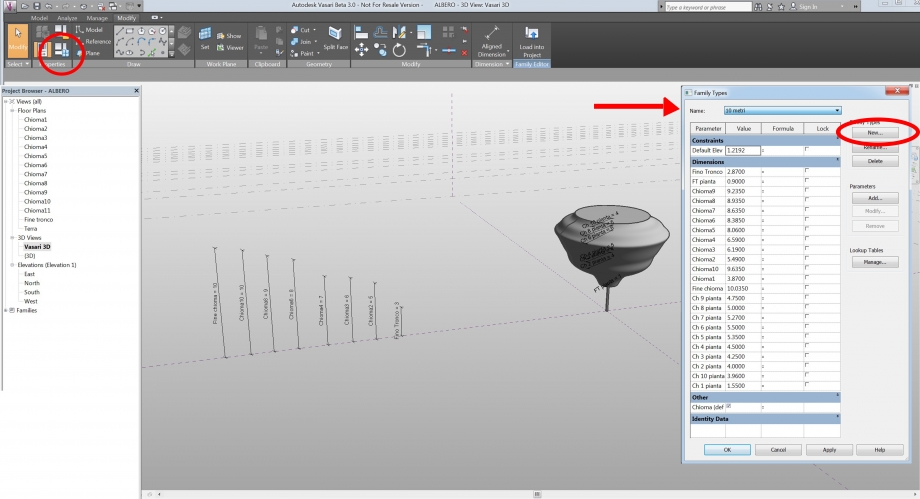
Ora andiamo ad impostare il parametro di tipo crescita; per prima cosa dobbiamo rendere le distanze permanenti cliccando sul simbolo vicino alla quota come appare in figura. Si aprirà una barra delle modifiche dove andiamo a cliccare su "Label" e "Add Parameter", diamo un nome alla quota e infine clicchiamo su "Type".
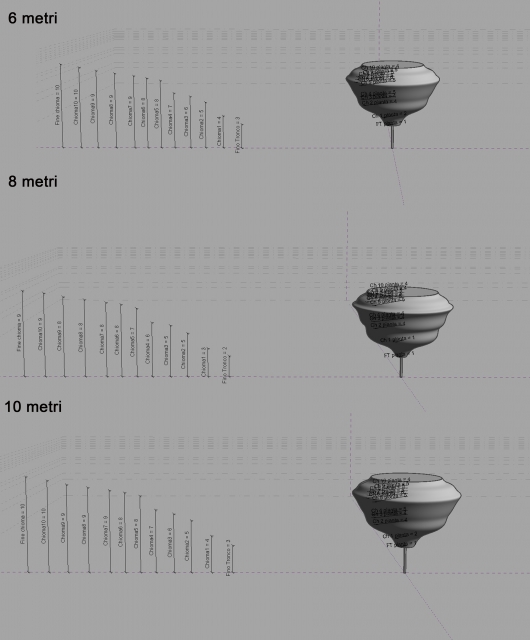
Una volta effettuata questa procedura per tutte le altezze e tutte le sezioni, aprendo la finestra delle "Family Types" troviamo tutti i parametri impostati fino ad ora. Adesso se clicchiamo su "New" rinominiamo questa famiglia e con lo stesso procedimento creiamo altre Family Types per ogni altezza dell'albero che vogliamo analizzare (es. 10m, 8m, 6m). Si copieranno automaticamente le impostazioni che abbiamo inserito e andando a modificare questi paramentri uno per uno e dando il comando "Apply", vedremo come si modificherà il nostro albero.
Riportiamo quindi la crescita dell'albero analizzato; la differenza non è così netta poichè avremmo dovuto studiare altezze maggiormente distanti, ma abbiamo riscontrato dei problemi nel modificare i parametri perchè la massa non si evolveva in modo totalmente uniforme.
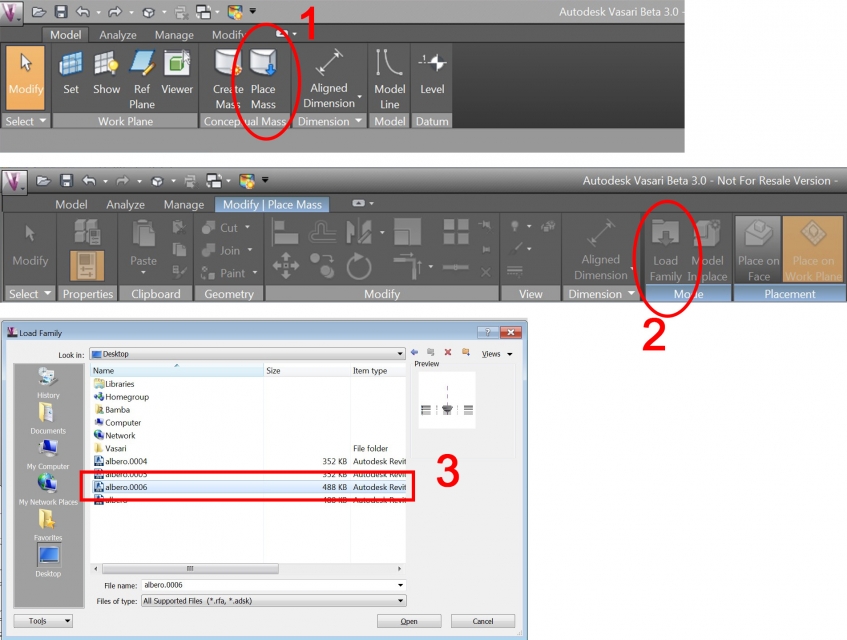
4. Importare l'albero
Per prima cosa bisogna aprire il file Vasari nel quale desideriamo importare l'albero, poi nella barra di comando selezionare "Place Mass", poi cliccare su "Load Family" e scegliere il file dalla finestra che si aprirà.
Model --> Place Mass --> Load Family
Una volta inserito l'albero nel file abbiamo analizzato il comportamento che ha rispetto all'edificio precedentemente studiato ed anche rispetto al contesto. Il risultato è che essendo un tiglio piantato recentemente e quindi ancora non di grandi dimensioni, ed essendo posizionato davanti la facciata Nord del palazzo non influisce particolarmente sull'ombreggiamento.