


 bassanelli_caprioli
Dom, 10/05/2015 - 20:37
bassanelli_caprioli
Dom, 10/05/2015 - 20:37
STATO DI AVANZAMENTO DEL PROGETTO
Il progetto in questione, rispetto alla consegna precedente, ha subito una serie di piccole variazioni, sia per quanto riguarda la forma stessa dell’edificio, sia per quanto riguarda il terreno su cui esso andrà a posizionarsi. L’idea iniziale di progetto, infatti, era quella di costruire un edificio con una forma molto libera, autonomo e che, quindi, si staccasse dall’edificio preesistente confinante, ma che, allo stesso tempo, si allineasse con esso per quanto riguarda l’altezza; diverse porzioni di edificio, inoltre, risultavano sollevate rispetto alla quota del terreno, dando vita ad un’impronta a terra molto limitata, con lo scopo di creare dei percorsi interni che si vanno ad insinuare nell’area. Questi percorsi garantiscono alle utenze di raggiungere qualsiasi luogo dell’area in modo rapido: in realtà la scelta progettuale, che ci ha portato ad inserire questi percorsi nel progetto, è sì funzionale, ma anche pensata per creare una visuale piacevole per chiunque voglia passare al di sotto dell’edificio progettato.
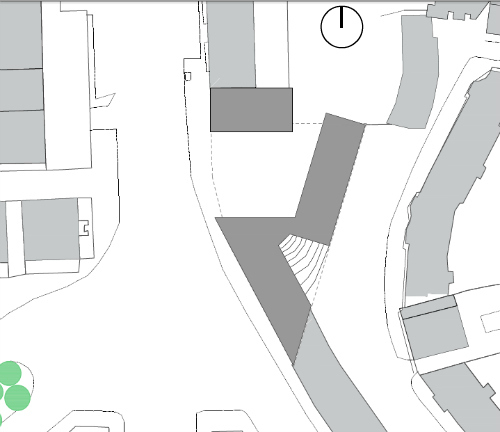
In seguito, l’edificio è diventato vincolato alla facciata cieca preesistente, sotto consiglio del professore, in modo tale da creare una continuità dal fronte strada Via degli Orti di Cesare e una visuale più gradevole rispetto a quella che si andava a creare in precedenza; inoltre, l’edificio non manterrà l’altezza dell’edificio confinante, ma verrà alzato, di uno o due piani massimo, poiché, altrimenti, i metri quadri previsti per il progetto risulterebbero insufficienti. Andando, poi, ad analizzare in modo più specifico il terreno, abbiamo pensato di create delle gradonate alte 0,50 m e lunghe 1,5 m, per consentire alle utenze di sostare, sedersi, mangiare qualcosa all’aria aperta e svolgere qualsivoglia attività, ma anche delle scalinate piuttosto lente, poiché intervallate da numerosi pianerottoli, in modo da raggiungere in maniera più agevole le quote del terreno a cui si vuole arrivare, ma non senza concedersi delle frequenti soste per ammirare l’edificio in sé per sé. Sono stati, infatti, creati dei percorsi preferenziali per attraversare l’area: il percorso più ampio è quello che conduce a una sala conferenze ipogea, la quale potrebbe rappresentare un luogo di interesse comune molto rilevante (ecco il motivo per cui abbiamo deciso di posizionarla in un luogo così centrale); l’altro percorso, invece, conduce a degli esercizi commerciali situati in via Ettore Rolli.
Analizzando i vari luoghi che compongono l’edificio è necessario puntualizzare che gli unici edifici al livello del terreno (in via Ettore Rolli) sono il bar e una banca di Micro credito e dei piccoli negozi (a quota +0.0), mentre a livello del terreno, a quota +6,85, sono presenti le camere ad uso “albergo”.

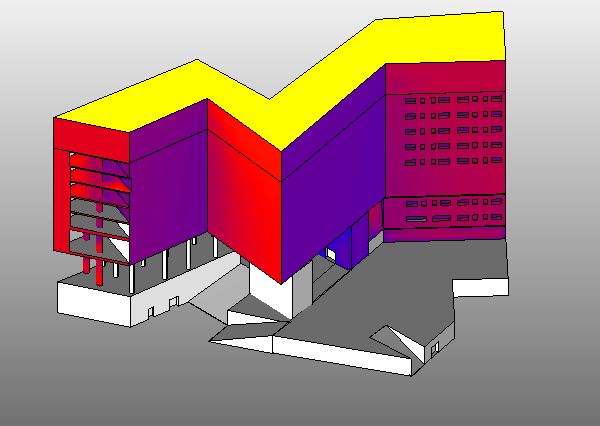
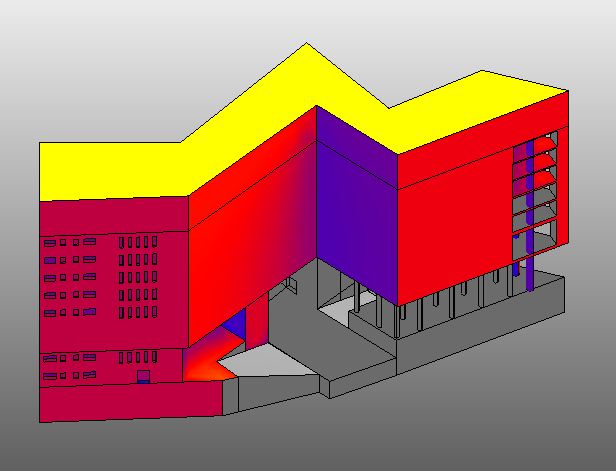
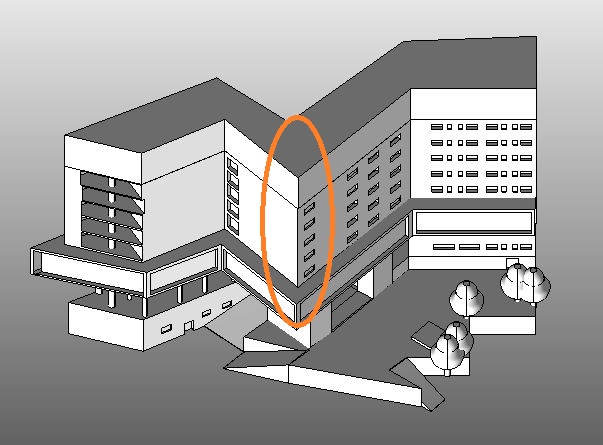
L’edificio è costituito da quattro bracci principali che non seguono un andamento rettilineo costante, ma cambiano direzione ogni volta.
Come detto in precedenza, per consentire il passaggio delle persone nei percorsi sotterranei, l’edificio presenta diverse parti a sbalzo che hanno bisogno di essere sorrette da alcuni noccioli strutturali, contenenti le scale e gli ascensori per accedere ai piani superiori, posizionati, esattamente, nei punti in cui le braccia dell’edificio cambiano direzione: i noccioli strutturali in totale sono tre, situati nei primi tre cambiamenti di direzione dell’edificio, mentre il quarto braccio, anch’esso a sbalzo, è sorretto da pilastri 30 cm x 30 cm.
All’interno sono state posizionate una serie di residenze diverse: delle camere ad uso “albergo”, dei mini alloggi e degli alloggi più grandi.
Nella parte che si vincola alla facciata cieca dell’edificio accanto, sono situate le camere; nel braccio centrale, invece, sono stati posizionati i mini alloggi di 35 mq, mentre negli ultimi due bracci, gli alloggi di 45 mq. Ogni tipologia di residenza ha un accesso a sé stante che si distingue dagli altri, in modo tale da rimanere isolati, ma allo stesso tempo, è stato inserito un piano completamente adibito a servizi, quali negozi, bar, ristoranti, una palestra, luoghi di scambio, di relax, e luoghi destinati ad attività socio-culturali, che funge da raccordo per tutte le utenze che andranno ad abitare l’edificio.
Le camere ad uso albergo sono impostate su corridoi centrali con affaccio ad est e ad ovest, le quali consentono una facile distribuzione degli spazi; anche i mini alloggi sono impostati su corridoi che variano a seconda della forma dell’edificio, mentre, gli alloggi più grandi sono a ballatoio e, nella testata terminano a punta (riprendendo la forma del lotto dell’area di progetto), dove sono inserite delle terrazze aperte che, eventualmente, verranno schermate da opportuni brise soleil.
Tutte le tipologie edilizie, infine, godono di alcuni spazi comuni liberi destinati allo svago, dove poter leggere e rilassarsi in compagnia.
ANALISI DELLA PIAZZA ESTERNA AL PROGETTO:
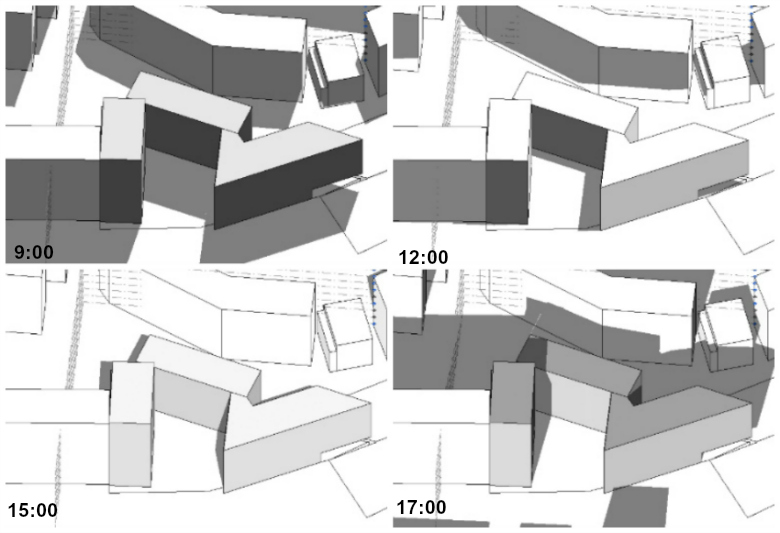
Di seguito, viene riportato l'ombreggiamento relativo al solstizio d'inverno. Come possiamo osservare, durante la mattinata, la piazza retrostante l'edificio è illuminata e risulterà sufficientemente calda. Nel primo pomeriggio, invece, la piazza risulta sempre più ombreggiata a causa dell' altezza dell'edificio, mentre la facciata principale su Via degli Orti di Cesare riceve luce. Essendo l' edificio molto stretto e lungo risulterà molto ben illuminato e caldo. La parte sottostante l'edificio, meno sottoposta a radiazione, è, invece, più fredda, risulta molto ariosa, e, a causa dell'altezza dell'edificio in quel punto, di circa 9,00 m, riceve molta luce.
Di seguito, viene riportato il solstizio d'estate. Come possiamo notare la piazza retrostante è molto soleggiata e calda, dovranno quindi essere inseriti nel progetto degli alberi caducifoglie per creare degli spazi dove sostare e trascorrere le ore mattutine; nel pomeriggio, invece, la piazza risulta ombreggiata e quindi sarà piacevole passare il pomeriggio in quel luogo.
Viene ora riportato la data dell' equinozio, giornata per la quale valgono le stesse considerazioni fatte sopra.
Riportiamo ora la radiazione solare della piazza confinante e, come possiamo notare, risulterà molto calda, per cui è opportuno posizionare degli alberi che, durante il periodo estivo, aiuteranno a rendere l'ambiente più fresco.
Vediamo ora come la radiazione solare annua cambi per l'edificio.
Verranno, in seguito, proposte le radiazioni delle due facciate principali dell' edificio. Si noti dalle immagini come le facciate, nella maggior parte del loro sviluppo, ricevono molta luce, per cui verranno successivamente creati degli aggetti che avranno lo scopo di proteggere le finestre dal sole e, di conseguenza renderanno quell'ambiente meno afoso e più fresco.
La testata sud, in particolare, come già detto in precedenza, è la parte dell'edificio più esposta al sole, motivo per il quale verrà opportunamente schermata tramite l'utilizzo di brise soleil.
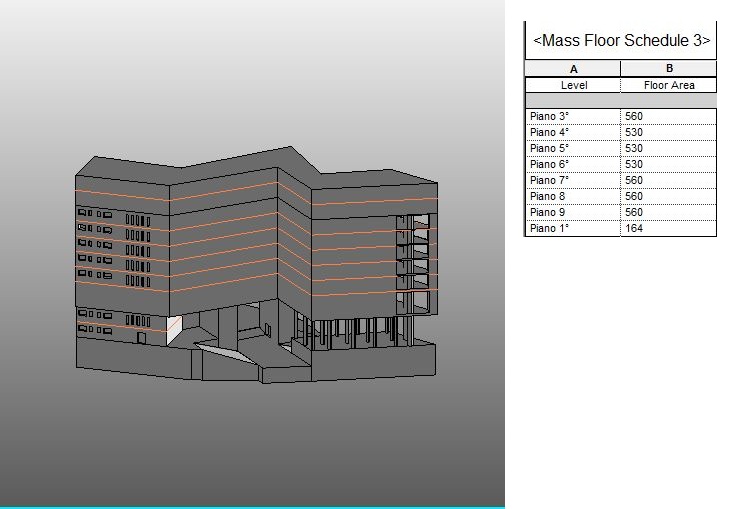
Andando ora a fare uno studio più approfondito dei metri quadri dell'edificio, notiamo come questi siano poco meno dei 5000 mq richiesti dal progetto (3000 mq residenziali + 1500/2000 mq servizi). In realtà, nella scheda non sono stati computati i metri quadri dei servizi che si trovano sotto l'edificio e quelli della sala conferenze. Aggiungendo, infatti, questi valori si arriva ora ad un valore che supera di poco i 5000 mq: avremo, quindi, una metratura sufficiente rispetto ai limiti richiesti.
il progetto è stato modificato in alcune delle sue parti, sono state definite le volumetrie interne, quindi abbiamo aggiunto le finestre al nostro progetto Vasari, abbiamo caratterizzato il piano dei servizi e abbiamo aggiunto gli alberi al proggetto. Le radiazioni risultano invariate, in quanto non è stata modificata la planimetria. Restano da definire gli ultimi due piani con gli alloggi da 35 mq. 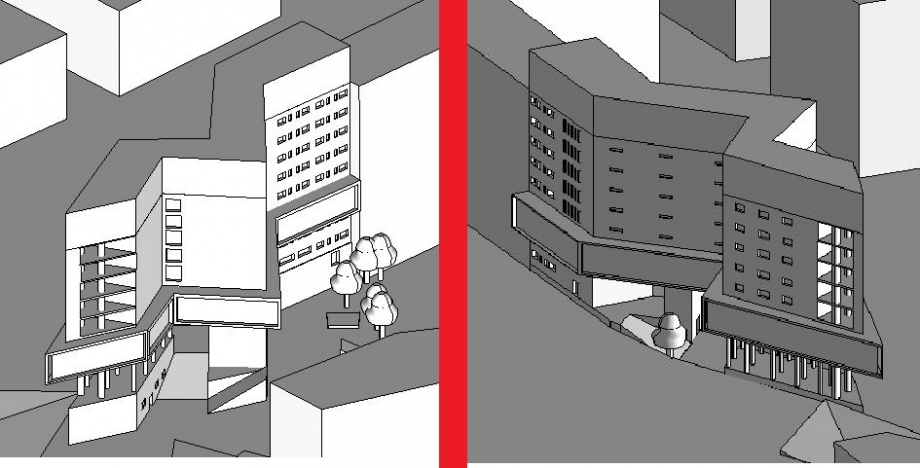
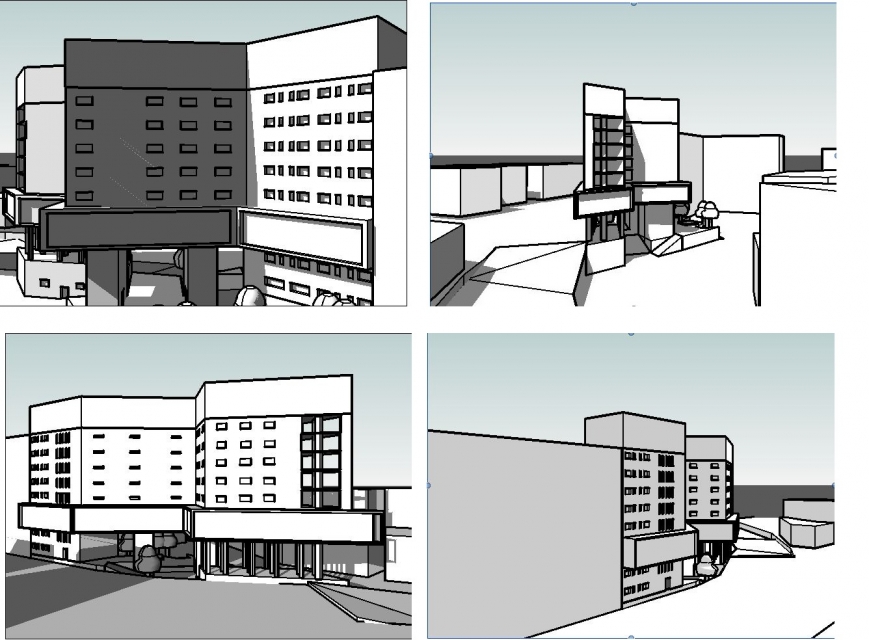
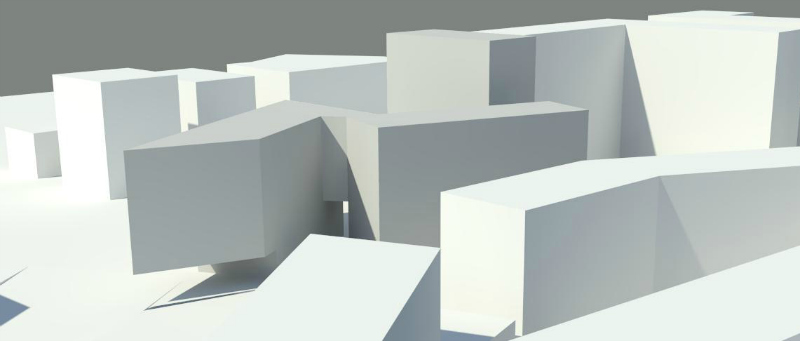
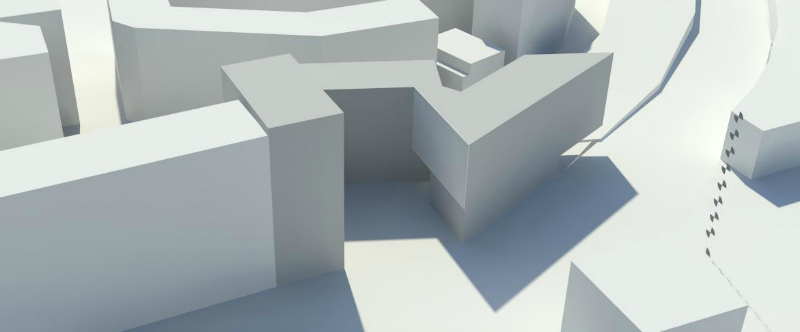
Vediamo ora qualche vista del nostro progetto :
Notiamo come la piazza retrostante il nostro edificio, risulti soleggiata d'inverno e ombreggiata d'estate. Sarà piacevole sostare nella piazza durante il pomeriggio estivo, trascorrendo del tempo seduti all' ombra pomeridiana, creata sia dall' edificio ma anche dagli alberi. In inverno invece la piazza sarà completamente soleggiata fino alle 12, ma sarà ancora piacevole stare anche durante il pomeriggio. 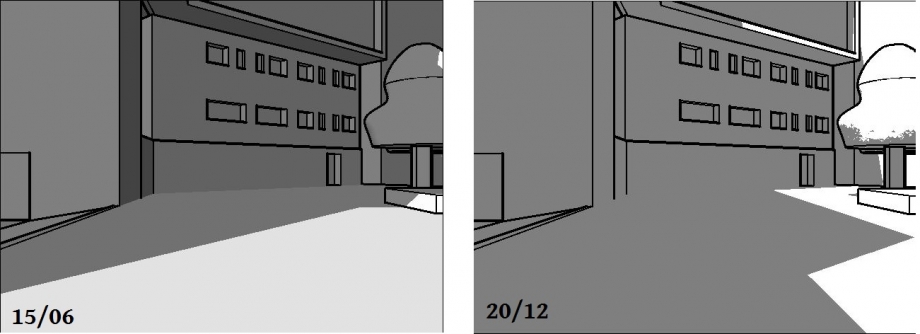
Analizziamo anche la parte sottostante il ponte creato nel nostro progetto, vediamo come la zona risulta piacevole d'inverno anche nel pomeriggio, e ombreggiata d'estate, essendo lo spazio molto alto, circa 9m, è molto arioso e luminoso.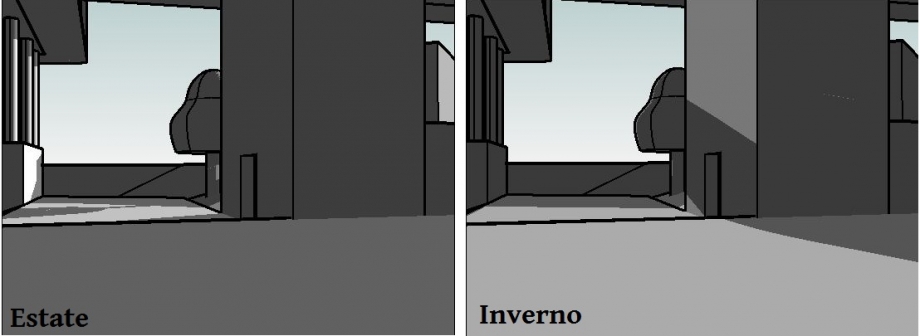
Vediamo ora l'accesso principale all'area che abbiamo sia da via degli orti di cesare che da via portuense vecchia, l' accesso avviene attraverso una scalinata affiancata da una gradonata, il percorso è sempre ben coperto e ombreggiato. Essendo ombreggiato, troviamo la possibilità di riposarsi sulle gradonate. 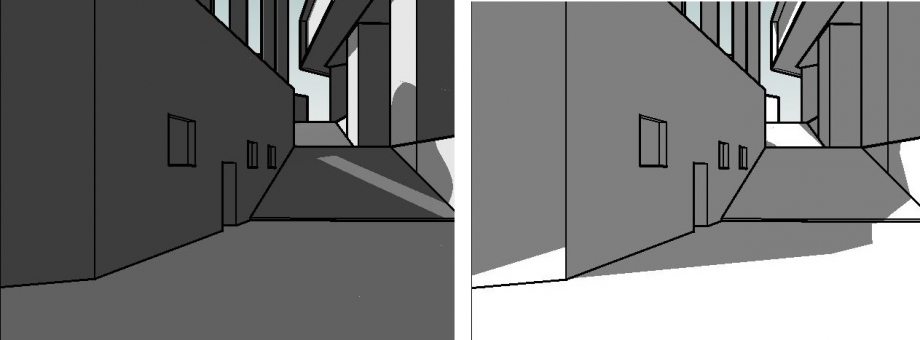
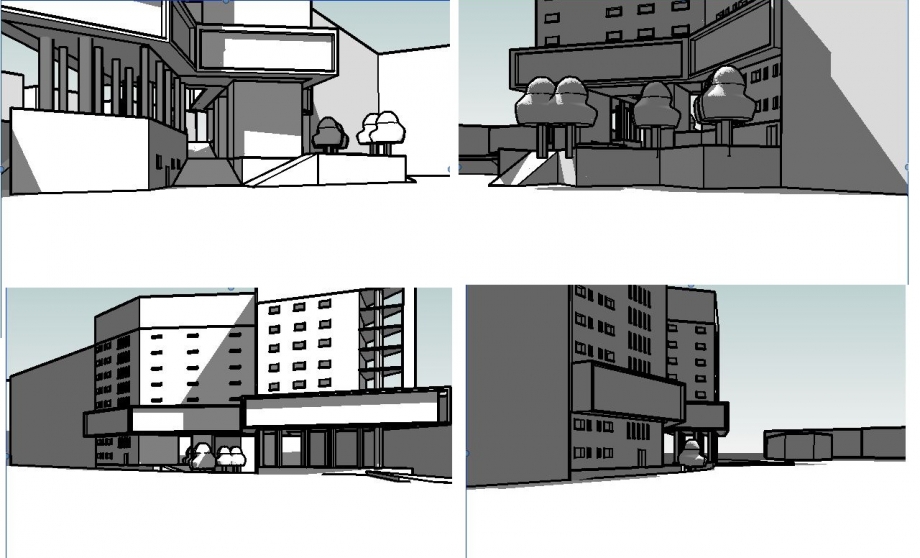
Presentiamo ora alcune viste dell'edificio e del suo intorno fatte nelle ore mattutine da via portuense vecchia e nelle ore pomeridiane da via degli orti di cesare, come possiamo notare, nonostante l'imponenza dell'edificio grazie alla sua snellezza, l'ombra sull'intorno è poco rilevante, la sua forma particolare, come visto anche in precedenza crea delle zone soleggiate e delle zone in ombra dove è possibile sostare.
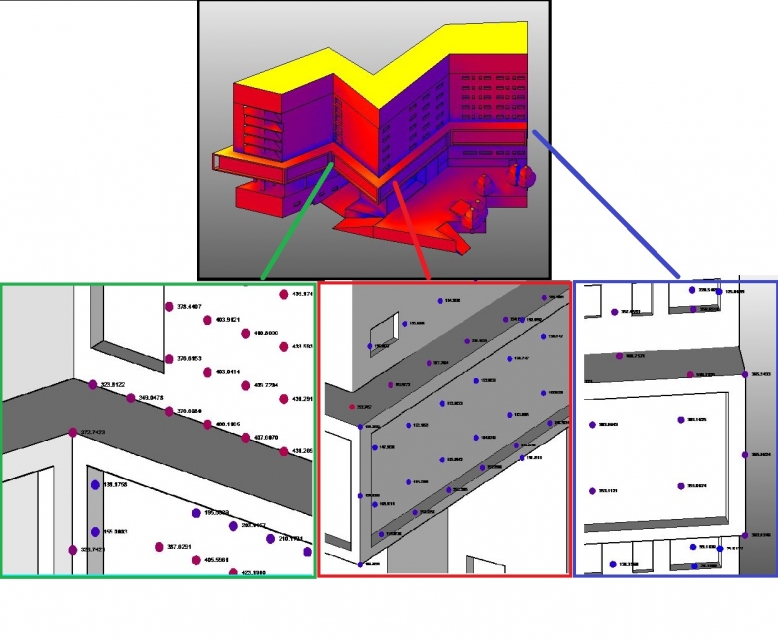
Vediamo ora le radiazioni solari sull' edificio, come si può vedere dalla radiazione l'edificio è molto esposto al sole, quindi gli interni risulteranno molto caldi, le finestre dove possibile andranno ombreggiate con aggetti, altre dovranno essere arretrate. Le radiazioni fatte si riferiscono ad un intero anno solare. I valori ricavati si aggirano intorno a 400/500 kwh/mq, nei punti più ombreggiati 200 kwh/mq. Nella parte ovest dell'edificio, su via degli orti di cesare, abbiamo valori che raggiungono anche 700/800 kwh/mq, questo perchè d'estate la facciata è molto illuminata. La parte terminale dell'edificio esposta sempre alla luce, risulterà la più calda, infatti abbiamo predisposto una terrazza aperta e ombreggiata con brise soleil. Il piano dei servizi per gran parte vetrato, ha le sue funzioni arretrate rispetto il profilo del piano, così che il camminamento risulti luminoso e caldo.

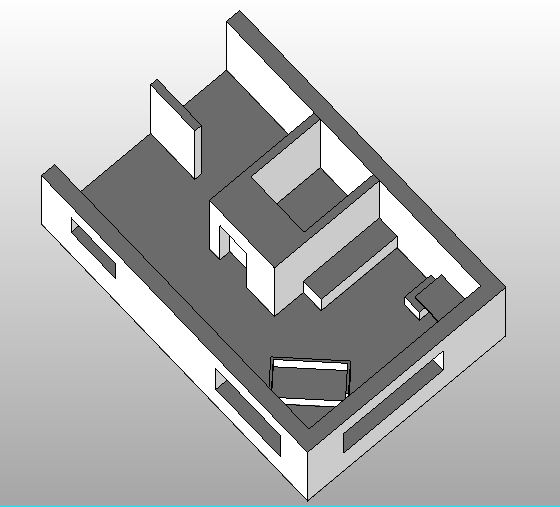
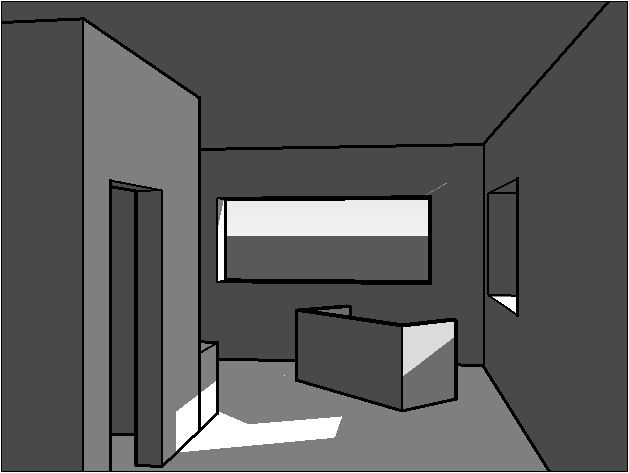
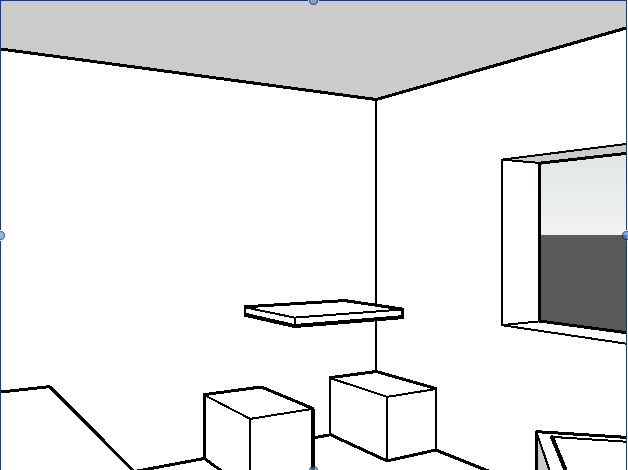
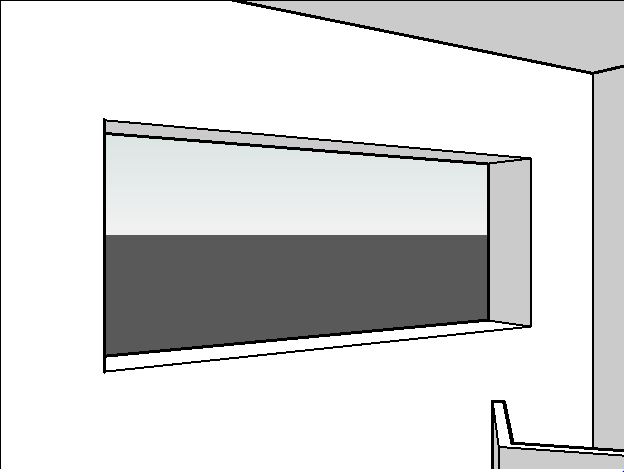
Infine abbiamo lavorato alla modellazione di una stanza di 35mq, abbiamo scelto la camera che risulta più luminosa e più sottoposta a radiazione
Di seguito le viste interne dell'edificio.
 Blasi_Elia
Dom, 10/05/2015 - 23:38
Blasi_Elia
Dom, 10/05/2015 - 23:38
Nella precedente consegna abbiamo presentato le nostre due idee di progetto iniziali, entrambe composte da tre volumi che articolano l’area situata tra Viale Trastevere e Via Crescenzo del Monte, in prossimità della stazione Trastevere.
Ad oggi ci siamo concentrate sullo sviluppo di una delle due idee, definendo meglio le forme degli edifici e la connessione tra di essi, in maniera tale da rafforzare l’identità del progetto e da garantire una distribuzione intelligente delle diverse funzioni richieste.
 Planimetria: la "torre", in alto, e le due "stecche", in basso.
Il progetto si compone di un edificio più alto che chiameremo per comodità “la torre”, di nove piani, posto in continuità con l’edificio a "L" preesistente che dà su Viale Trastevere, in maniera tale da “tappare” la facciata cieca di quest’ultimo. La torre costituisce una "micromondo", una sorta di unità autonoma, in cui il piano terra è interamente occupato da servizi a disposizione dei piani superiori, costituiti quasi totalmente da alloggi ad albergo.
Il dislivello tra le due strade si supera attraverso il piano seminterrato dell'edificio centrale; questo presenta servizi al piano terra e minialloggi ed alloggi a doppio affaccio ai cinque piani superiori; il terzo edificio invece, prospiciente su Viale Trastevere, è alto sei piani e presenta sempre servizi al primo piano e minialloggi ed alloggi ai piani superiori. Le due "stecche" sono collegate tra loro da un corpo vetrato sulla piazza e dalla forma irregolare che si sviluppa per un’altezza di quattro piani e ospita servizi, in continuità con la parte terminale dell’edificio che dà su Viale Trastevere.
ANALISI DELL'OMBREGGIAMENTO
1) Gli edifici e la piazza
A questo punto abbiamo analizzato l'ombreggiamento sulle facciate degli edifici, focalizzandoci su quelle più problematiche esposte ad Ovest e a Sud, e sulla piazza centrale, in modo da immaginarne la vivibilità e il comfort nei momenti più significativi dell'anno: solstizi ed equinozi.
Solstizio d'estate
Notiamo che la piazza centrale risulta ombreggiata per buona parte della mattinata e, presumibilmente (sebbene non siano mostrati anche gli orari oltre le 17:00) anche nelle tarde ore del pomeriggio. Il problema riguarda perlopiù le ore centrali della giornata, come d'altronde era prevedibile, in cui la piazza è quasi interamente assolata. Il problema potrà essere aggirato tramite la giusta collocazione di alberi caducifoglie, che garantirebbero il giusto ombreggiamento nei mesi estivi. Le facciate meno soleggiate degli edifici risultano quelle esposte a Nord e la facciata esposta ad Ovest della stecca centrale, che riceve l'ombra degli altri due per tutta la mattinata.
Solstizio d'inverno
Notiamo che le facciate più penalizzate sono quelle "interne" che danno sulla piazza, eccezion fatta per la facciata Sud della torre, favorita dall'esposizione. La piazza, inoltre, diventa ben illuminata e piacevolmente fruibile solo nelle poche ore centrali del pomeriggio, ma si ricordi anche che questa non è una corte, né tantomeno interamente chiusa sui tre lati: essa infatti presenta punti di passaggio tra Viale Trastevere e Via Crescenzo del Monte, anche attraverso il corpo di collegamento tra le due stecche sopraelevato,pertanto non crediamo si possa generare un ambiente eccessivamente buio o o soggetto ad umidità nelle ore in cui la piazza è in ombra.
Equinozio di primavera
Abbiamo scelto l'equinozio di primavera come rappresentativo di entrambi gli equinozi, in cui la situazione di ombreggiamento e altezza del sole è pressoché simile. Le immagini mostrano che la piazza appare ben progettata per le "mezze stagioni", in quanto, fatta eccezione per la mattinata, da mezzogiorno in poi essa presenta un buon equilibrio di aree soleggiate e aree in ombra, costituendo un piacevole spazio aperto ben illuminato ma che presenta anche zone riparate dove sostare nelle ore più calde.
2) Il corpo vetrato di collegamento
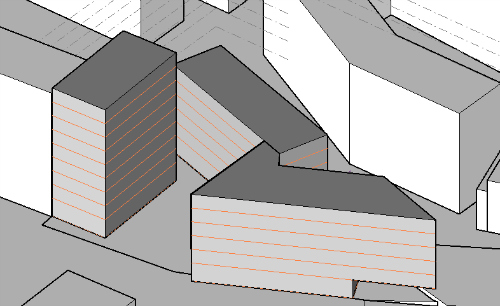
Ci è sembrato significativo anche mostrare come il corpo vetrato dalla forma irregolare che collega le due stecche non sembri costituire un rischio per il comfort termico interno: la sua esposizione infatti è favorevole, in quanto, la grande vetrata prevista, in continuità con la facciata dell'edificio, è esposta a Nord, e pertanto è in ombra per la maggior parte della giornata, anche in estate.
Solstizio d'estate, ore 12:00. Equinozio di primavera, ore 12:00.
 Solstizio d'inverno, ore 12:00.
ANALISI DELLA RADIAZIONE SOLARE
1) Gli edifici e la piazza
 Primavera
 Autunno
 Estate
 Inverno
Anche qui abbiamo focalizzato l'analisi sulle facciate degli edifici esposte a Sud e ad Ovest, immaginando che siano quelle che ricevono una quantità maggiore di radiazione solare durante l'anno. Notiamo come, tra le facciate "interne" degli edifici che danno sulla piazza, quella esposta ad Ovest della stecca centrale sia, durante tutto l'anno, quella che riceve una minor quantità di radiazione solare: in inverno siamo intorno a valori massimi di 40 Kwh/mq, mentre in estate non adiamo oltre i 150 KWh/mq. L'analisi della radiazione solare ci ha permesso anche di chiarire il discorso della piazza, che non presenta poi un ammontare di radiazione così omogeneo e così alto come avevamo immaginato dallo studio delle ombre: infatti, il percorso del sole e durante la giornata e durante l'anno, fa sì che comunque in maniera alternata la piazza riceva le ombre dei tre edifici, mentre il problema nelle stagioni più calde è costituito dalla fascia centrale, dove in estate si raggiungono picchi di 330 Kwh/mq. Da qui la necessità ancora più impellente di progettare uno spazio aperto con alberi posizionati strategicamente e caduciformi, in maniera tale da non compromettere l'irraggiamento della piazza nelle stagioni più fredde.
2) Il corpo vetrato di collegamento
 Primavera
 Autunno
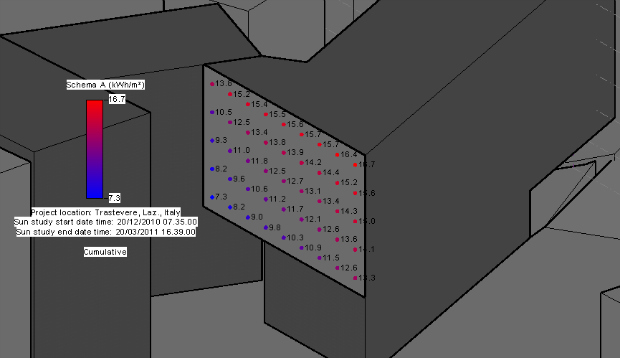 Inverno
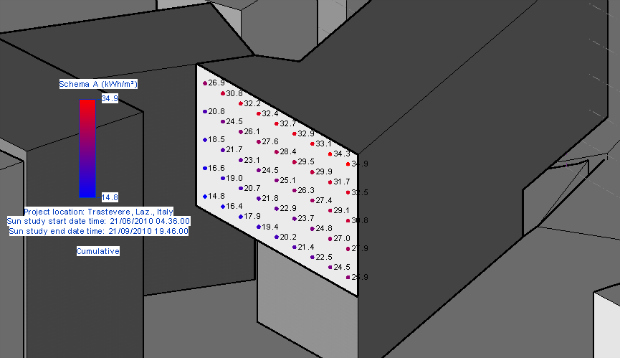 Estate
Abbiamo ritenuto utile effettuare un'analisi di tipo numerico della radiazione solare sul corpo vetrato di collegamento, per dimostrare che la scelta di vetrare una porzione piuttosto ampia di facciata non comprometterebbe in modo critico il comfort termico dei servizi posti all'interno (secondo le nostre previsioni, palestra a doppia altezza e bar panoramico). Infatti, la facciata vetrata è esposta a Nord e, riportando l'analisi della radiazione delle quattro stagioni, appare evidente come questa risulti bassa durante tutto l'anno: soffermandoci infatti sulla situazione più critica, ossia quell'estiva, notiamo come anche qui i valori massimi raggiunti siano assolutamente bassi (34.9 Kwh/mq).
Non abbiamo effettuato ulteriori e più specifiche analisi della radiazione sulle superfici in quanto il progetto non è ancora in uno stato avanzato, tant'è che non abbiamo ancora chiarito le aperture e le superfici vetrate, che potranno essere analizzate solo successivamente.
ANALISI METRATURA DEL PROGETTO
Infine, grazie al comando MASS FLOORS e quindi alla creazione dei livelli che costituiscono i piani del progetto, abbiamo creato una SCHEDULE per il nostro progetto che ci permettesse di evidenziare le metrature di ciascun piano e di confrontarle con le richieste del laboratorio.

Notiamo come l'area totale presenti un significativo esubero di metri quadri: ciò in parte è dovuto alla non considerazione delle doppie altezze dell'area destinata a servizi che dà sulla piazza, al fatto che le misurazioni sono state tutte effettuate al lordo, comprendendo quindi anche lo spessore murario, e al fatto che il progetto è ancora in divenire.
Dom, 10/05/2015 - 22:11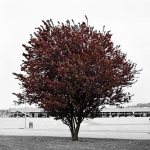 Marchetti-Marchi
Dom, 10/05/2015 - 20:54
Marchetti-Marchi
Dom, 10/05/2015 - 20:54
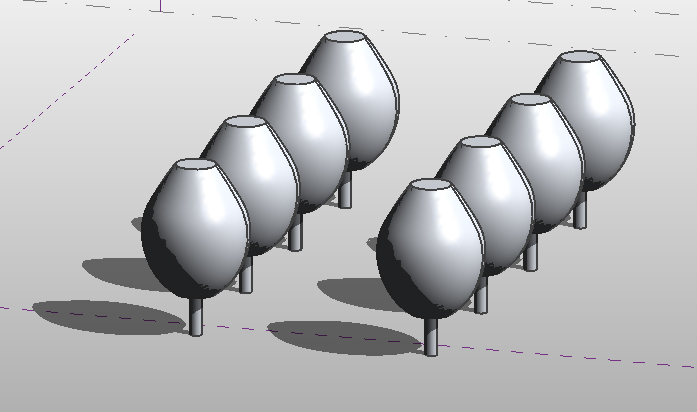
Procediamo per questa esercitazione alla modellazione 3D di un albero.
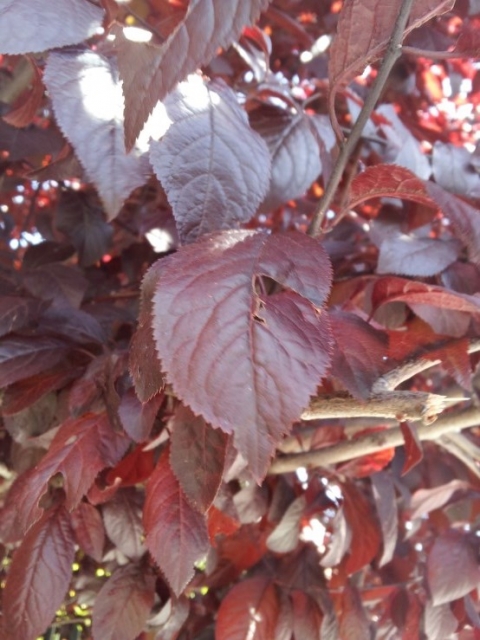
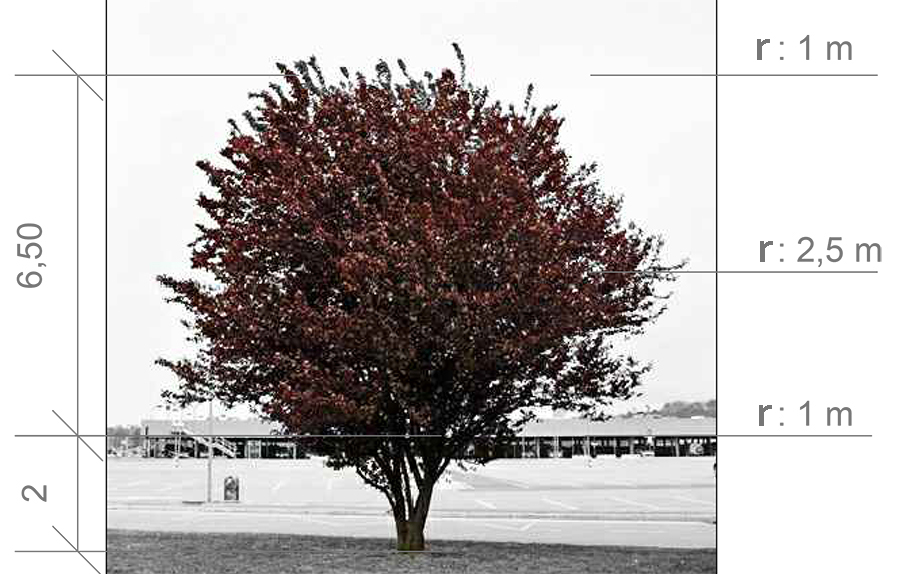
Abbiamo deciso di modellare il così detto Amolo, o in latino, PRUNUS CERASIFERA NIGRA, un albero molto presente per le vie di Roma caratteristico soprattutto per il colore bruno delle sue foglie.
Caratterizzato da un'ampia chioma di forma sferico/ovale, il prunus presenta questo tipico colore per tutta la stagione vegetativa.
L'amolo è utilizzato molto spesso come ornamento nei parchi e nei giardini cittadini per la sua forma contenuta.
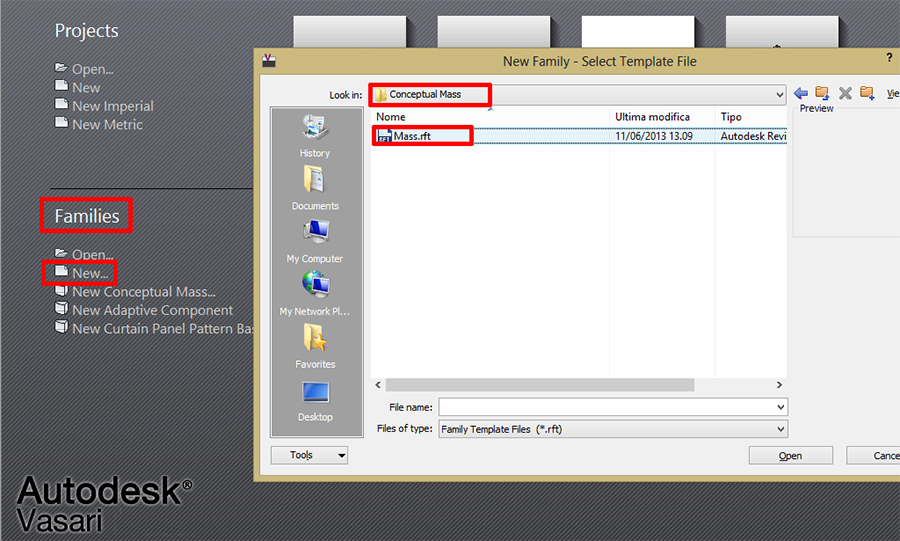
Per la modellazione della vegetazione procediamo aprendo un file dalla categoria Families> New> Conceptual Mass> Mass.
Una volta aperto il file di lavoro procediamo come sempre a cambiare le unità di misura sotto Project Units in metri.
Possiamo ora creare dei livelli di lavoro che ci permettano di disegnare differenti circonferenze per creare poi la forma finale della chioma.
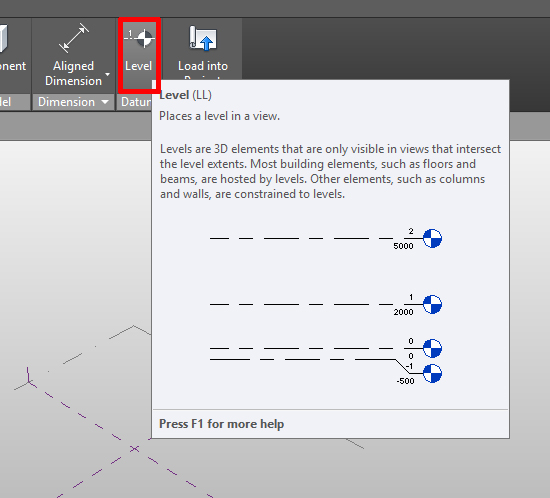
Rinominiamo ogni singolo livello per facilitarci il lavoro.
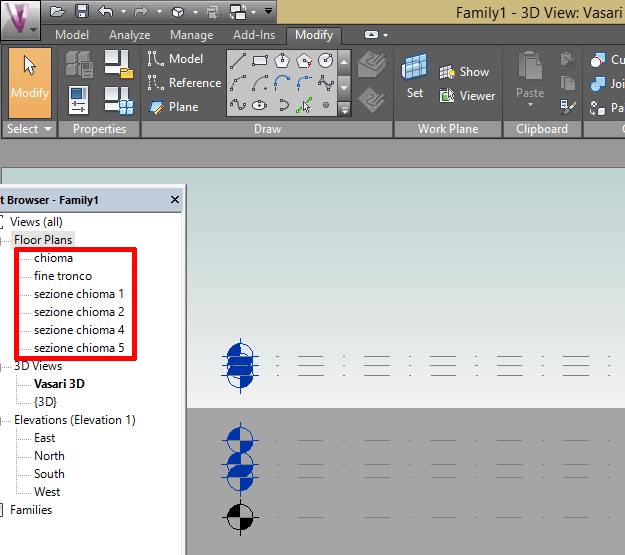
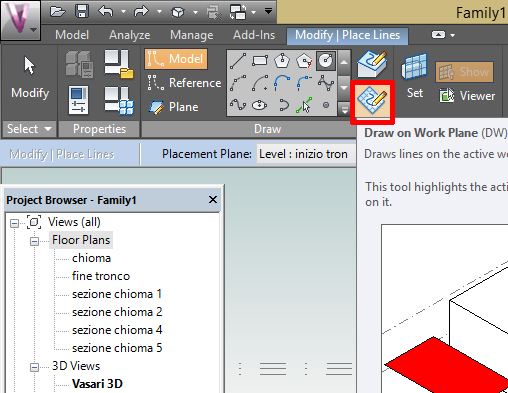
Ogni volta che lavoriamo su un livello ci assicuriamo che sia attivo il comando Draw on Work Plan così da essere sicuri di disegnare su quel livello specifico.
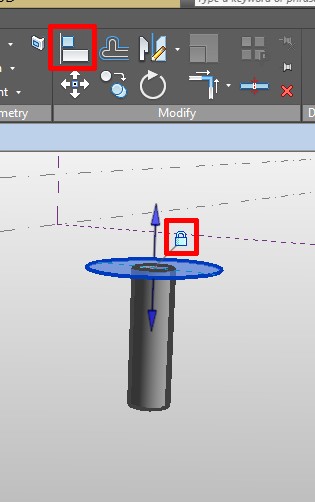
Una volta modellato il volume del tronco e una prima circonferenza di base della chioma utilizziamo il comando Align selezionando prima il volume del tronco e poi quello della circonferenza, ci apparirà un lucchetto che,se chiuso, permette di "legare" i due volumi.
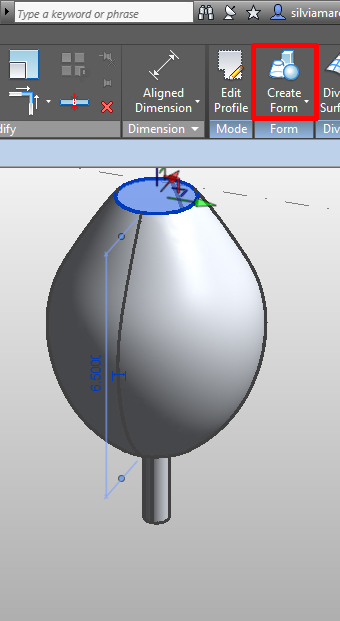
Per finire selezioniamo tutte le circonferenze create precedentemente sui diversi livelli e usiamo il comando Create Form>Solid Form per creare il volume della chioma.
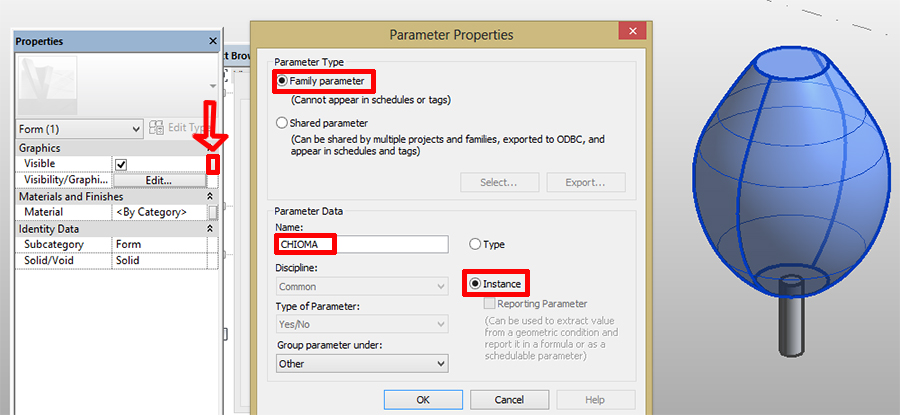
Una volta creato il volume del nostro albero creiamo il parametro per la caducità delle foglie stagionale.
Selezioniamo il quadratino accanto a Visible in Proprieties, impostiamo i parametri qui sotto mostrati.
Una volta fatto ciò la chioma può essere resa visibile o invisibile.
 Adamczyk_DeFlorio
Dom, 10/05/2015 - 20:10
Adamczyk_DeFlorio
Dom, 10/05/2015 - 20:10
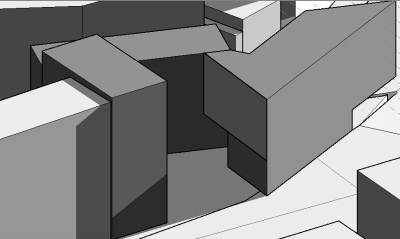
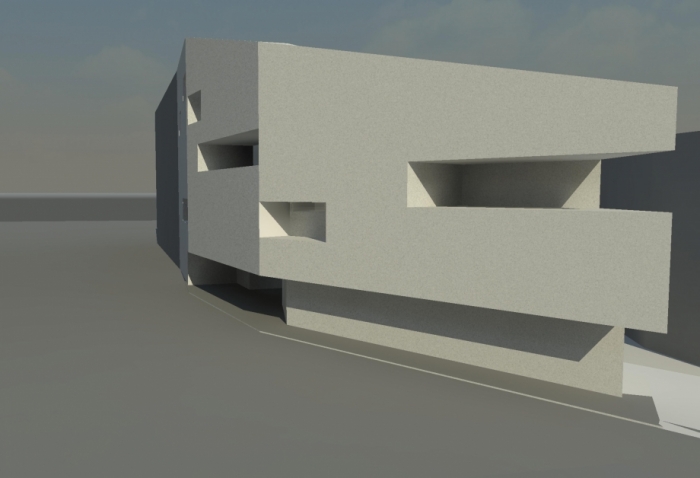
To complete the third delivery, we have to analyze the behavior of our building during the day and during the year. We made some changes from second delivery. Actually, we have just one building situated on west side of the area of project.. The building turns according to Viale Trastevere, an important street next to the area, and gradually becames lower, according to the slope of the zone.
We have analyzed this first situation:
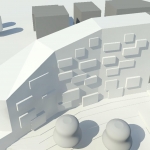
From this, we can note how important is the presence of our building in its context. In fact the building creates a sort of square ,by its form, and it is possible to see that the building itself protects this space during the hottest hours of summer, like in the previous delivery.
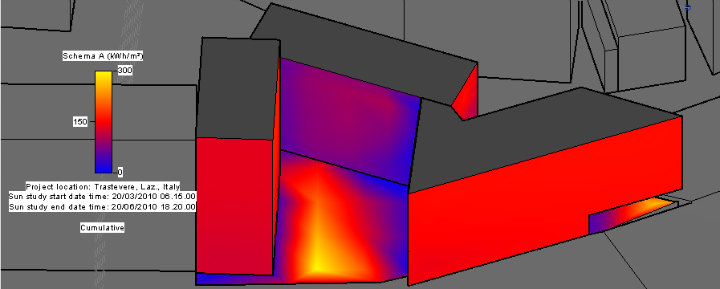
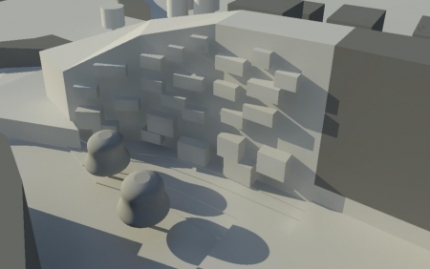
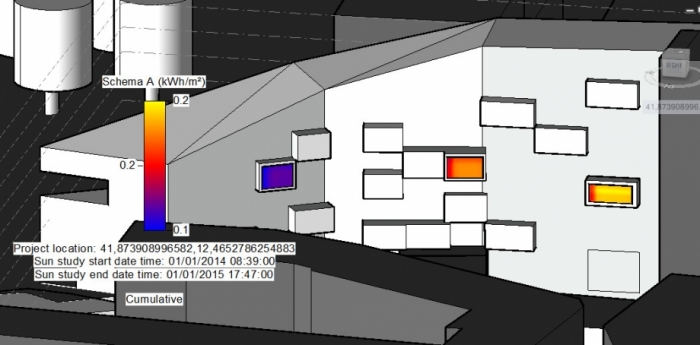
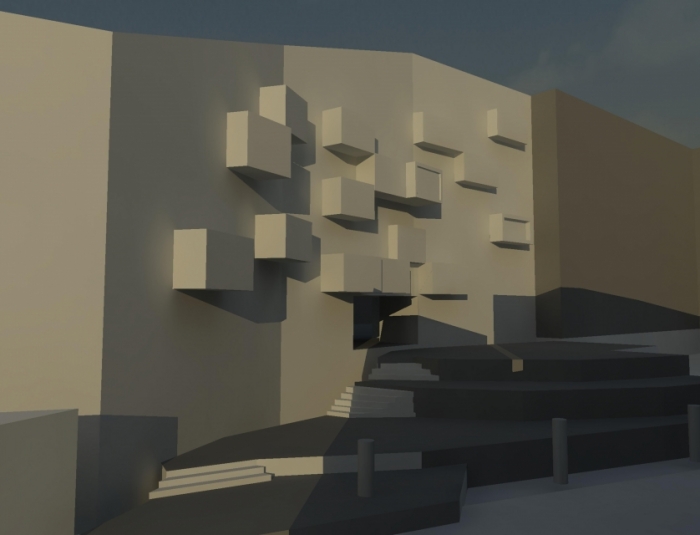
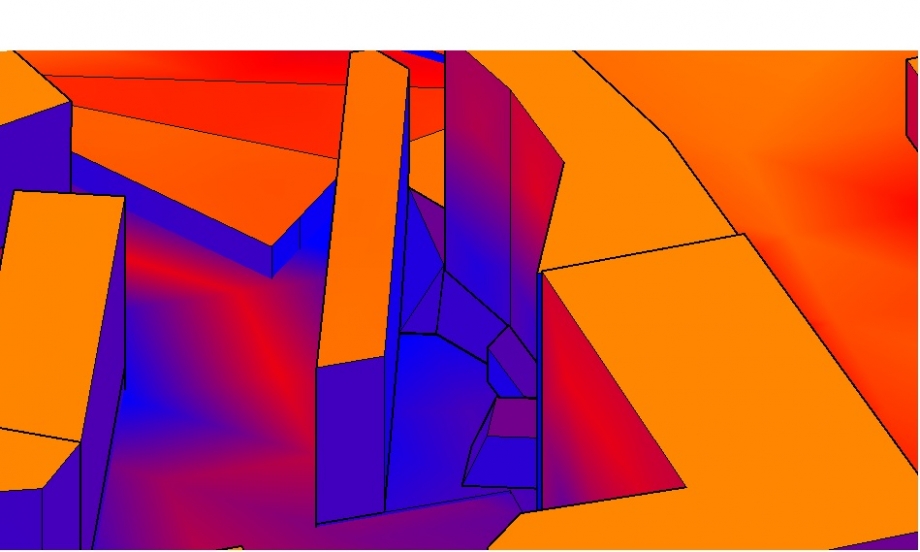
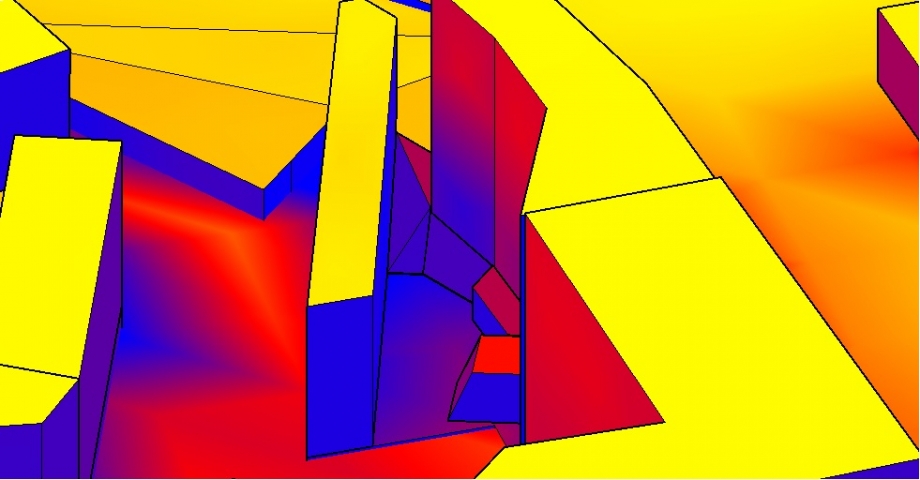
In following steps, we have analyzed just the east face which has a series of protruding square that come out from the face itself
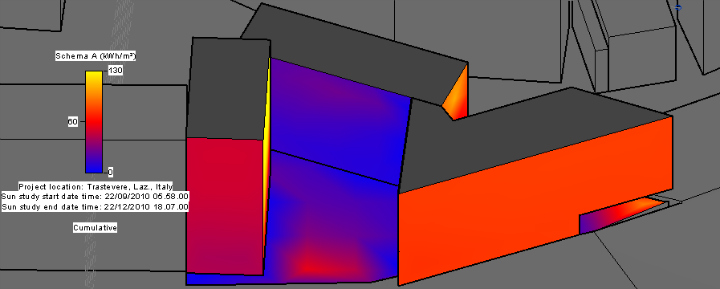
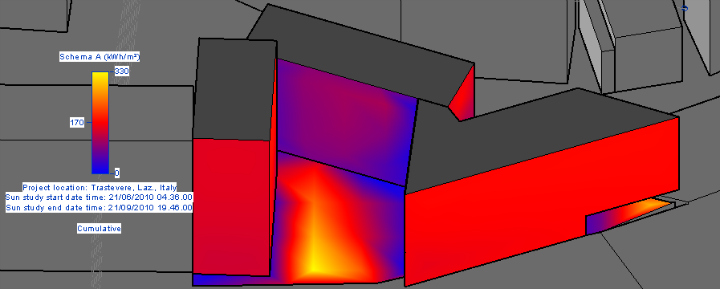
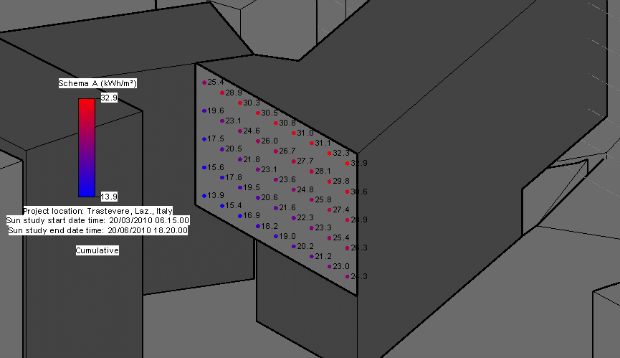
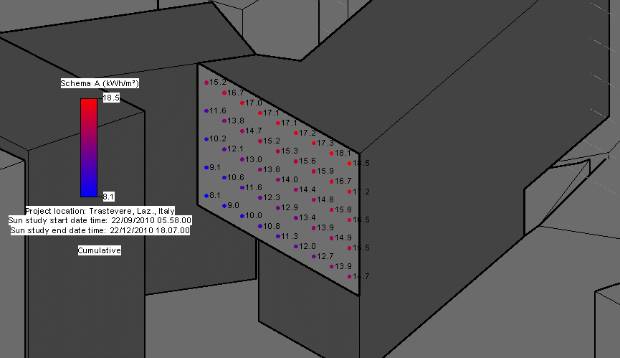
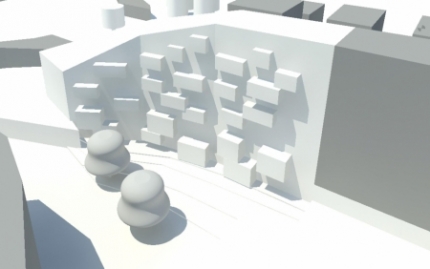
Meanwhile, we focused on 21/06 and 21/12. From the first analysis (in summer) we can study the way in which the east face is shaded. On this side, the protruding squares has not a significative effect. On other hand, to reduce the strength of the sun, we thought to put some trees along the border of the area, but we can see from the follower image that, actually, the trees can't stop in a effective way the solar radiation. For the future of our project, we have to remember this aspect. We can act in two ways. First, we can increase the number of the trees or, second, we can put another kind of trees. For example we could think about plane trees, which present a large foliage and which are widespread in Rome, in particular along the river Tevere (not very far from our buiding). This second way can be better but presents a little defect. In fact, to reduce the total cost of the project, surely we will put in our square just young trees, which are too small to have a strong impact in a short time. So we have to wait the trees grow up to have a comfortable squares. During the winter we can see how there is a lot of space in shadows on east face, generated by the protruding squares.
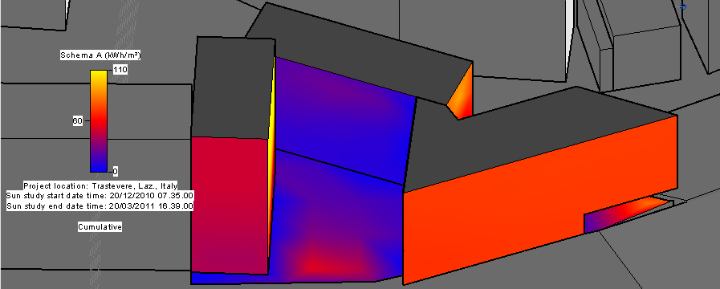
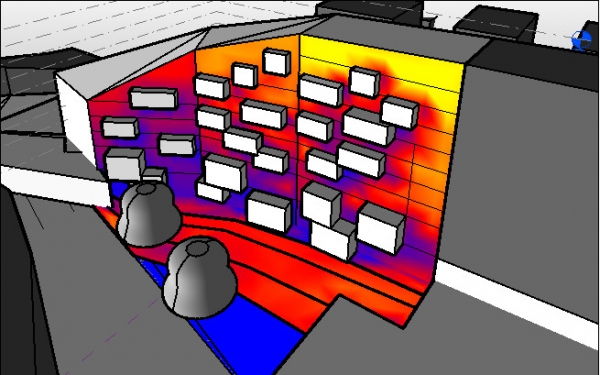
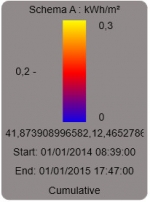
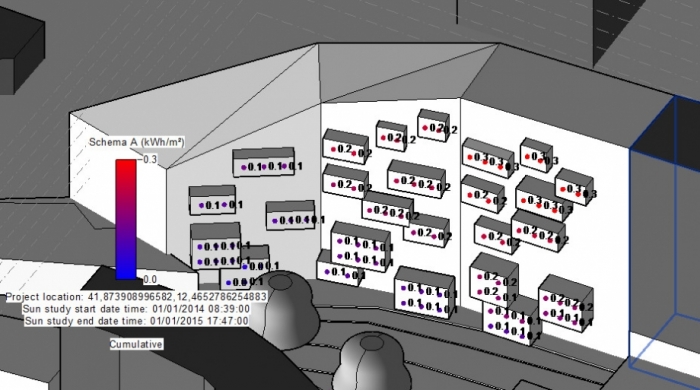
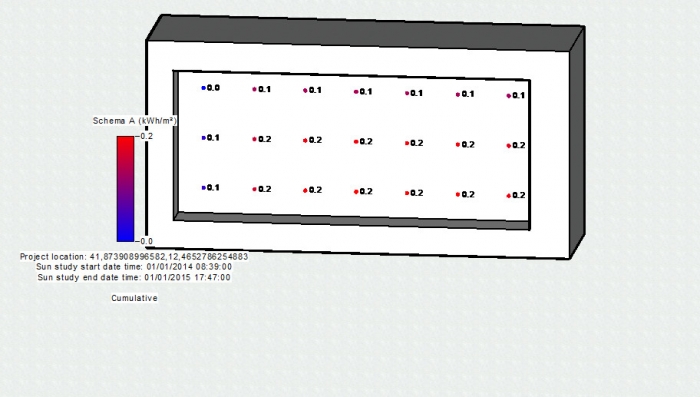
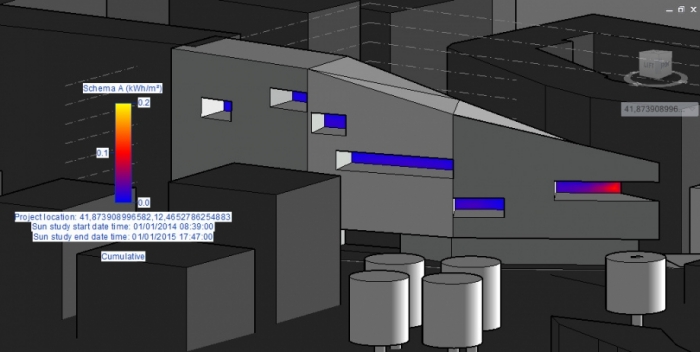
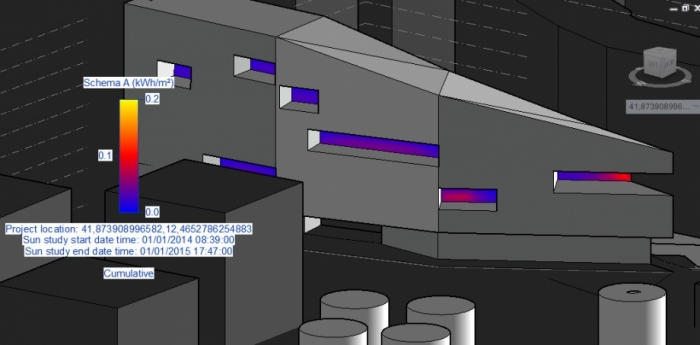
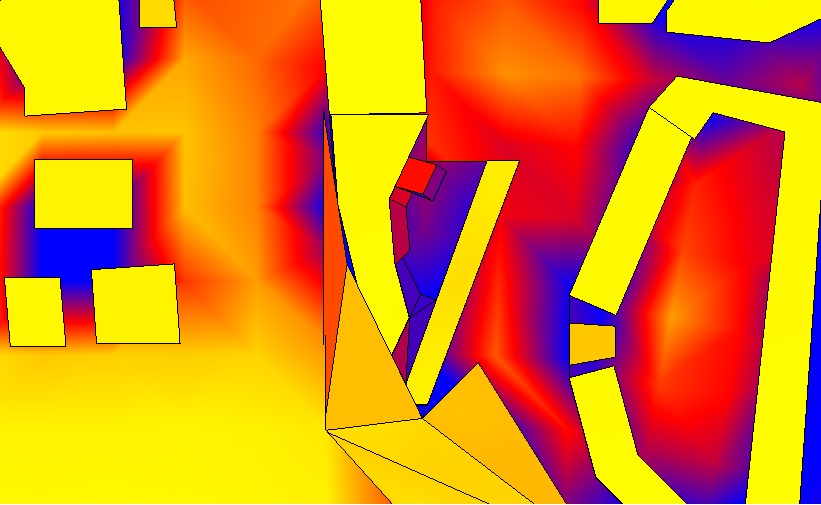
To understand the behavior of the east face during the whole year, we made a cumulative analysis. We can note that there are a lot of cold points on east face. In this points, we think that surely will be some important problems caused by moisture and mold. To solve this problem, we can reduce the projection of the squares or we can create a breezy facade. Again, the behavior of the lower part (th connection to the ground)of our building is very important. In fact, in this analysis, it is totally represented like a cold part.
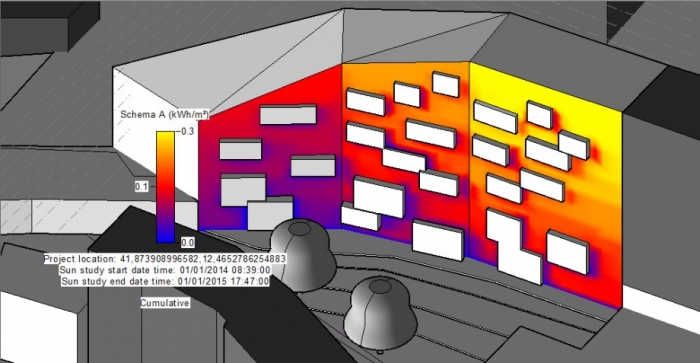
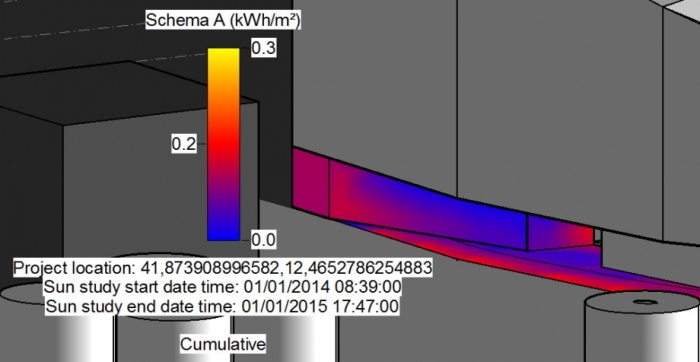
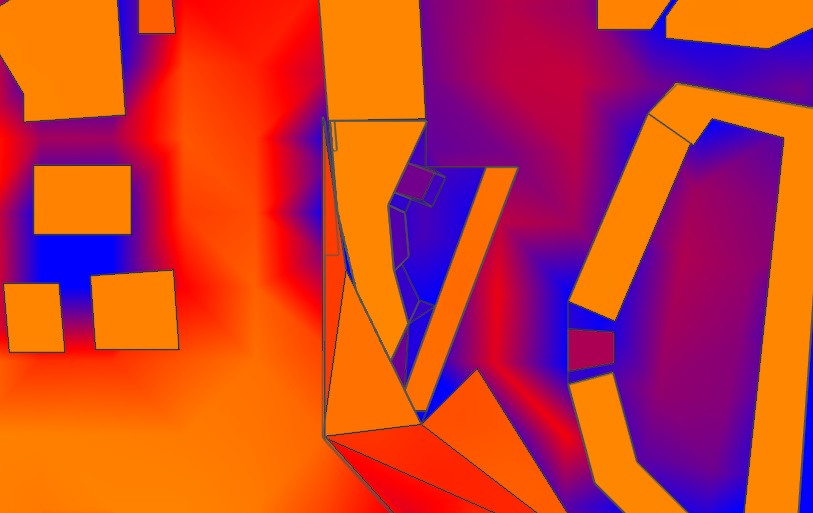
We said that we can reduce the projection of the square to improve the behavior of the east face. In the follower image, we show you a new result. Here we have shorted the projection of the squares just for 60/80 cm. We can not some differences from the previous situaton.
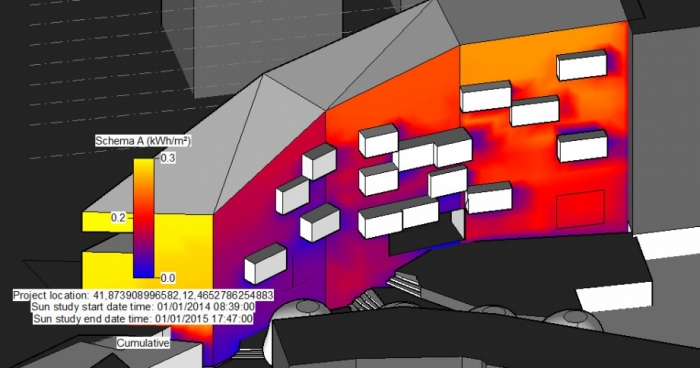
We supposed that the east face of every protruding sqaures is made by glass, so we decided to analyzed it. It is possible to note how there is a different intensity of the radiation according to the orientation of the squares. If we want to obtain the best, we need to add some brise soleil on most radated square and we need to have some particular kind of glass in other squares, for a low emissivity.
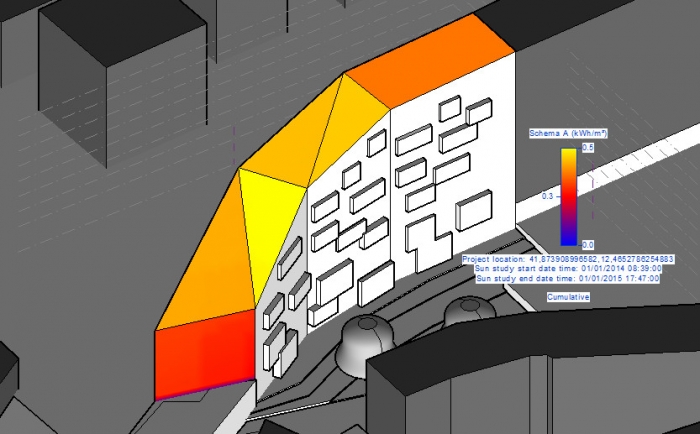
We studied the behavior of the coverage too, on which there is no more some level in a different height but a simple surface which could be moved by a series of pockets with some balconies or windows. It is possible to understand that this surface is the most radiated, because of its exposure on south. The follower image confirms this. We could use on this face a brise soleil system too.
We analyzed west face too. On this face, we want to insert some large windows, that include the whole main room of the accomodations. For this last, we choose this side especially to promote the evening light. In fact our building wants to serve a particular kind of people like professionist or students,which will spend a lot of time outside or in common spaces, which are located on east face.
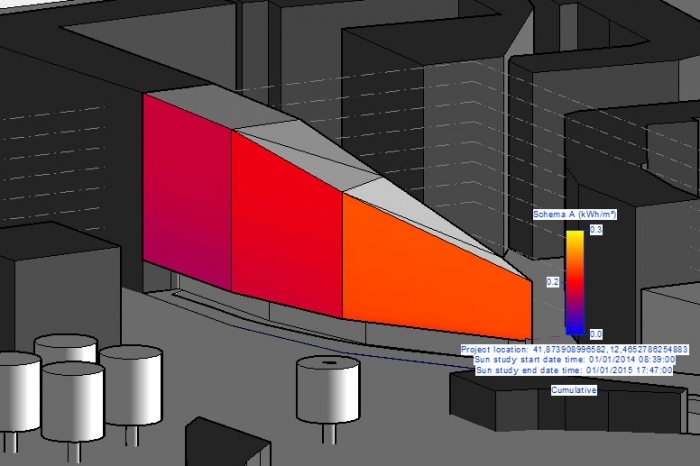
From this analysis, we can understand how the face is radiated (very strong on last part).
We are thinking about a brise soleil system for this face, like on coverage.
We said that we are thinking about a series of large windows on this face. Now, there is not something of sure but to understand the behavior of this, we made a numeric analysis.
From this image, we note that our windows not change in a significative way the behavior of the whole west face.
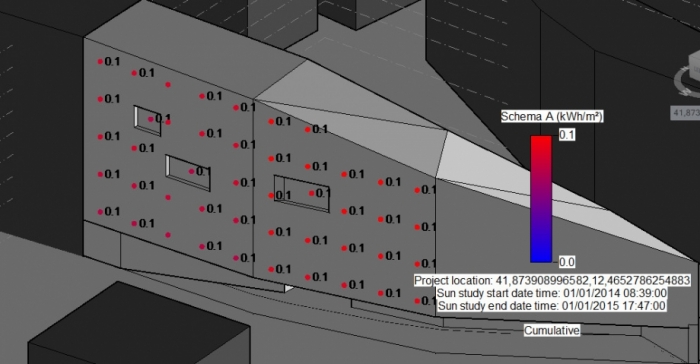
We analyzed the ground floor too, which can will be empty for a lot of space.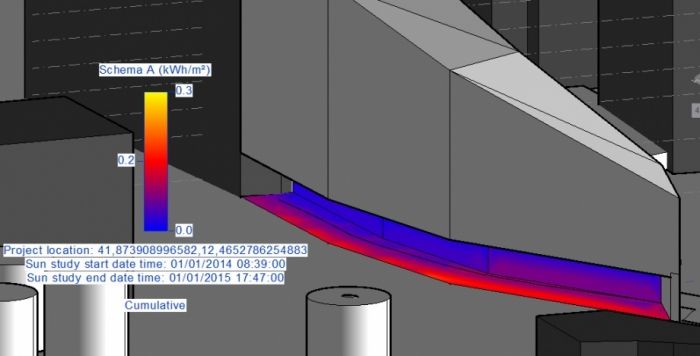
By this images, we understand that there is a lot of cold surfaces. We are thinking about a system through which we can avoid some mold or moisture.
Actually, we thought to turn a little the surfaces, like in follower image.
We note how turning some surfaces, we have less cold areas. This action can be valid for every surface located on ground floor.. We can note that by creating a passage through ground floor, we have less cold areas and a more comfortable space.
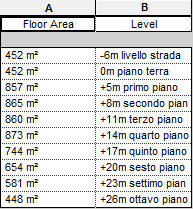
In the end, we measured the horizontal surface.. Actually there is 6700 mq. This is not good because we are using too surface but from this number we have to steal the open spaces on coverage, some spaces generated by Raumplaum system and the space generated by the loft located at lower and higher floor.
01/06/2015_Project Update
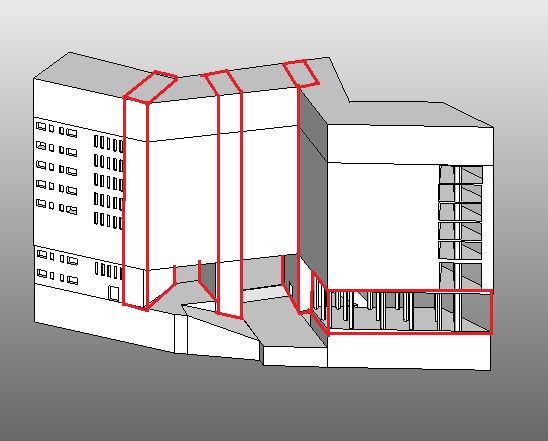
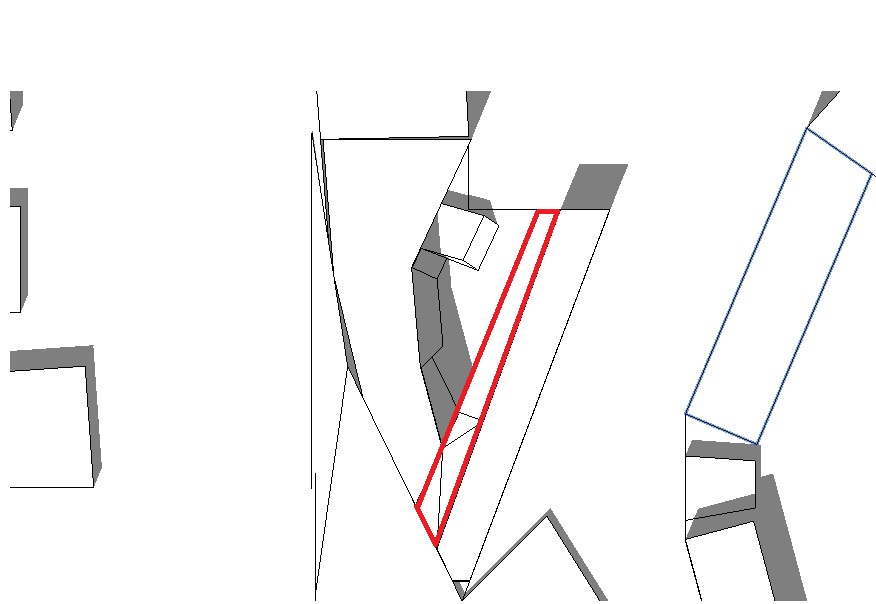
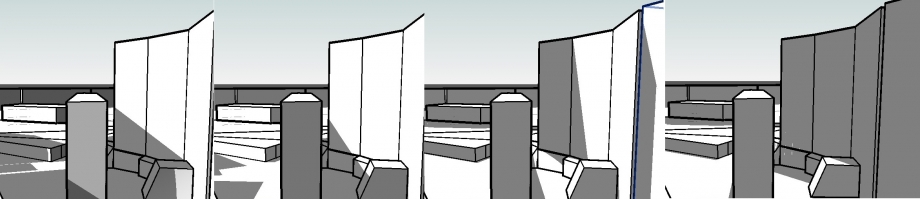
One of the main changes that we made since last time is the decrease of our protruding volumes, because the last version created too much shadow on facade. This aspect could encourage the development of mold and moisture stains, conditioning the aesthetic value and the healthiness of this building. Here, we report an image of last version of our east facade:
After this recent setting, we have analyzed the details of the facade. In particular, we analyzed the main glass surfaces, according to their disposition in the three part of facade. So we analyzed three windows. This kind of analysis can help us to understand in which cases we can set the frame on flush outer or just 10 cm behind it. The next image can help you to understand the windows anayzed:
Now, let's show you our results.
1_The first case report the results about a window which is located in south part of our building (blue window in previous image), but which is orientated on north-east:
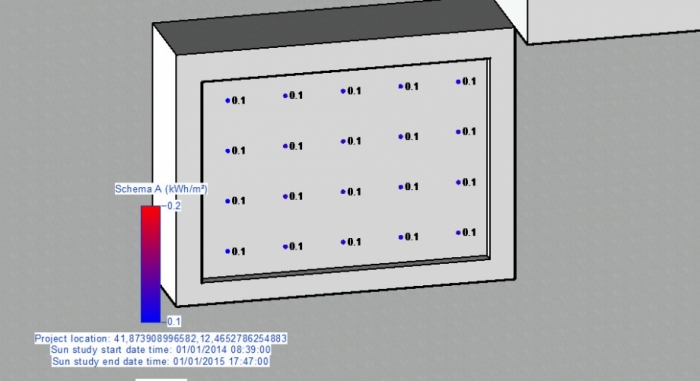
As we can see, precisely because of its orientation the window has too low values of solar radiation. If we decide to use it in this way, we have to use a particular kind of glass which could have an important impact on total budget. In this case, we thought to set the frame on flush outer and to turn our glass surface on south east. In next image we report the results of this last setting:
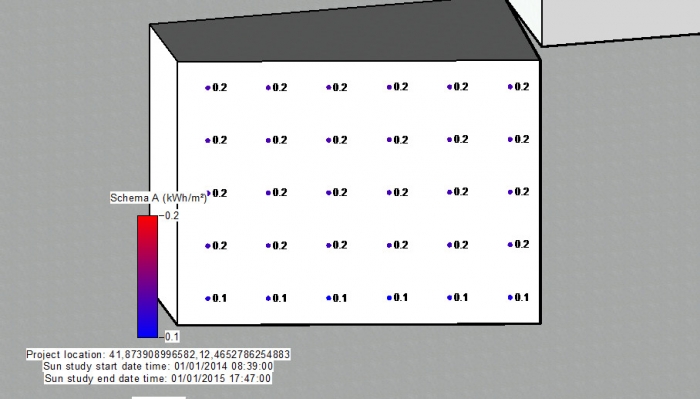
2_The second example tells us about a window located in the central part of the building, almost perfectly orientated on east:

As we can see in the previous picture, we have a good range of values. For this reason, this window may not undergo significant changes.
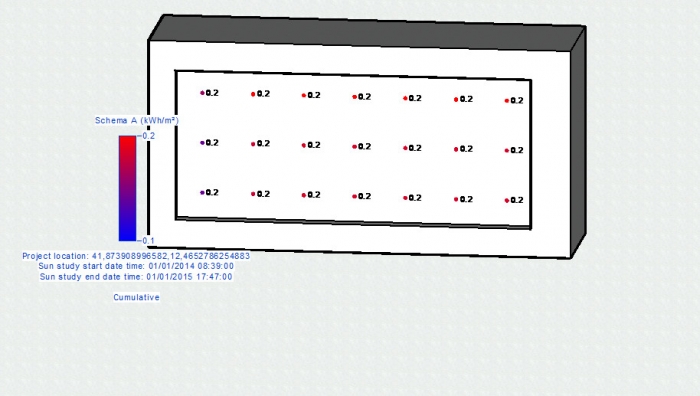
3_The third and last exmple is about an other window which is almost prfectly orientated on east, but which is located in north part of the project. In this case too we have some good values. However we wanted to try a new disposition, just to understand how significant can be a frame which is located just 10 cms inside the protruding volume. The next two images show us the original situation (a) and the new setting of the frame (b):
 (a)
(a)
 (b)
(b)
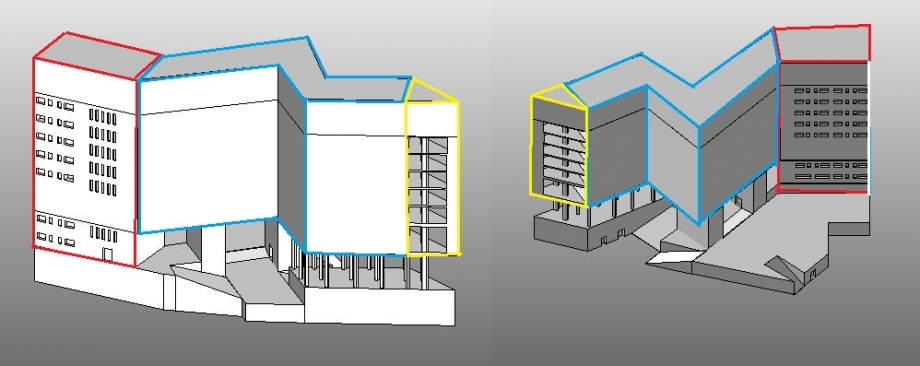
Now, we are going to analyze the west facade
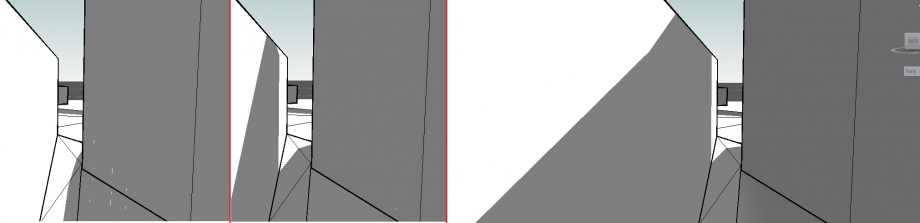
In the previous stage, this facade had not yet been the subject of a thorough study, but now it has its own uniform, moved by deep openings:
Just this openings were the subject of further analysis:
As we can see from previous picture, this openings can create an interesting design, but on other hand if we look at the project in an energetic prospective, this openings generate an important problem. In fact, a part of the holing on south (your right), all others will be irradiated only by the sun which are going down on west. Such radiation is not sufficient to energy purposes. Back here the problem of the development of mold and moisture stains. To solve this problem, we must pay close attention during the project of the pack wall and during its realization too, to avoid thermal bridges and other perspiration problems.
We could also think about a ventilated facade inside the openings, but we have no much height space and there is an orizontal barrier on our holing. So this system might not have an important result.
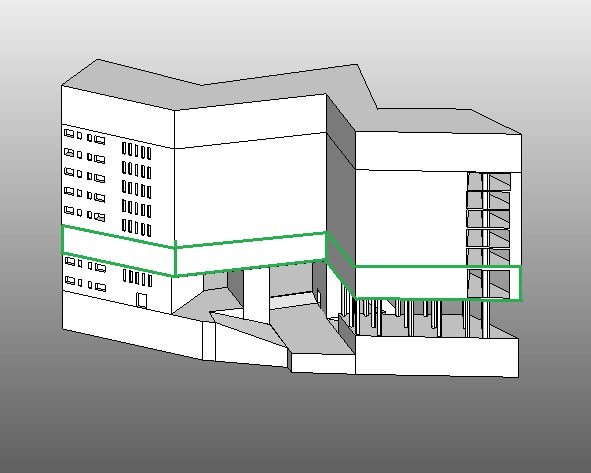
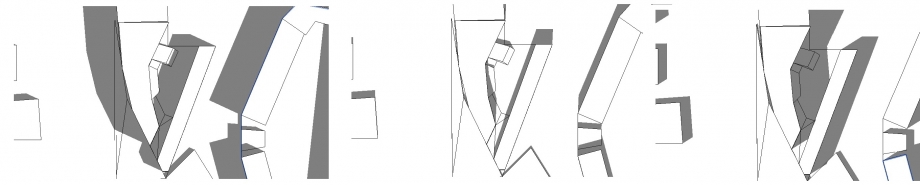
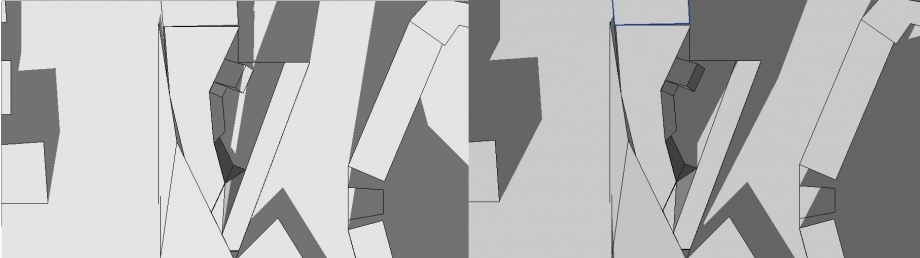
During the debate of the project, we thought to decrease the depth of these openings.
In the follower image, we report the results of the decrease from 6.4m to 4m:
From the comprison beetween the two situation, we can note how the change described above has an impact close to zero. Therefore, most likely this strategy will not be implemented, because this changes alters the structure and the internal configuration in a significant way, without bringing an important improvement.
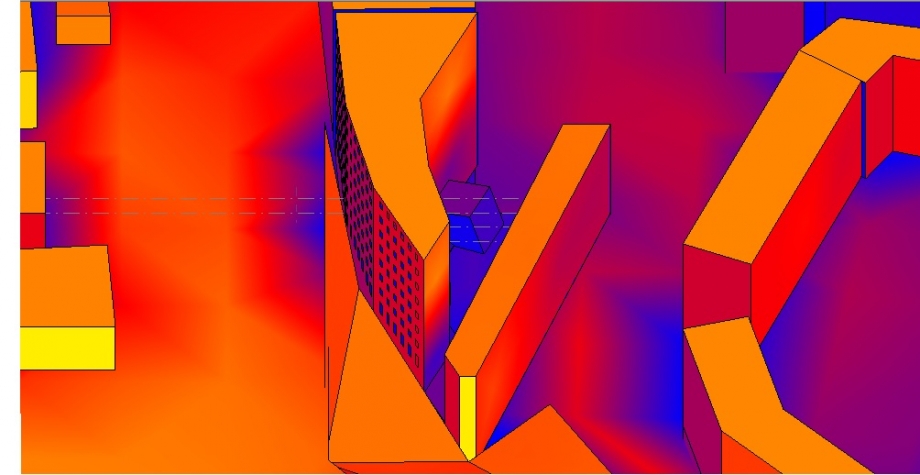
Here we report a render about east facade with internal square and its shadows:
The analysis of shadows is set to 11:00 on the winter solstice. As we see, the area is shaded by an adjoining building on which we can not intervene. This shadow doesn't allow a good livability on square during the winter. However, it does not create any problem for the sunshine of the east facade of the building.
Dom, 10/05/2015 - 21:11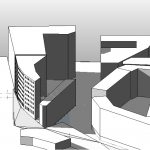 Simone Del Conte
Dom, 10/05/2015 - 18:53
Simone Del Conte
Dom, 10/05/2015 - 18:53
Progetto Residenza Temporanea, Trastevere
Breve descrizione del progetto :
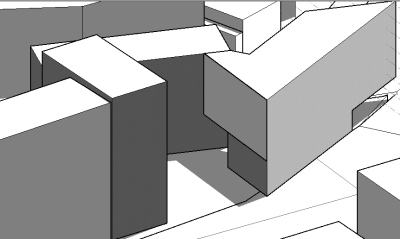
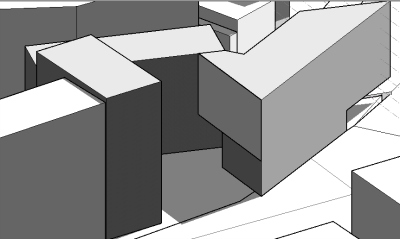
Il progetto è costituito da due edifici di diversa altezza. Sono separati da una fessura che aprendosi sempre di più genera una piazza. Un elemento che caratterizza il nostro progetto è la direttrice NORD-EST , SUD-OVEST , che permette di attraversare il lotto e raggiungere Via Crescenzo Del Monte dall' incrocio di Viale Trastevere, senza dover essere esposti al traffico veicolare di Via degli Orti di Cesare.
Il dislivello di 7metri è stato assecondato da un sistema di scale all' interno della piazza. I piani terra di entrambi gli edifici, che quindi si trovano a due quote differenti ( +0.00 , +7.00 ) , sono destinati alle funzioni comuni mentre i piani superiori, sono destinati agli alloggi.
Nel piano terra dell' edificio più basso sono presenti i servizi destinati anche al pubblico ( palestra, car sharing).
Al piano terra,nella piazza, un volume più grande contiene la sala conferenze, mentre quello più piccolo una sala studio.
La problematica maggiore per quanto riguarda l'analisi della radiazione solare, deriva dal fatto che la piazza è chiusa a sud ed esposta a nord; tuttavia sebbene il software,effettuando un' analisi cumulativa, mostri una carenza totale di radiazione solare, la piazza riceve illuminazione diretta almeno due ore al giorno , anche d' inverno, come mostrato con l'analisi dell' ombreggiamento .
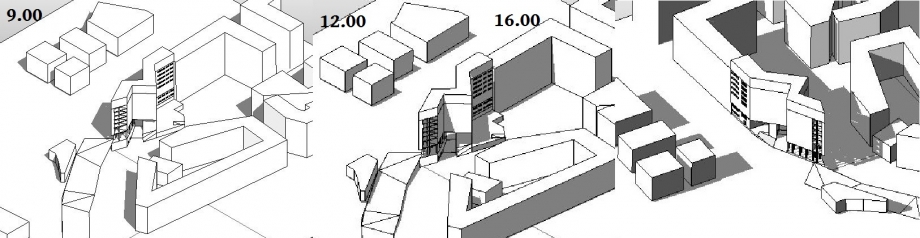
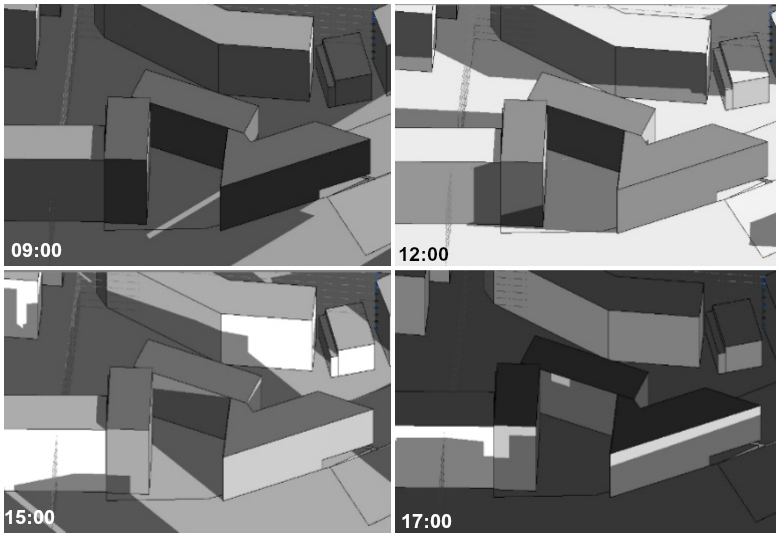
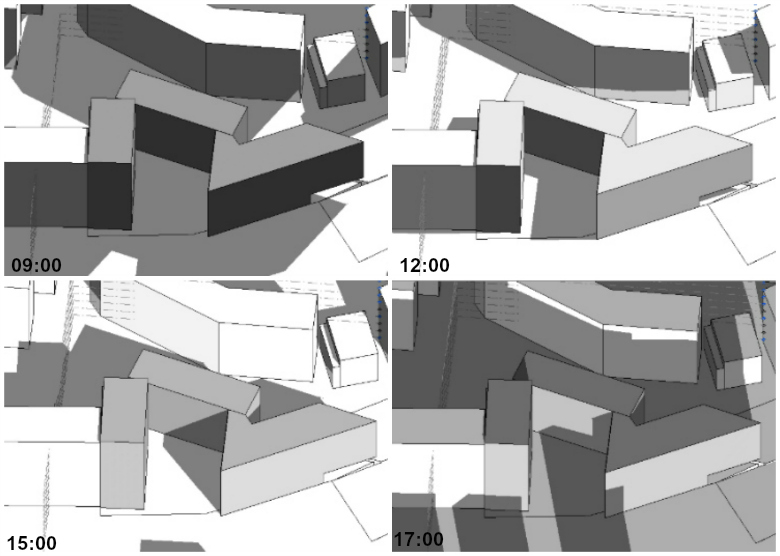
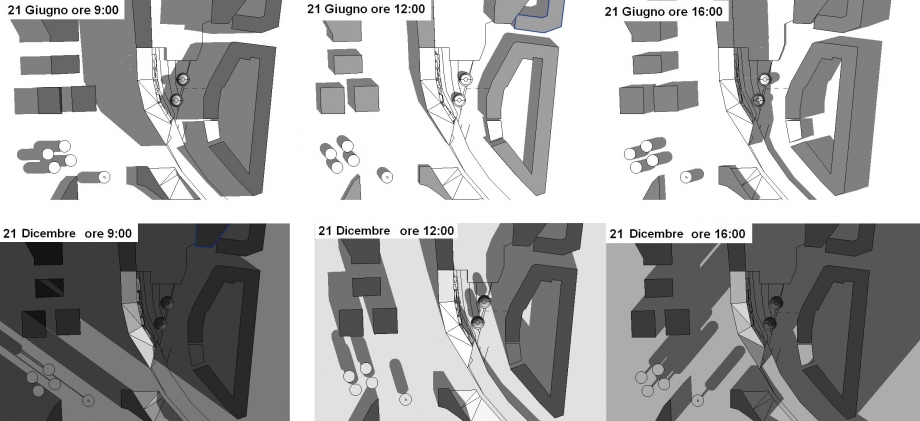
_ANALISI OMBREGGIAMENTO SOLSTIZIO D' ESTATE

ore 9.00 ore 12.00 ore 18
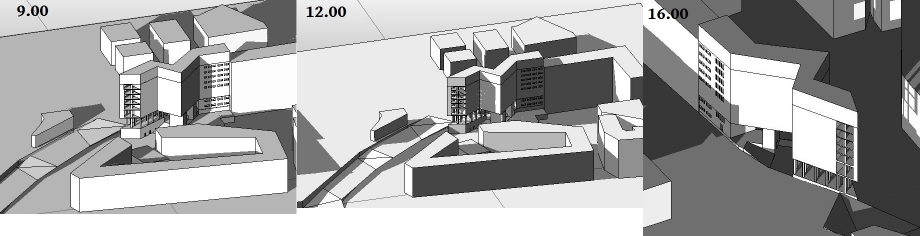
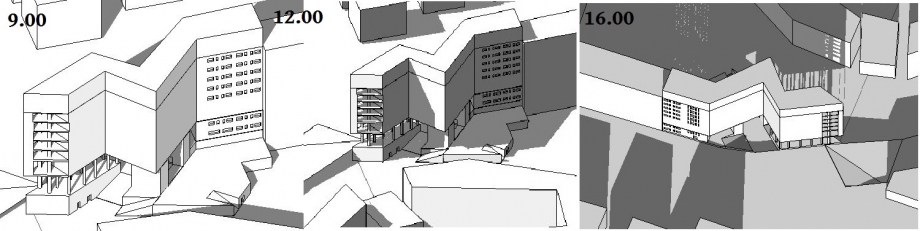
_ANALISI OMBREGGIAMENTO SOLSTIZIO D' INVERNO

ore 9.00 ore 12.00 ore 16
_ANALISI OMBREGGIAMENTO PIAZZA DURANTE IL PERIODO ESTIVO (21\06)
ore 11.00 ore 13.00 ore 15.00
In estate la piazza riceve illuminazione diretta per quattro ore al giorno ; alle 13 è quasi completamente illuminata.
_ANALISI OMBREGGIAMENTO PIAZZA DURANTE IL PERIODO INVERNALE (21\12)
ore 13.45 ore 15.00
_durante il solstizio d'inverno, alle ore 14, la direttrice nord-est , sud-ovest, è priva d'ombra
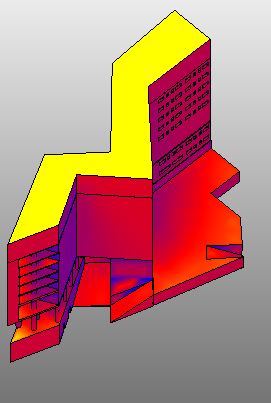
_ANALISI DELLA RADIAZIONE SOLARE, IN PIANTA, DURANTE IL PERIODO ESTIVO
_ANALISI DELLA RADIAZIONE SOLARE,IN PIANTA, DURANTE IL PERIODO INVERNALE
_ANALISI DELLA RADIAZIONE SOLARE, VISTA SUD, DURANTE IL PERIODO ESTIVO

_ANALISI DELLA RADIAZIONE SOLARE, VISTA SUD, DURANTE IL PERIODO INVERNALE
_ANALISI DELLA RADIAZIONE SOLARE DELLA PIAZZA, VISTA NORD, DURANTE IL PERIODO INVERNALE
_ANALISI DELLA RADIAZIONE SOLARE DELLA PIAZZA, VISTA NORD, DURANTE IL PERIODO ESTIVO
Immaginavamo in un certo senso che l'apertura generata dai nostri edifici poteva essere poco illuminata e quindi d'inverno fredda, tuttavia d'estate rimane un luogo di piacevole fruizione, ideale per ripararsi dal caldo in attesa dell' arrivo dell'autobus nella fermata adiacente l' area di progetto , oppure come luogo di ritrovo o per fare una breve sosta all' ombra.
Uno dei punti cardine del nostro progetto è infatti quello di "difendersi" dai raggi del sole durante il periodo estivo, dal momento che l'incrocio antistante l'area di progetto, quattro mesi l'anno, diventa invivibile ed aspettare l'autobus su Via degli Orti di Cesare, risulta poco piacevole.
Mentre in estate, l'effetto previsto dal software, è proprio quello che volevamo ottenere, d' inverno probabilmente verrà meno la sosta nella piazza, che si ridurrà ad un attraversamento per raggiungere via Crescenzo Del Monte da Viale Trastevere, senza essere esposti al traffico veicolare di via degli Orti di Cesare.
Forse dobbiamo mediare tra varie esigenze e fare le scelte più opportune alla luce delle caratteristiche che stanno alla base del nostro progetto.
Per ridurre dunque le problematiche legate ad un' esposizione non ottimale della facciata durante il periodo invernale, potremmo adottare soluzioni come :
- destinare il lato interno dell' edificio (quello che si affaccia nella corte) , alla distribuzione ( ballatoi) o zone tecniche (ascensori,locali macchine,impiantistica, ecc..), o di servizio ( scale), e quindi ambienti, spazi, che non siano nè residenziali , nè di sosta.
- utilizzare in facciata materiali che non risentono eccessivamente delle basse temperature,umidità,agenti fisici : non sceglieremo tinte,stucchi, intonaci, cemento facciavista, ma piuttosto vetro, pannelli in laterizio ecc..
- la facciata rivolta a SUD , che si affaccia nella piazza , sarà probabilmente rivestita di materiali caratterizzati da colori chiari (o che hanno comunque un alto coefficiente di riflessione), in modo tale da riflettere almeno un minimo di luce diffusa.
Successivamente con il comando " camera" abbiamo evidenziato l' ombra sulle facciate interne in diverse ore della giornata ( 21\06 ) vista da Nord verso l'interno della corte.
ore 9.00 ore 11.00 ore 13.00 ore 14.00
 ore 14.00 ore 15.00 ore 16.00
Dom, 10/05/2015 - 19:41