 BONANNO_CARLETTI
Lun, 27/04/2015 - 17:27
BONANNO_CARLETTI
Lun, 27/04/2015 - 17:27
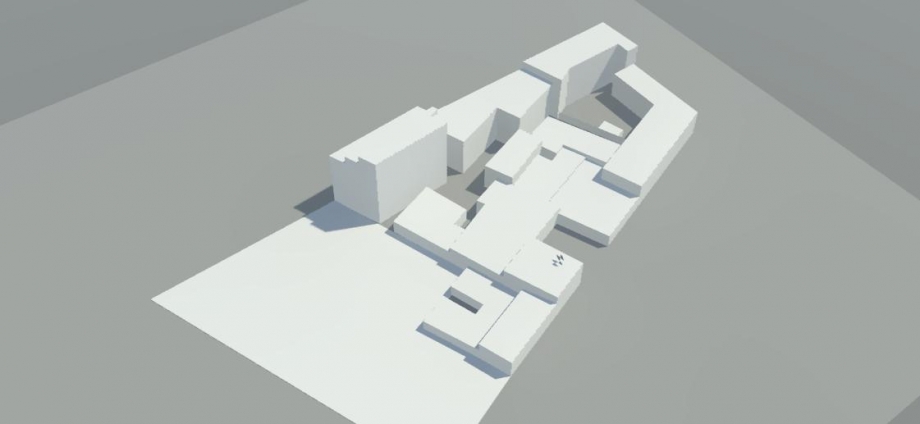
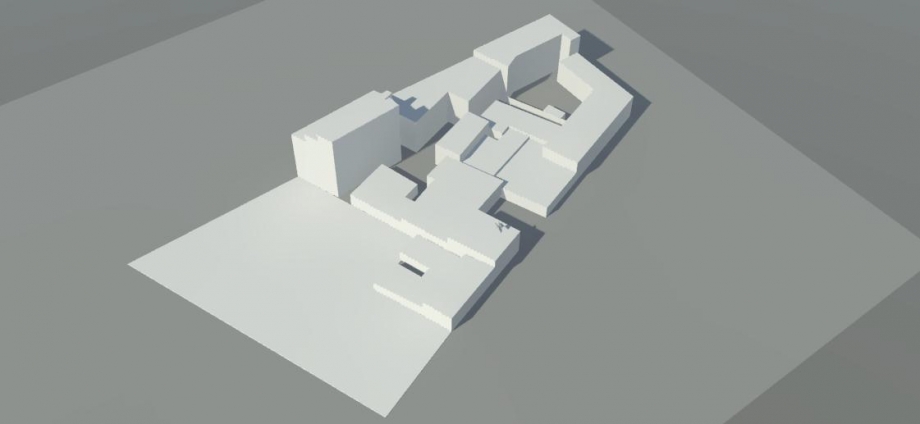
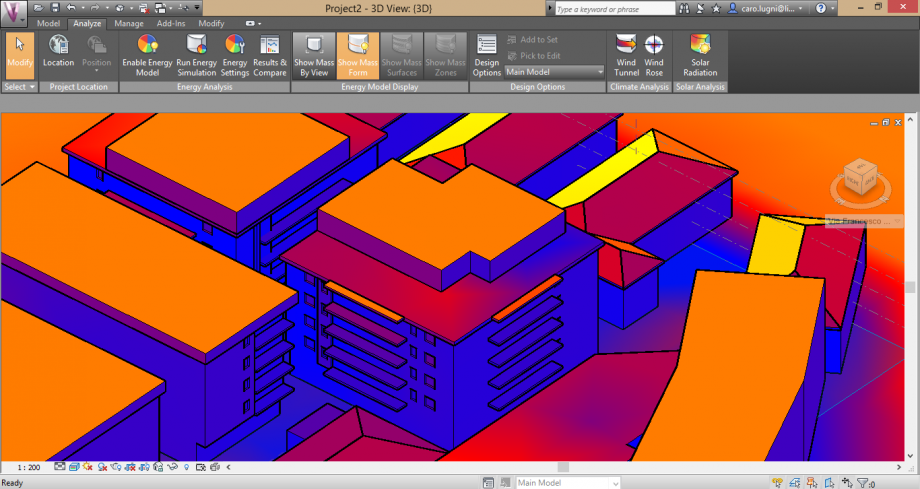
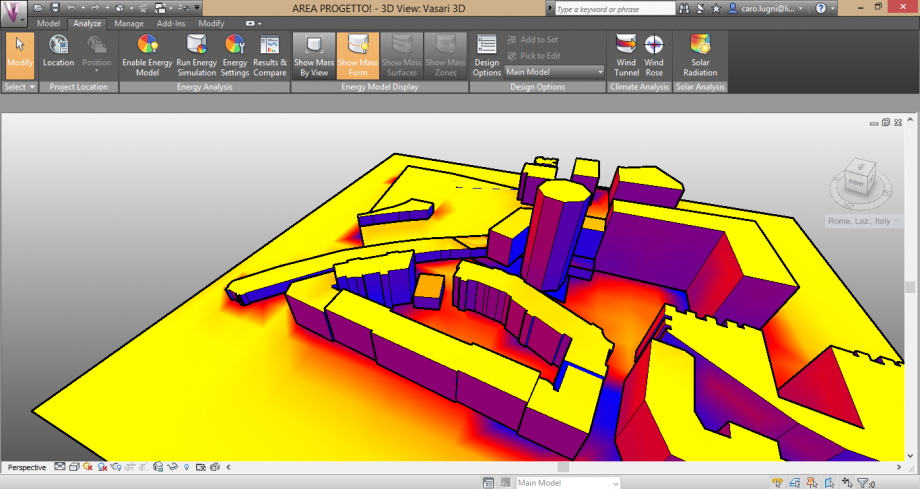
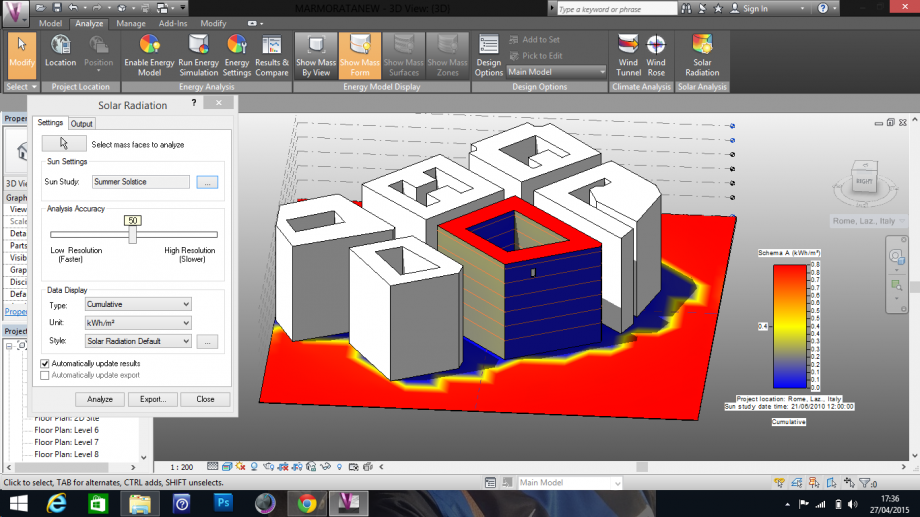
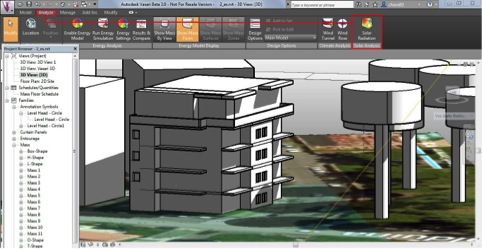
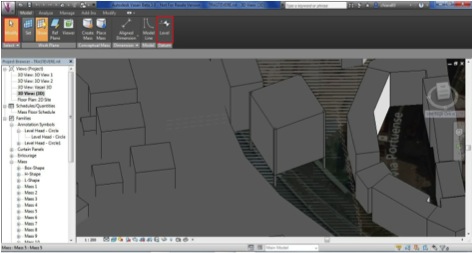
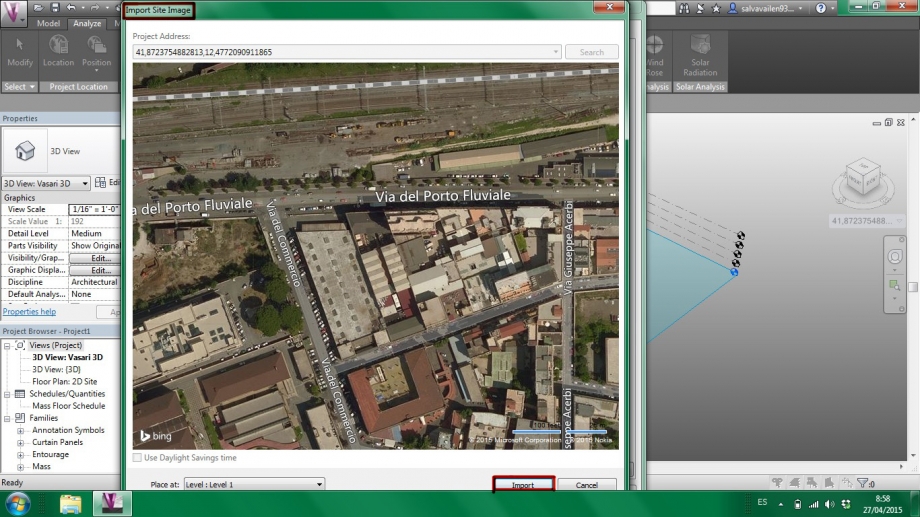
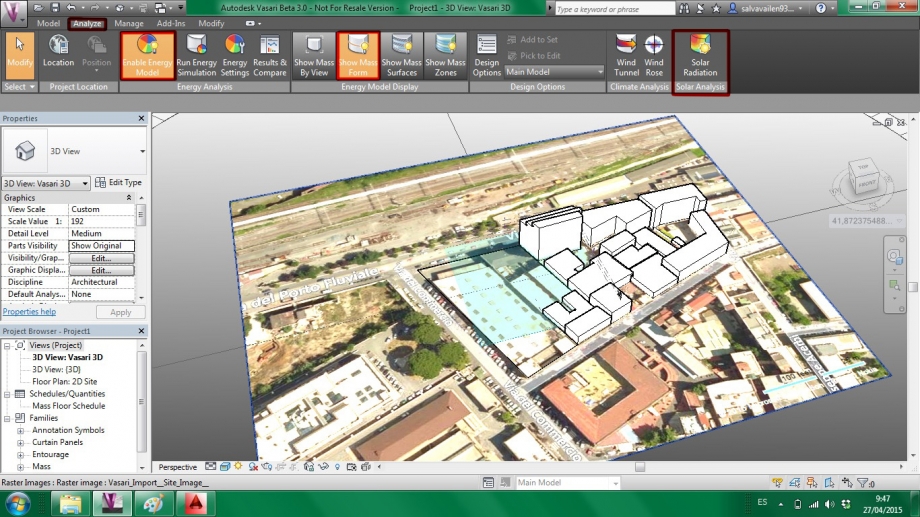
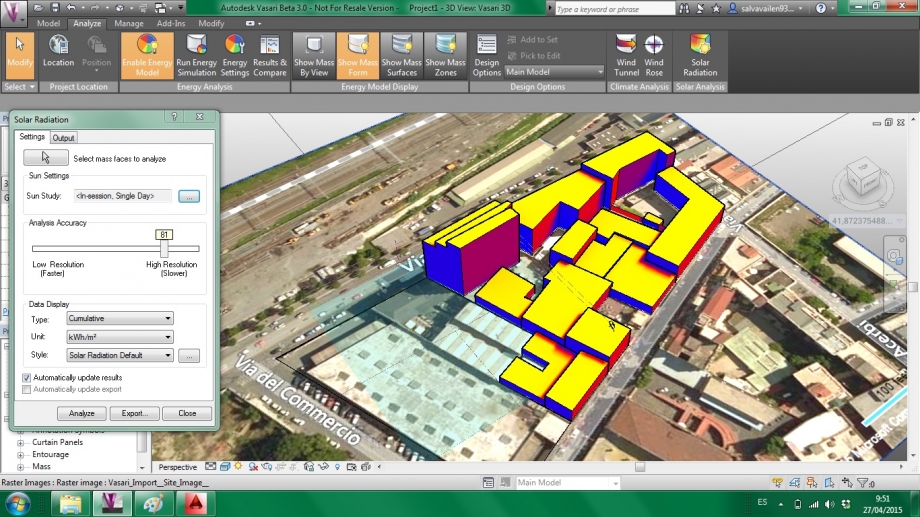
After the modelling of the area (by the creation of volumes,balconies,void and windows)we can start to analyze the solar radiation on the area and on the builings.
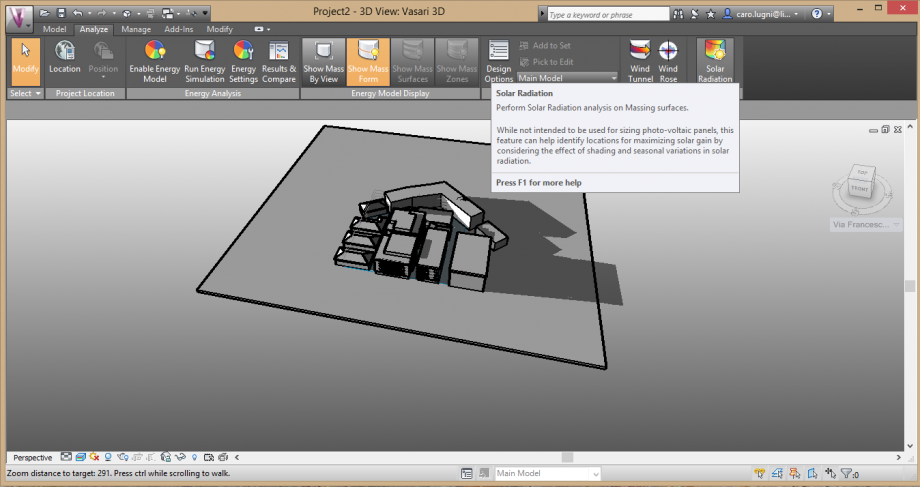
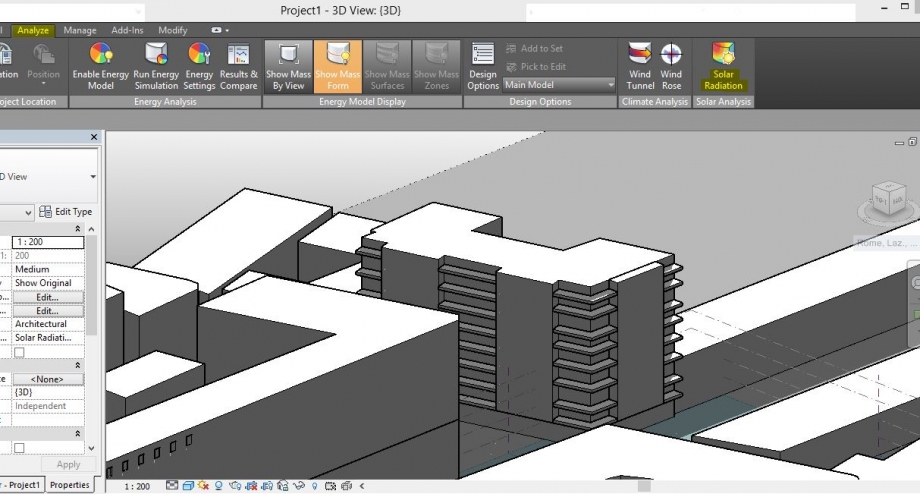
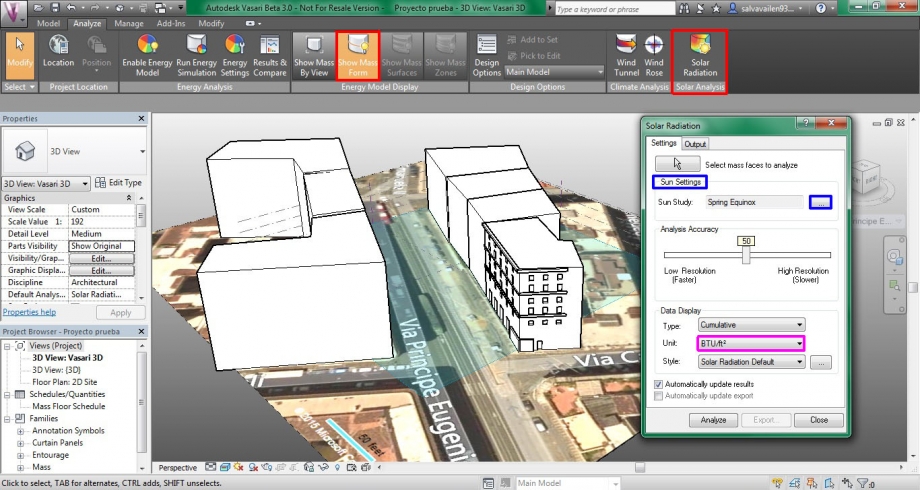
So open the menu "Analyze" and click to "Solar Radiation"
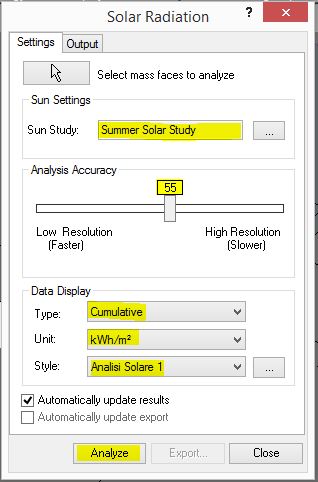
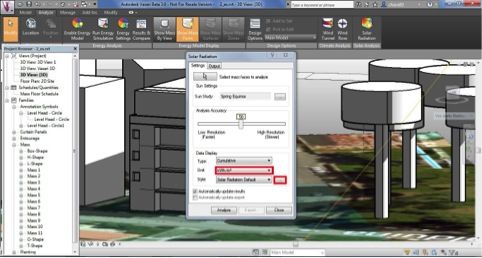
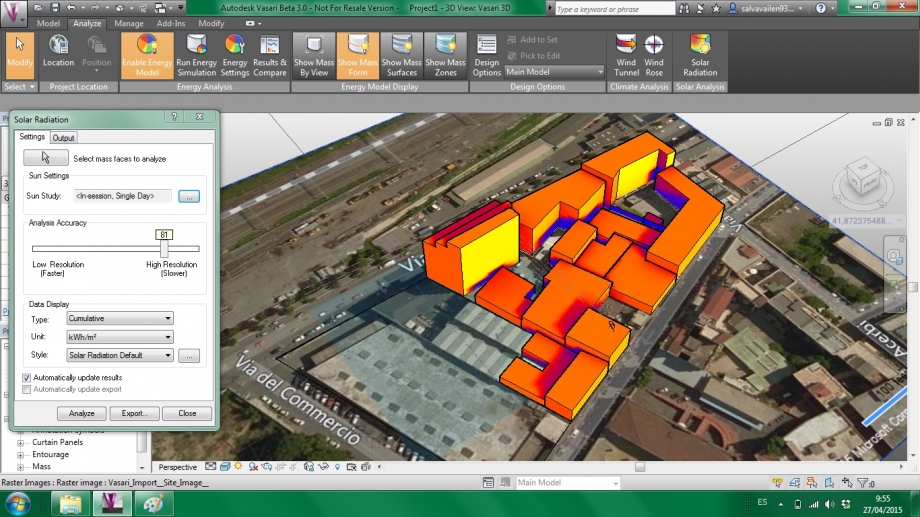
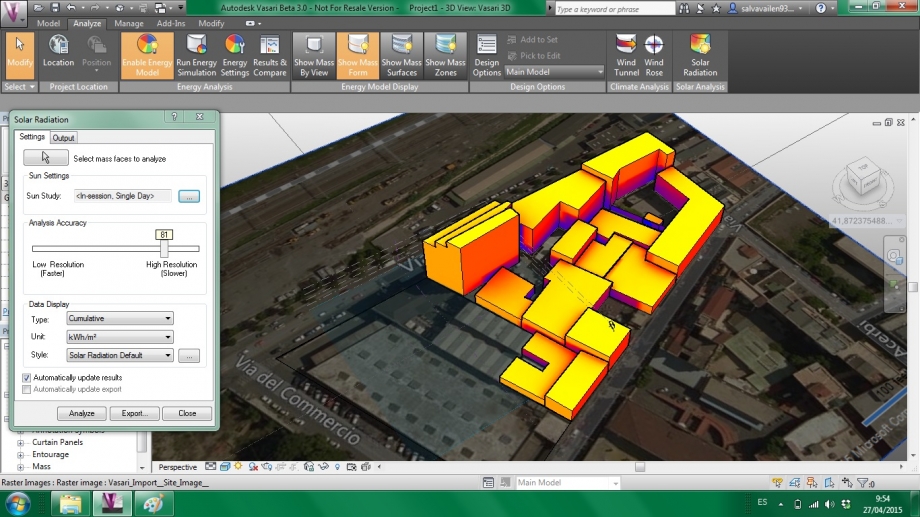
after that Vasari open a new window where we can choose the detail of our analysis:first of all set the unit to "kWh/m2" "Type<comulative" and "Style<solar radiation default" after that we can choose the accuracy of analysis that is set by default at 50%,at least we can choose to analyze one particular surface by clicking on "Select mass faces to analyze" or all the model
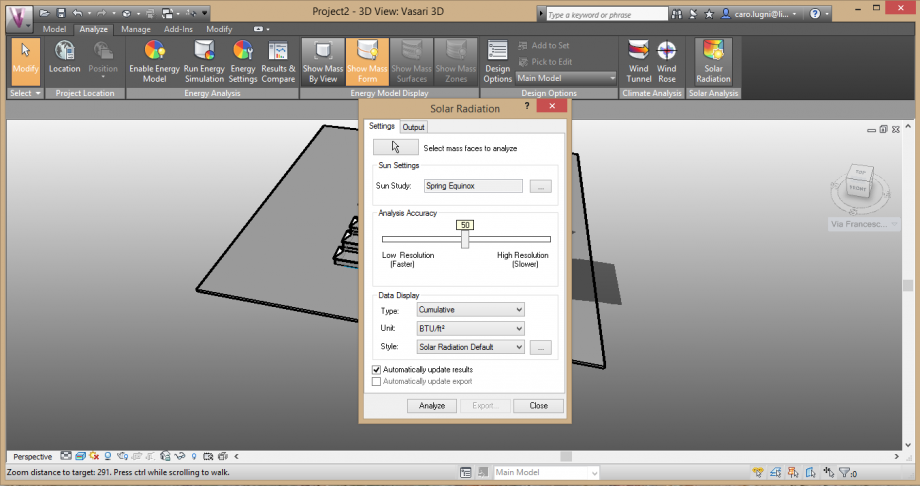
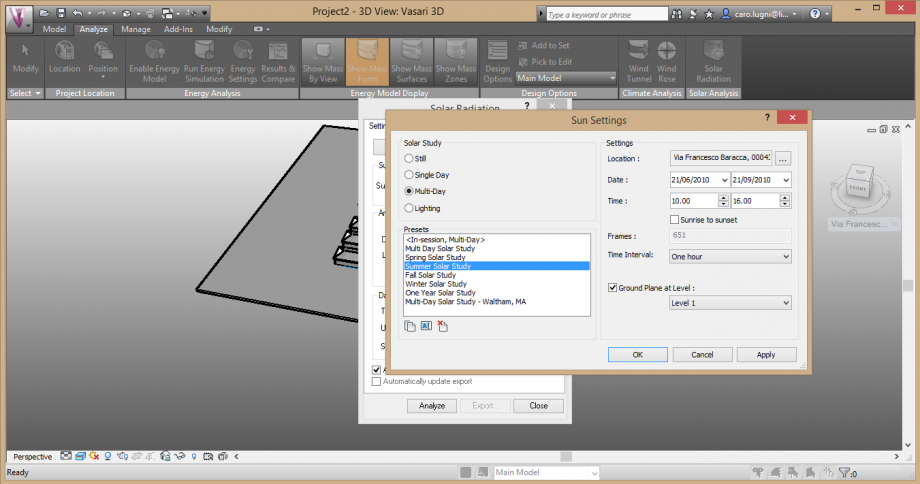
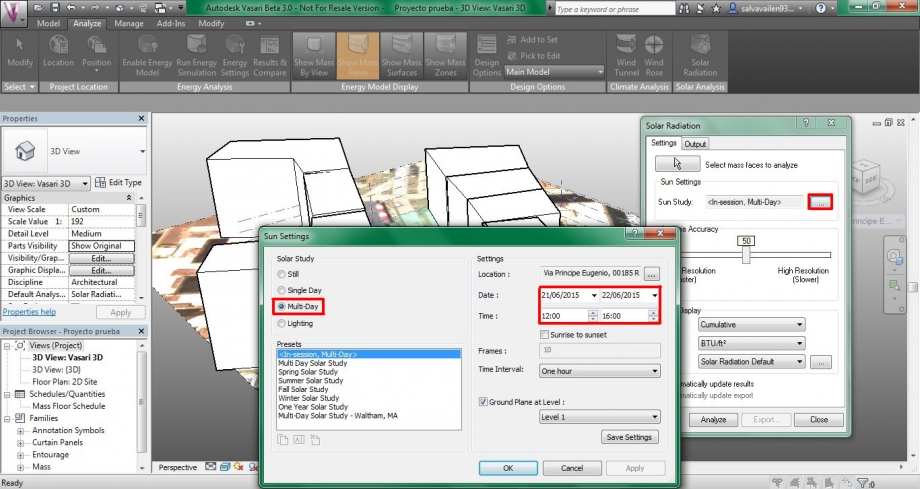
After setting this option you can set the period for the analysis by clickind on the three dots near "Sun studies",here we can choose the sun settings:
First of all set the solar study on "multi-day" click on one of the preset you need ( we have used summer and winter solar studies),for the rest you can leve the Vasari default options.
after that you can customize the graphic configuration of your analysis by clickin on the three dots near the style menu on the solar radiation main menu.
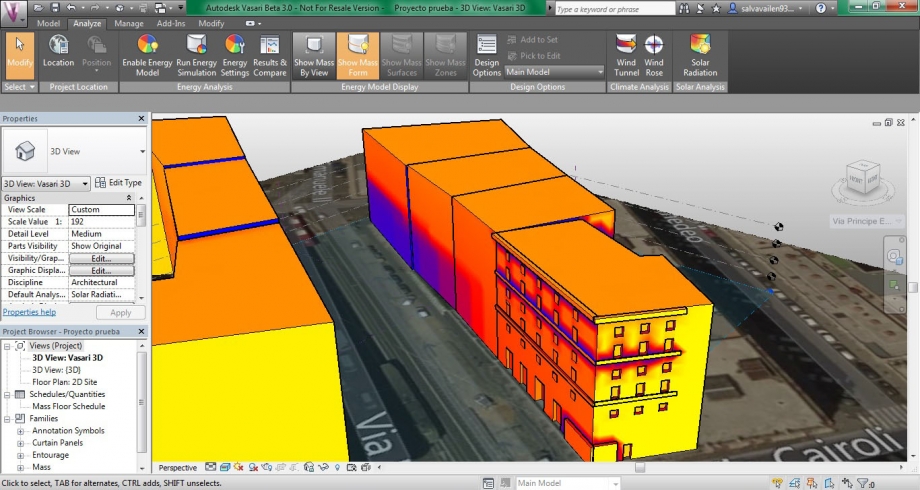
We set "Ecotec stile" on the left and choose the red for the higer and hotter result and blue for the lower and cooler result,by clicking on the legend menù you can also choose the range of values that you need.

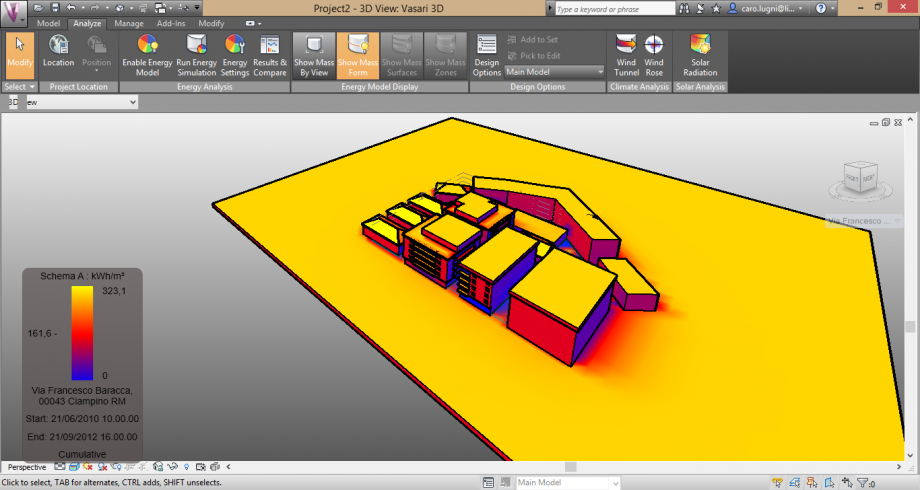
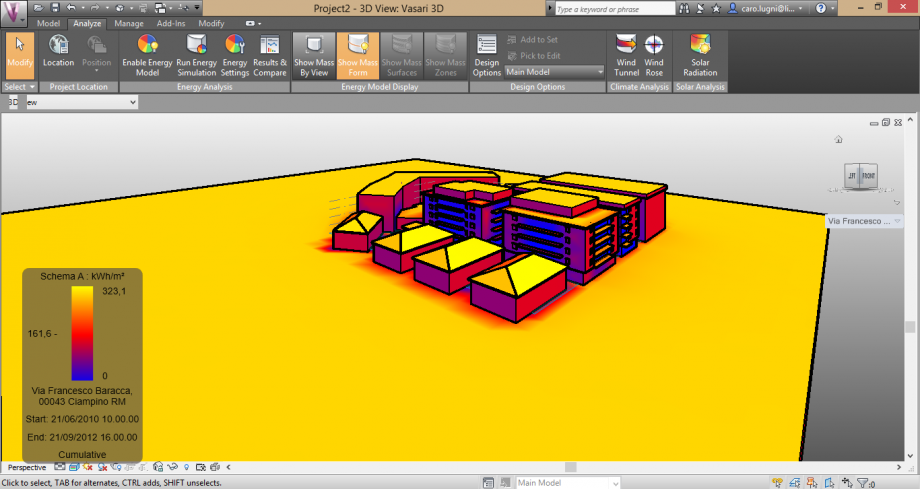
After setting the options for the analisys and after creating our custom style for the rappresentation we can start to analyze the area with te solar radiation.
We've choose some intersting view of the area in the different season,the results confirm the supposition that we've just expres on the study of shading:
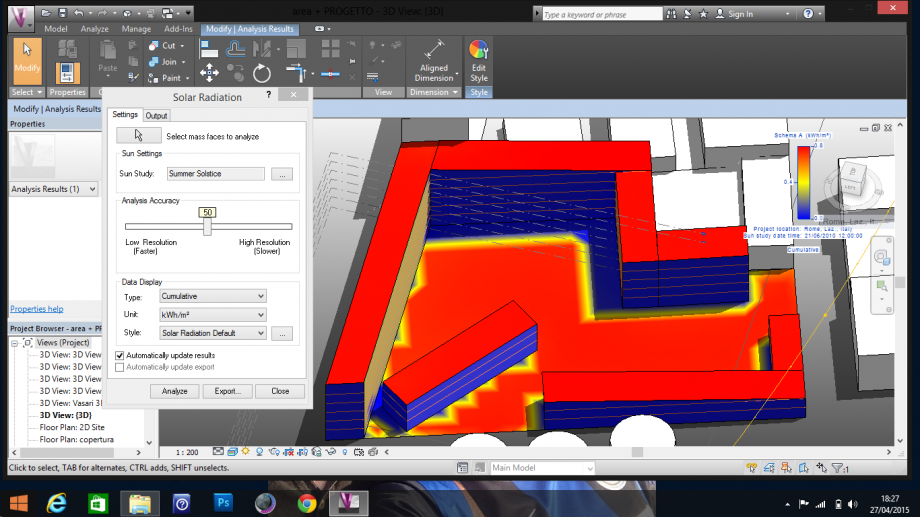
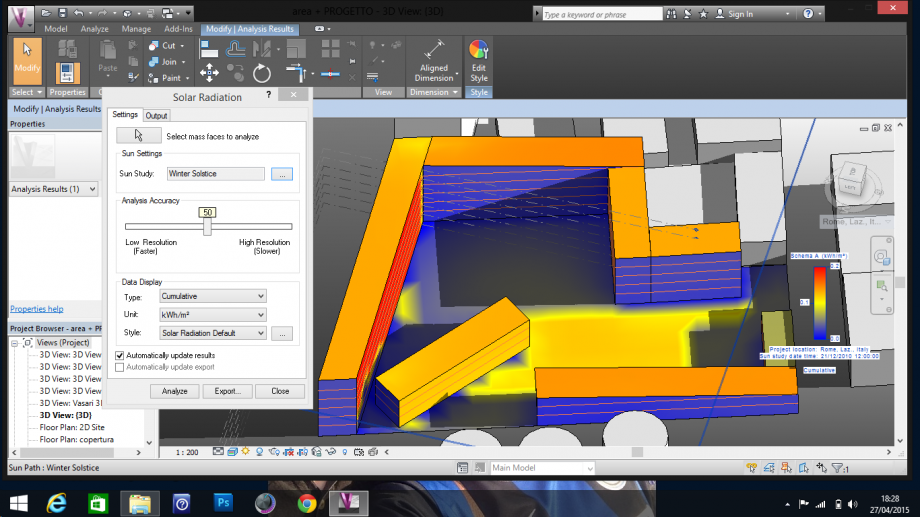
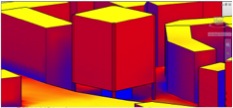
the first one that we're going to analyze is the South-East view of analyze is the South-East view of the area
-Summer
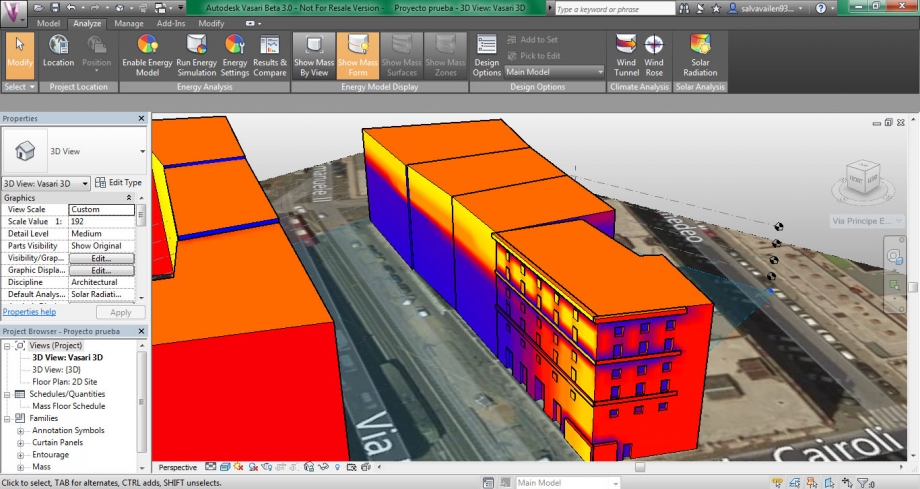
-Winter
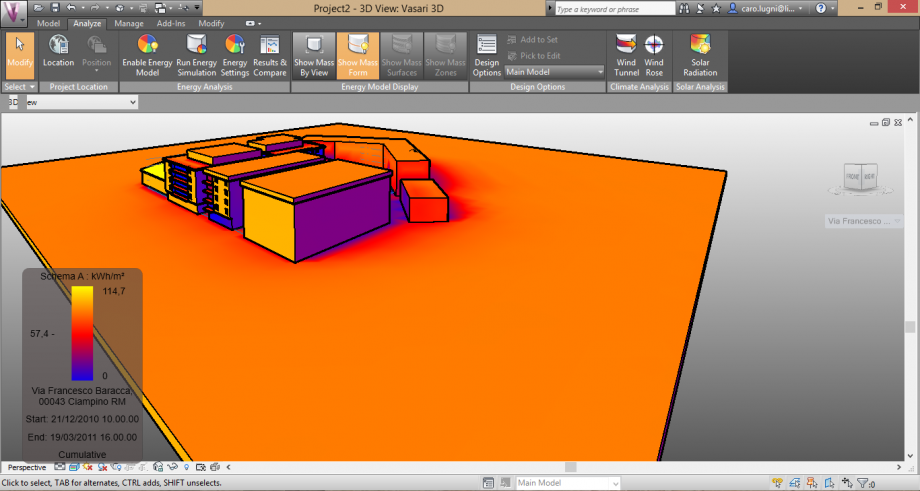
By this viewing we can observe that a constant both in winter and in summer is the cold area that the solar radiation create between the edifices,and obviously the cold areas on the balconies but the most important thing is that between the buildings there is a cold area during the all year,this could be useful on summer and on the hotter day of the year,but culd be critic during the rest of the year,first of all for the quality of the life in the internal side of the complex,secondly because of the creation of molds and wet stains in this area.
We can see more in detail this situation if we tacke a look on the internal court (during the winter,the most critic period):
-North-East
-Nort-West
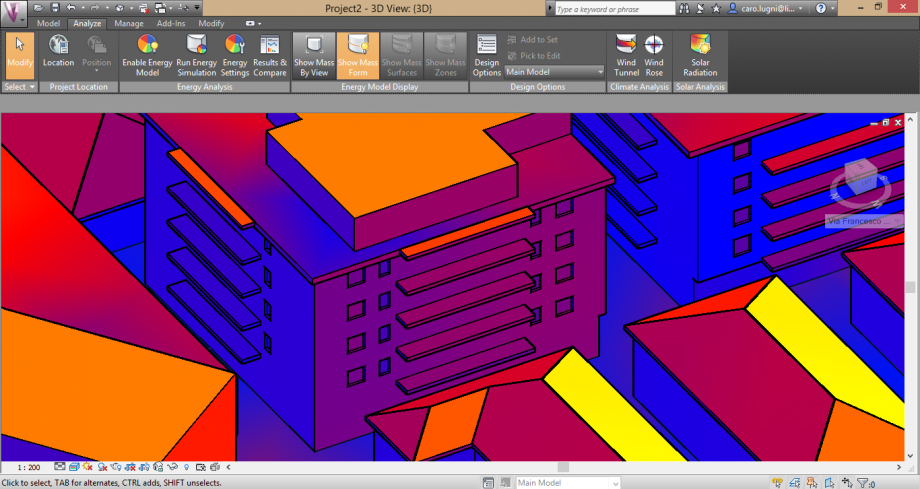
The court as we saw is always shading during the winter days,but these immages confirm the situation,this situation could be a real problem for the life inside,the heating costs ecc...
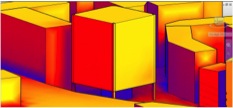
By the observation of the West facades we can see the same problem:
-Summer
-Winter
Here we can see another problem:the more external west side of the comlex is really cold,but here we've some big windows and balconies,this thing express the contradictory nature of the area,and show that the building was built without attention at the issues of sunshine,as we told on the shading report.
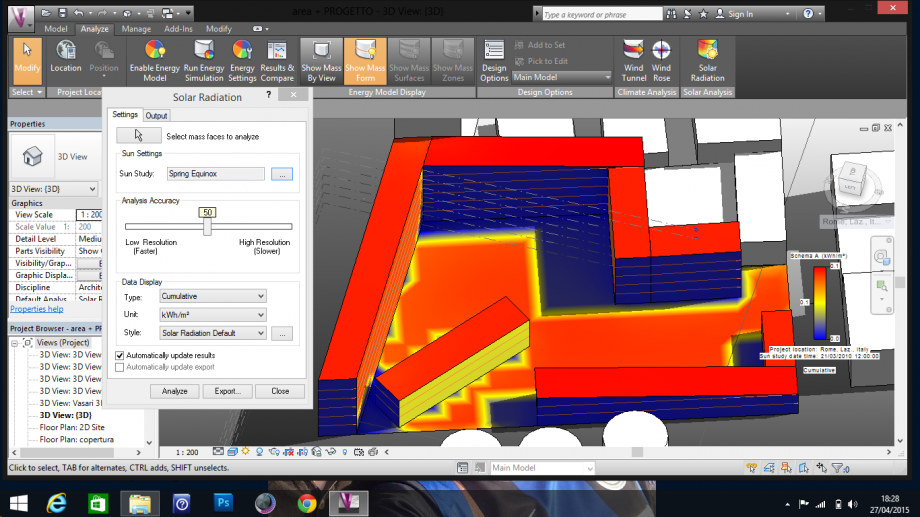
Another intersting view is on the south elevation that facing Via Francesco Baracca
-Summer
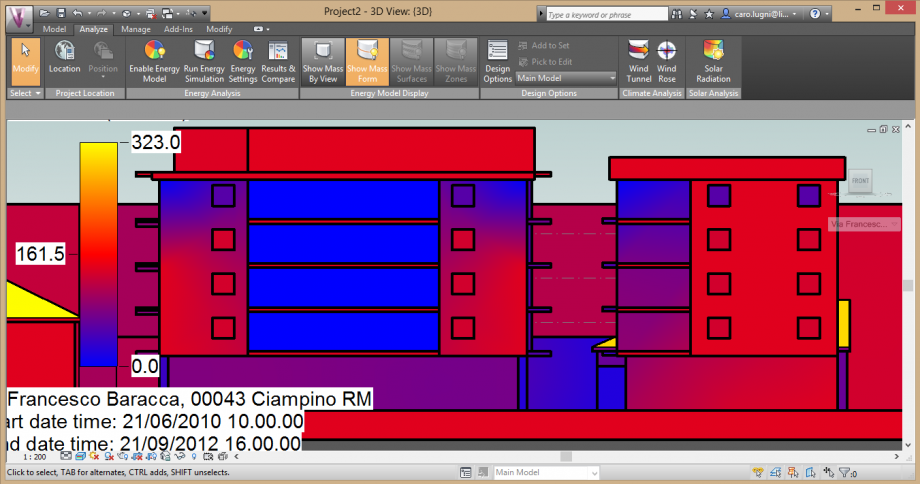
-Winter
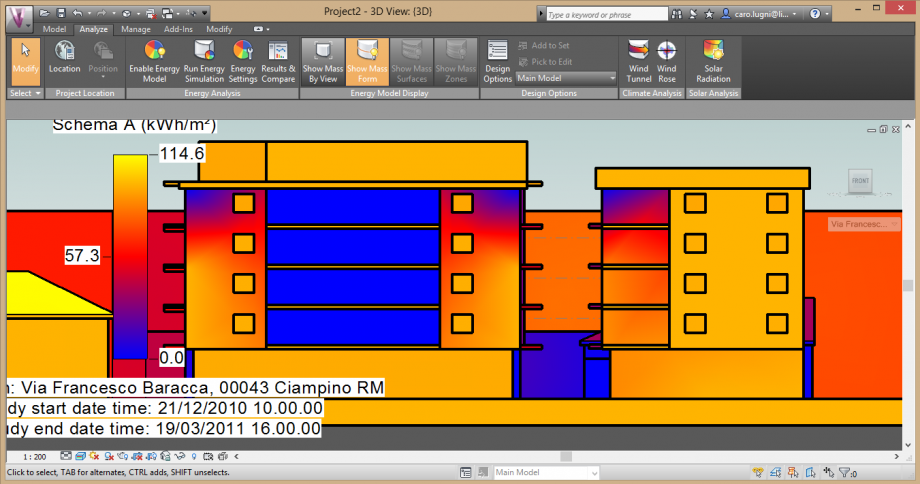
we can say that the behavior of the facade is quite normal,except for the external corner on the last floor near the roof,in fact in that particular areas we can see an anomalous change of color,it rappreset a critic area where the Kw/h m2 quickly change,theese are the areas where we can see anomalous behavior of the masonry and the plaster and not high quality of architecture.
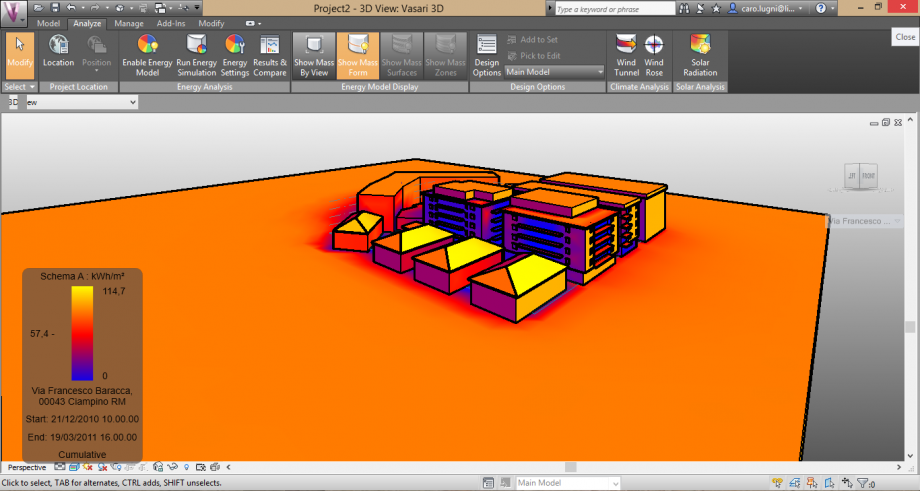
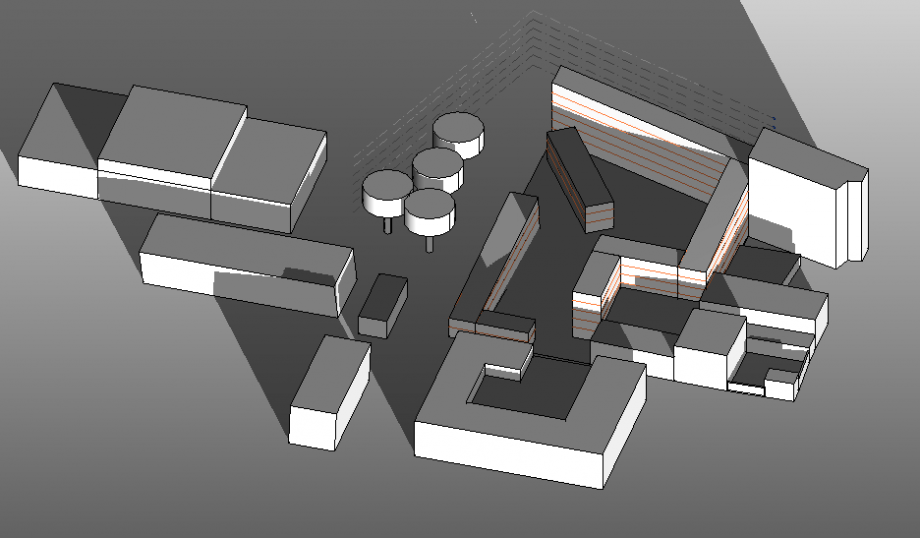
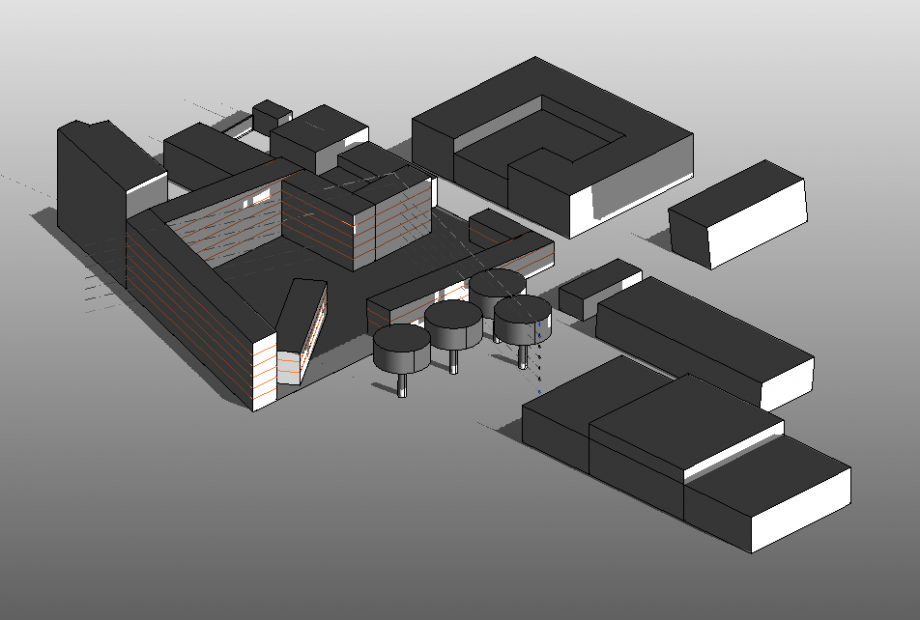
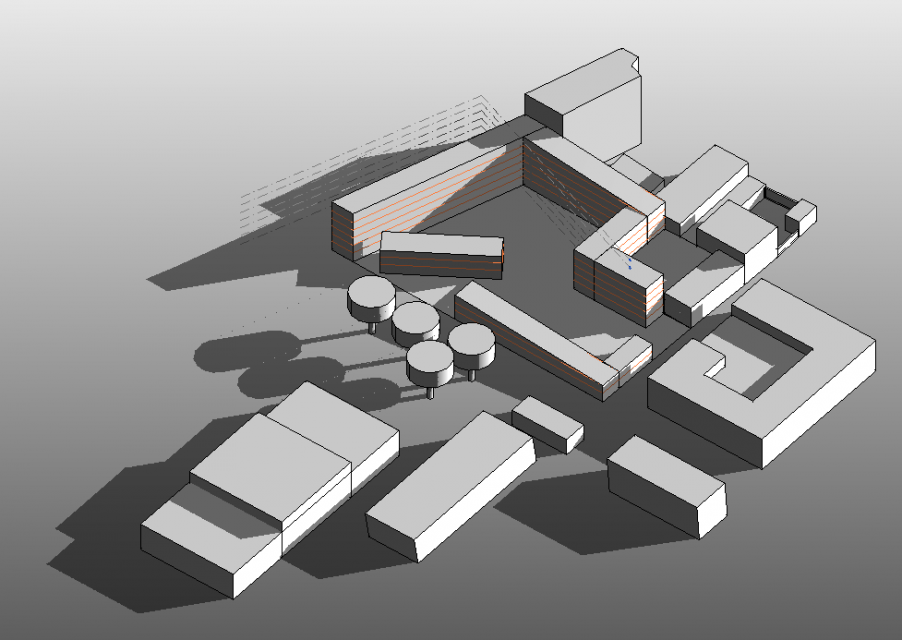
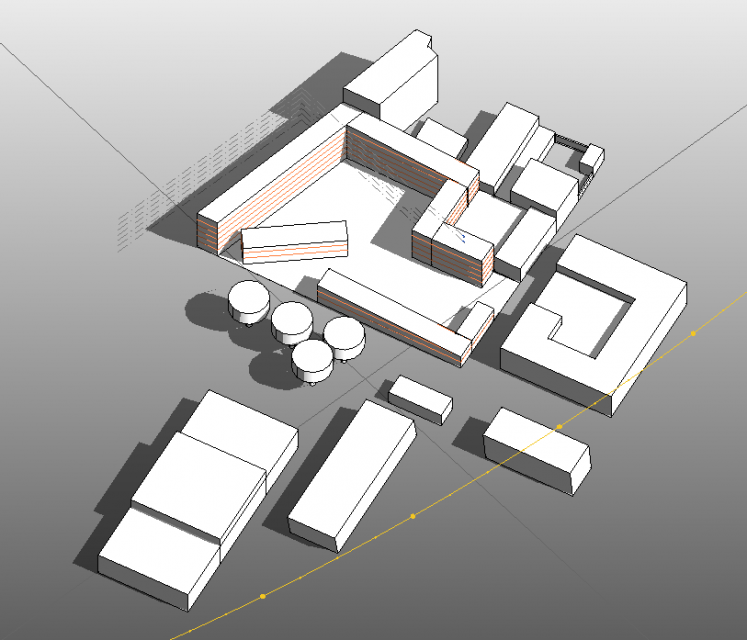
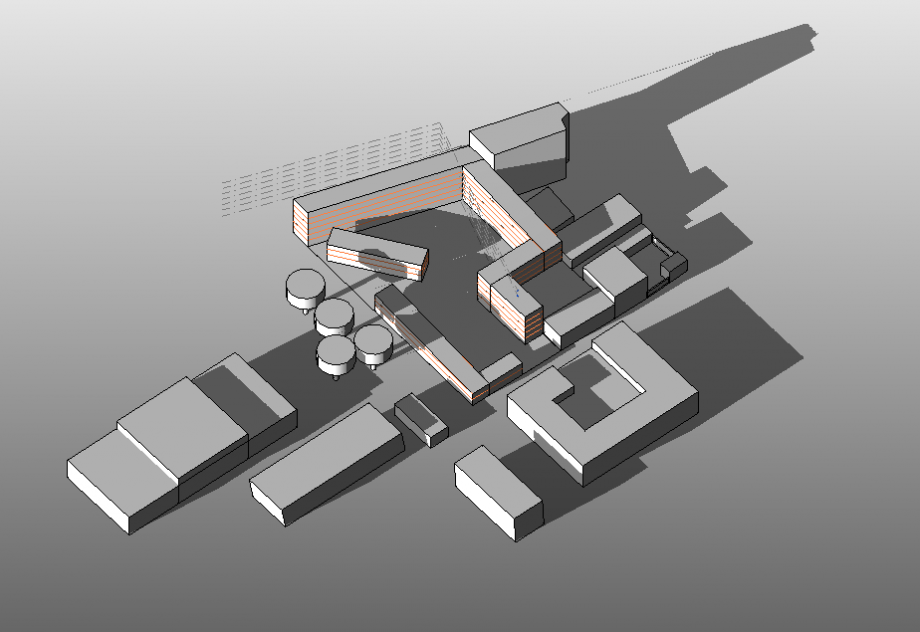
With the Solar Radiation we've also analized the project area where we're going to project a temprary residences,the area is setting in Rome on the intersection between Via degli Orti Di Cesare (near the train station of Roma Trastevere)Viale di Trastevere and Circonvallazione Gianicolense,is a very intersting site not only for its history but also for the position and topography of the area
-Area Winter
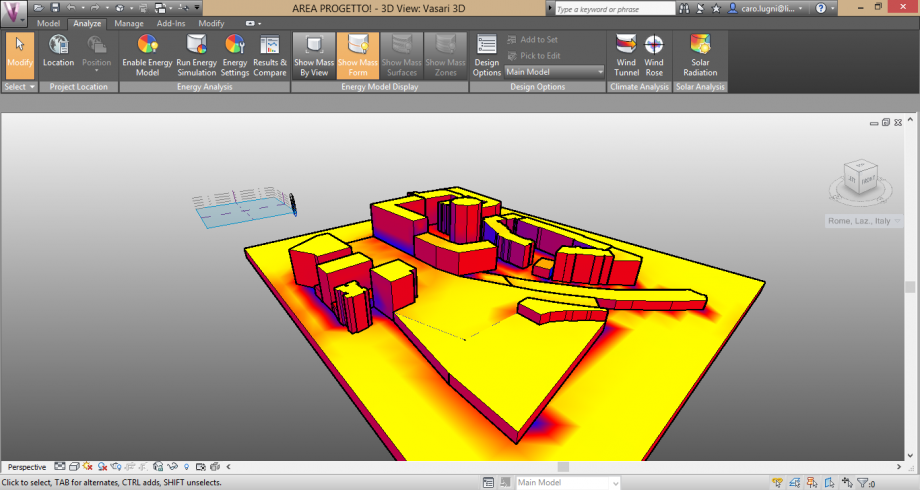
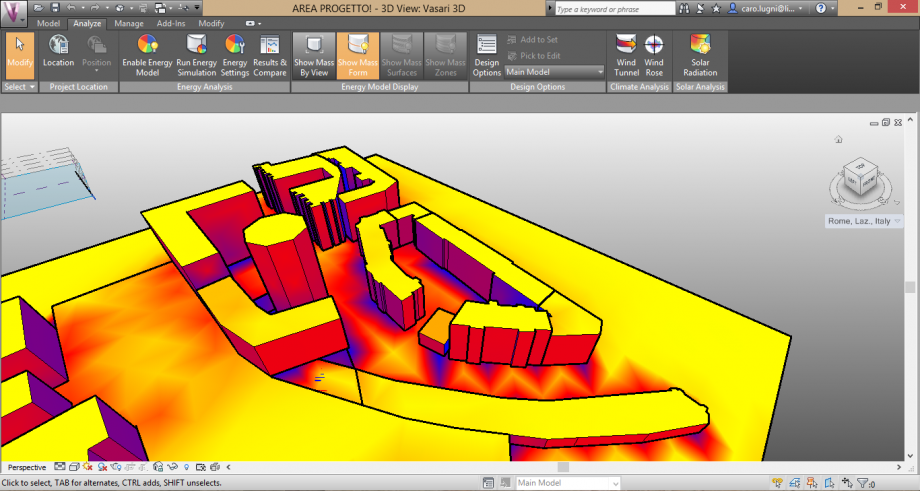
we've also insert the volumes of our project (or what is our first idea of the project) and we've seen a quite good behavior during the winter season,this analysis could be an important way to see and adjust the problem of the project.
Lun, 27/04/2015 - 18:29
 BARBARA PARIS
Lun, 27/04/2015 - 16:59
BARBARA PARIS
Lun, 27/04/2015 - 16:59
Modellazione e analisi solare
Premessa
Nell' analisi eseguita sugli edifici di Via del Gazometro, abbiamo affronatato una nuova problematica, ovvero quella relativa all'esposizione degli elementi architettonici aggettanti nonchè quella delle bucature. L' analisi è stata fatta attraverso il comando di radiazione solare di Vasari, il che ci permette di capire quanto siano esposte le superfici e quanto questo influenzi lo stato di conservazione o degrado dell'architettura presa in analisi. Per valutare quindi lo stato di un edificio abbiamo dapprima modellato l'architettura individuando gli elementi più significativi come bucature, aggetti, terrazze, balconi e superfici con esposizione di particolare interesse. In un secondo momento abbiamo invece effettuato l'analisi solare utilizzando l'apposito comando , che ci permette di visualizzare nell'unità di misura che preferiamo, l'attività esercitata dal sole all'interno di un arco di tempo stabilito da noi. Grazie a questa ispezione ci è permesso capire anche quali interventi sia possibile effettuare su un'architettura qualora fosse necessario. Difatti questo torna utile se si volesse intervenire sulla sostituzione di una superficie opaca con una trasparente o sull'utilizzo di un materiale piuttosto che un altro. Fatta questa premessa nei punti successivi si elencano i passaggi necessari per eseguire modellazione e analisi solare.
Modellazione
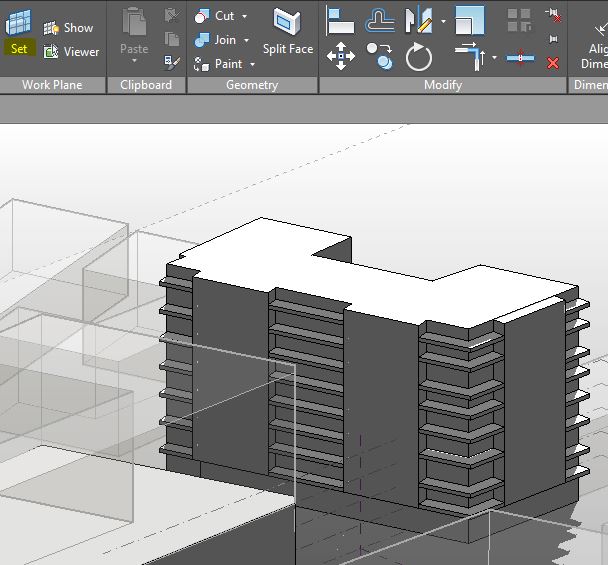
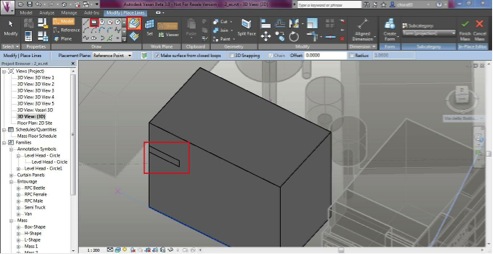
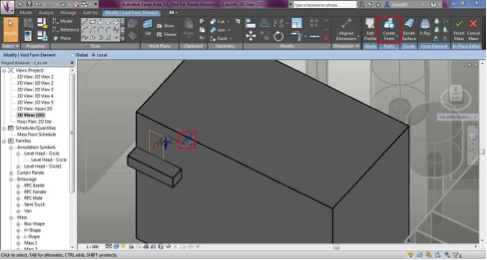
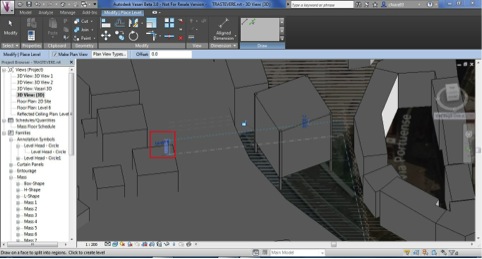
1. Per modellare un edificio con un aggetto o una bucature innnzitutto si deve selezionare la massa su cui si intende lavorare
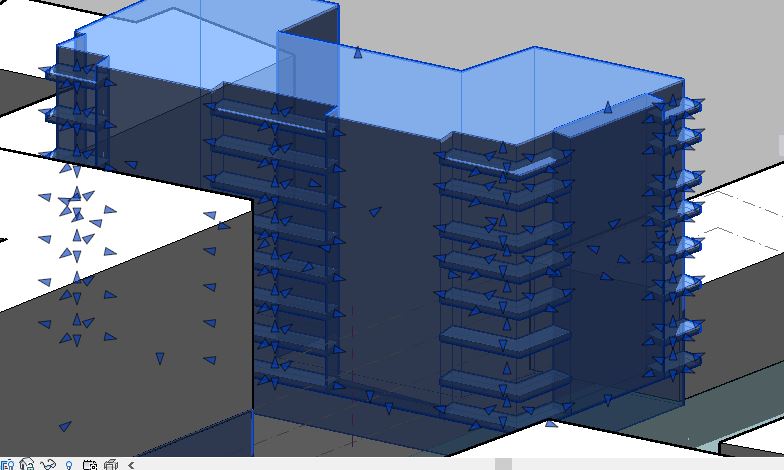
2. Una volta selezionata la massa cliccare Edit in Place e Set per selezionare il piano su cui si intende lavoarare
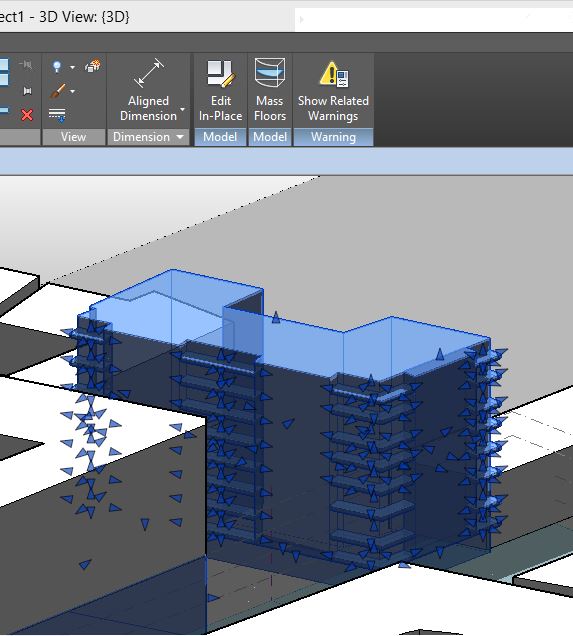
3.A questo punto possiamo andare sulla barra e scegliere lo strumento che preferiamo all'interno di Draw per disegnare l'oggetto
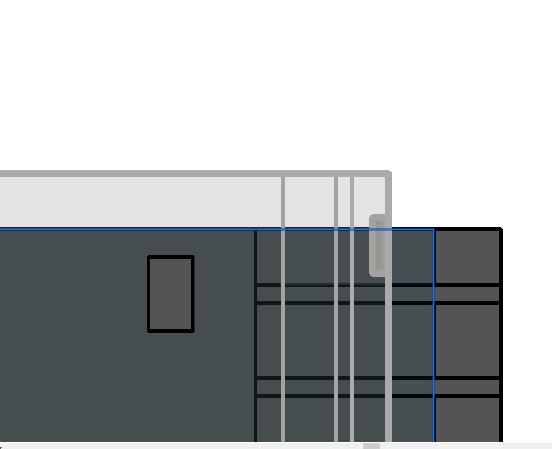
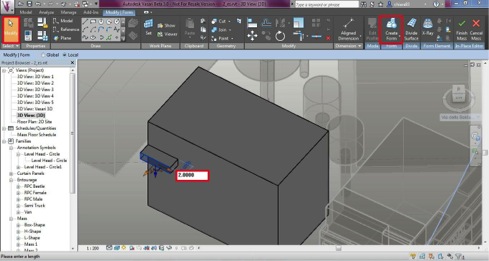
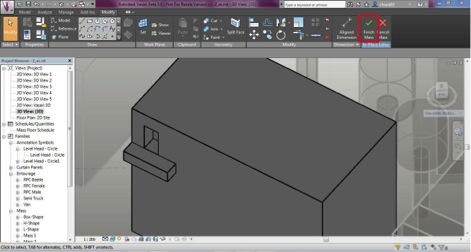
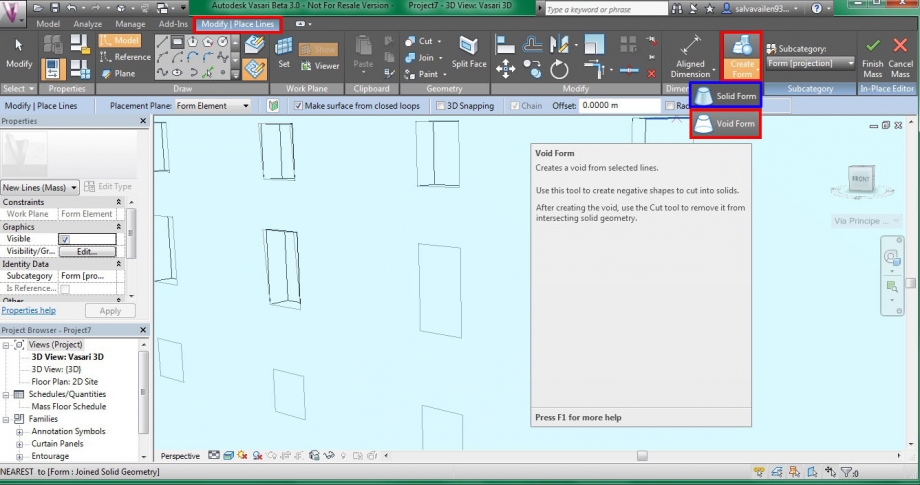
4. Una volta che abbiamo disegnato l'oggetto possiamo cliccare su Create Form per estrudere. Se vogliamo un aggetto scegliamo Solid Form, se voglimo una bucatura scegliamo Void Form.
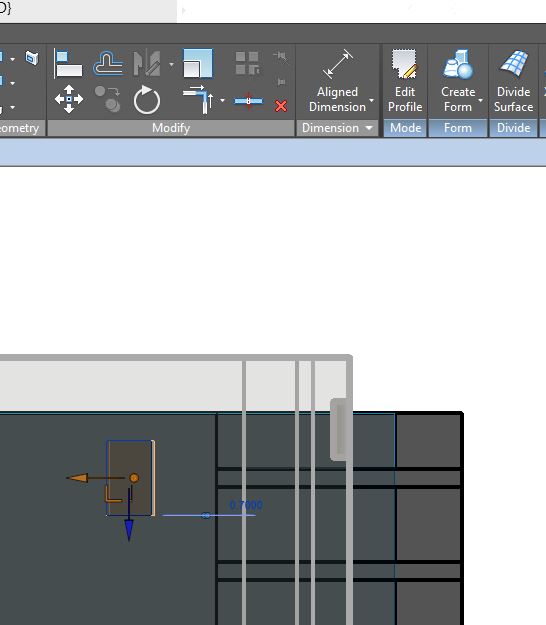
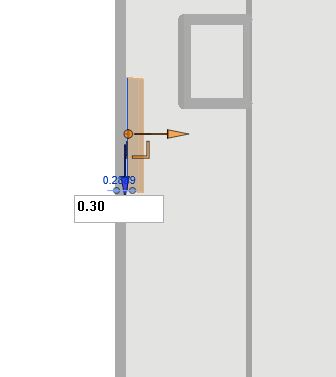
5. Infine scegliamo la profondità del nostro oggetto
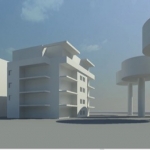
Alcune viste dell'edificio modellato
Analisi Radiazione Solare
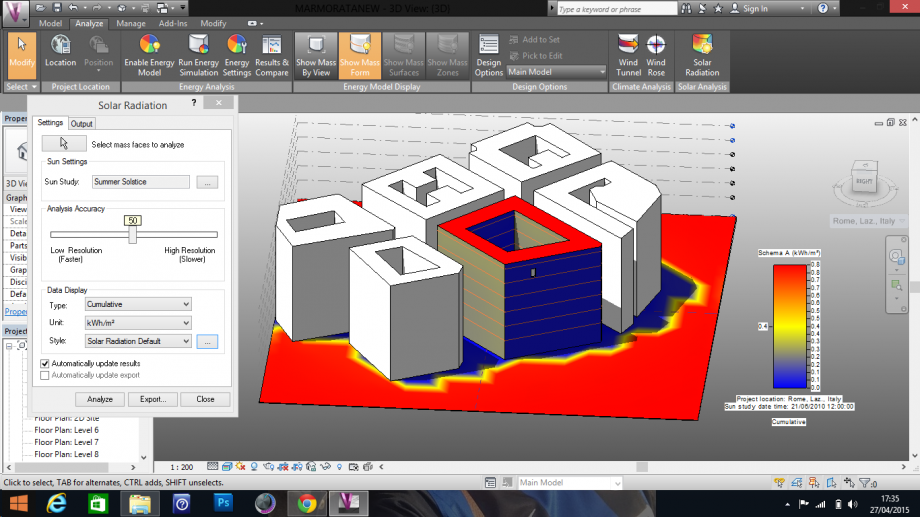
1. Una volta creati gli oggetti che interessano la nostra analisi possiamo effettuare l'analisi solare, perciò per prima cosa clicchiamo sulla barra Analyze e poi sul comando Solar Radiation
2. A questo punto impostiamo le proprietà per fare l'analisi attravaerso la finestra che si apre come si vede nell'immagine. Nella nostra analisi è stato scelt di misurare il valore della radiazione in kWh/mq e l'analisi è stata fatta sia per il periodo estivo che invernale nella fascia oraria 12:00-16:00
3. Nella nostra analisi possiamo personlizzare lo stile in cui visualizzare i valori perciò potremo apportare tali modifiche clicccando su Style . Dopodichè potremo rinominare il nostro stile personalizzato.
4. Possiamo poi scegliere il periodo dell'anno e l'orario in cui visualizzare la radiazione solare apportando le modifiche all'interno di Sun Settings.
A questo punto il software ci mostrerà l'analisi e gli effetti della radiazione sull'edificio
In questa vista si vedono i valori della radiazione solare nel periodo estivo nella fascia oraria 12:00-16:00
In questa vista si vede la radiazione nel periodo invernale nelle ore 10:00-16:00
In entrambi i casi si nota come questo edifico subisca una radiazione solare non eccessiva . In effetti l'edificio è ombreggiato sulla facciata quasi tutto l'anno per la presenza di un altro edificio sul fronte stradale opposto . La facciata è esposta ad est , perciò tranne che per poche ore durante la mattinata , per il resto del tempo l'edificio è in ombra. Sicuramente a questo edifico non servono interventi di ombreggiamento. Piuttosto sarebbe preferibile intervenire in copertura e sulla facciata a sud che invece non sono mai protette, come si vede nell'analisi sottostante che è stata fatta scegliendo una visualizzazione di default definita Ecotect Style.
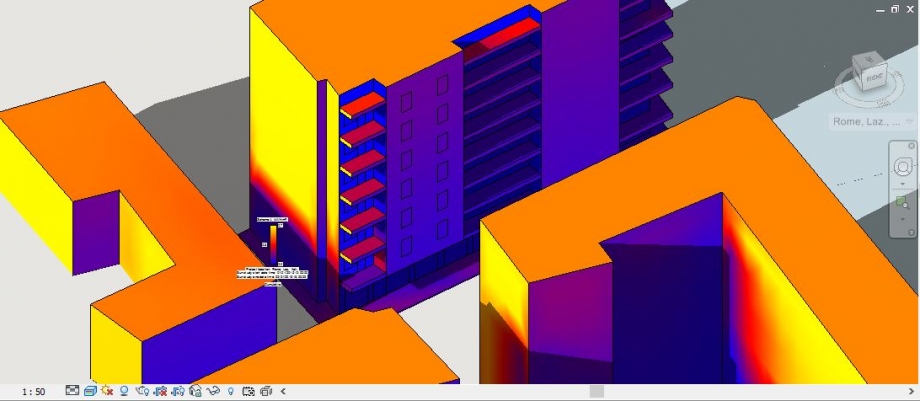
Analisi della radiazione di un anno solare in fascia 12:00-16:00
Analisi della radiazione in periodo estivo in fascia 12:00-16:00
Lun, 27/04/2015 - 18:15
 Falcinelli_Gaglione
Lun, 27/04/2015 - 17:36
Falcinelli_Gaglione
Lun, 27/04/2015 - 17:36
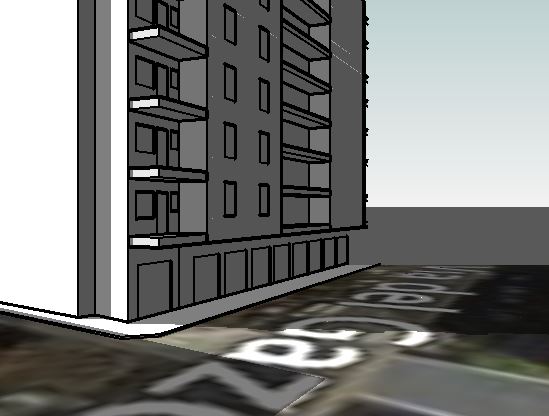
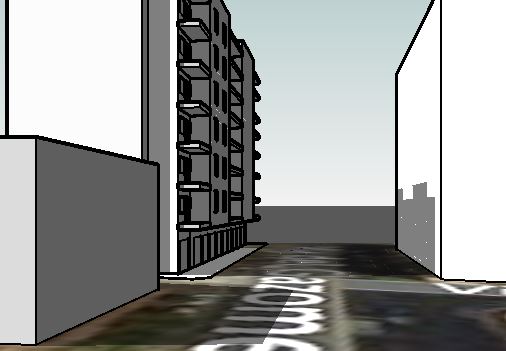
I fattori che influiscono sull'irraggiamento termico sono la posizione geografica, la data e l'ora del momento in cui viene fatto lo studio, le condizioni atmosferiche, l'orientamento e le posizioni delle superfici prese in analisi. Partendo dall'edificio di Via Marmorata, ci siamo subito accorte che l'edifico in questione , così come quelli nelle immediate vicinanze, non mostravano particolari elementi in aggetto (quelli cioè che influiscono sull'irraggiamento di una superficie). Dunque non avendo balconi, terrazze, pensiline o cornicioni importanti, ci siamo concentrate sullo studio dell'irraggiamento che interessa il terreno, le facciate e le finestre dell'appartamento dove ci era possibile fare riscontri tra Vasari e realtà. Analizziamo la prima immagine:
 Questa analisi mostra la radiazione solare sul nostro edificio e sul terreno nella stagione primaverile. La facciata principale, come si può vedere nello studio dell'ombreggiamento della prima esercitazione, è sempre in ombra. Di conseguenza anche nell'analisi dell'irraggiamento riscontriamo un colore blu che indica bassi valori di radiazione solare.
Le stesse considerazioni valgono per la stagione invernale, dove però notiamo una colorazione che tende più all'arancio per via delle temperature più basse.
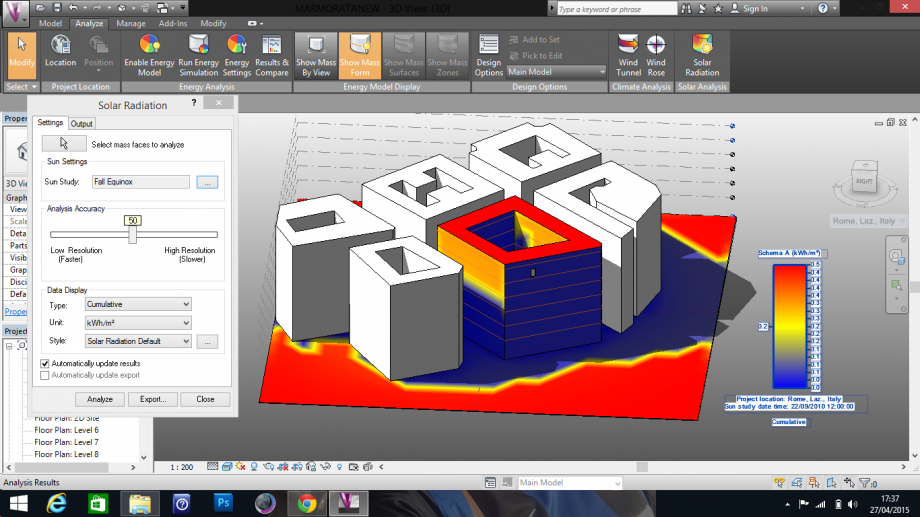 In autunno e in estate non ci sono grandi variazioni per quanto riguarda la facciata principale orientata ad est. La copertura in tutte le stagioni risulta fortemente irraggiata, da questo ne trae beneficio l'ultimo piano nelle stagioni fredde e ne risente nelle stagioni calde. La presenza degli edifici per quanto riguarda la strada è significativa durante tutto l'arco dell'anno in quanto la loro ombra riduce il surriscaldamento della strada.
Analizziamo ora i valori che riguardano nello specifico le finestre: in sequenza vediamo ESTATE - INVERNO - PRIMAVERA - AUTUNNO
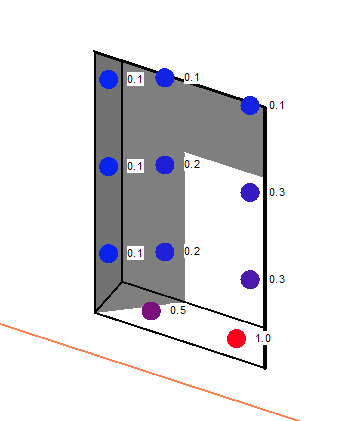

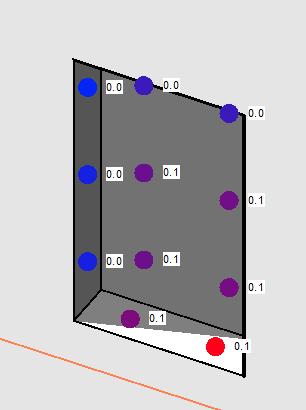
i valori si aggirano in un intervallo che va da 0.0 a 0.2 in inverno e primavera. In autunno raggiunge il massimo in 0.3 mentre in estate registriamo i valori più alti: 0.3, 0.5, 1.0. I valori più bassi si trovano in tutte le stagione nella parte più ombreggiata, i più alti ovviamente riguardano le porzioni esposte al sole. Abbiamo analizzato anche un'altra finestra esposta ad ovest:
riportiamo solo i casi dei valori più alti e più bassi, rispettivamente di estate ed inverno. Ci accorgiamo subito di come siano diversi rispetto a quelli della finestra esposta ad est. Il prospetto ovest infatti risulta più irraggiato rispetto all'est.
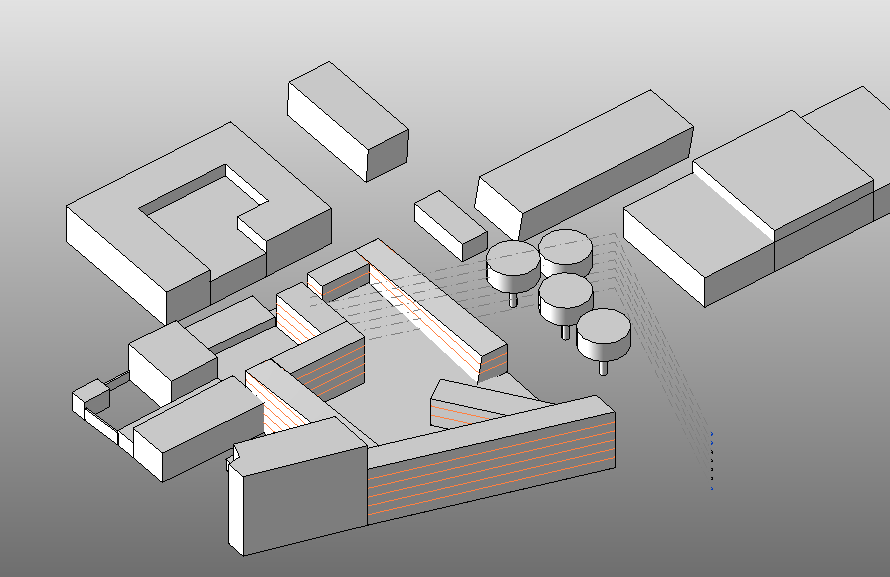
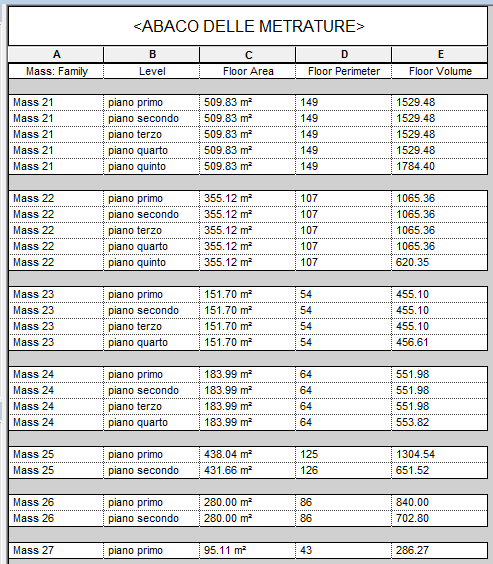
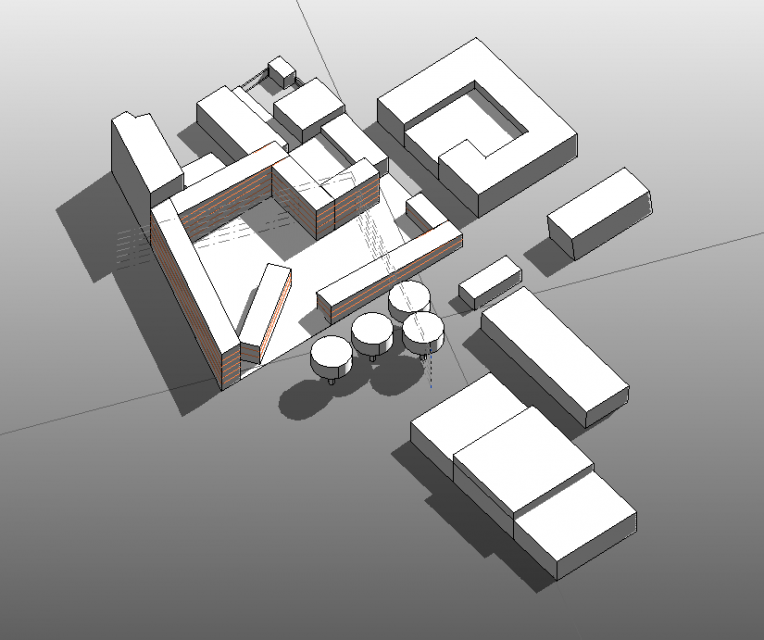
A questo punto il nostro studio si è spostato su via del Porto Fluviale dove è presente l'area di progetto. Oltre alla modellazione degli edifici limitrofi al lotto d'interesse abbiamo modellato anche una ipotesi di progetto e abbiamo elaborato un abaco delle metrature :

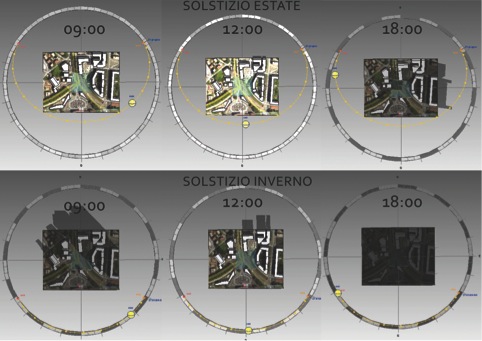
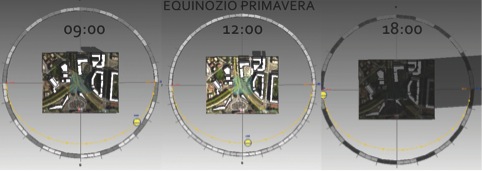
Successivamente abbiamo visto come si comportano le ombre nelle 4 stagioni negli orari più significativi: AUTUNNO
ORE 9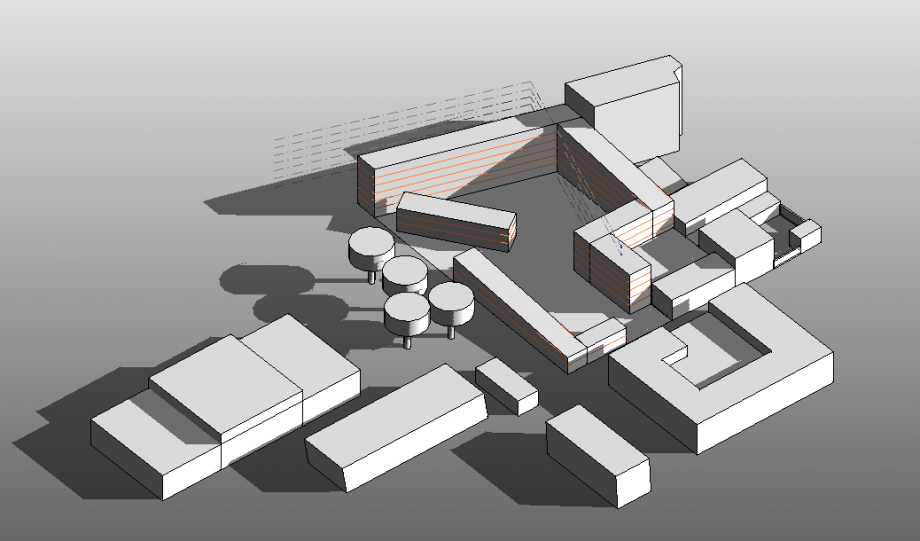
ORE 12
ORE 18
ESTATE
ORE 9
ORE 12
 ORE 18
 INVERNO ORE 9
 ORE 12

ORE 18
 PRIMAVERA ORE 9
 ORE 12
ORE 18
E' importante analizzare il comportamento delle ombre per la progettazione di spazi esterni ed interni ben vivibili e confortevoli. Con questo obiettivo abbiamo analizzato anche le radiazioni solari che interessano l'area e i nostri volumi:
AUTUNNO

ESTATE
INVERNO
 PRIMAVERA
 Notiamo che le facciate esposte a nord sono sempre in ombra e quindi sono colorate di blu e presantano valori bassi come quelle ad ovest. Risultano particolarmente soleggiate le facciate a sud, per questo sarebbe meglio pensare a delle schermature orizzontali in quanto il sole è alto. Ad est invece c'è molto sole in estate e poco in inverno ma potremo approfittare delle ombre generate dai palazzi limitrofi all'area.
 Ciccarelli_DeSantis
Lun, 27/04/2015 - 17:37
Ciccarelli_DeSantis
Lun, 27/04/2015 - 17:37
- 1_TUTORIAL MODELLAZIONE BALCONI E FINESTRE:
Cliccare su Modify, quindi su “Edit In-Place” per modificare l’edificio selezionato e creare così il primo balcone;
Selezionare Model à Rectangular e creare la prima figura assicurandosi che il comando “Wotk in plane” sia attivo in modo da lavorare sulla facciata dell’edificio prescelta;
Subito dopo aver modificato le sue misure cliccare su Create Formà Solid in modo da estrudere il rettangolo e stabilire di quanto dovrà aggettare il balcone (ad es: 2,00 m);
Ripeto il procedimento precedente per creare la finestra, ma questa volta seleziono il comando “Create form” à Void e scelgo le dimensioni della rientranza;
Infine fare click su “Finish Mass” per terminare e uscire dalla modalità modifica dell’edificio.
2_TUTORIAL SOLAR RADIATION:
Dopo aver modellato l’edificio iniziamo l’analisi degli spazi aperti che circondano l’edificio e dell’edificio stesso attraverso il comando “Solar Radiation”;
- Cliccando sul comando “Solar radiation” si aprirà una finestra da cui cambieremo le seguenti impostazioni:
- Il tipo di analisi facendo click sul menù a tendina “Type” à Cumulative
- L’unità di misura cliccando sul menù a tendina di “Unit”-à kWh/m2
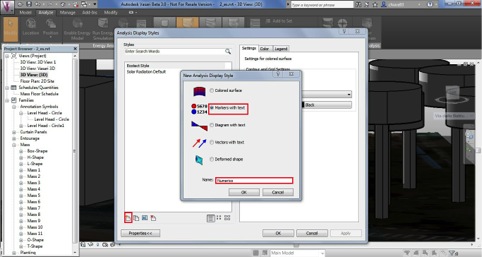
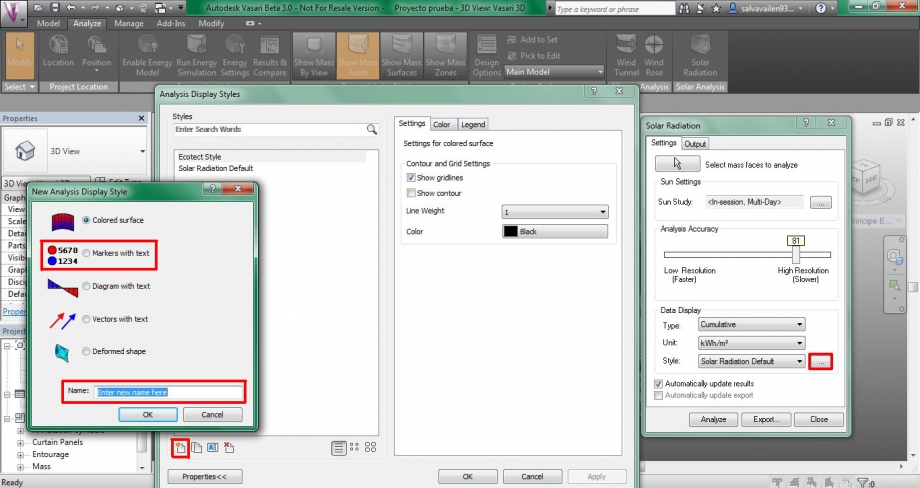
- Lo stile cliccando sui puntini accanto al menù a tendina di “Style”
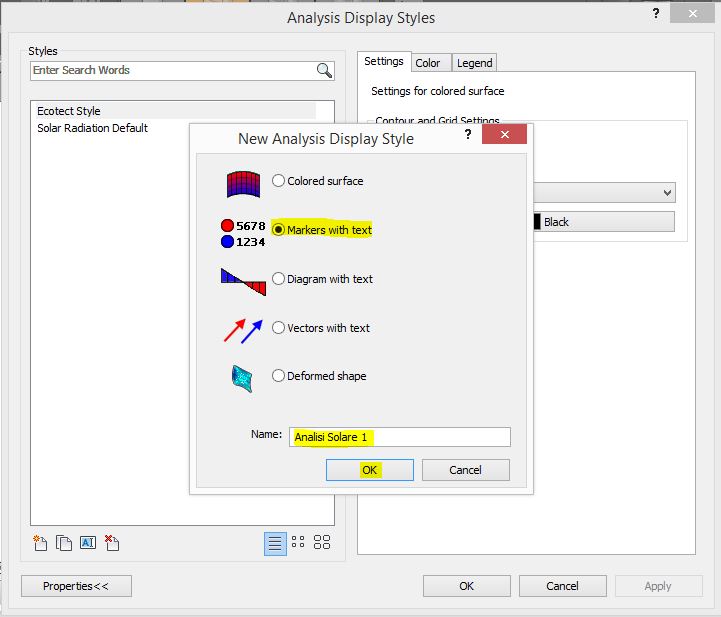
- . Si aprirà dunque un’ulteriore finestra, clicchiamo sulla prima icona in basso a sinistra e creiamo un nuovo stile. Nella finestra “New analysis display style” spuntiamo “Markers with text” e nominiamo il nuovo stile con ad es: “Numerico” , quindi facciamo click su Ok;
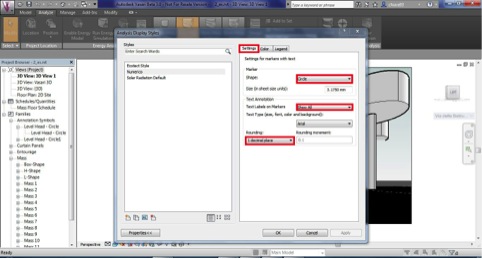
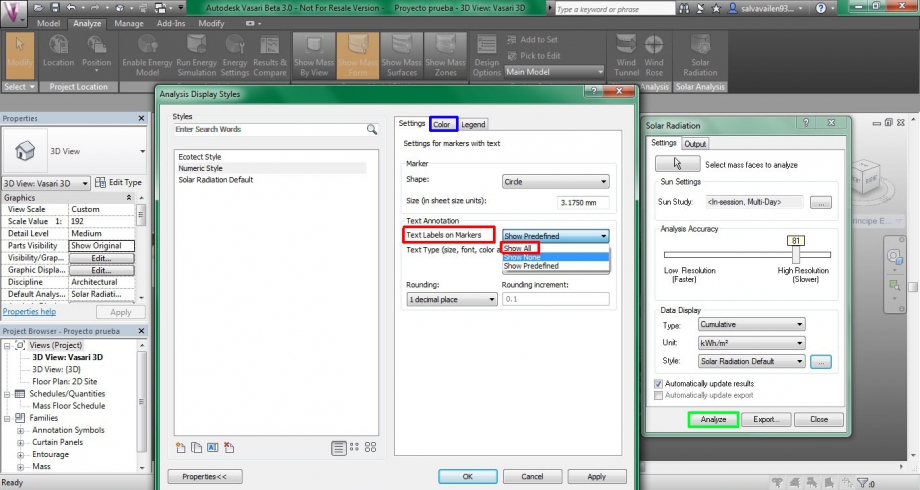
Ora cliccando su numerico possiamo modificare le impostazioni e i colori tramite “Settings” e “Color”:
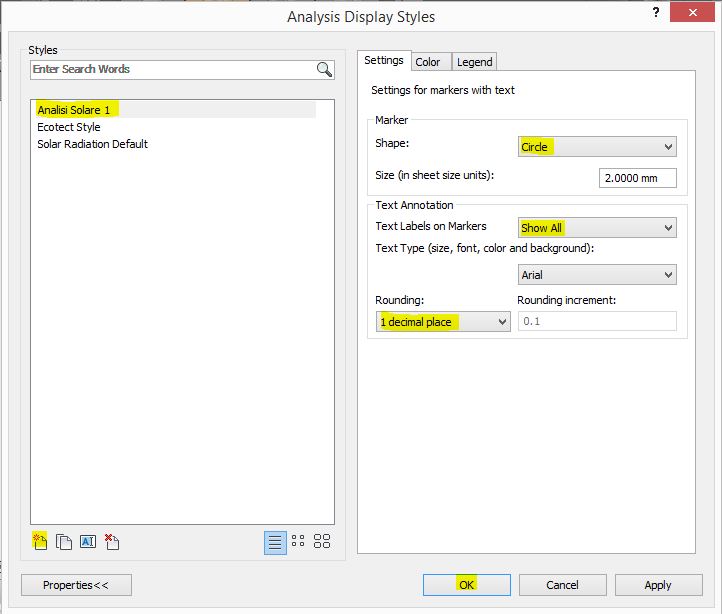
- Cliccando su “Settings” possiamo cambiare le impostazioni dei seguenti parametri:
- La forma del marcatore modificando dal menù a tendina di ShapeàCircle
- Text Labels on Markers à Show All
- Il numero dei decimali di approssimazione tramite Rounding à 1 decimal place (volendo anche 2 decimal place)
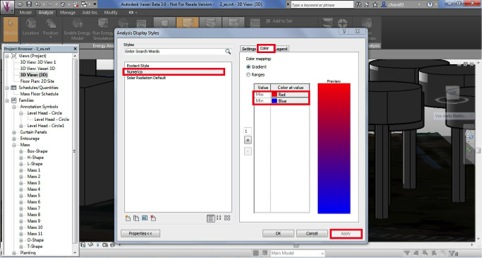
- Facciamo click su “Color” e impostiamo i valori massimi in rosso e i minimi in blu facendo click sui comandi sotto la colonna “Color at value” e ponendo “Red” e “Blue” rispettivamente per “Max” e “Min”.
ATTENZIONE: I colori, da default, sono impostati esattamente al contrario!
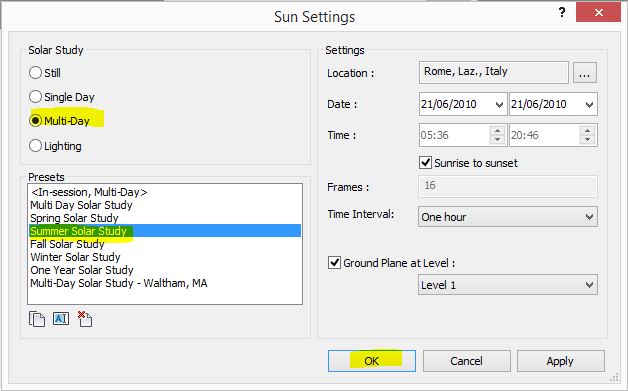
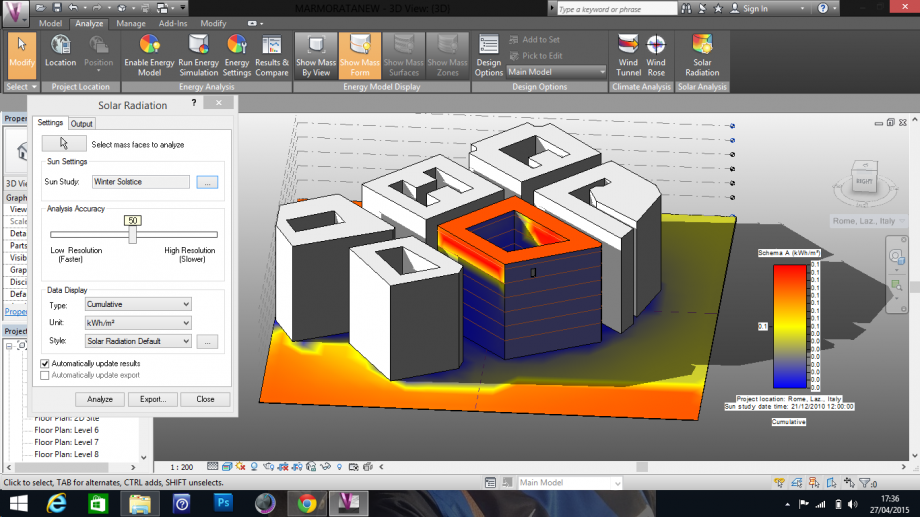
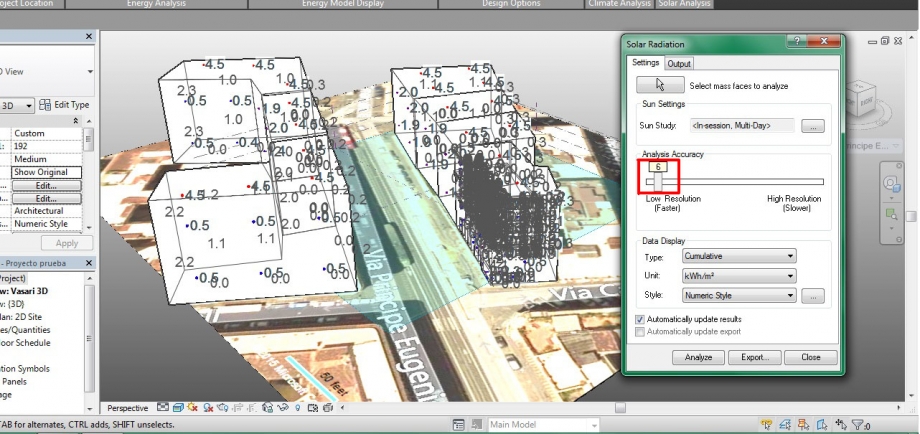
Dunque tornando alla finestra iniziale di “Solar radiation” facciamo click sui puntini accanto alla voce “Sun study”; si aprirà una nuova finestra dove modifichiamo le seguenti impostazioni:
- Nel quadrante in alto a sinistra è possibile scegliere l’arco di tempo durante il quale eseguire l’analisi (Single Day, Multi-Day etc); spuntiamo la voce “Multi-Day”;
IMPORTANTE: Mentre nello studio delle ombre condotto nella scorsa esercitazione abbiamo scelto di condurre l’analisi considerando un arco di tempo ristretto (ad es: un singolo giorno), in questo caso, usando lo strumento Solar Radiation, è molto più utile analizzare un arco di tempo vasto (ad es: una stagione) piuttosto che la singola giornata;
- Nel quadrante in basso a sinistra possiamo scegliere la stagione da studiare (ad es: clicchiamo su Summer Solar Study);
- Nel quadrante in alto a destra possiamo scegliere i giorni e l’ora modificando rispettivamente “Date” e “Time”; (se vogliamo farlo dall’alba al tramonto sarà sufficiente spuntare la voce “Sunrise to sunset”;
- Nel quadrante in basso a destra fare attenzione che sia settato il “ground plane” giusto.
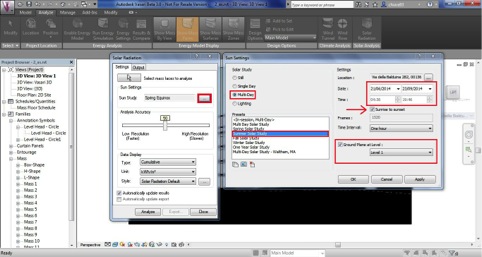
- Fare click su Ok per tornare al menù precedente e quindi cliccare su “Analyze” per iniziare l’analisi.
3_ANALISI DEGLI SPAZI APERTI CIRCOSTATI ALL’EDIFICIO CONSIDERATO:
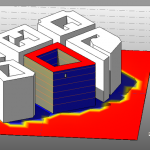
Abbiamo preso in analisi il cortile interno, spazio di pertinenza del nostro edificio e dei due edifici circostanti, di cui avevamo precedentemente esaminato le ombre per la prima esercitazione.
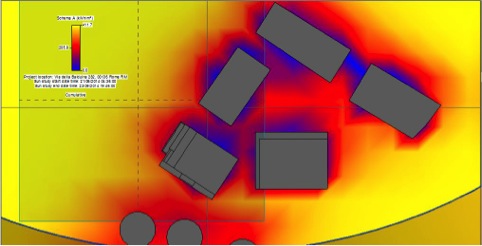
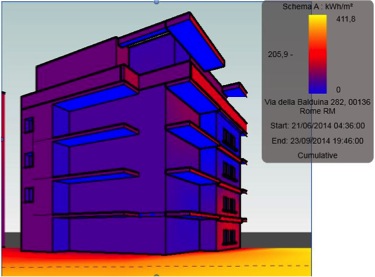
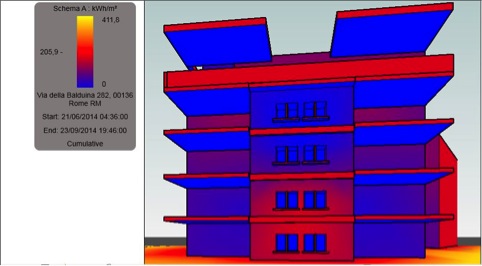
RADIAZIONE SOLARE ESTIVA
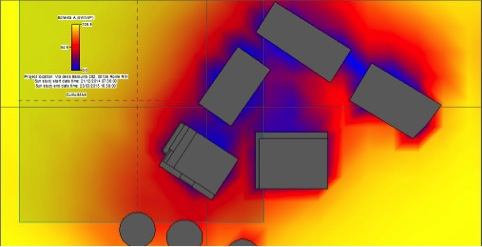
RADIAZIONE SOLARE INVERNALE
Come era emerso dalla precedente analisi sull’ombreggiamento, il cortile interno risulta in ombra durante quasi tutto l’anno a causa dell’eccessiva vicinanza dei tre palazzi circostanti, fatta eccezione per le ore 12.00 del solstizio d’estate quando risulta pienamente illuminato. Alla luce di questo studio non sorprendono i risultati che sorgono dall’analisi dei valori della radiazione solare. Abbiamo condotto lo studio esaminando ciò che accade durante la stagione estiva ed invernale. In entrambi i casi le zone con radiazione solare più bassa sono quelle prossime agli edifici, mentre i valori più alti li troviamo nelle zone più esterne e dunque prive di protezione. I valori massimi estivi raggiungono i 206 kWh/m2 (abbiamo tralasciato i valori massimi corrispondenti al colore giallo poiché su quell’area nella realtà si sviluppano altri edifici non presenti in quest’analisi) , mentre durante la stagione invernale scendono notevolmente a circa 55 kWh/m2. Focalizzandoci ora sul cortile interno (1), esso risulta essere poco confortevole durante la stagione invernale, come evidenziato dall’immagine e dalla concentrazione del colore blu, e dunque dei valori minimi di radiazione solare.
In seguito, al fine di rendere il più veritiera possibile quest’analisi abbiamo inserito la vegetazione, ipotizzando che tale presenza potesse influire sull’andamento della radiazione solare.
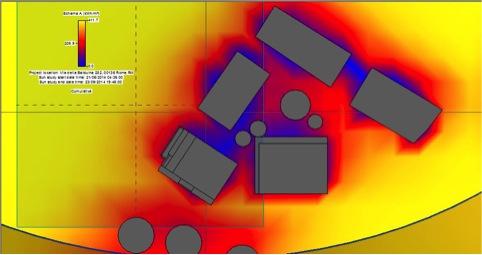
RADIAZIONE SOLARE ESTIVA– CON VEGETAZIONE

RADIAZIONE SOLARE INVERNALE – CON VEGETAZIONE
Abbiamo osservato come durante l’estate la situazione resti pressoché invariata, mentre durante l’inverno la vegetazione aumenti la concentrazione dei valori minimi nella zona del cortile interno.
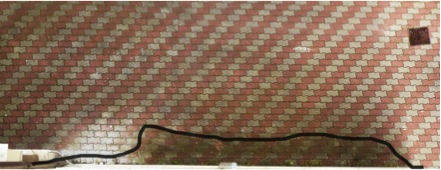
Durante la stagione estiva, quindi, il cortile risulta essere uno spazio fresco punto di ristoro durante le calde giornate d’estate; durante l’inverno, al contrario, questo diventa uno spazio freddo e piuttosto umido, come dimostrato tra l’altro dalla presenza di muschi/licheni e di macchie dovute all’umidità:

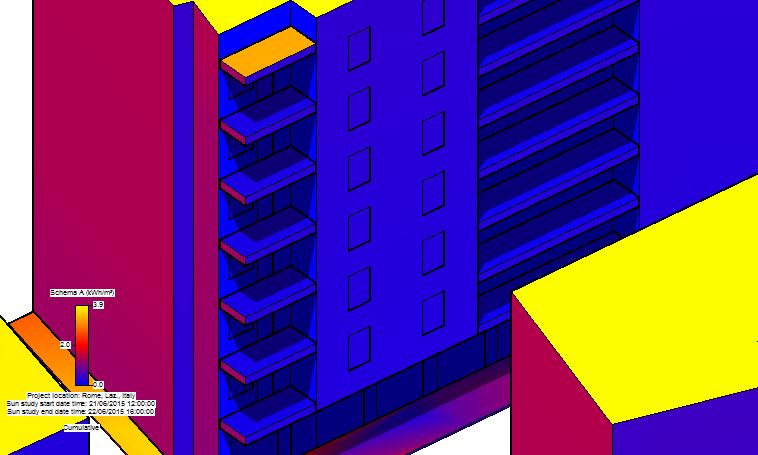
Abbiamo dunque esaminato con il metodo cumulativo anche alcune delle facciate del nostro edificio, per avere delle informazioni, anche se approssimative, su quanto calore fosse generato su di esse. Infatti questo tipo di analisi può generare delle inesattezze se usata per studiare le facciate.
FACCIATA OVEST - ESTATE
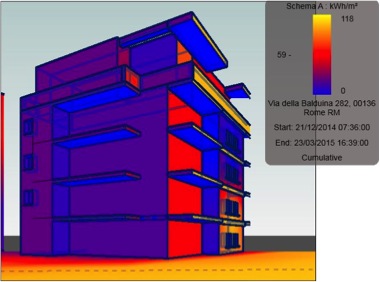
FACCIATA OVEST - INVERNO
FACCIATA ESPOSTA A SUD/OVEST – ESTATE
FACCIATA ESPOSTA A SUD/OVEST – INVERNO
CONSIDERAZIONI:
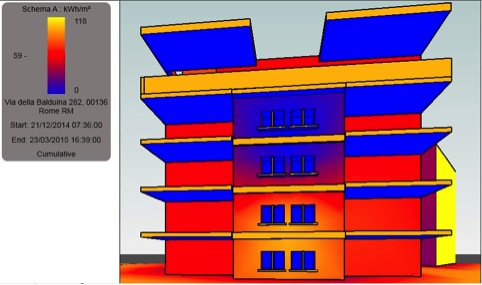
- In accordo con l’analisi sull’ombreggiamento questa facciata risulta essere la più illuminata durante l’anno (causa: esposizione + assenza di edifici circostanti), tuttavia la presenza di aggetti modera il calore e riduce la radiazione solare che durante l’estate raggiunge valori molto bassi (piani alti) o comunque un valore inferiore ai 100 kWh/m2 (piani inferiori). Di conseguenza questa soluzione architettonica garantisce buoni livelli di comfort durante l’estate, dando vita ad ambienti freschi. D’inverno, i valori di radiazione solare si mantengono bassi facendo sì che i piani inferiori godano di valori buoni (fino a 59 kWh/m2) mentre quelli superiori restino freddi e poco confortevoli. Ipotizziamo che questa situazione provochi la diffusione di macchie dovute all’umidità e di degrado dell’intonaco, anche se questi danni non risultano evidenti a causa della recente ristrutturazione delle 4 facciate dell’edificio.
 In secondo luogo è interessante effettuare un confronto tra i valori della radiazione solare dei piani inferiori registrati d’inverno e quelli annotati durante l’estate e notare come i valori non varino notevolmente come negli altri casi; d’inverno infatti si raggiungono i 118 kWh/m2 e d’estate ci si stabilizza intorno ai 170 kWh/m2 . Possiamo quindi affermare che (in proporzione) l’inclinazione dei raggi solari durante l’inverno faccia scaldare la facciata maggiormente che in estate.
Ci focalizziamo ora sulla finestra del terzo piano:
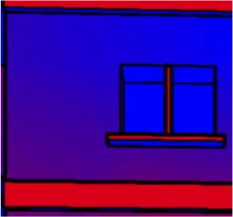
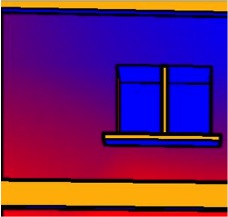
Notiamo come la presenza di valori bassi di radiazione solare in prossimità della parte inferiore della finestra e dunque dell’aggetto implichi una condizione di degrado, seppur poco evidente, data la recente ristrutturazione dell’intonaco di facciata.
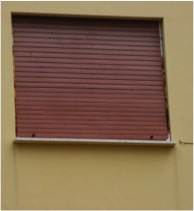
DETTAGLIO DEGRADO INTONACO FINESTRA
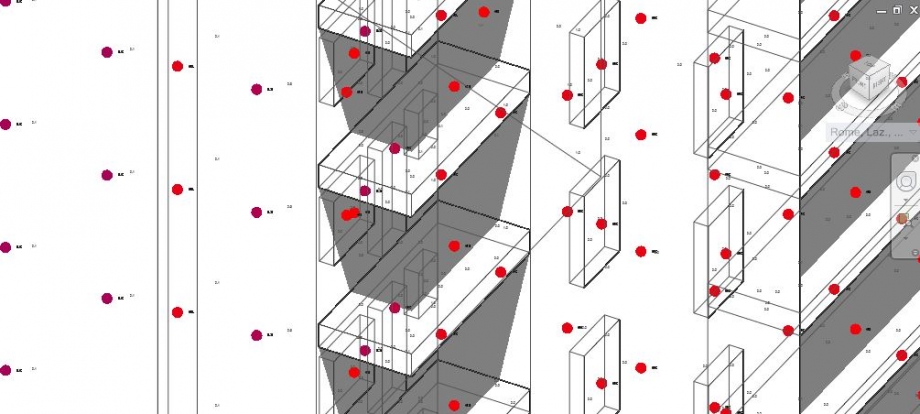
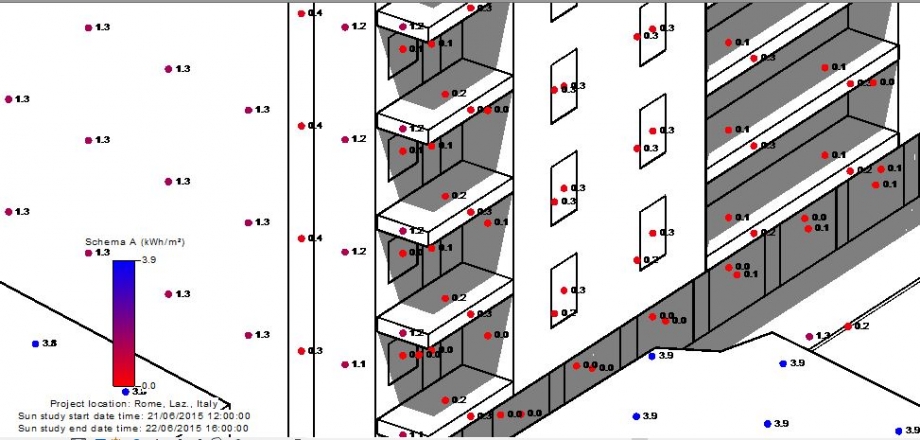
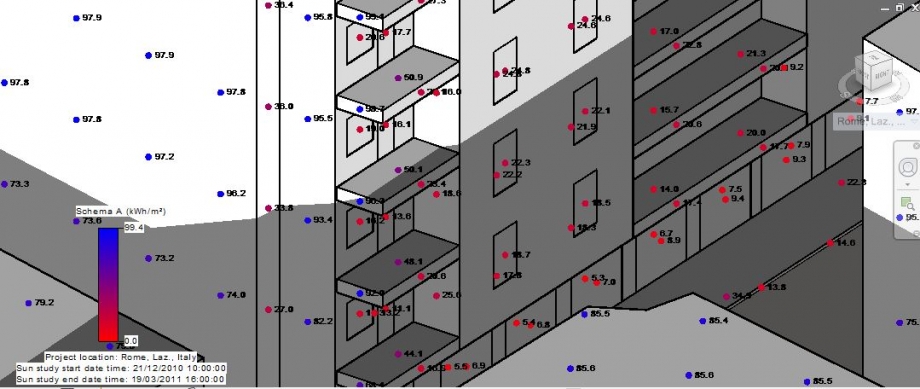
4_ANALISI NUMERICA – DETTAGLIO:
Al fine di conoscere con maggiore esattezza i valori della radiazione solare conduciamo ora un’analisi numerica delle facciate opache e delle finestre vetrate della FACCIATA SUD/OVEST.
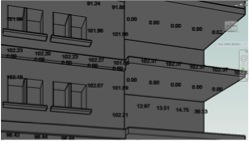

SUPERFICIE OPACA – INVERNO SUPERFICIE OPACA ESTATE
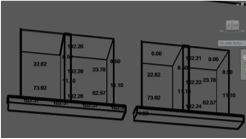
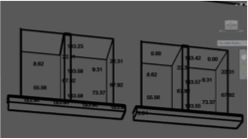
SUPERFICIE VETRATA – INVERNO SUPERFICIE VETRATA – ESTATE
CONSIDERAZIONI:
PREMESSA:
Innanzitutto è possibile notare una coerenza tra i due stili di analisi (cumulativa e numerica) in quanto, soffermandoci sui valori del 3 e del 4 piano, notiamo un andamento crescente dei valori di radiazione solare man mano che si procede verso i piani inferiori, a causa della presenza degli aggetti (come dimostrato in precedenza).
- SUPERFICI OPACHE
In inverno i valori sono piuttosto alti e si aggirano intorno ai 110 kWh/m2 sulla facciata opaca, garantendo dunque un alto comfort agli ambienti che affacciano su questo fronte; d’estate i valori aumentano rispetto al periodo invernale( 180 kWh/m2 ca), sebbene siano dei valori relativamente bassi per tale periodo e testimoniano la presenza degli aggetti in facciata e la loro efficacia in vista del caldo estivo. L’influenza degli aggetti emerge anche dai valori della radiazione solare dei balconi, o meglio delle facciate protette dagli aggetti dei balconi, che riportano valori molto bassi in estate fino ad un massimo di 15 kWh/m2.
- SUPERFICI VETRATE
Anomalo è il comportamento delle finestre, dove i valori di radiazione solare risultano maggiori in inverno piuttosto che in estate. La spiegazione potrebbe derivare dall’inclinazione dei raggi solari durante i due periodi dell’anno e di conseguenza dalla presenza degli aggetti. D’inverno i raggi più bassi colpiscono direttamente la finestra, d’estate i raggi, aventi un’inclinazione maggiore, vengono intercettati dagli aggetti.
5_ANALISI AREA DI PROGETTO
ANALISI OMBREGGIAMENTO CON E SENZA IL NOSTRO EDIFICIO
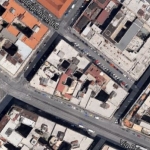
L’area di progetto esaminata, situata nel quartiere Trastevere, si trova in prossimità dell’omonima Stazione ed è delimitata a Ovest da Via degli Orti di Cesare e a Est da via di Monte Crescenzo. Queste due strade sono poste a due quote differenti e fanno sì che l’area si trovi su un dislivello di 6 metri circa.
Abbiamo innanzitutto esaminato l’andamento solare sull’area di progetto senza il nostro edificio durante i 4 periodi principali dell’anno:
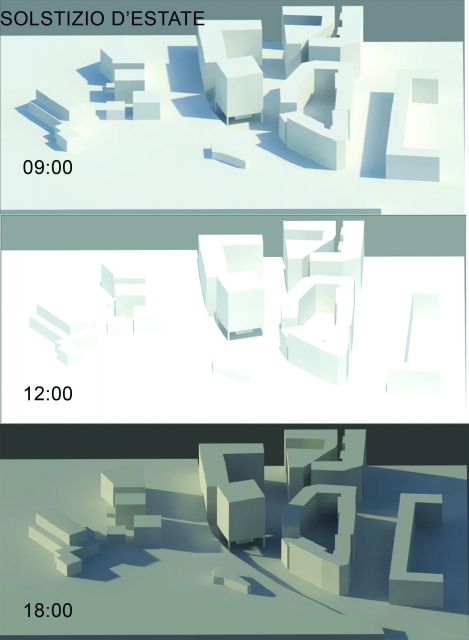
SOLSTIZIO D’ESTATE
Durante il periodo estivo, la nostra area è sempre esposta al sole, tranne alle 18:00 dove inizia ad essere ombreggiata dagli edifici esposti ad ovest.
SOLSTIZIO D’INVERNO
Nel periodo invernale invece abbiamo una situazione completamente diversa, poiché la nostra area è completamente ombreggiata dagli edifici circostanti e viene illuminata totalmente solo alle 12:00.
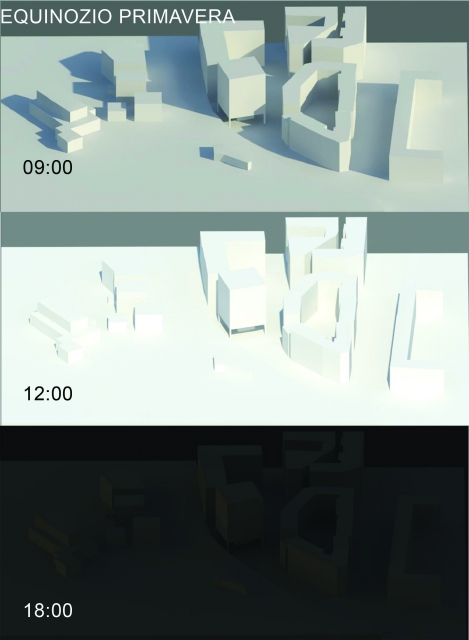
EQUINOZIO PRIMAVERA / AUTUNNO
Per quanto riguarda i due equinozi si verifica la stessa situazione, ovvero, alle 9:00 il lotto viene parzialmente ombreggiato dagli edifici alla sua sinistra, alle 12:00 l’area è totalmente soleggiata ed infine elle 17:00 viene di nuovo parzialmente oscurata dagli edifici ad ovest.
Successivamente abbiamo inserito il nostro edificio all’interno dell’area e analizzato la situazione negli stessi periodi dell’anno:
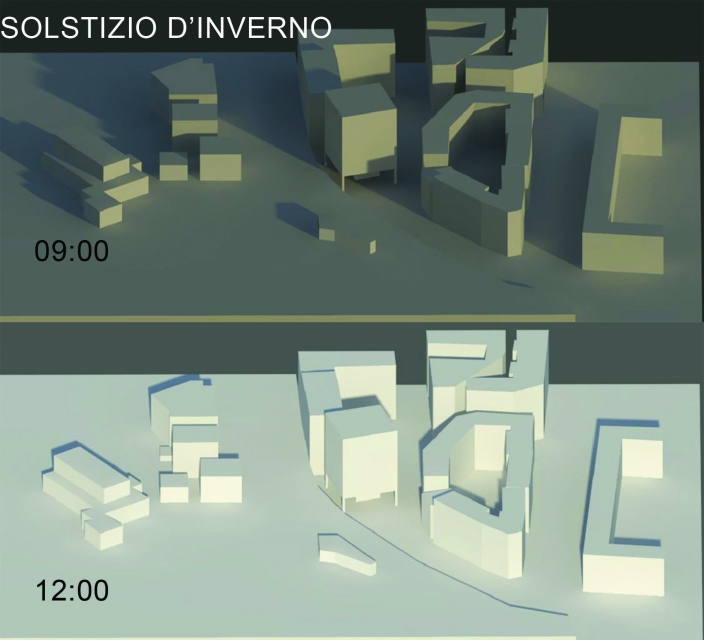
N.B. Manca l’analisi del solstizio d’inverno alle ore 18:00 poiché durante la stagione invernale il sole tramonta prima di quest’orario e dunque nel render l’area si presentava totalmente in ombra.
Notiamo come le facciate dell’edificio risentano in maniera diversa dell’esposizione solare: la facciata esposta a Nord risulta soleggiata durante l’intero arco dell’anno fatta eccezione per le ore 18.00 del solstizio d’estate. Dunque dall’analisi della radiazione solare ci aspettiamo dei valori piuttosto alti sia durante l’inverno che durante l’estate.
6_ANALISI RADIAZIONE SOLARE
Abbiamo inoltre studiato i valori di radiazione solare dell’area di progetto e abbiamo notato che durante il periodo estivo la radiazione arriva ad un livello molto alto (386 kwh/mq), mentre nel periodo invernale si arriva ad un massimo di 97 kwh/mq.

ANALISI RADIAZIONE SOLARE AREA TRASTEVERE – INVERNO
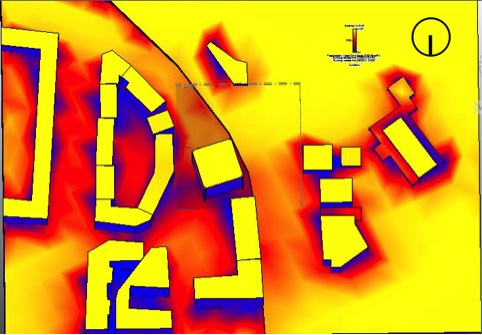
ANALISI RADIAZIONE SOLARE AREA TRASTEVERE - ESTATE

 Notiamo come la vicinanza tra il nostro edifico e quello antistante sul fronte Nord crei una zona con valori di radiazione solare piuttosto bassi, dunque ci focalizziamo sull’analisi delle 4 facciate del nostro edificio al fine di conoscere i valori approssimativi della facciata e tenerne conto in fase di progetto di finestre e aggetti.
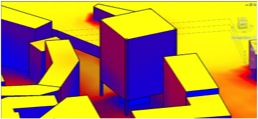
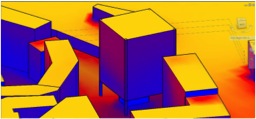
FACCIATA SUD/OVEST – ESTATE FACCIATA SUD/OVEST – INVERNO
FACCIATA NORD/EST – ESTATE FACCIATA NORD/EST – INVERNO
CONSIDERAZIONI:
Alla luce dell’analisi condotta terremo in considerazione che le facciate esposte a Nord e a Est registrano valori di radiazione solare piuttosto alti sia in estate che in inverno (come ci aspettavamo dall’analisi dell’ombreggiamento), al contrario delle facciate Sud e Ovest che risentono della vicinanza con gli edifici circostanti e dell’ombra che questi proiettano su di esse. In fase di progetto dunque dovremo tenere conto di questi valori e realizzare degli aggetti protettivi nelle facciate Nord e est al fine di rendere il più confortevoli possibili gli ambienti che vi si troveranno.
7_CONTROLLO DELLE DIMENSIONI DELL’EDIFICIO – COMANDO SCHEDULE
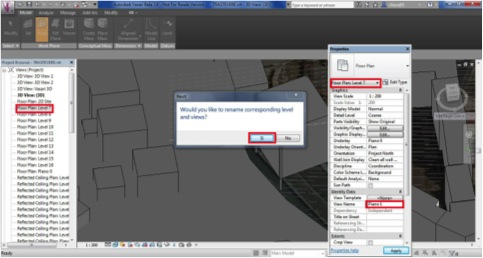
- Fare click su Modify --> Level
2. Considerando che ad ogni livello che andremo a creare corrisponde un piano del nostro edificio possiamo realizzare tanti livelli quanti sono i piani e distanziarli a seconda dell’altezza di piani;
3. È possibile rinominare i livelli ( in modo da associarli ai piani dell’edificio, ad es: piano 1, 2 ecc) facendo click con il tasto destro del mouse sul livello prescelto da menù a sinistra, cliccando su Properties e modificando il nome tramite la voce “View Name”;
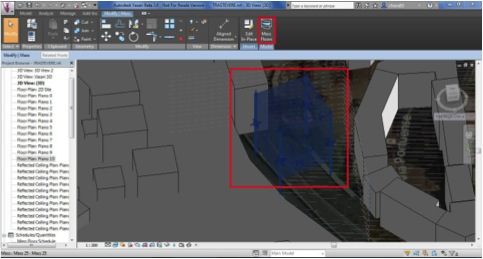
4. Cliccare dunque sull’edificio in questione e selezionare il comando “Mass Floors” in modo da far intersecare i piani dei livelli appena creati con l’edificio, dando luogo così ai vari piani;
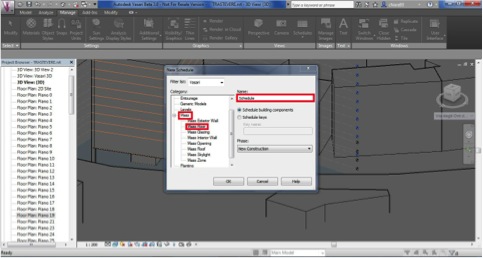
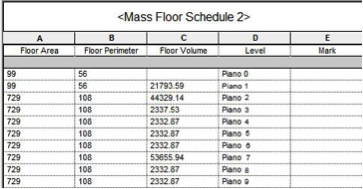
5. Facendo click su “Schedule” si aprirà una nuova finestra, selezionare “Mass Floor”, e se si vuole, rinominare la schedule;
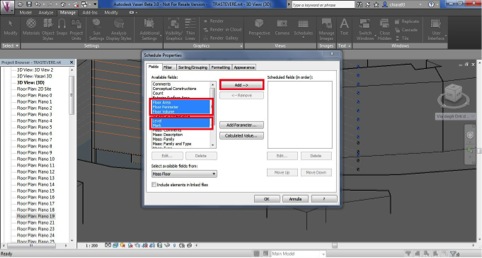
6. Dunque si aprirà una nuova finestra, è possibile scegliere le proprietà della schedule e anche i calcoli che effettuerà (ad es: Floor Area,Floor Perimeter, Floor Volume, Level, Mark). Quindi fare click su Add e successivamente su Ok.
La seguente schedule contiene il calcolo dei livelli delle masse esaminate. Secondo le linee guida il progetto deve avere una superficie massima di 5000 m2 , suddivisi in 3000m2 per le abitazioni e 1500/2000m2 per i servizi. Dalla tabella emerge che secondo le dimensioni del nostro edificio arriviamo ad una superficie di circa 6000 m2 e dovremmo dunque leggermente ridimensionare l’edificio o comunque tenere conto del fatto che siamo vicini al limite dimensionale massimo.
 Mas_Izquierdo
Lun, 27/04/2015 - 10:51
Mas_Izquierdo
Lun, 27/04/2015 - 10:51
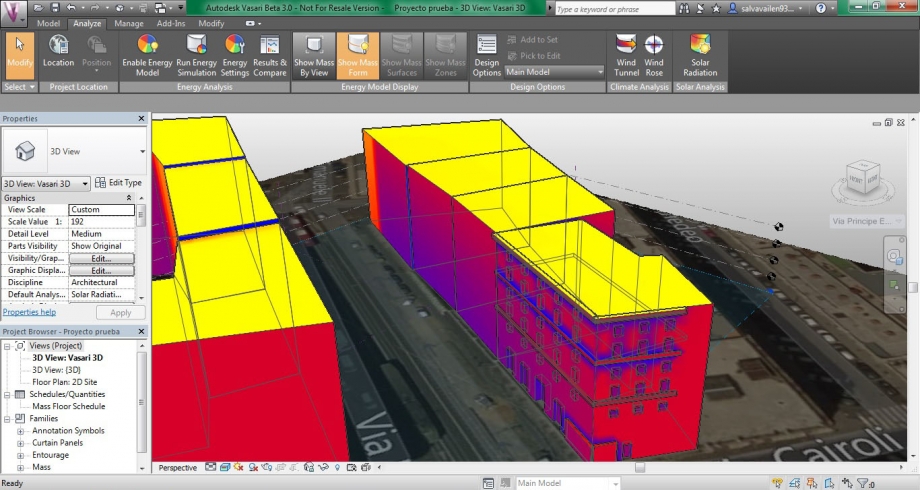
In questo punto analizziamo la radiazione solare nell'edificio della prima consegna col fine di studiare gli effetti che ha questo nel nostro volume e per trovare la migliore forma per migliorare o diminuire il suo effetto.
1. Per ottenere una maggiore precisione nel momento di realizzare lo studio solare procediamo a modelle le finestre, porte e cornicioni del nostro edificio.
Per ciò dobbiamo selezionare il nostro volume e selezioniamo "select in piace" con ciò possiamo modificarlo. Per lavorare nel piano desiderato dobbiamo selezionare "set" e scegliere il piano nel quale realizziamo i cambiamenti.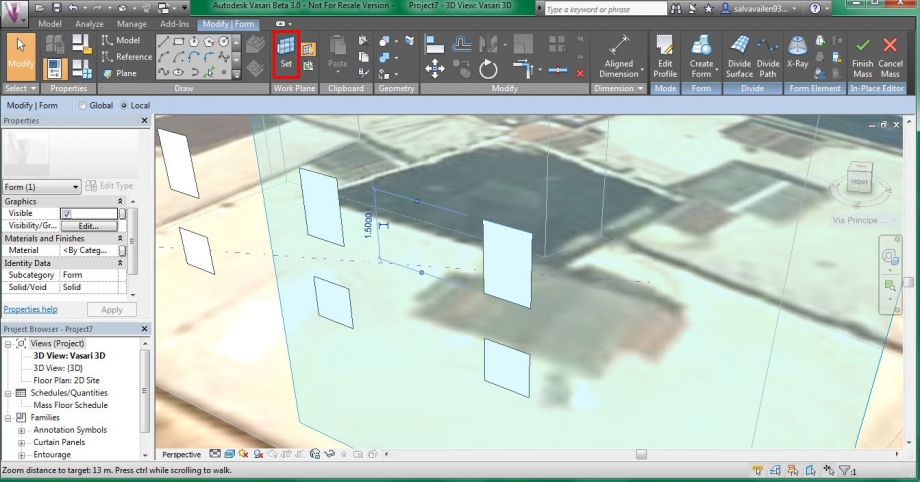
A) Per creare le finestre, una volta selezionato il piano di lavoro, facciamo un rettangolo con le misure e dopo selezioniamo "create form" → "voild form."
B) Per creare il cornicione o balcone procediamo della stessa forma e selezioniamo per fare il volume "create form" → "solid form."
2. Una volta abbiamo l'edificio modellato procediamo all'analisi della radiazione solare. Per ciò dobbiamo selezionare "Analize" → "Show mass form" → "Solar radiation"
Per cambiare le proprietà desiderate procediamo della seguente forma:
"Sun settings" → "Sun study" e selezioniamo le opzioni per i differenti studi nelle differenti epoche ed orario dell'anno.
Le unità di misura per la radiazione devono stabilirsi in KWh/m² → "Solar radiation" → "Data display" → "Units"
Procediamo ad analizzare:
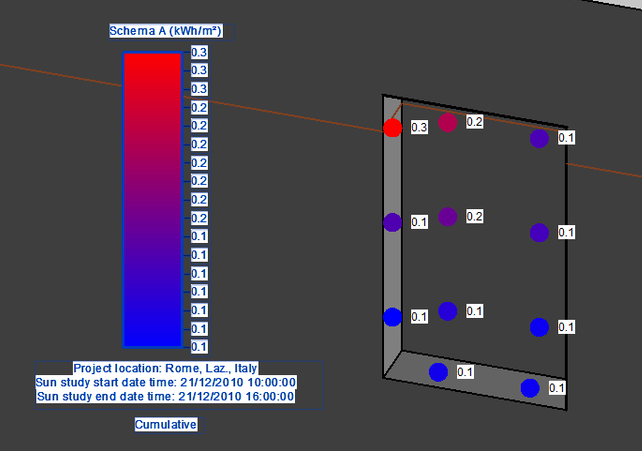
IVERNO 9:00
IVERNO 12:00
IVERNO 16:00
In questo momento possiamo analizzare e dire che a partire dalle 12:00 di mezzogiorno l'ombra generata per l'edificio di fronte fa nel nostro edificio una zona più fredda sulla facciata sud ovest.
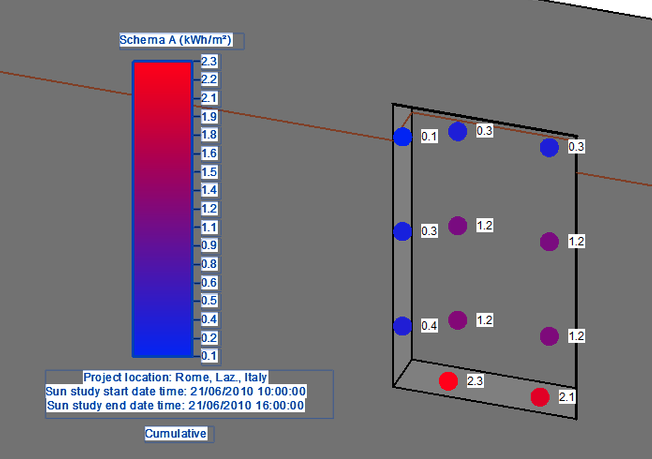
ESTATE 9:00
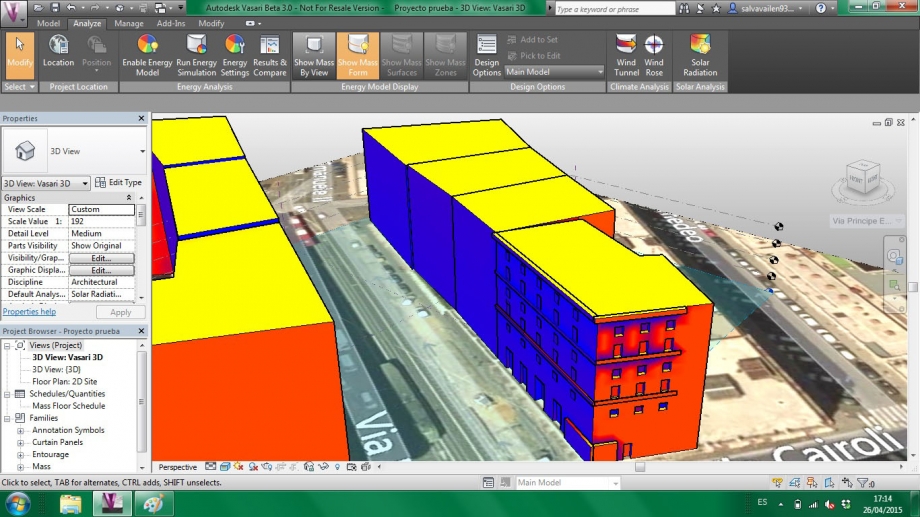
ESTATE 12:00
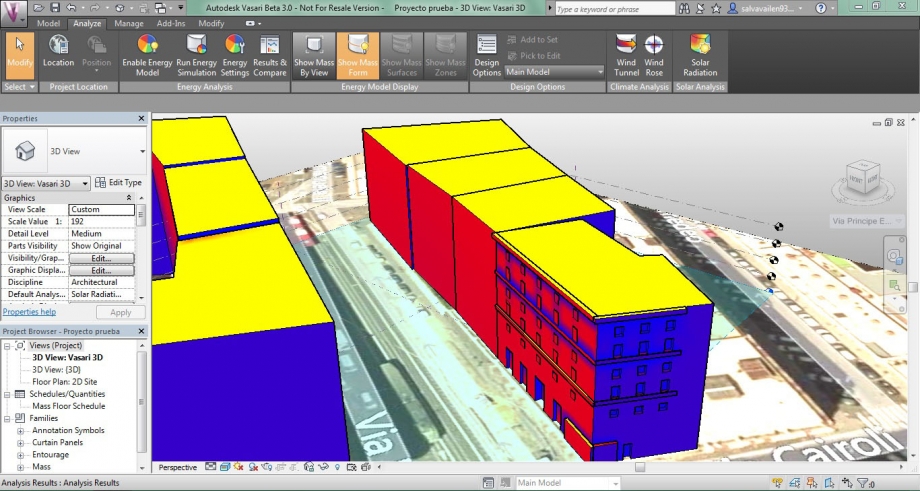
ESTATE 16:00
Con questo studio possiamo analizzare che in estate, nelle prime ore del giorno la facciata sud-ovest si presenta più fredda, invece la facciata est più calda, questo si deve a che in questa ora il sole incide su questo piano. Invece a partire dalle 12:00 di mezzogiorno succede l'effetto contrario, stando la facciata sud-ovest più calda.
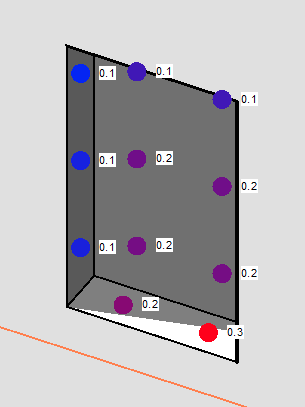
3. Per realizzare un studio più determinato dobbiamo servire lo studio numerico dei valori di radiazione.
Per ottenere questi valori numerici dobbiamo selezionare: "Solare radiation" → "Data display" → " "Style" dove si apre un nuovo ciglio e dove dobbiamo creare una nuova suola di lavoro che chiameremo Numeric Style e dove selezioniamo "Markers with text"
Una volta creato il nostro stile dobbiamo cambiargli le proprietà. Per ciò dobbiamo selezionare:
"Text Labels on markers" → "Show all"
"Colore" → e dargli l'azzurro per i valori minimi ed il rosso per i valori massimi.
Arrivati a questo punto procediamo all'analisi dell'edificio: "Analyze"
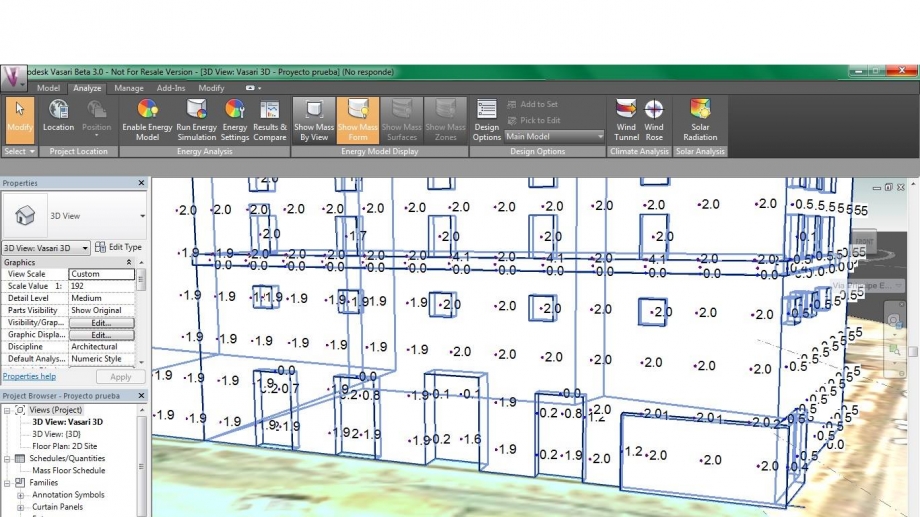
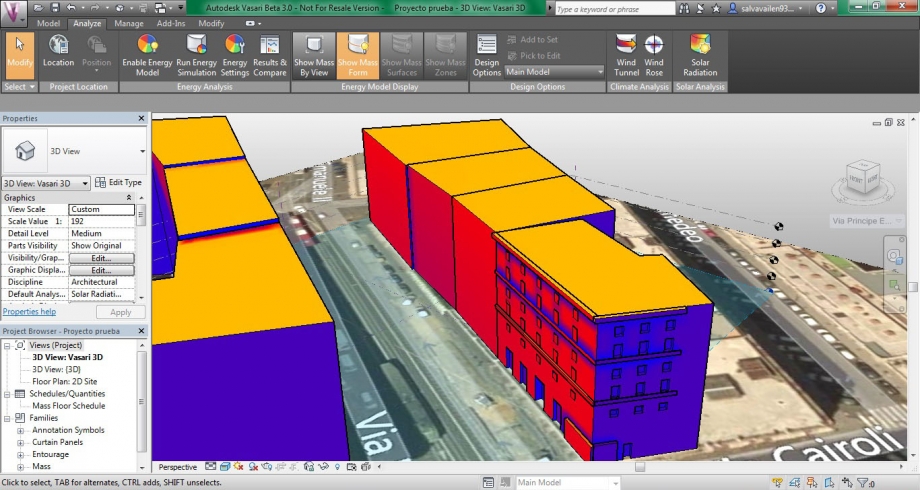
Osservando i valori ottenuti possiamo analizzare i differenti aspetti volumetrici dell'edificio:
Il piano di facciata sud è il piano che presenta un maggiore valore di radiazione non avendo nessun sistema di protezione solare, solo nelle ore che conta sull' ombra generata per l'edificio di fronte.
Sotto ai cornicioni otteniamo il valore minimi, per quello che possiamo dire che sarà una zona confortevole nell'orario di estate e che genera un sollievo per le finestre inferiori in questa epoca dell'anno.
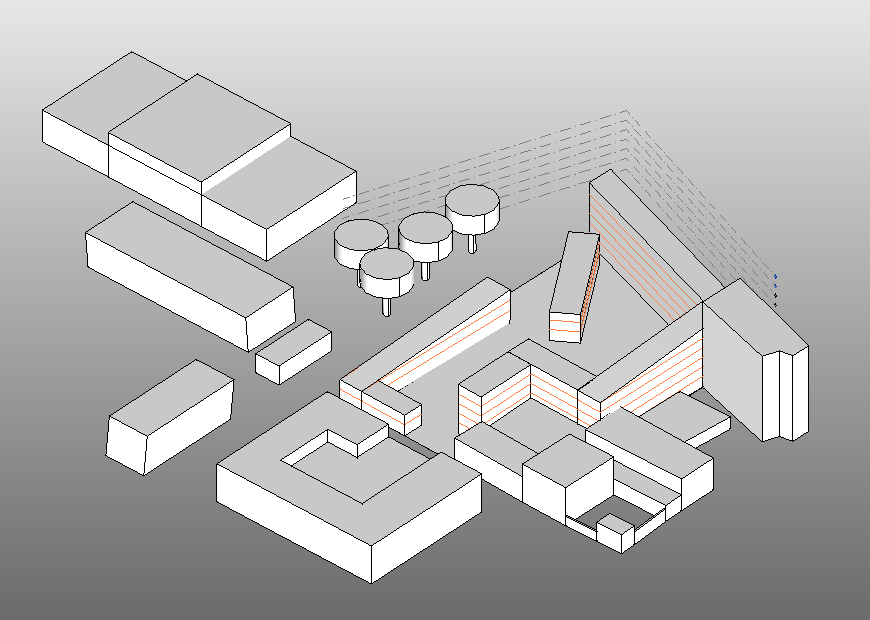
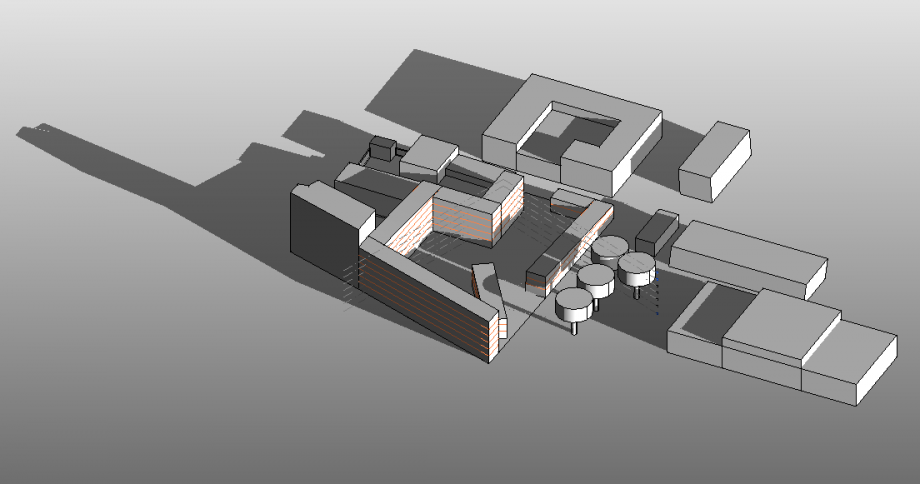
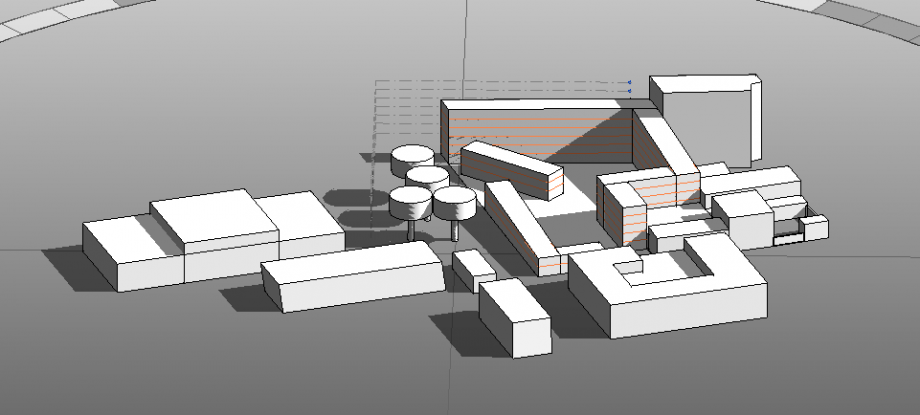
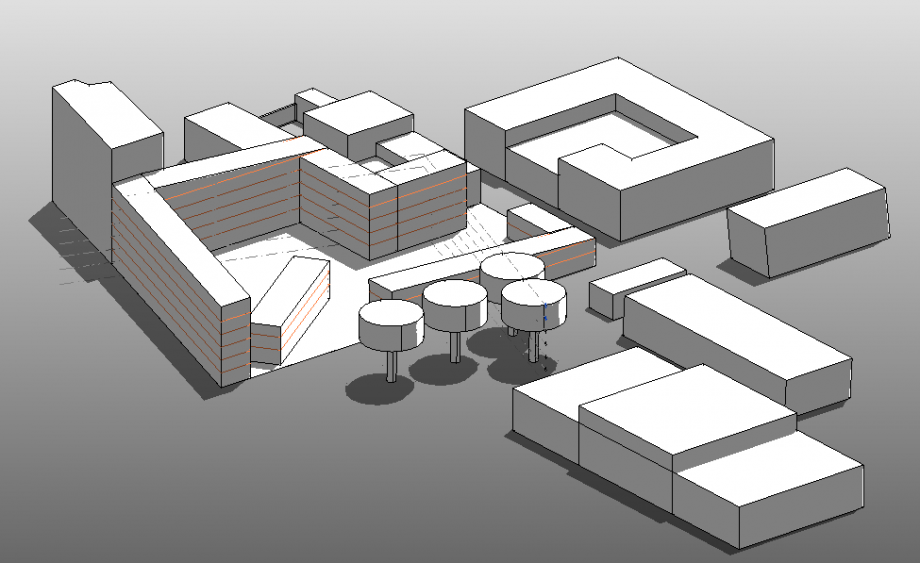
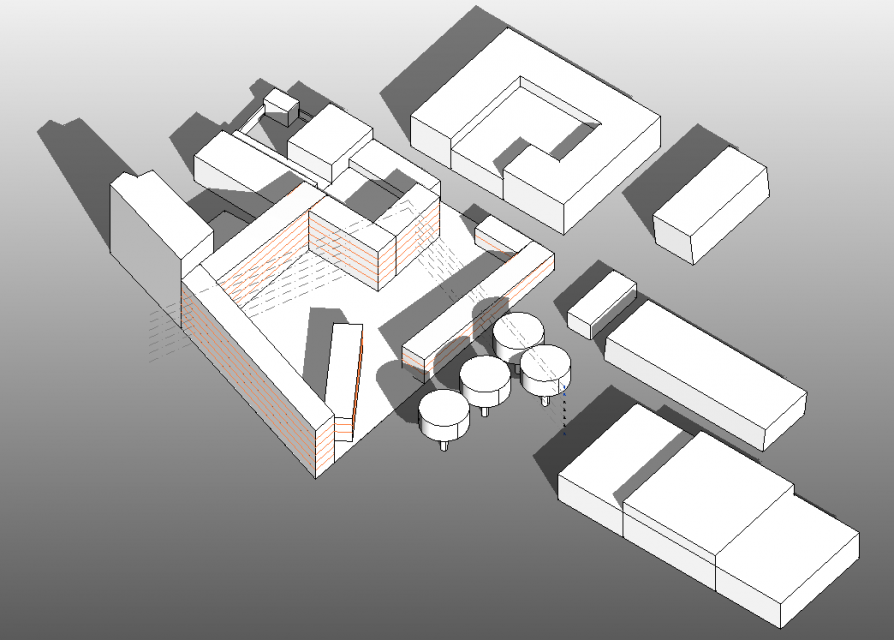
SECONDO LAVORO_STUDIO DE L'AREA DEL NOSTRO PROJETTO IN VIA DEL PORTO FLUVIALE
Ci troviamo in un'area di progetto con una buona orientazione, ed oltre ad una gran spianata di lavoro, per quello che possiamo proiettare un edificio con molte possibilità.
Per lo studio della radiazione dobbiamo procedere così come nell'anteriore lavoro.
1_selezionare la zona di lavoro del nostro progetto.
 2_creare i volumi dell'ambiente:
3_procediamo all'analisi della radiazione solare della stessa forma che in analisi anteriore:
INVERNO 9:00

INVERNO 12:00
INVERNO 16:00
ESTATE 09:00
ESTATE 12:00

ESTATE 16:00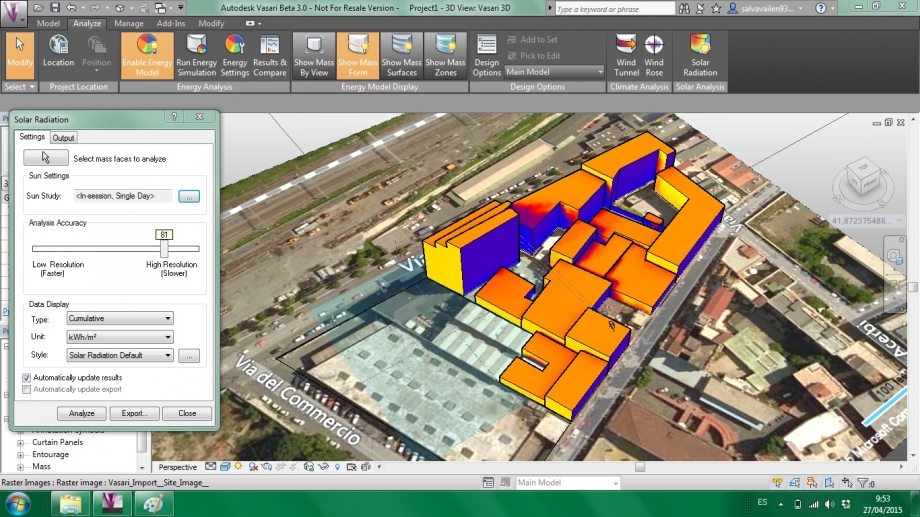
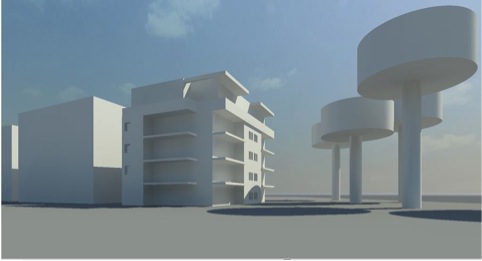
Render dalla zona di progetto: