


 Carrino_Cervelloni
Ven, 24/04/2015 - 13:48
Carrino_Cervelloni
Ven, 24/04/2015 - 13:48
ARTE 1: ANALISI EDIFICIO VIALE ASIA
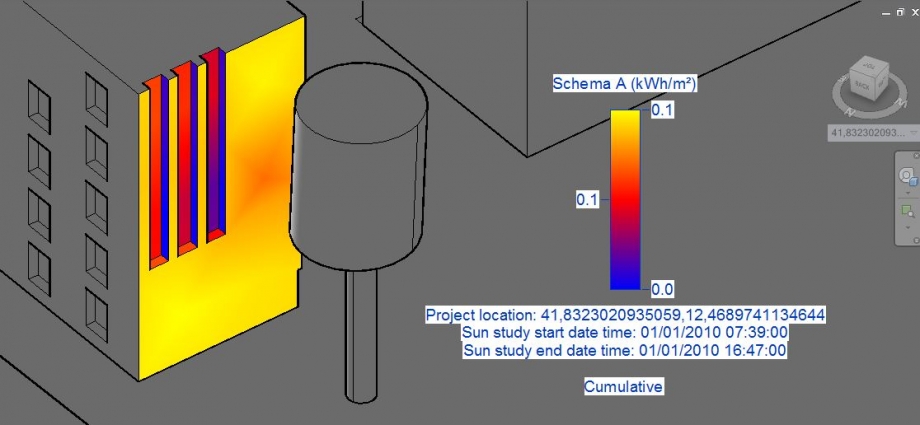
L’analisi sulla radiazione solare dell’edificio in Viale Asia interessa gli spazi aperti circostanti, le facciate e le finestre, in modo tale da capire quali sono i lati negativi e positivi dell’azione del sole sull’agglomerato urbano in questione.
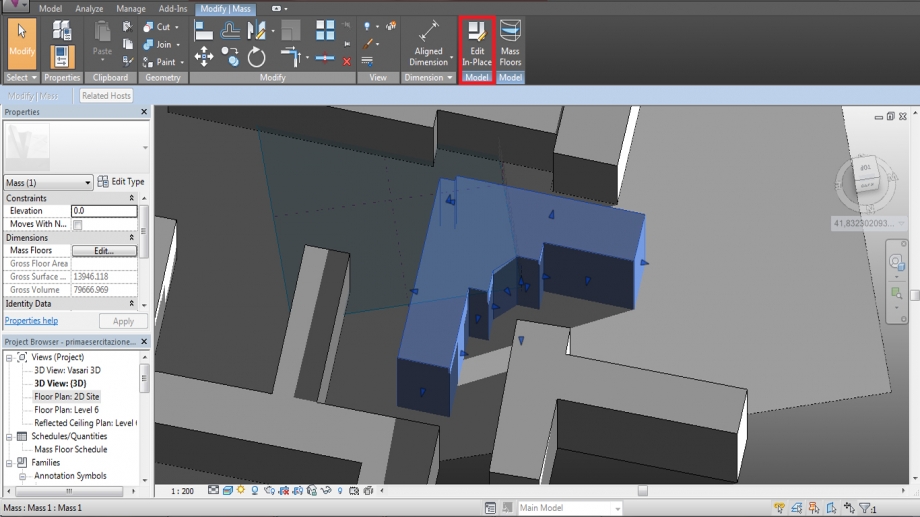
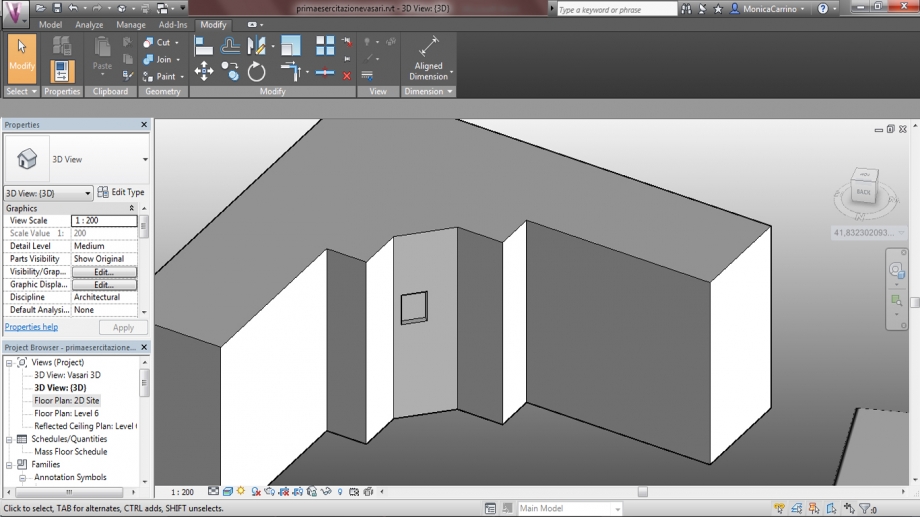
Il procedimento inizia con la creazione delle masse che rappresentano gli edifici, a cui saranno poi inseriti dei dettagli aggiuntivi, quali finestre e bucature. Per inserirli bisogna selezionare l’edificio interessato e cliccare su MODIFY MASS > EDIT IN PLACE.
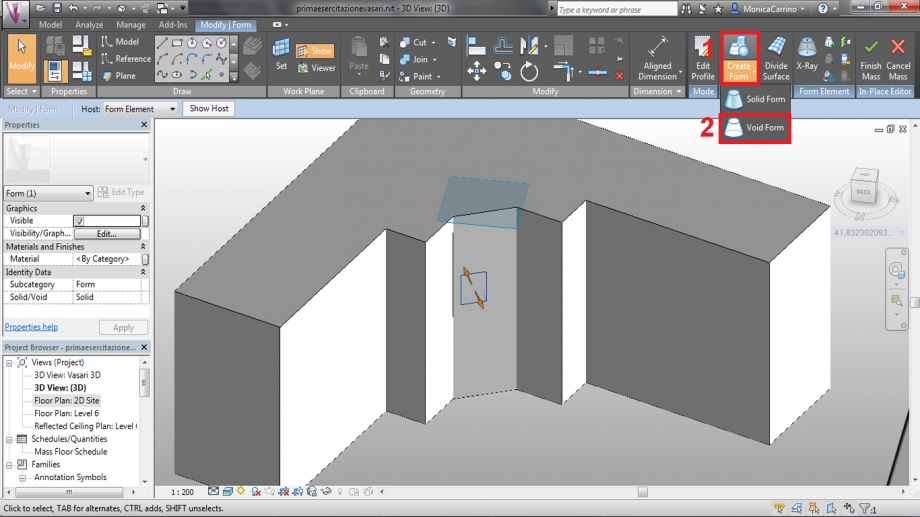
Su una facciata dell’edificio, disegnare la figura che si vuole rappresentare e successivamente cliccare sul comando CREATE FORM > VOID FORM, e inserire di quanto far rientrare o sporgere la medesima figura creata.
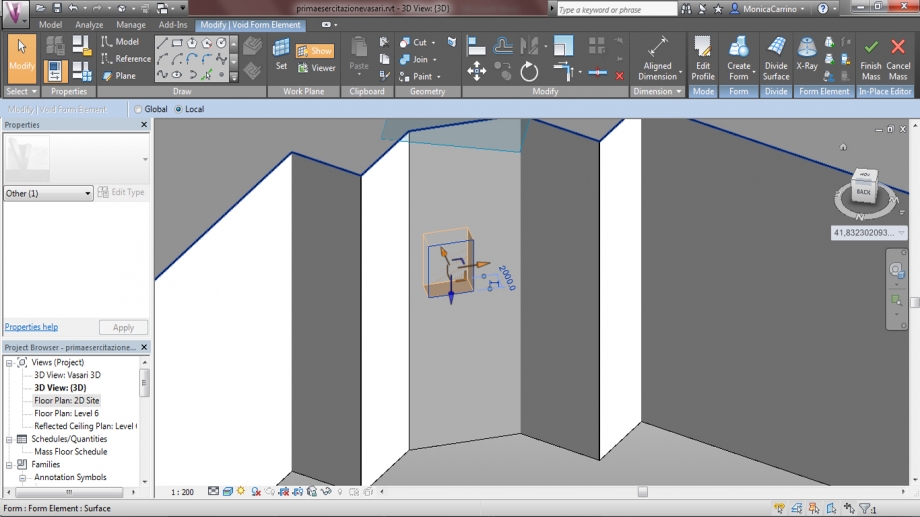
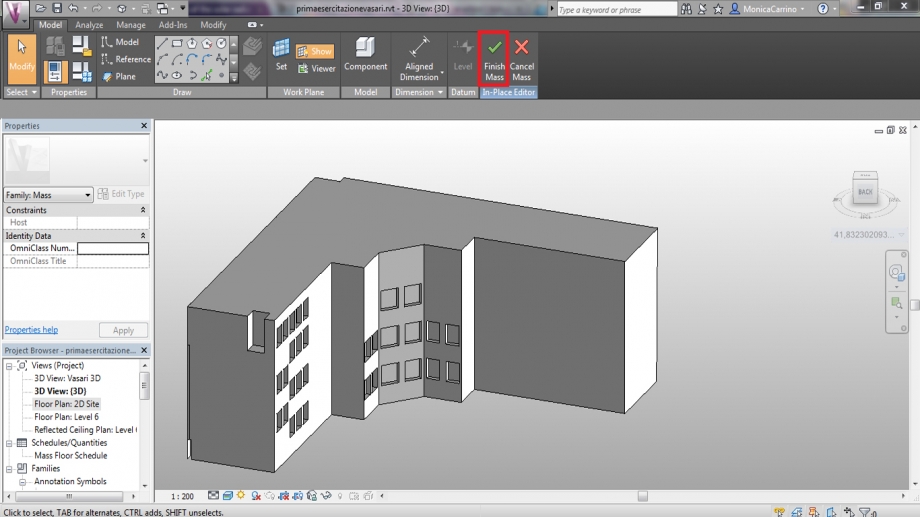
Una volta realizzate tutte le bucature, cliccare sul comando FINISH MASS.
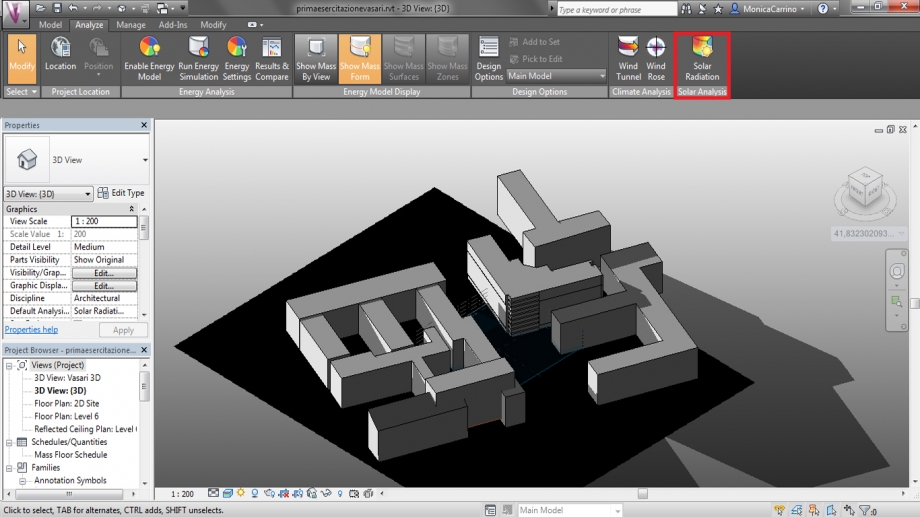
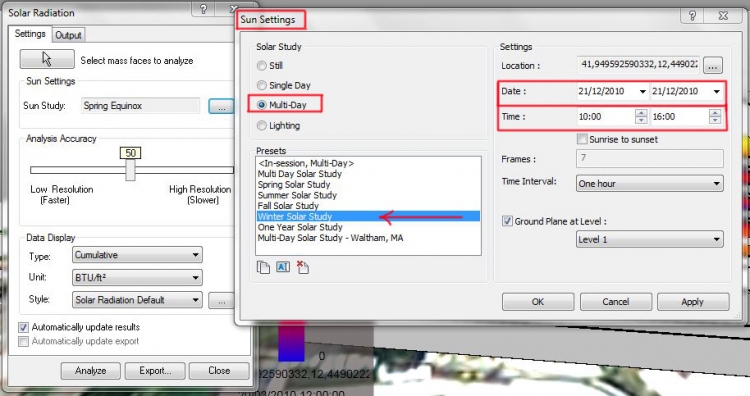
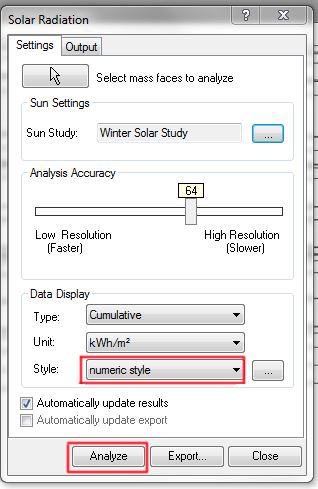
Il passo successivo è quello di effettuare l'anasisi solare, cliccando su SOLAR RADIATION, si aprirà una finestra in cui inserire determinate preferenze.
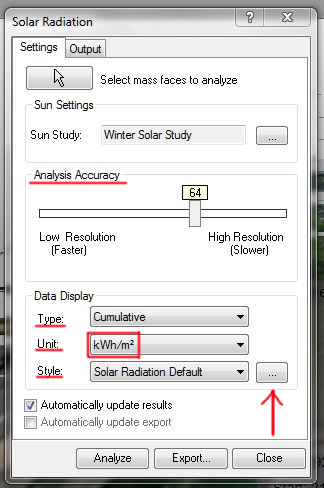
1) In DATA DISPLAY:
- Type: Cumulative
- Unit: KWh/m2
- Style: Solar Radiation Default
2) In SUN SETTING, cliccare sulla modalità MULTY DAY, e inserire alternativamente SUMMER SOLAR STUDY e WINTER SOLAR STUDY.

1. Studio solare degli spazi aperti
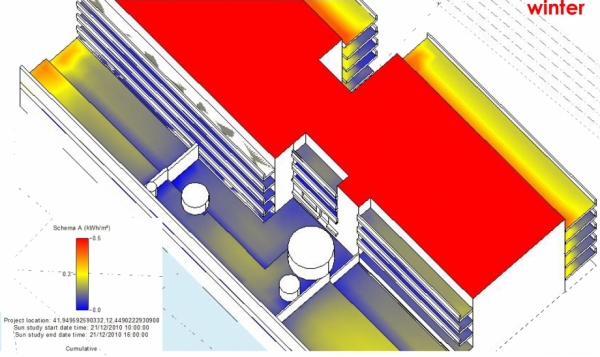
Abbiamo analizzato la zona di Viale Asia, durante il periodo invernale
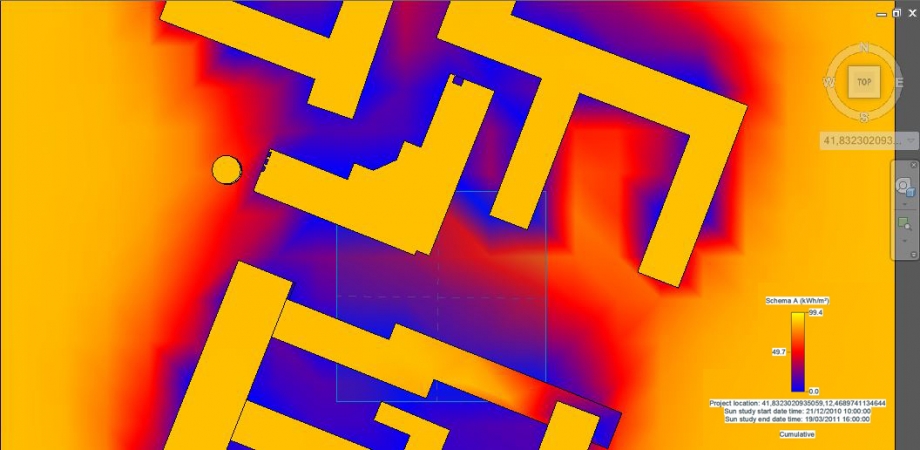 e successivamente durante il periodo estivo.
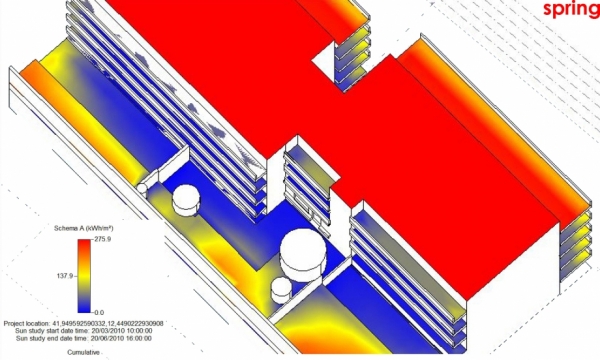
Considerando che il nostro edificio si colloca all'interno di un agglomerato di immobili e il suo unico fronte libero è protetto da alberi, dopo una prima analisi possiamo constatare che durante il periodo invernale, lo spazio circostante l'edificio risulta essere freddo proprio a causa della schermatura fornita dagli edifici limitrofi.
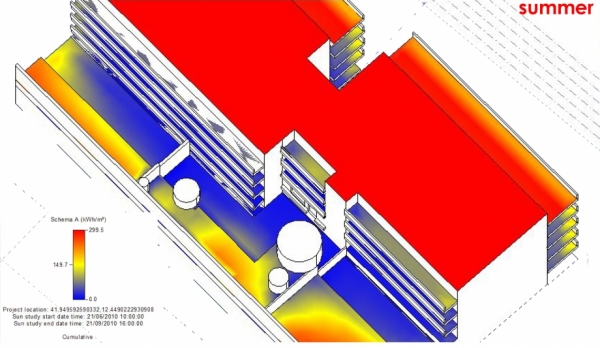
In estate invece questa condizione risulta essere positiva in quanto più ci si avvicina al perimetro della struttura e tanto più gli spazi esterni risultano meno esposti all'irraggiamento solare, pertanto sono più freschi. Ad eccezione del fronte occidentale, privo di qualsiasi riparo, che però viene schermato dagli alberi della piazza.
Abbiamo anche analizzato l'azione del sole sulle diverse facciate.
 Facciata Nord-Ovest
 Facciata Sud
 Facciata Nord-Ovest
 Facciata Nord-Ovest; Inverno
 Facciata Nord-Ovest; Estate
Approfondendo quello che abbiamo già notato nella situazione generale, la facciata Nord-Ovest risulta essere scarsamente sottoposta ai raggi solari. In inverno sarà quindi fredda e poco illuminata da luce naturale. In estate invece questa condizione potrebbe risultare positiva perchè permette di avere un ambiente fresco all'interno; le facciate orientate ad Occidente, al contrario di quelle orientate a Settentrione, sono leggermente più riscaldate dai raggi solari.
 Facciata Sud-Est; Inverno
 Facciata Sud-Est; Estate
La parte Sud-Est è invece ampiamente soleggiata: in inverno infatti supera i valori medi determinati dal grafico (specialmente in prossimità dell'affaccio sulla strada), permettendo così una buona illuminazione e una trasmissione termica capace di creare un microclima interno confortevole.
L'estate i valori medi non vengono superati, ma mantenuti, permettendo anche in questo caso una situazione positiva.
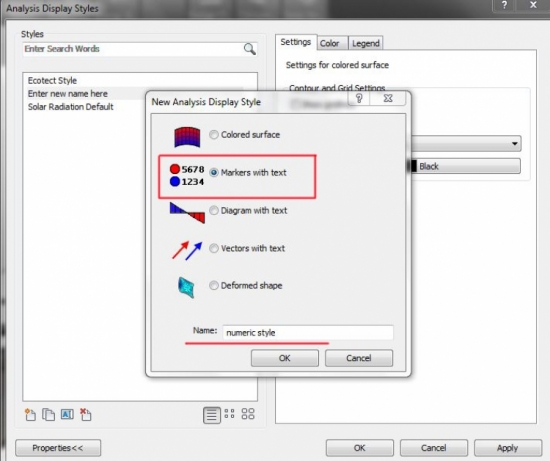
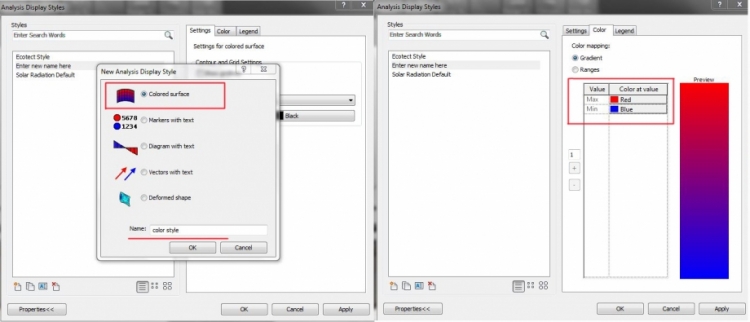
Lo studio della radiazione solare può essere fatto anche con altre preferenze: si può creare infatti un nuovo stile che chiameremo "Numerico6lab" nella tendina delle impostazioni del comando SOLAR RADIATION.
In particolare attraverso questo stile abbiamo studiato le radiazioni che colpiscono le finestre, in modo tale da approfondire lo studio.
2. Studio solare delle superfici vetrate
 Facciata Nord-Ovest; Inverno
 Facciata Nord-Ovest; Estate
 Facciata Nord-Ovest; Inverno
 Facciata Nord-Ovest; Estate
3. Stato di conservazione dell'edificio
Per studiare lo stato di conservazione dell'edificio, è necessario cliccare, nella finestra delle impostazioni del comando SOLAR RADIATION, la voce "One year solar study" e spuntare la casella "Sunrise to sunset".
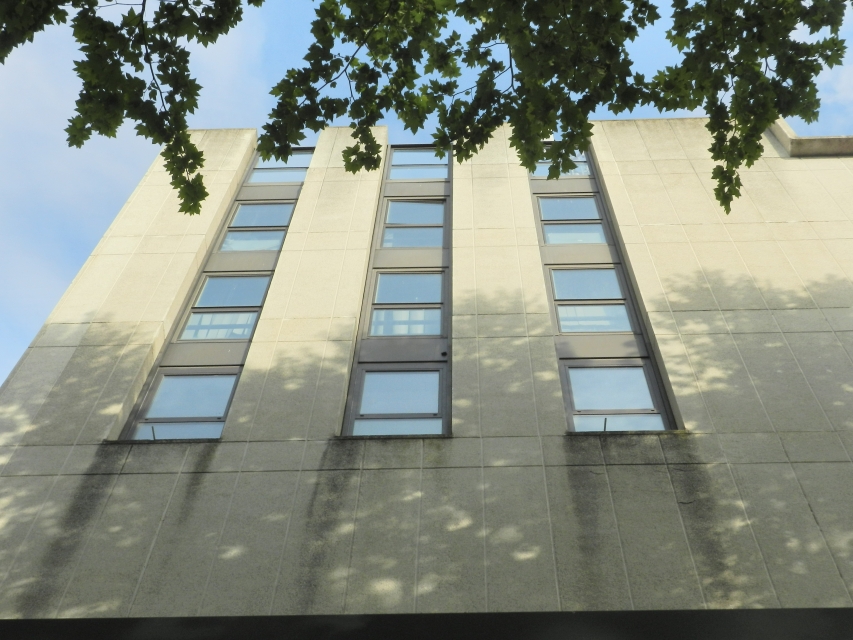
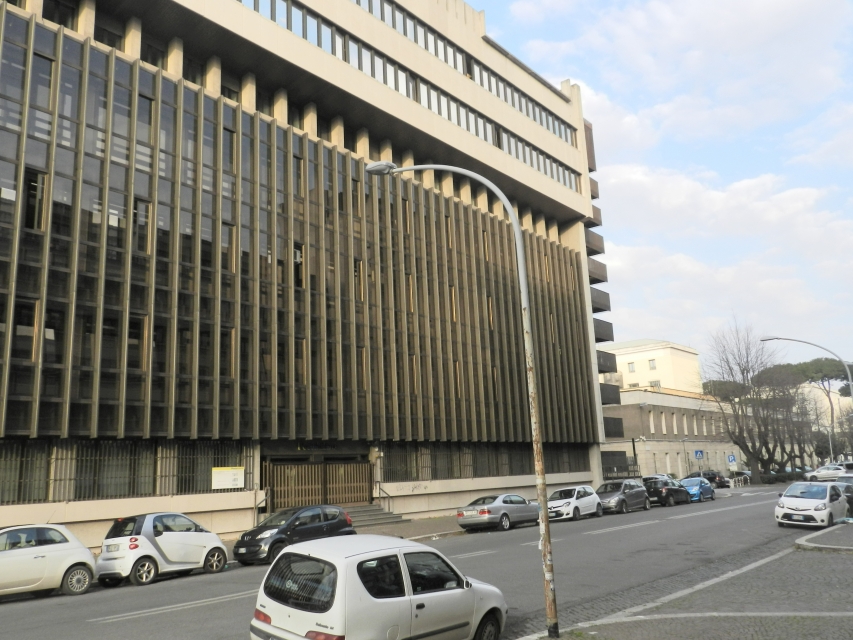
L'eccessivo contatto tra la facciata e la luce del sole ha portato alla formazione di macchie al di sotto dei lunghi infissi.
PARTE 2: ANALISI AREA DI PROGETTO
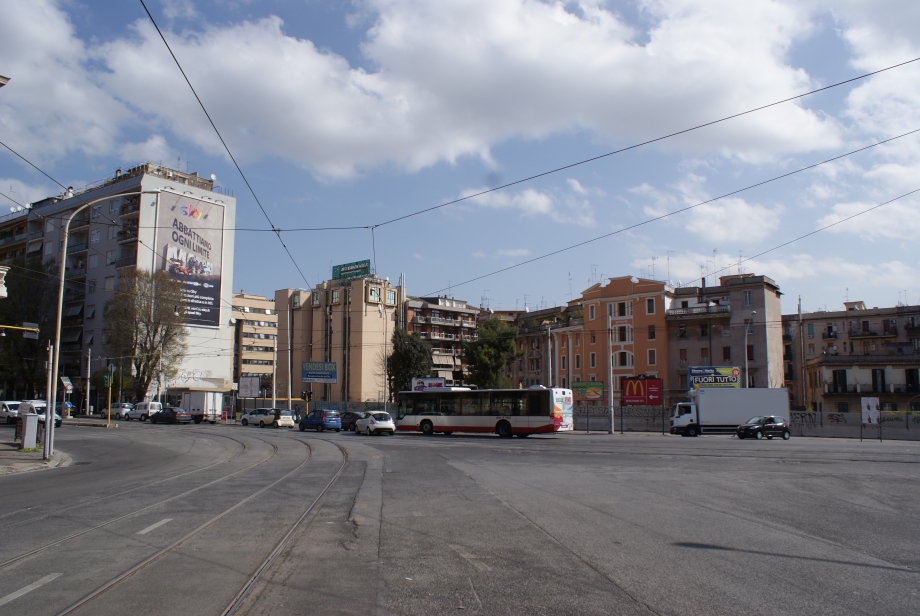
L'area di progetto si colloca all'incrocio tra via degli Orti di Cesare, via Crescenzo del Monte e via Trastevere; in prossimità della stazione di Roma Trastevere, alle spalle dell'area di Trastevere, tredicesimo rione del municipio I di Roma Capitale, sulla riva ovest (a destra) del fiume Tevere e a sud della Città del Vaticano; è in contatto con la zona Marconi e nei pressi dei quartieri Portuense e Gianicolense.
Occupa una superficie di 1800 mq, ha un'altimetria che va dai 20.90 metri ai 14.06 metri.
Sull'area effettuiamo l'analisi delle ombre e delle radiazioni in sostituzione alle schedule definite dalla consegna, in quanto in mancanza di una idea di progetto sarebbe impossibile farle.
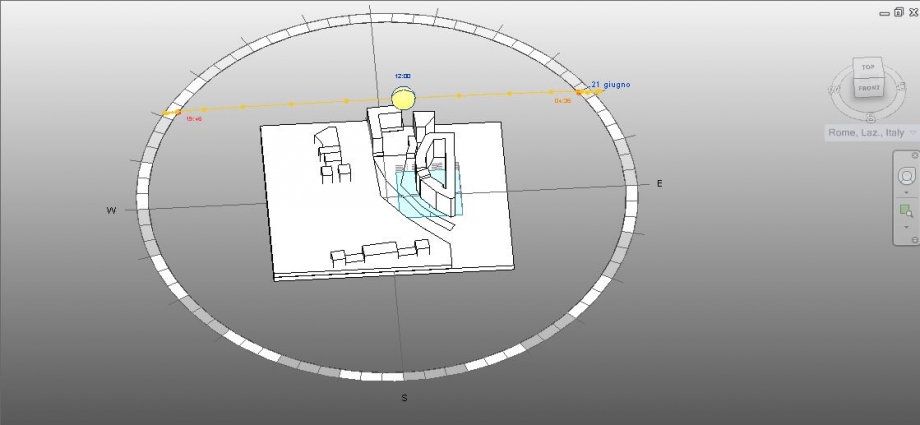
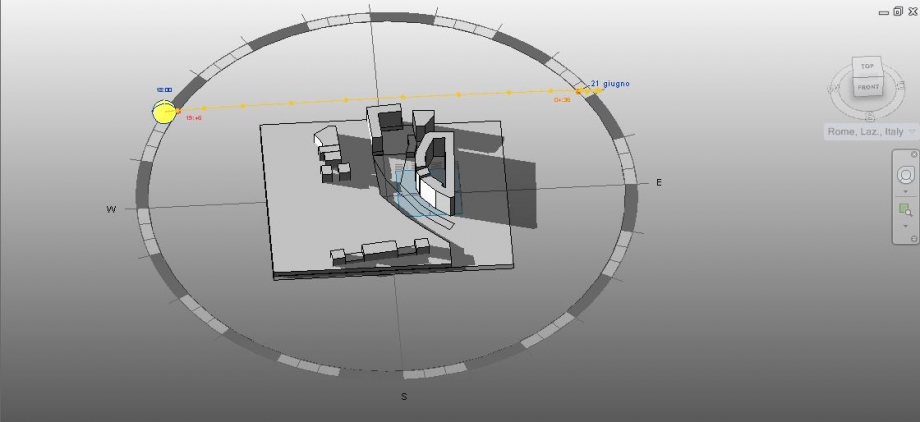
L'ombreggiamento viene analizzato nei tre orari fulcro (9:00, 12:00, 18:00) nelle giornate del solstizio d'estate e di inverno.
Solstizio di Inverno:
9:00
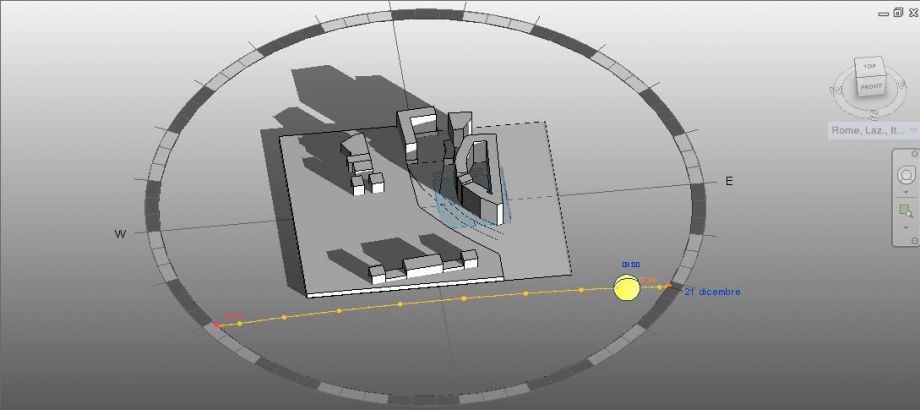
12:00
18:00
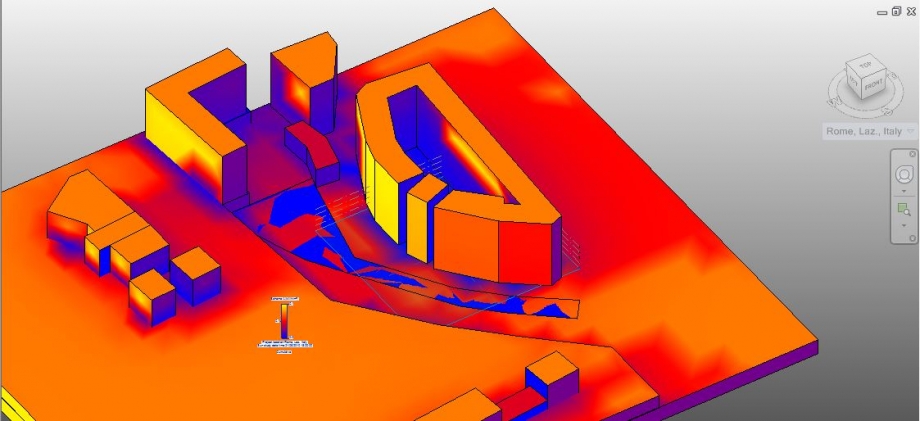
Radiazione solare
Durante l'inverno, l'area risulta essere poco soleggiata nelle prime ore del mattino, cosa che si ripropone, se non peggiorata, anche al tramonto. La situazione invece migliora a mezzogiorno, quando la luce invade l'area e le zone limitrofe. La stessa conclusione si può raggiungere analizzando il grafico delle radiazioni, da cui si può dedurre che la zona di progetto risulta essere abbastanza riscaldata durante la fase invernale, specialmente nella parte occidentale, ragion per cui può essere consigliato posizionare luoghi in cui la gente può trascorrere la maggior parte del tempo per riscaldare l'interno senza un estremo utilizzo di consizionatori (ad esempio le camere).
Solstizio d'estate
9:00
12:00
18:00
Radiazioni solari
Durante l'estate l'area è costantemente colpita dai raggi solari; solo alle 18 la situazione migliora leggermente. Questo si ripercuote sulle radiazioni e sulla temperatura del manto urbano e degli edifici vicini, a causa dell'assenza di altri edifici che possano schermarlo e difenderlo. In qualsiasi modo venga posto l'edificio, bisognerà utilizzare climatizzatori per rinfrescare l'aria interna.
Dom, 26/04/2015 - 15:50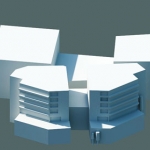 Ferilli_Losito
Dom, 26/04/2015 - 15:26
Ferilli_Losito
Dom, 26/04/2015 - 15:26
- ANALYSIS OF THE SOLAR RADIATION - VIA BONAVENTURA CERRETTI_QUARTIERE AURELIO
About this second delivery, we've studied the solar radiation of the buildings already developed during the first one, in order to verify the advantages and disadvantages.

After the creation of the volumes (we've added other ones to study solar radiation more precisely), we've sketched the openings of the windows and balconies in the facades studied in the first exercise.
FIRST STEP : clicking on SET, select the facade on which to draw the punch.

Draw a rectangle with CREATE FORM --> VOID FORM to extrude window.

Finally, to complete the modeling click on FINISH MASS.
SECOND STEP : Now, we can start the study of the solar radiation clicking on ANALYZE --> SOLAR RADIATION

THIRD STEP :
1) Select the facades you want to analyse

2) Clicking on SOLAR RADIATION --> SETTINGS we can set date and time which we want to study.

FOURTH STEP : To analyze the radiation on the buildings, we've decided to study the most significant and different seasons of the year, winter and summer.
MULTIDAY WINTER STUDY

MULTIDAY SUMMER STUDY

We've considered especially the two facades facing North, in which we've realized openings of the windows and balconies.


FIFTH STEP : In SOLAR RADIATION --> STYLE, we can create a new style setting (we've chosen, for example, ES2_NUMERI).

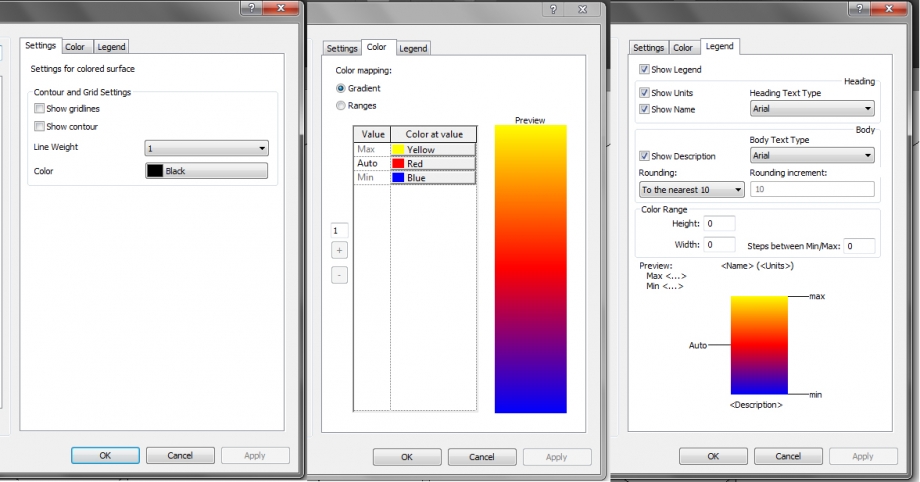
The next step is modify SETTING, COLOR, LEGEND


Besides, It’s possible to change the density of the numeric indicators of the radiation clicking on ANALYSIS ACCURACY if they're too big or too little in the model.
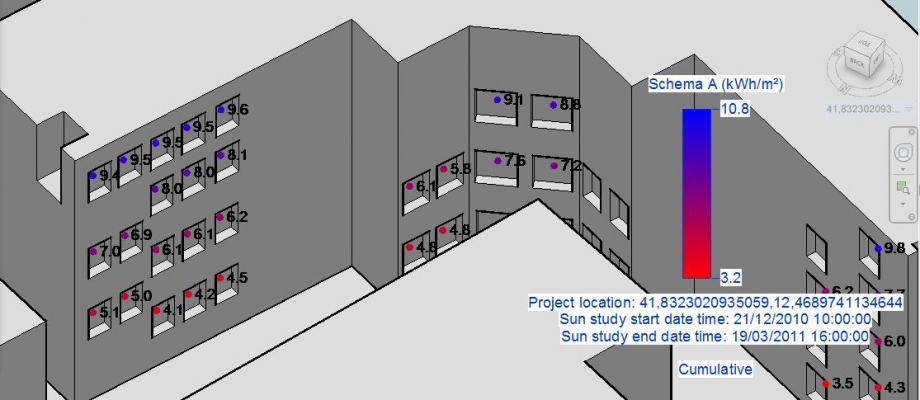
NORTH FACADE ON WINTER

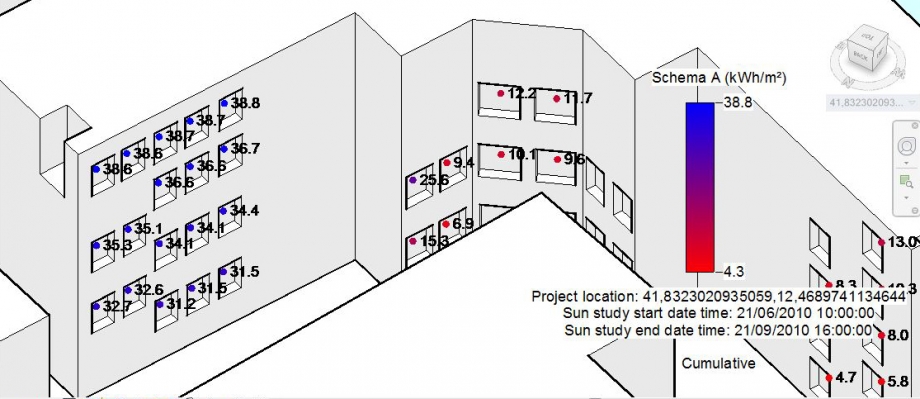
NORTH FACADE ON SUMMER

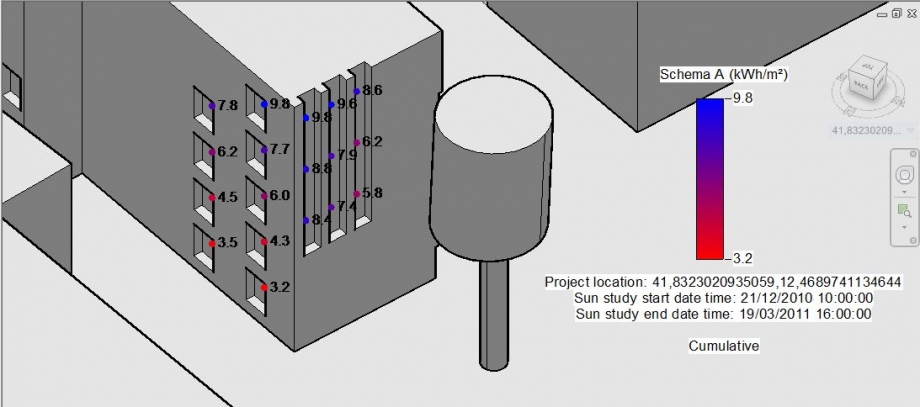
SIXTH STEP : Besides, we wanted to see which parts of the two buildings could be impaired during th whole year because of the solar radiation so we have clicked on ANALYZE --> SOLAR RADIATION --> SETTINGS, we've set ONE YEAR SOLAR STUDY and then SUNRISE TO SUNSET.

Our impressions: it can be noticed that both of facades facing North receive a light solar radiation. That can be considered a disadvantage or an advantage. Infact, during winter, living rooms and kitchens are quite cold and that's because the small balconies aren't able to retain the heat of the sunlight and to transmit it to the adjacent rooms. North facade is very cold even because being in front of a park without any shields involves the rooms will be less comfortable in winter and it will be necessary to provide the heating inside them. On the other hand, during summer, living rooms and kitchens will be very illuminated so as they will be even the freshest and most comfortable areas of the house. In the end, we can notice that the biggest balconies receive more sunlight than the others and their depth prevents sunlight from having direct contact with the rooms, which reduces the temperature inside of them.
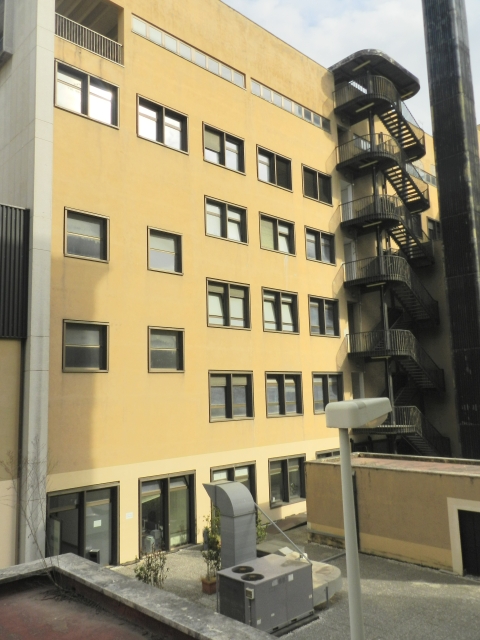
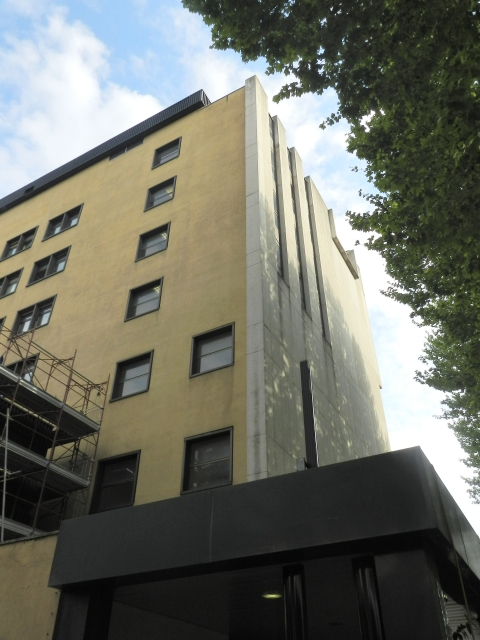
As soon as possible we've decided to add meaningful and detailed pictures of the facades, in order to study which parts of the building have been deteriored by mold and humidity because of a bad exposition or a low radiation during the whole year.


Observing these buildings, we've noticed they show some deteriored areas which are covered by humidity, mold and moss. The balconies (perphaps 'cause of infiltrations) and the walls next to the floor are especially damaged in this sense: this capillary moisture rising from the ground is probably caused by the errors of work or the lack of waterproofing; otherwise, we could face a similar situation even if the waterproofing isn't perfectly funtioning. The damp walls from lifts are caused by building materials that absorb the moisture from the soil. On the other hand, humidity can be produced by water spray from vehicles which pass through the street next to the buildings. However, this happens because these parts receive less sunlight than the others.
- ANALYSIS OF THE SOLAR RADIATION - AREA DI PROGETTO_QUARTIERE OSTIENSE
The area which we've to study is located between Via del Porto Fluviale and Via del Commercio.
The program involves the realization of a building with differentiated functions: residences, shops and ateliers. It should be measure 7100 mq (about 21.850 mc). Will be carried out different types of apartments ranging from 25 mq to 100 mq for more users, such as families looking for stable situation, young singles, students, unemployed looking for temporary houses.

We've started the study of the area although we have not realized our project yet. So we've analyzed some moments of the year.
SPRING EQUINOX_H 9

SPRING EQUINOX_H 17

On spring, the area seems more comfortable than on winter: in the morning the adjacent building cast their considerable shadow over it; on the other hand, in the afternoon, the sunlight is more cozy and appreciated.
WINTER SOLSTICE_H 9

WINTER SOLSTICE_H 17

On winter the area is completely dark, so it begins quite cold and inhospitable, especially at 9 a.m.
SUMMER SOLSTICE_H 9

SUMMER SOLSTICE_H 17

We can notice how the area is very sunny during summer: the adjacent buildings don't cast any shadows on it, so it's hot and not protected from solar radiation, except at 9 a.m.
At this point we've analyzed the effects of the radiation solar on this area.
MULTI DAY STUDY_WINTER


MULTI DAY STUDY_SUMMER


From this study, it can be noticed the area realized with Vasari software is quite liveable during winter, even if the facades facing North seems more cold than others. That could be considered an advantage during summer but, according to me, it could be necessary to provide a green area to this district, so it can shade the sunlight during the hottest hours.
Dom, 26/04/2015 - 15:34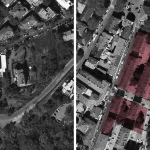 Ermirio_Morabito
Dom, 26/04/2015 - 13:34
Ermirio_Morabito
Dom, 26/04/2015 - 13:34
In order to develop a deeper analysis with Vasari, we decided to pick the building where we live as it was easier to make photos from the inside. The new site is very close to the public square we had chosen previously, and it’s located in Vigna Clara’s neighbourhood as well.
Part 1: Adding details to the façades
A. Working on levels and workplanes
Level are much important during the modeling process as they represent the height of items. It is advisable to create a number of levels equal to the amount of floors on our project. You can create a new level in the "Model" Menu by clicking on "Level”. In our situation we have 6 floors, each 3 meter high, so we'll need 7 levels, as a default Vasari has already 5, so we'll just add two.
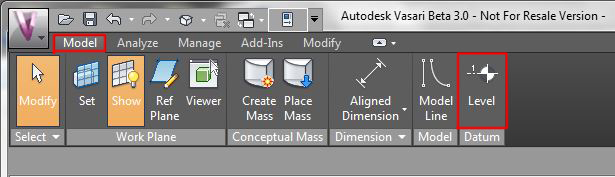
Levels are also important as they can be used as workplanes, a workplane identifies the area on which the software will place the drawing/mass you are working on, selecting the workplane is the first thing to do each time you are willing to modify or add something to your model.
It is possible to select a workplane by clicking on "set" under the "model" menu. Now you can either select a level from the list or pick a different plane directly from the model.
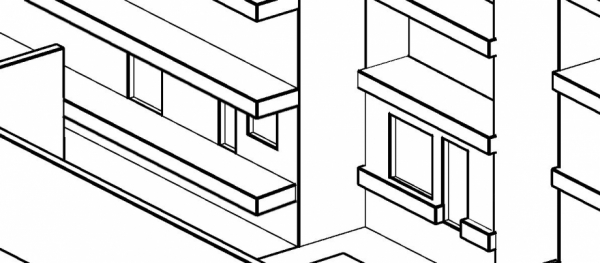
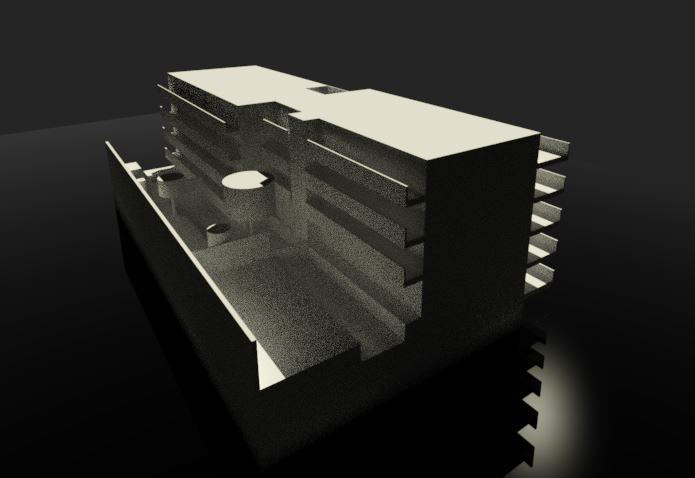
B. Shaping balconies
In order to obtain a more precise solar analysis it is important to add to the model any horizontal and vertical shading. In our case we shaped the balconies of the South facing façade and the balconies and terraces on the Northern one, as this are the façades we’re going to analyse.

C. Shaping windows
In order to evaluate the behaviour of the glass surfaces and calculate the solar radiation on them you should shape the windows by working with the modelling tools. Be sure that you’re working on the “Edit in Place” space.
D. Adding trees and more details
It is important to consider vegetation and more details such as containment walls and fences whenever they take part to the shading of a building. We added few trees on the Northern terrace by shaping cones and fences on the balconies.
Part 2: Solar radiation – main settings
A. Performing the solar radiation analysis - basic settings
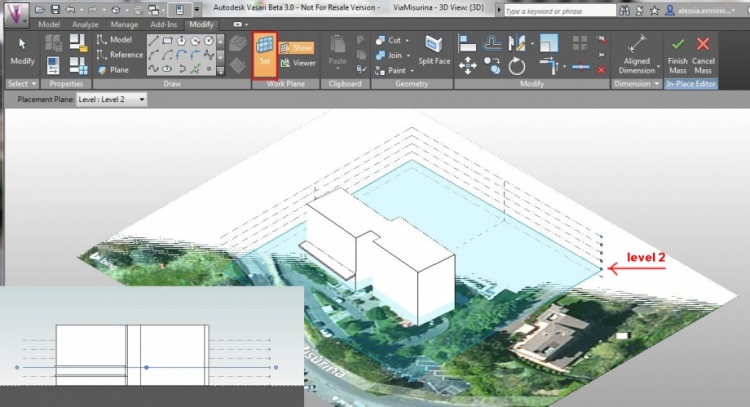
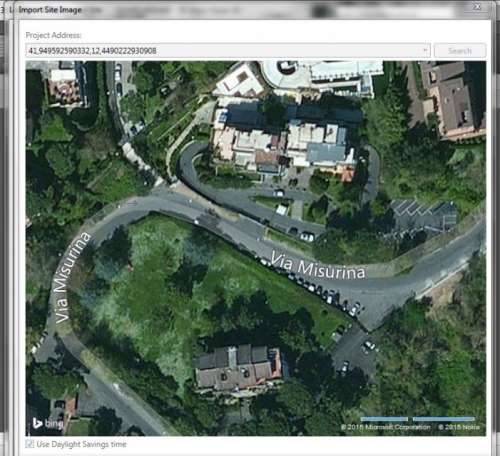
In order to begin the solar radiation analysis, be sure that you have set the right location previuosly. In our case it is “Via Misurina”, which is located in the Northern part of Rome.
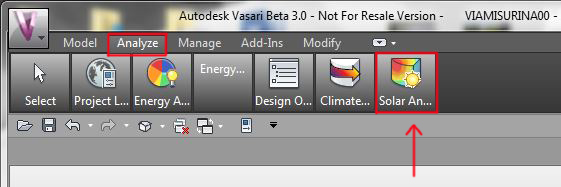
Set the “Analyze” menu from the main toolbar and then click on “Solar Radiation”.
This will open up the “Solar Radiation” window. You have now to set many options:
- Firstly, you should select the faces that you want to analyse by clicking on the cursor icon.
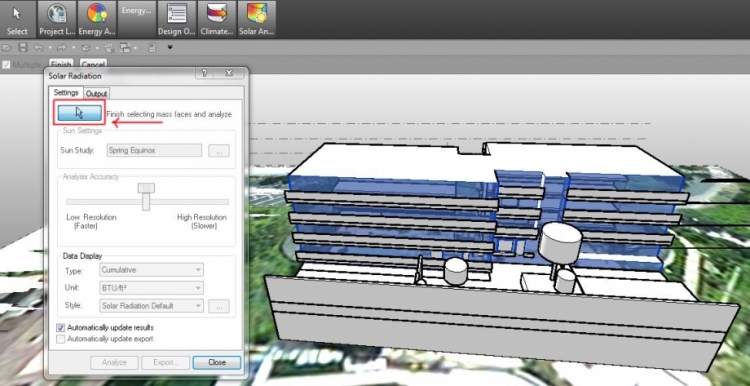
- With the “Sun Study” option, you can set the lapse of time that you want to consider. If you click on the dots icon, the “Sun Settings” window will open up. By clicking on “Multi-day” on the “Solar Study” menu you can set the days and hours that you are choosing to consider. You can choose a fixed analysis such as a seasonal one by using the “Presets” list. Otherwise you can set days and hours in the “Settings” list. You have the option to make a sunrise-to-sunset analysis as well. Be sure that you are setting the Ground Floor before starting the analysis.
- The “Analysis accuracy” bar lets you improve the accuracy of your analysis. Highest the accuracy, slower the analysis
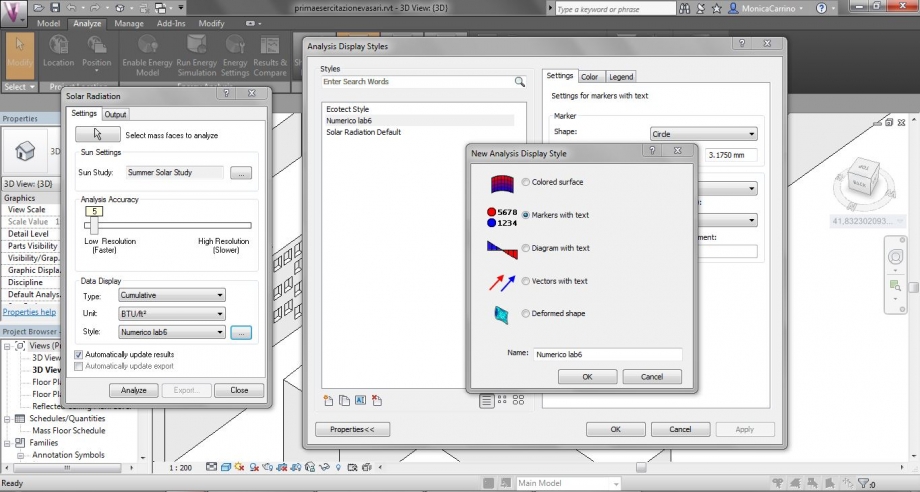
- By clicking on the “Data Display” list you have to set the “Type” of analysis you want to make. We decided to make a “cumulative” one. Then you should set the paper unit. We’re working in KWh/m2. Finally, you can choose a certain analysis’ “Style” or use the default one.
- We decided to create more appropriate styles for our analysis. We’re interested in checking the quantity of solar radiation on the windows. In this case we can’t use the default style as the colour scale is set on a single element and not on the entire building. This can lead to some analysis errors because elements with different exposition might have same colours but a considerably different solar radiation. As a result we’re introducing the numeric style. You can change the analysis’ style by clicking on the dots icon. This will open up the “Analysis Display Style” window. You can create a new style by clicking on the icon lower left. We’re choosing the “Markers with Text” type of analysis and naming it “Numeric Style”.
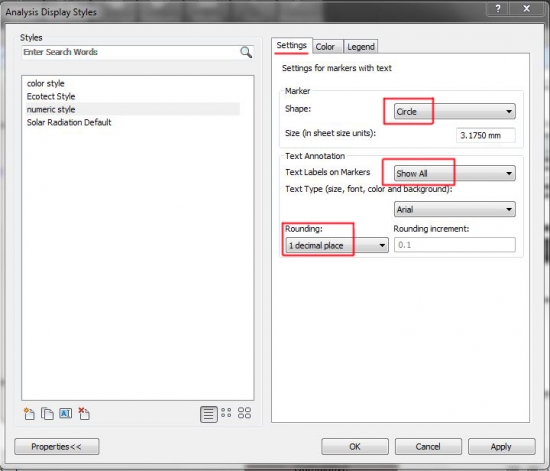
By clicking on “Ok” you will come back to the “Analysis Display Style” window. You have now to set some other options. On the “Marker” list we chose the “Circle” shape. Then we selected the “Show All” option in the “Text Annotation” menu and we set the rounding to 1 decimal place.
As far as the colour-based method is concerned, we decided to create a “Colour Style” in the same way as we noticed that it was easier to work with the maximum/minimum colours inverted.
- Be sure that you have set the “Automatically update result” before clicking on the “Analyze” button so that your analysis will update by itself whenever you’re changing something to your model.
Part 3: Solar radiation analysis – considerations (Via Misurina, Rome)
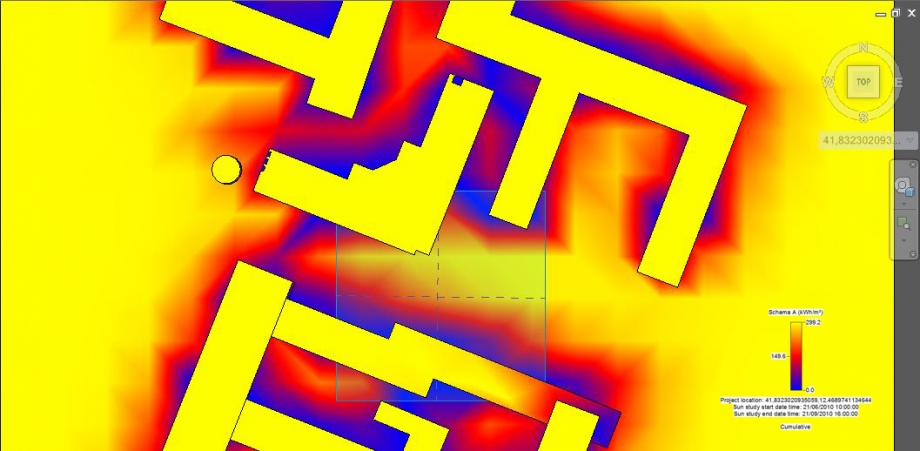
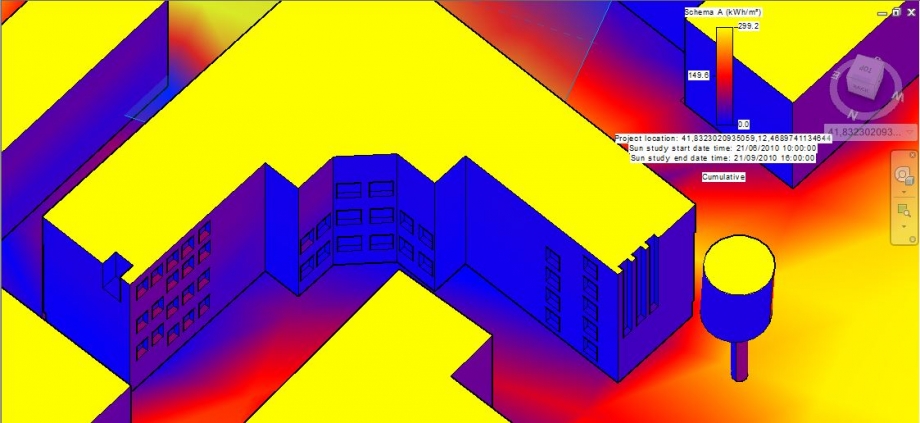
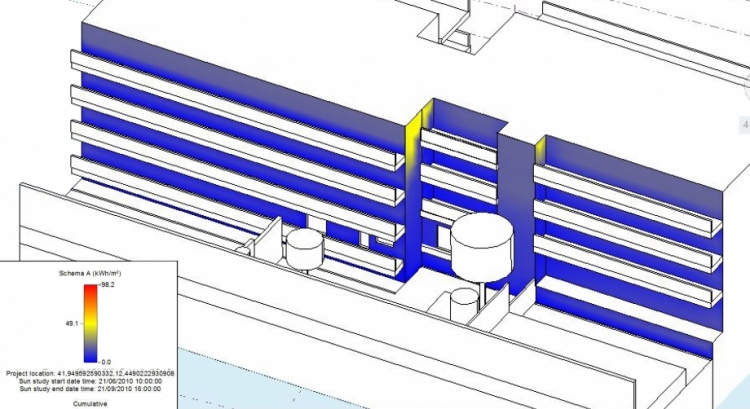
A. Colour-based method - evaluation of the open spaces surrounding the building
Firstly, we decided to study the outdoor space of one of the North facing terraces. The terrace develops on two levels, with a height difference of 1,40 m. On the higher level there’s a swimming pool, while the lower has a living/dining function.
We analysed the solar radiation during the different seasons and made a comparison. The analysis show that the radiation is very low for almost the whole year. As a matter of fact the values during winter reach only 0.5 KWh/mq, while they peak only during summer on the rooftop with 299 KWh/mq.
To sum up, the terrace is a very liveable place during summer. The higher level reaches 147 KWh/mq, while the lower remains stable between 0 - 50 KWh/mq. This means that you can relax in the cool living part or sunbathe near the swimming pool. As it can be seen from the pictures, the constant shadowing of the lower floor keeps it fresh, while the higher one is not too hot although it receives direct sun rays.
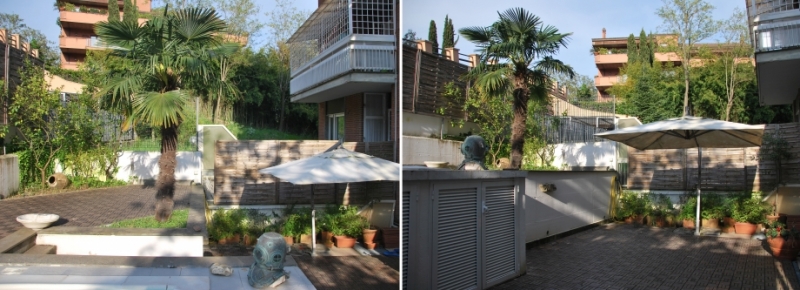
The situation is completely different on winter, when the whole terrace is very cold. As the evidences of deterioration reveal, walls and other element are moss – covered and show humidity stains.
In order to avoid those deterioration evidences should be actuated some strategies such as the use of dark materials for the floor and the walls which can absorb the solar radiation, and the use of waterproof sprays to avoid humidity stains.
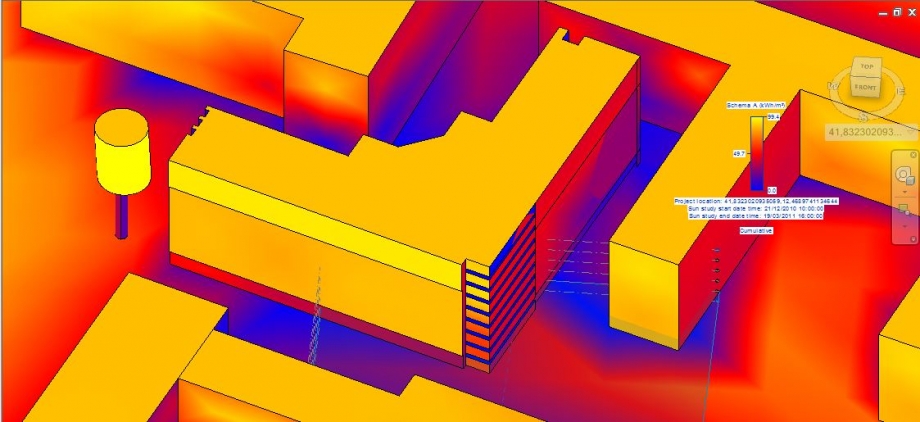
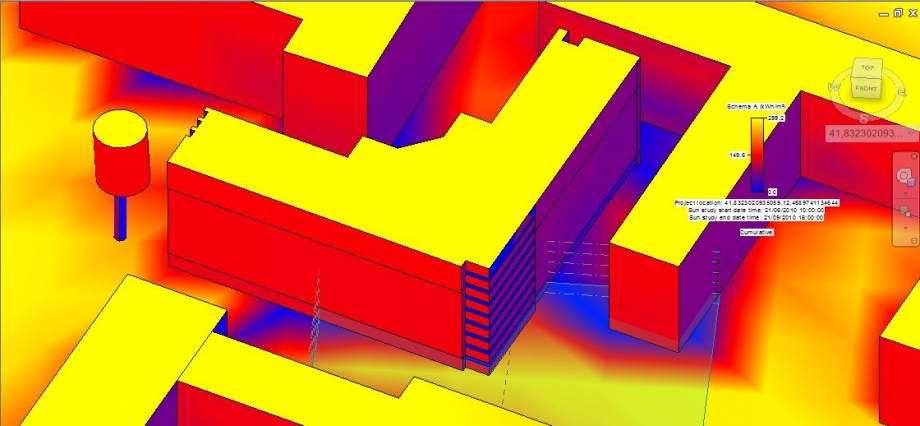
B. Colour-based method - checking the quantity of solar radiation on opaque walls
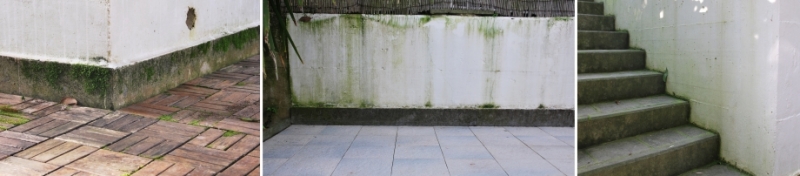
Our analysis focused then on the effects of the solar radiation on opaque walls of the Northern façade.
It can be noticed that the higher part of the façade seems a way more irradiated than the lower, but this is actually not truth as the solar radiation fluctuates only between 0 and 0.1 KWh/mq.
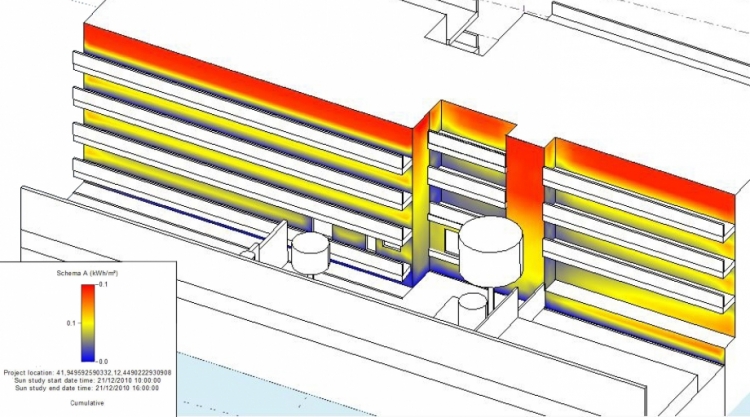
The situation is very similar during summer, where the radiation only increases slightly on the upper corners of the building.
In conclusion the façade does not receive solar radiation at all and this leads to considerable signs of deterioration, as it can be clearly seen from the pictures. The deterioration is due to several reason. When it rains the water doesn’t dry quickly as it can happen to a Southern façade, so that it becomes stagnant and generates mould and efflorescence. Cantilevers are a cause as well, as they don’t let the water to drain correctly.
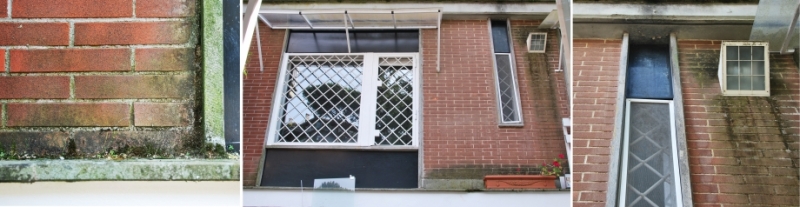
In this case can be adopted the solutions that we briefly illustrated in the outdoor analysis.
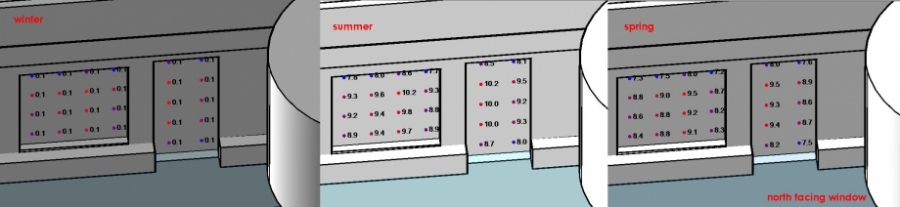
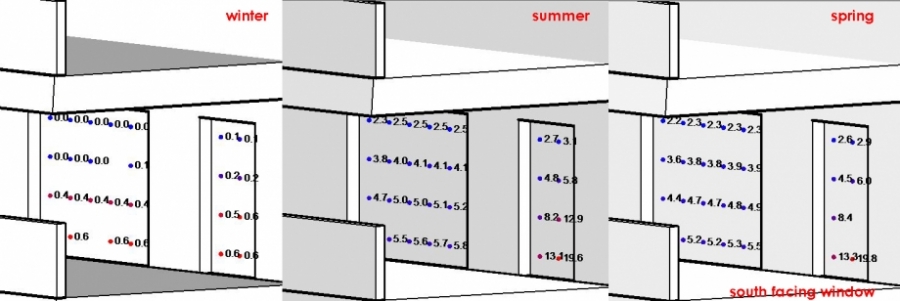
C. Number-based method - checking the quantity of solar radiation on the windows
In the end we decide to study the behaviour of a North facing window and make a comparison with a Southern one.
During winter the radiation values are slightly higher on the South facing window. As a matter of fact it reaches 0.6 KWh/mq on the lower part, while the Northern window stays constant around 0.1 KWh/mq. On the other hand, during summer it’s the North facing one to reach the seasonal peak with 10.2 KWh/mq, while the Southern remains constant between 2 – 6 KWh/mq, with a little exception of 13 KWh/mq on the lower right corner. In conclusion the South facing window comes up with the best situation as far as exposition is concerned. During summer, when the sun is quite high, it is shaded with a balcony, in order to let the light in but not the heat. During winter, when the sun is lower, sun rays warm up the house.
This analysis leads to some considerations.
With a conventional float glass, a significant amount of solar radiation passes through the window, and heat from objects within the space is reradiated back into the glass, then from the glass to the outside of the window. In order to avoid the overheating of the North facing façade during summer, it should be used a Low-emissive (Low-E) glass. It is a window glass that has been treated with an invisible metal or metallic oxide coating, creating a surface that reflects heat, while allowing light to pass through. This glass is obviously more expansive than a float one, but it’s coatings are proven to reduce energy consumption. As said before, the Southern façade as an optimal exposition, so that the Low-E isn’t necessary for it.
We can make some other considerations about the light. A North facing room catches only a restricted amount of cold light for the most of the year. In order to optimise the brightness of the room walls should be painted with warm colours, such as light red or yellow. Greyish colours should be avoided, otherwise the room will look quite dark. The Northern light is quite constant, so that the room vibe won’t change a lot during the day.
A South facing room catches a consistent amount of warm light. Painting a room like that is very easy, as it can be used either cold or warm colours. Like the Northern light, the Southern is constant as well, so that the colour used won’t appear different during the day.
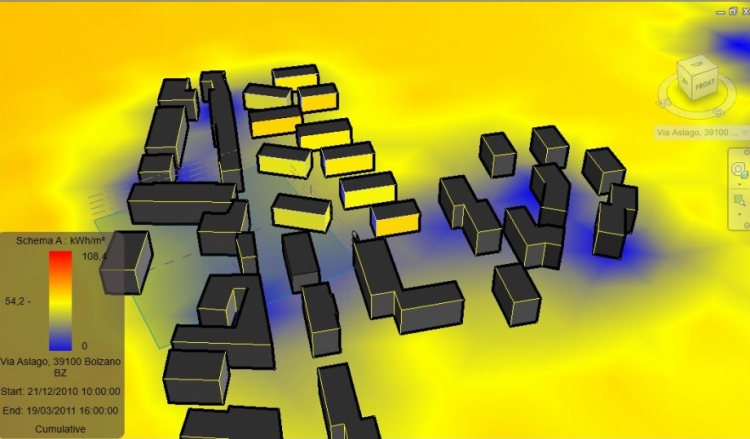
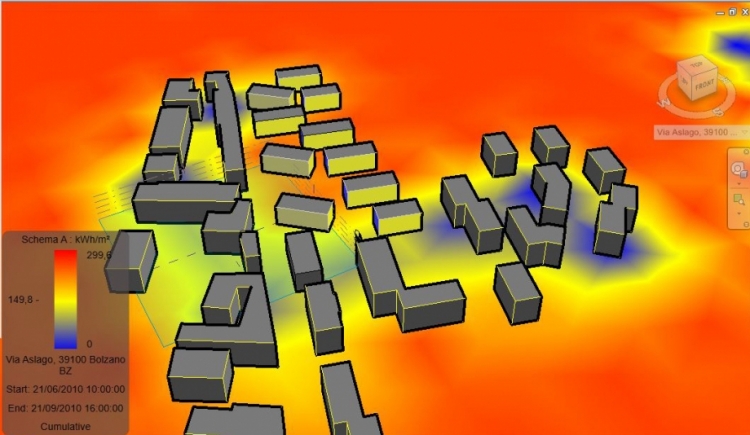
Part 4: Solar radiation analysis – considerations (Via Aslago, Bolzano)
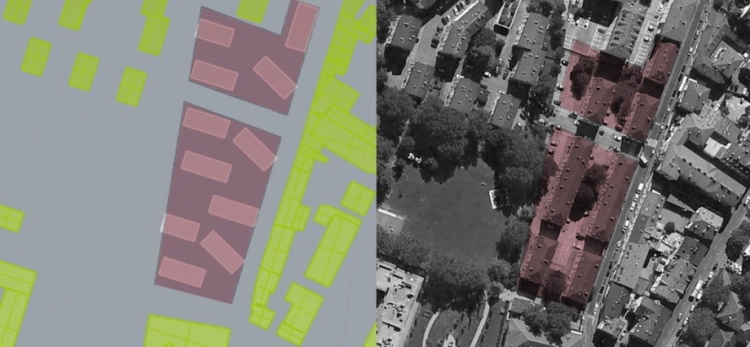
The site project is located in the Southern part of the city of Bolzano, in an area close to the Isarco river named Oltrisarco. The area is near the industrial area and it’s crossed by an highway and a railway. The site is located in Via Aslago and it’s about 7000 square meters. Actually the site consists in 7 residential buildings built during the ’40. IPES, the local authority responsible for social housing residences, planned to demolish those buildings and commissioned 80 new accommodations.
One of the main features of the area is the presence of the Kohlern mountain located East, which significantly affects the shadowing of the whole area, especially during the morning.
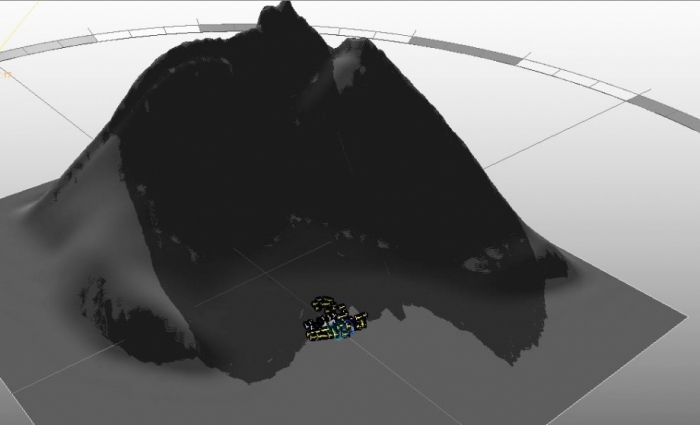
A. Shadows analysis
We started our studio by doing a shadows analysis in order to understand the shadowing problems of the site.
At the present moment the buildings have a North – South orientation. This means that the longest façades – where the main windows are located - are exposed East and West. As said before, the East orientation represents a significant problem because of the presence of the mountain, so that the morning sun hardly irradiates the façade. As a result, we decided to invert this orientation in order to get a more correct enlightenment of the main façades.
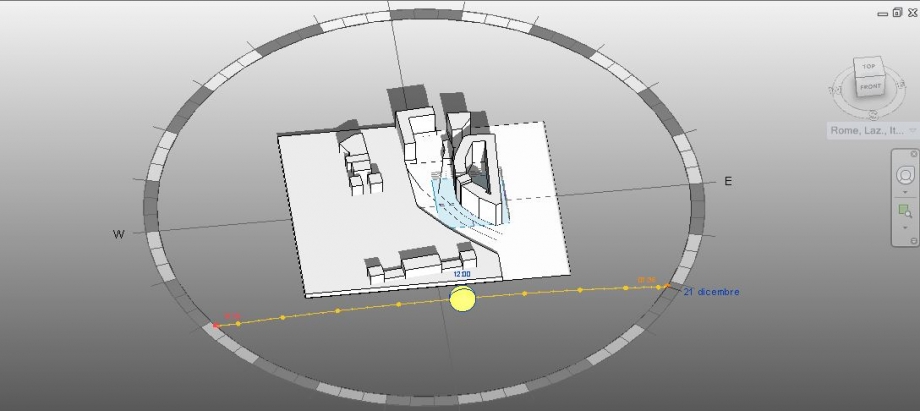
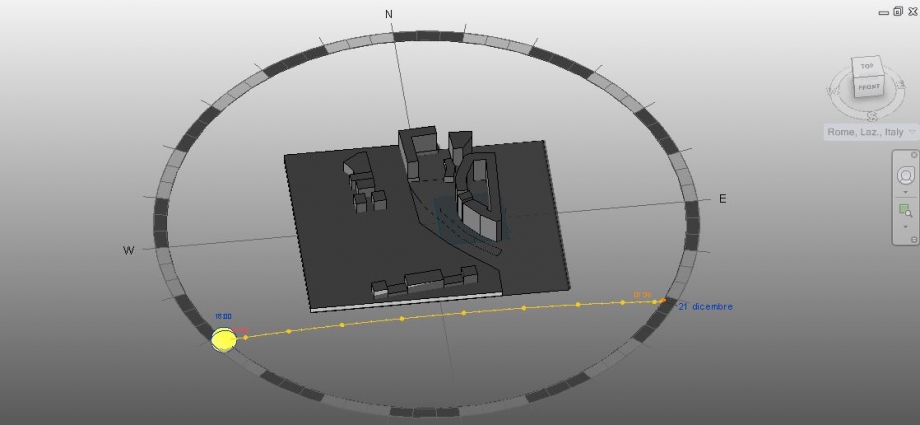
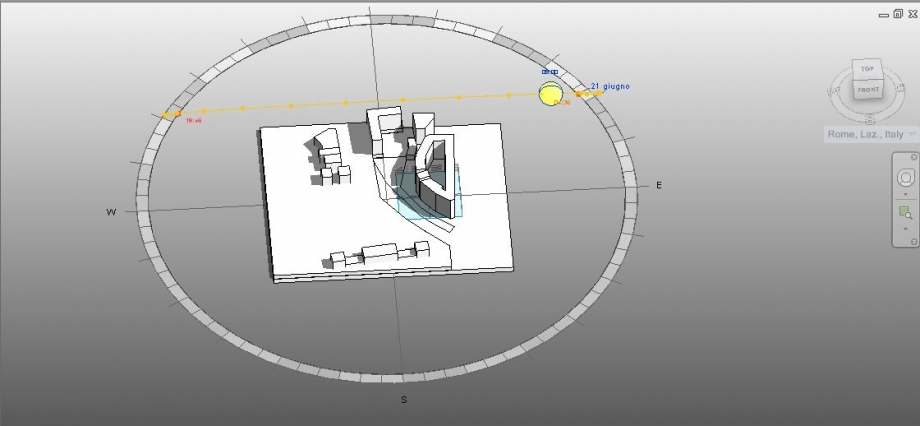
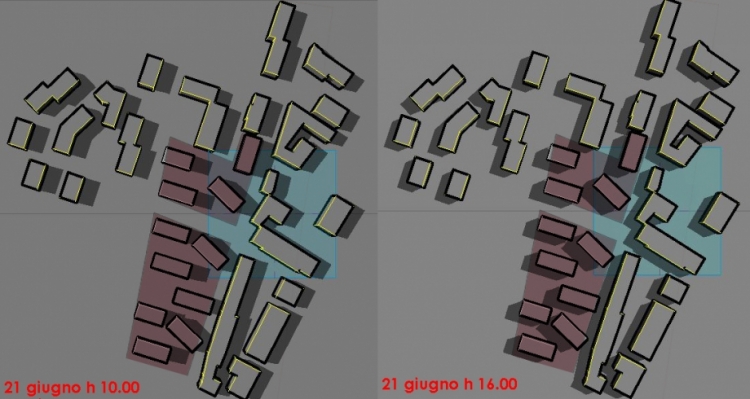
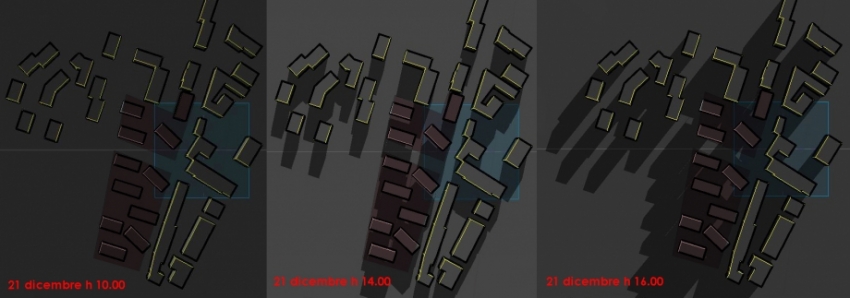
We decided to make the shadows analysis of the project site within our first design thoughts. In order to understand the solar exposition of the courtyards and squares designed we considered several situations during the year 2015. We picked up the dates of the equinoxes and solstices and 2 different moments of each day (10:00, 16:00).
During summer (21st of June) those public spaces seem to be quite liveable places. As a matter of fact the courtyards are completely enlightened at 10 am, when the sun is not that hot yet, while they are quite shadowed at 4 pm, when the sun is warmer. We can consider to plant some trees to improve the shadowing.
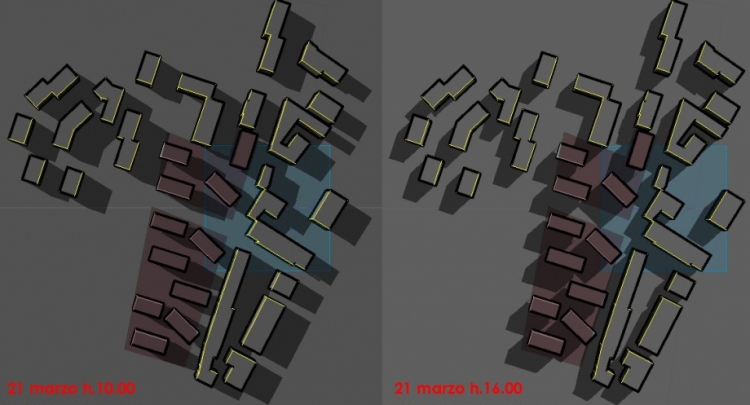
During spring and fall the squares will be quite nice in the morning: although the sun is not so hot, they are well enlightened. On the other hand they are quite cold and shadowed in the evening.
We decided to pick 3 different hours on the 21st of December, as we realised that the site will be very cold and shadowed. As it can be clearly seen from the analysis, the courtyards will be shadowed for almost the whole day. As a result will be necessary to figure out a new solution for public spaces during winter. We were thinking about designing indoor common spaces that can be easily heathen up in order to create a more comfortable space.
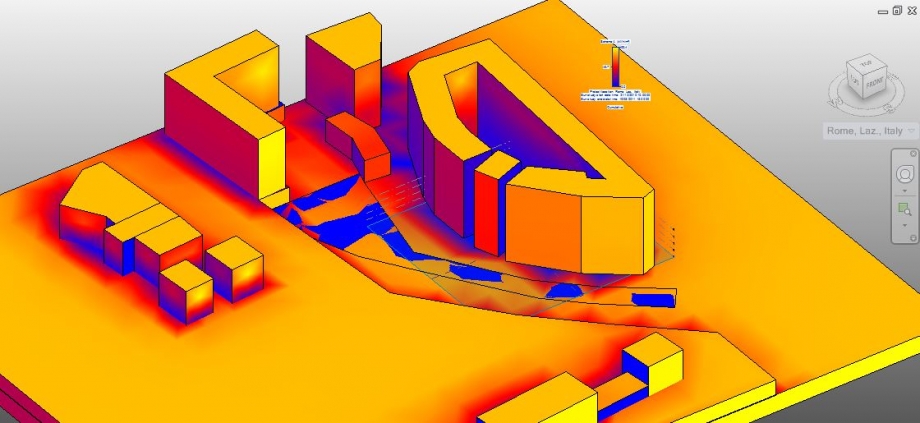
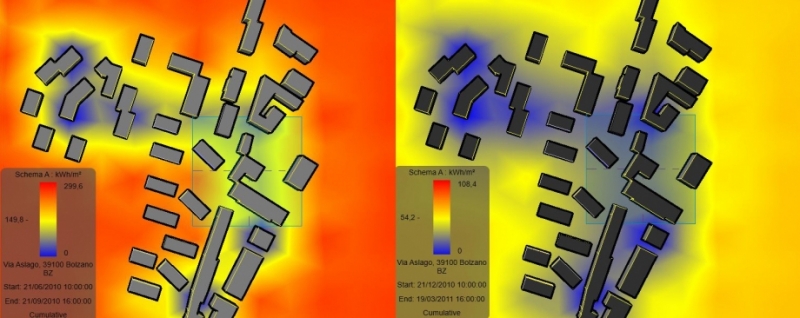
B. Solar radiation analysis
We decided to study the solar radiation during the most critical periods of the year: summer and winter.
In order to make a deep analysis of the quality of public spaces, we firstly considered the solar radiation on the ground. The colour – based method analysis validates the studio we made while studying the shadowing. The solar radiation during summer is quite high – it peaks with 299 KWh/m2 – while it only reaches 54 KWh/m2 during winter. As a result we should consider to use bright paving materials and to plant some trees in order to shade the solar radiation during summer, while we can weatherize the flooring in order to avoid mould, efflorescence and humidity stains during winter.
Then we chose to study the façades’ solar radiation. As it can be seen from the pictures, the Northern façades don’t receive any solar radiation at all, so that we should adopt preventive measures in order to avoid deterioration signs. We should use waterproof materials, able to absorb the slight radiation.
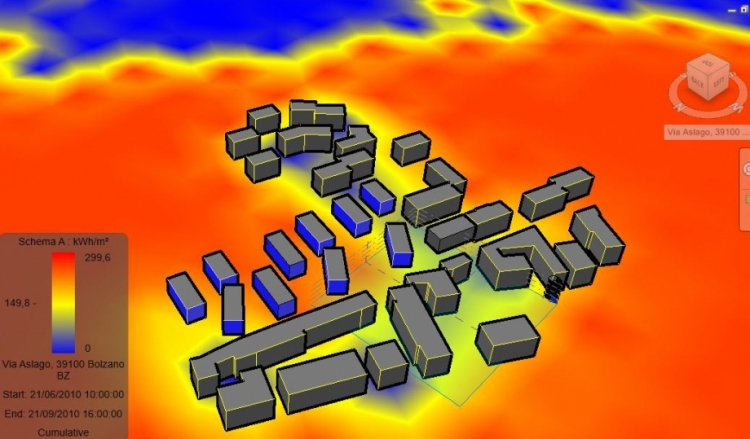
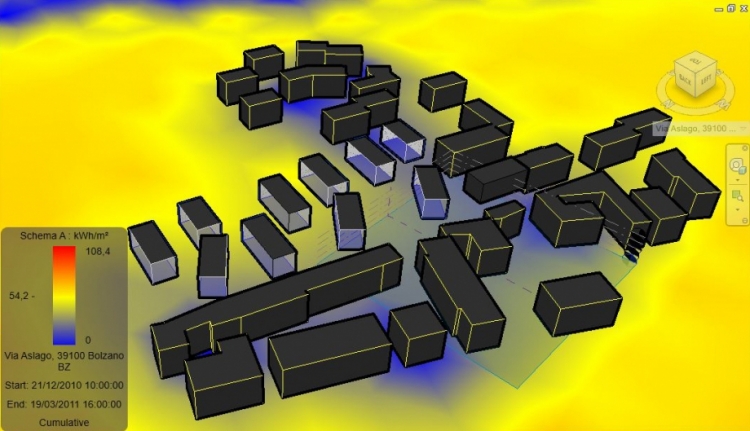
The Southern façades receive a quite high solar radiation during summer – which result to be around 150 KWh/m2 – while the number is not that high for winter – 50 KWh/m2. In matter of the treatment of Southern façades, we should consider the observations done previously about Via Misurina building. South facing façades come up with the best situation as far as exposition is concerned, so that we can think about opening big windows on them. During summer, when the sun is quite high, they can be easily shaded with cantilevers, in order to let the light in but not the heat. On the other hand during winter, when the sun is lower, sun rays warm up the house.
 BONANNO_CARLETTI
Dom, 26/04/2015 - 14:26
BONANNO_CARLETTI
Dom, 26/04/2015 - 14:26
buongiorno,il problema riscontrato è il seguente: non avendo di default la solar radiation su Vasari Beta 3,tramite i link forniti dagli altri utenti siamo andati a scaricare sia i dll provando ad inserirli nell'apposita cartella senza risultato,sia il pacchetto Vasari addins con analogo risultato

il pc è un Windows 7 a 32 bit qualcuno può aiutarci?
Dom, 26/04/2015 - 14:26 Lollobrigida_Lugni
Dom, 26/04/2015 - 13:56
Lollobrigida_Lugni
Dom, 26/04/2015 - 13:56
First, select the mass and on the Modify section click on Edit In Place in order to create new form on the mass.

Once you have opened it you can use the drawing tool to create the surfaces to extrude as solid or void forms. Solid forms make balconies and any other projection, void forms make loggias, windows, voids ect.

When you've finished the modellation you can start to analyze the solar radiation using the tool "Solar Radiation " on the Analize bar

It's really important to set the right unit (kWh/m2) to get right informations.

In order to get a summary analysis we can select Multi-day on sun settings and we can chose a specific period of the year, for example, Summer Solar Study .


In order to have a clear and readable analysis you can set colors you prefer to express radiation's intensity.
 This is our analysis result:
SUMMER SOLAR STUDY


soil analysis

WINTER SOLAR STUDY


soil analysis

Solar analysis shows interesting patterns in the shadow setting. All buildings are aligned along the N-S axis, therefore even a quick deduction leads to understanding the issues that south facades may face.
Speaking about open spaces, the way that joins the three buildings is happening to be in a very unfortunate situation. Both our personal experience and computing studies reveal how such area is very hot in summer (although its functional use as mutual access to the residences surely does not require a proper temperature throughout the year). The walking surface radiates a lot of heat during this period and only the perpendicular ways between the buildings have proper shading. On the other hand, the particural alignment puts the main way in a condition of full sun in winter, which is useful and correct. As we said in previous statements, this place is relatively wide and has a lot of potential. Low plants in the area might mitigate humidity and comfort in the summer and the winter but they are few and problably quite unnecessary. Our suggestion would have been to connect the three building to the one towards East to create some kind of shadow that woud have likely made a comfortable (and fresh) place to stay in.
The facade that shoud have required much more attention is the South one. As shown it has no kind of projecting element that could have shaded the windows on that side. In a year almost all apartments (except for the penthouses that have been design with care) get sunlights inside, with evident comfort problems. Any kind of cantilever just right above the windows would have done the job. As for the angle loggias, the terms are different. Loggias are by themeselves good shading solutions for summer midday hours but here whe are dealing with an angular condition. Therefore early summer mornings are much less comfortable. It shoudl have been useful to put a vertical shading system to avoid it.
The East facade has the same issues: few orizontal shadings and one module of loggias which of course face the sunlight in summer and winter, with all the problems that occur because of it. The north side may instead suffer from a internal heat loss, caused by too big windows and low light inside as well. In fact this facade has even more balconies than neccessary. As a result, big windows exist and they problably release a lot of heat in winter. In the summer they are garanteed with good shading.
Thanks to this programme we can understand the reason why we can found some phenomenos, for example the spots in the plaster of the highest balcony, the more stressed by the difference in solar radiation, how shown here

a similar thing happens here

OUR PROJECT'S LOCATION ANALYSIS
Project area is located within the Municipality of Rome Capital VIII (ex XI City Hall ) , at the limit with the XI Hall , particularly close to the historic center and it belongs to Piramide – Ostiense's neighbour.
The lot, almost rectangular in shape belongs to the block defined by the axes via del Porto fluviale to the north, via del Gazometro to the east, via dei Mercati Generali in South Street and vi del Commercio in West.
It is flat and it is located in an' altitude of about 15 meters above sea level; covers about 4700 square meters and has a perimeter of 300 m. it is about 100 m. long with a width that varies from a minimum of 35 m to 60 m. The major axis follows the 'orientation NNW-SSE. Currently busy for almost the entire surface of sheds and warehouses two or three stories high.
A peculiar characteristic of the neighborhood, to a greater extent than others, is the variety of profiles, heights and types of residences. See the adjacent lot. The front of the North 'is occupied by isolated houses in line at least five levels, from industrial buildings and lower back row houses in successive blocks. Many of these are historic buildings of the early twentieth century, built in conjunction with the river port. Given the hypothetical demolition of existing buildings, the east side would be closed by the irregular profile created from the head of these row houses and buildings of various function placed in the courtyard; South buildings at least three stories high.
We decided to make a preliminar study of the shadows during the solstices and equinoxes in order to understand the real situation of our area and to regoulate our project's dimentions.
We choose a court tipology in order to commemorate the near class areas dating back to the 30's.
it was an hard decision because of the effect of this tipology on the shadows but we tried to moderate ur building in order to valorize the courtyard to, raising the building on pillars.
this is our fist shadows analysis making at 10.00 a.m. of equinoxes and solstices.

Still preliminary at this stage we begin to use some useful programs for the analysis of our building.
SOLAR RADIATION


Our courtyard turns out to be a temperate place where solar radiation are mitigated by shadow zone.
To get informations about the quantities of the building. First create the mass floor by clicking on the mass.

Click on Schedules.

Select the mass floors.

Select the fields you are interested in and click on the Add botton.

These are the final results:
