


 Enrico Mele
Mer, 18/02/2015 - 15:17
Enrico Mele
Mer, 18/02/2015 - 15:17
Definition of Attractor :
In the mathematical field of dynamical systems, an attractor is a set of numerical values toward which a system tends to evolve, for a wide variety of starting conditions of the system. System values that get close enough to the attractor values remain close even if slightly disturbed.
In architectural terms we could use an attractor in the design process to get some interesting features in components that build up our projects.
In order to realize a parametric facade create by a series of elements I start to create a "XYZGrid" that define the position of the several elements. This node, in input, requires the counts of x, y adn z rows, the origin point and the spacing between rows giving in output a list of points.

First stop. The node doesn't work and after push "Run" I don't see anything in the model view. Well, "XYZGrid" is a custom node, so maybe there's something wrong with the inputs that compose itself. Let's try to Edit Custom Node.

Here it is! There's something wrong in this block.

"Warning: Multiple definitions for 'Point' are found as Autodesk.DesignScript.Geometry.Point, Rhino.Geometry.Point"
There is a collision between the two definition of Point of Autodesk and Rhino. This bug is almost strange, but is conceivable if we has installed some Dynamo Packages that speaks with Rhinoceros like MantisShrimps or Rhynamo. The deal is that this block doesn't recognize if this point is an Autodesk Point or a Rhino Point, so i tried to put in the entire definition "Autodesk.DesignScript.Geometry.Point" and save the custom node.

WOW! IT WORKS! Now I have my points grid. Now i want an attractor ruled by the distance between every grid's point and a Reference Point in Revit. Let's create a Reference Point and then select this element with the node "Select Model Element".

I need to measure the distance between this Reference Point and points of the grid so is useful the "Geometry.DistanceTo" but there's a problem with the Reference Point. It's not a "point" so we have to transform it into a Point (node: ReferencePoint.Point).


Combining this increasing distances in a Geometry node ruled by a center and a distance, for example a Circle by center and radius we should have our working attractor. This is an attractor with circles that has their centers in the XyzGrid and the radius ruled by the distance to the reference point.

Adjusting the scale of the distance we do appreciate better the usefulness of this node.

If we move the Reference Point in Revit and re-Run Dynamo the attractor works.

 paolaorellana
Sab, 14/02/2015 - 05:54
paolaorellana
Sab, 14/02/2015 - 05:54

Professore
Come discusso in classe, vado lavorare alla consegna finale (verrà modificato nel formato corretto).
Spero che i commenti ...
 paolaorellana
Sab, 14/02/2015 - 05:00
paolaorellana
Sab, 14/02/2015 - 05:00
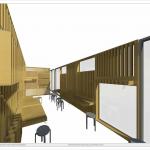
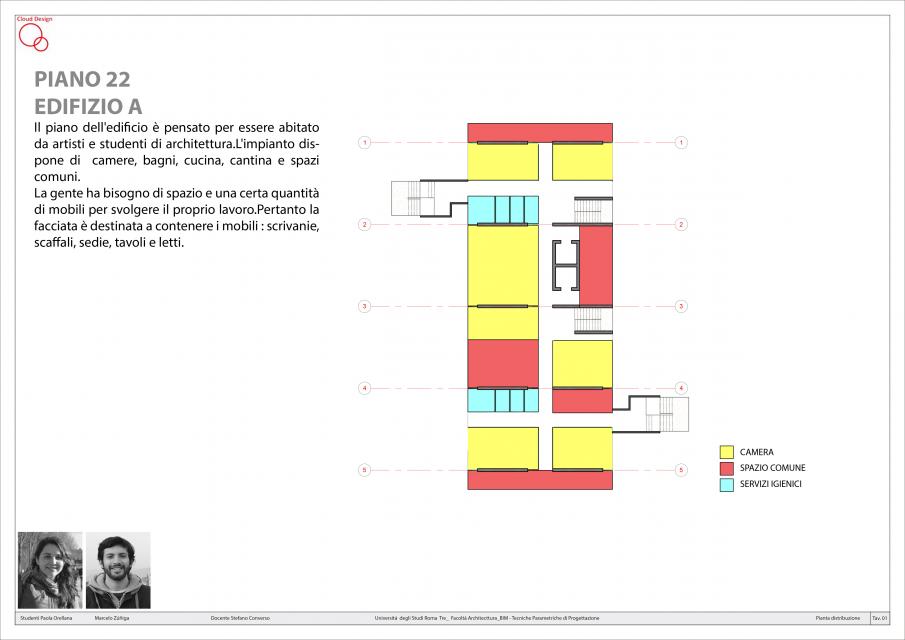
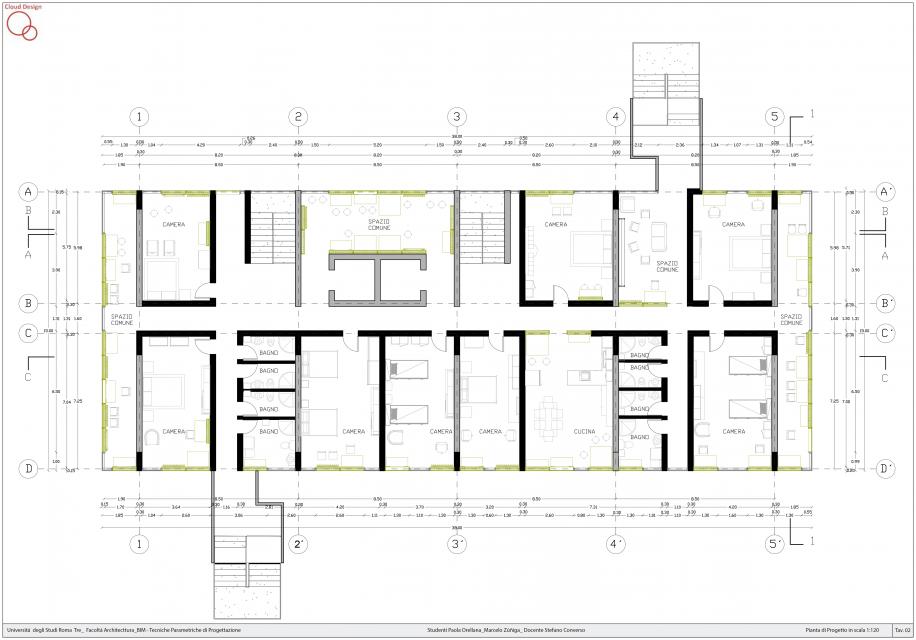
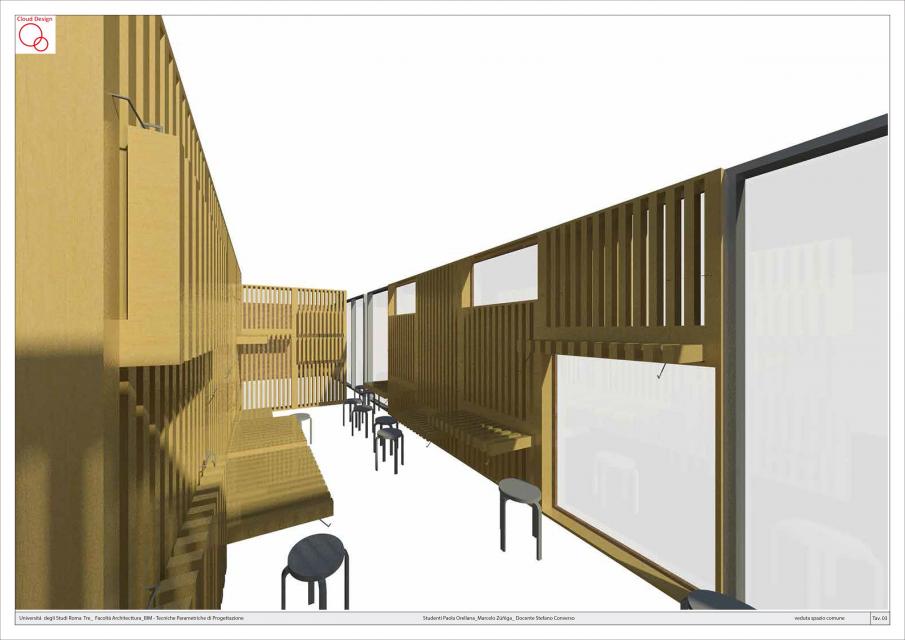
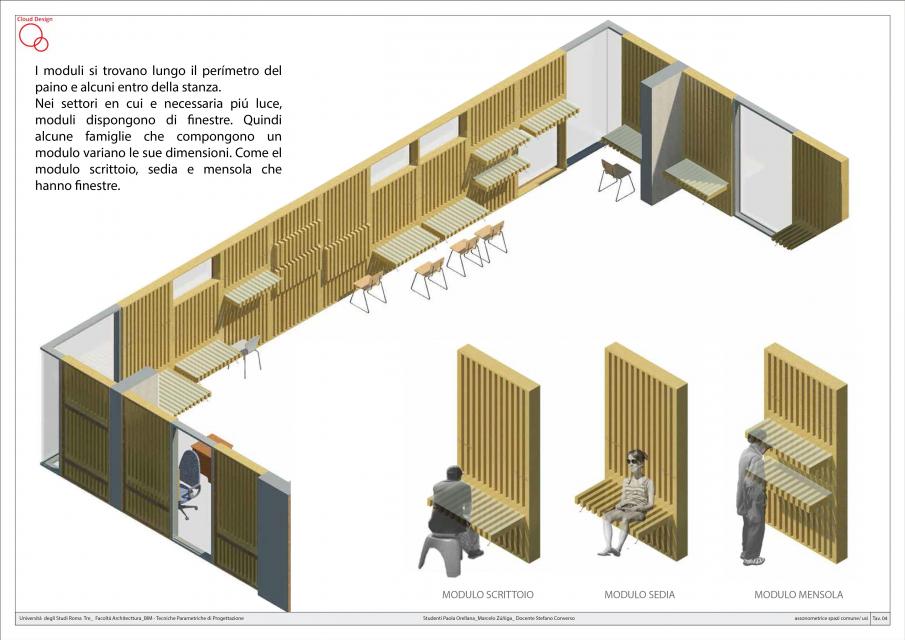
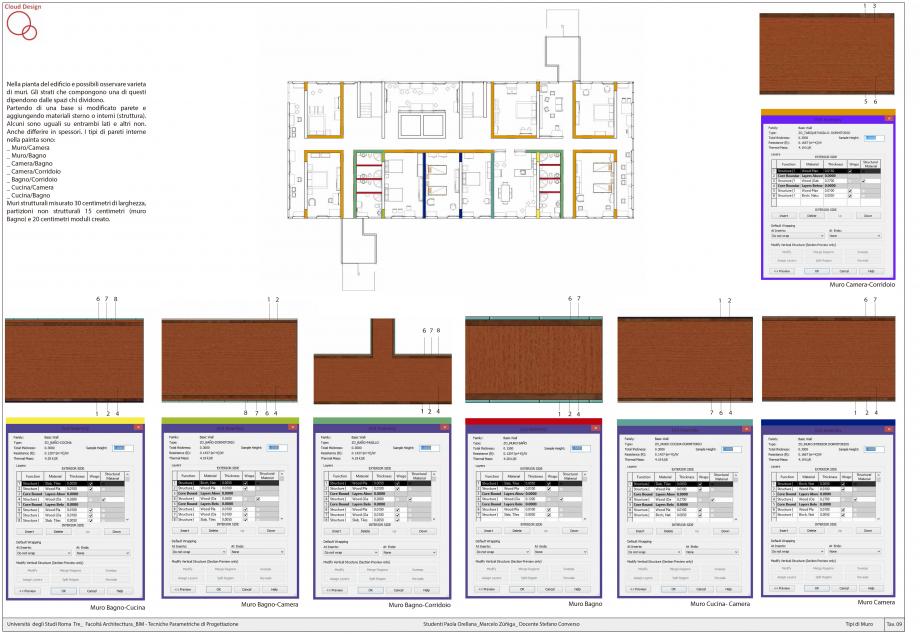
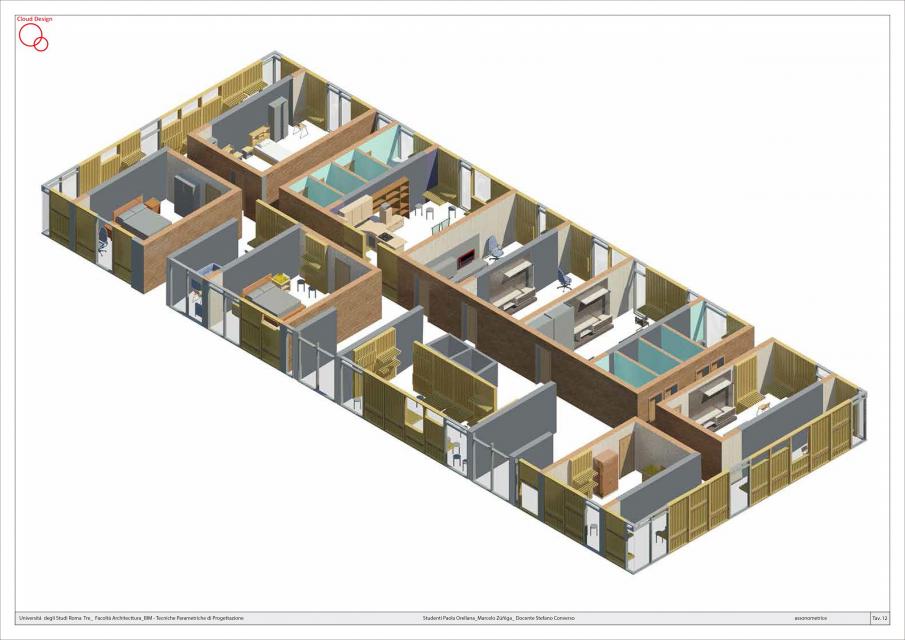
Il progetto genera uno spazio di ricreazione per le persone, puó essere fatto attivitá in famiglia: camminare, trotto, esercizio, sedere, magro, pedalando una bicicletta.
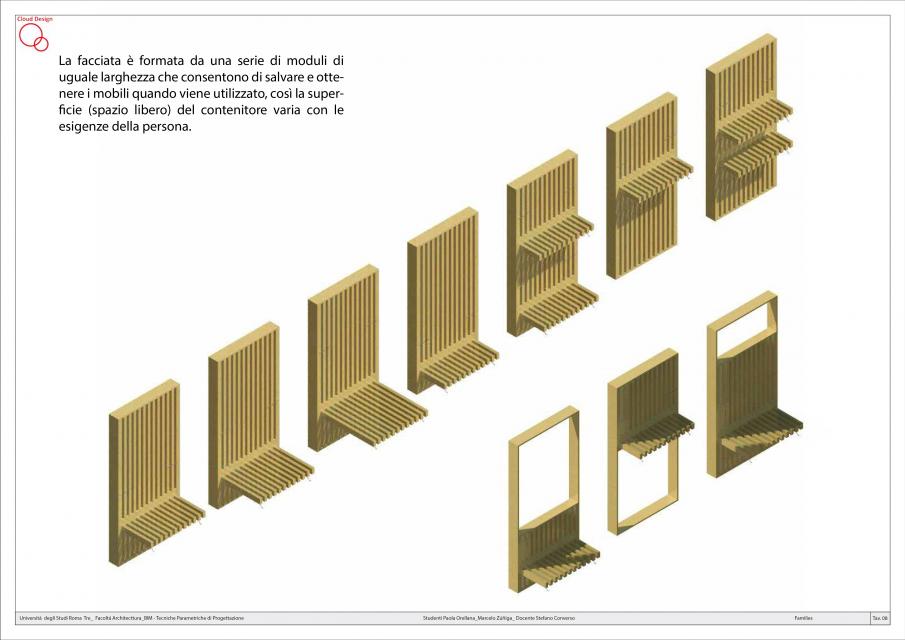
Ci sono un modulo come “C” (family 1) in diverse misure, questo modulo é ripetuto durante el progetto. Una scaletta é formata con piccolo terrazze nel percorso.
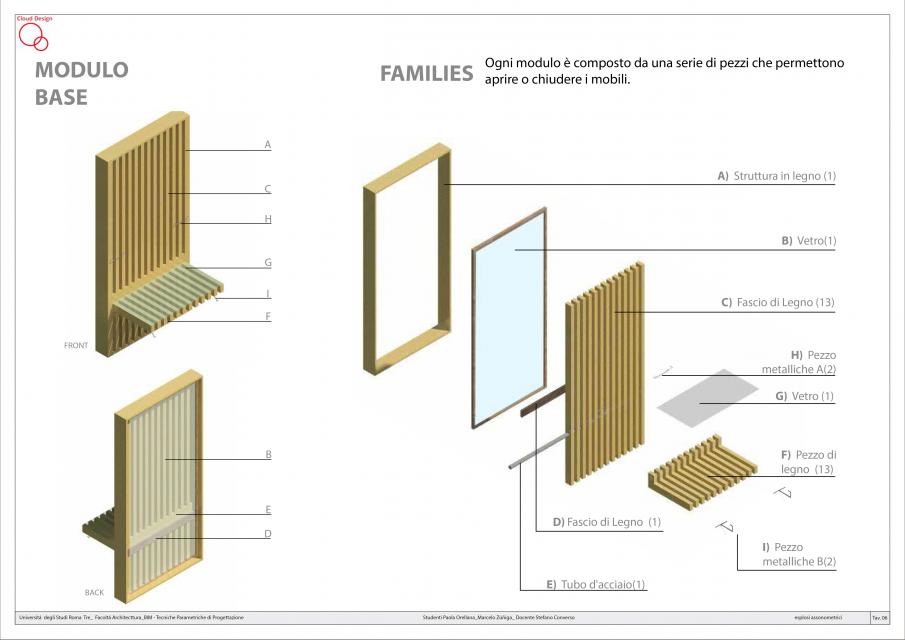
La prima cosa che ho fatto è stata aperta una famiglia "Metric Generic Model", per creare un modulo di base come "C".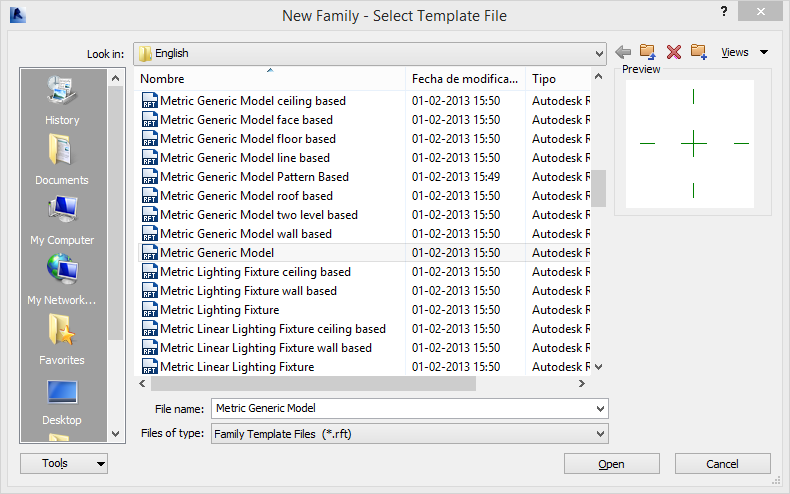


Quindi progettare il modulo, ho incorporato parametri e materiale. Penso che molte famiglie con differenti misure per incorporare il progetto !!


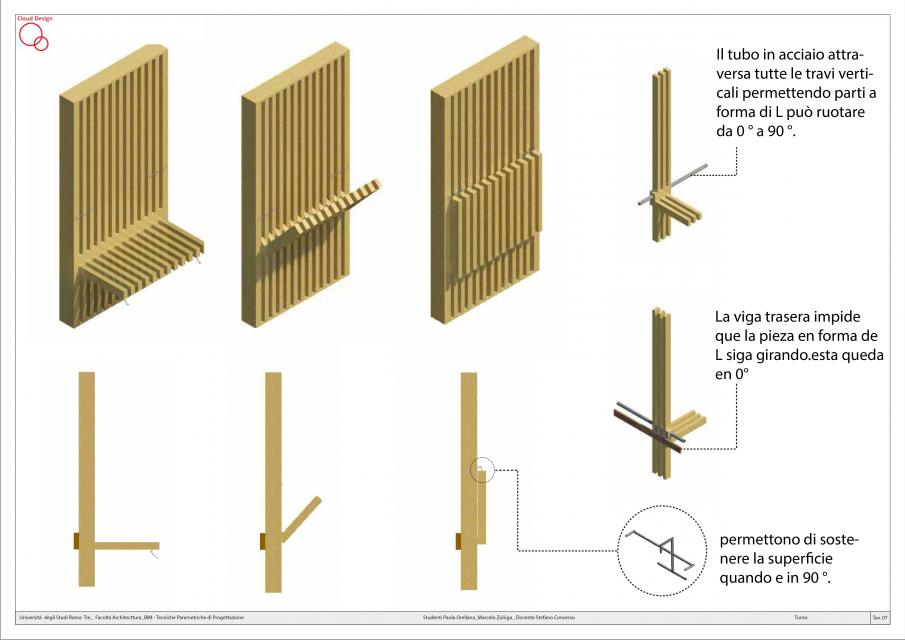
Questa famiglia è composta da due parti orizzontali collegate da un pilastro. Questo dato è molto semplice e le tre pezzi che formano vengono ridimensionati per generare diversi usi all'interno della grande passeggiata pedonale che si proietta.
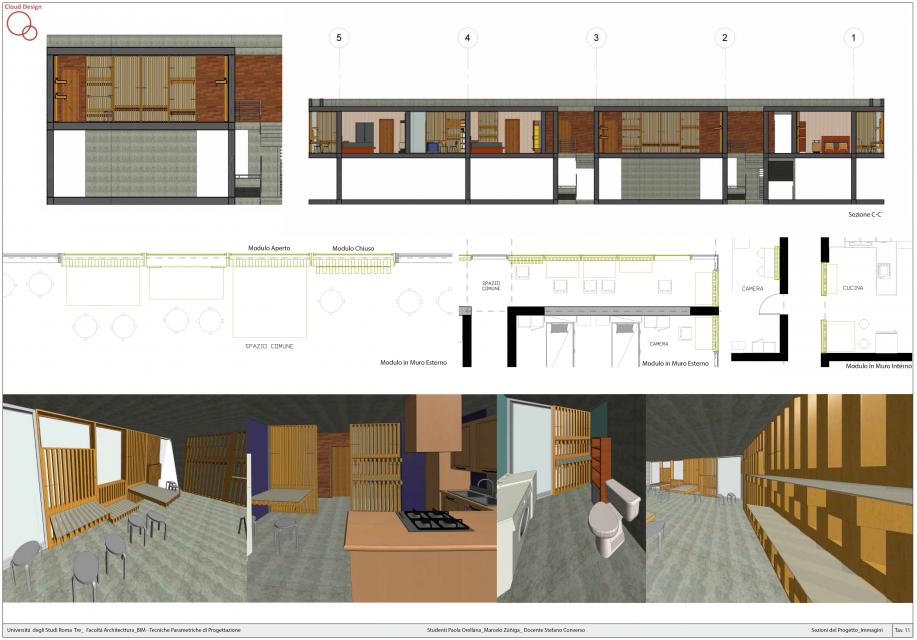
Famiglia 2, é la ringhiera dello spazio peatonal, questo ha due pile di ferro e vetro, collegati da un elemento metallico.
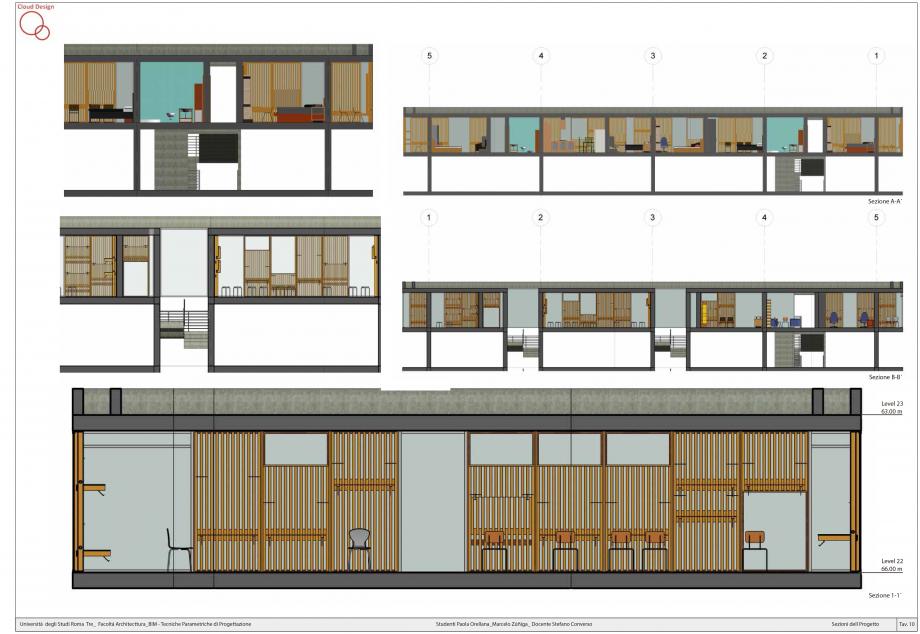
I pezzi sono disposti in modo da formare una scala con terrazze, si può andare a piedi (in alto). A piano terra si può andare a piedi o in bicicletta o scooter.
 I pezzi sono disposti in modo da formare una scala con terrazze, si può andare a piedi (in alto). A piano terra si può andare a piedi o in bicicletta o scooter.

 Elevazioni progetto.


 Manuel Andrè Bo...
Gio, 12/02/2015 - 22:52
Manuel Andrè Bo...
Gio, 12/02/2015 - 22:52
the code below contains a CSS media query, and it goes at the bottom of your CSS file:
@media only screen and (max-width:480px) {
/* do something to the design for small screens */
}
The job of a media query is to detect the screen or window size of the device a user is using to view your site or application. In the preceding example we are detecting for a maximum screen size of 480px; then inside the brackets, we are able to adjust the design (in the presentation layer) to better fit the smaller screen size.
It's device-independent, so we can activate these media queries by resizing your browser window to 480px
Note
If you loaded the example to this point up on a phone, you would notice that your media query isn’t working yet. The Web page probably looks all zoomed out, and this obviously isn’t what we’re looking for. There is an HTML meta element that you need to add into the <head> of your document to make sure this initial zoom happens and your media queries work as expected. That element looks like: <meta name="viewport" content="width=device-width, initial-scale=1">
let's start from opening a text editor, copy/past the code below and save as "MyTest.html". Here a very basic HTML5 code:
<!doctype html>
<html>
<head>
<title>Great Home Page in HTML5</title>
<meta charset="utf-8">
<!--CSS-->
<link rel="stylesheet" href="css/styles.css">
</head>
<body>
<!-- replacing DIV with the new HEADER element -->
<header id="header" role="banner">
<h1><a href="/">Great Home Page in HTML5</a></h1>
</header>
<nav id="nav" role="navigation">
<ul>
<li><a href="/about" id="about">About</a></li>
<li><a href="/articles">Articles</a></li>
<li><a href="/staff">Staff</a></li>
<li><a href="/contact">Contact</a></li>
<li><a href="http://bim.rootiers.it" id="bim.rootiers">bim.rootiers.it</a></li>
</ul>
</nav>
<!-- replacing DIV with the new ARTICLE element -->
<article id="main" role="main">
[content here]
</article>
<!-- replacing DIV with the new FOOTER element -->
<footer id="footer" role="contentinfo">
<p>© 2015 MABdesign site</p>
</footer>
<script src="js/script.js"></script>
</body>
</html>
You can see the result by opening "MyTest.html" in your internet Browser

like in CSS, there are a few ways you can apply JavaScript to an HTML document. We’re going to talk about three ways:
- Inline JavaScript
- Embedded JavaScript
- External JavaScript
Inline JavaScript
like inline CSS, is when you attach JavaScript directly in the HTML. One of the most common applications of inline JavaScript is adding a click behavior to an element. “Click” is a JavaScript event that executes when a user clicks, and you can tie certain behaviors to it. Code example:
<nav id="nav" role="navigation">
<ul>
<li><a href="/about" id="about">About</a></li>
<li><a href="/articles">Articles</a></li>
<li><a href="/staff">Staff</a></li>
<li><a href="/contact">Contact</a></li>
<li><a href="http://bim.rootiers.it" onclick= " alert('stai per essere indirizzato al sito web bim.rootiers.it'); ">bim.rootiers.it</a></li>
</ul>
</nav>
In this example, when the user clicks “bim.rootiers.it” a JavaScript alert will pop up saying, “stai per essere indirizzato al sito web bim.rootiers.it” and then execute the normal link behavior of visiting the About page.
Embedded JavaScript
is JavaScript that is inside an HTML document, but contained within a <script> element and executed only on that page. In next code we are going to add an ID of "bim.rootiers" to the last anchor (the last link) in the navigation. This was done because it is valid HTML, still remains semantic, and now you can easily target that link without adding any JavaScript inline to the document. Code example:
<nav id="nav" role="navigation">
<ul>
<li><a href="/about" id="about">About</a></li>
<li><a href="/articles">Articles</a></li>
<li><a href="/staff">Staff</a></li>
<li><a href="/contact">Contact</a></li>
<li><a href="http://bim.rootiers.it" id="bim.rootiers">bim.rootiers.it</a></li>
</ul>
</nav>
<script>
/* The Function, define the thing you want to happen */
function doTheThing(){ alert('stai per essere indirizzato al sito web bim.rootiers.it'); }
/* The Variable, get the element you want to do it on */
var elem = document.getElementById("bim.rootiers");
/* The Event Listener, set up something to listen for the event you want, then execute the function */
elem.addEventListener("click", doTheThing, false);
</script>
when the user clicks “bim.rootiers.it” a JavaScript alert will pop up saying, “stai per essere indirizzato al sito web bim.rootiers.it”. IT's the same function before but in an embedded style
External JavaScript
Making a JavaScript file external isn’t that different from doing the same to a CSS file. The <script> element you learned about in the previous section has an available attribute called src (source), which allows you to pull an external JavaScript file into an HTML document and execute the containing functions. Code example:
<script src="js/script.js"></script>
</body>
</html>
Linking your JavaScript file at the bottom of the document rather than at the top will let you control the rendering of the page a little better. It can technically be linked from anywhere in the HTML document.
Contents of script.js
/* The Function, define the thing you want to happen */
function BimRootiers(){ alert('stai per essere indirizzato al sito web bim.rootiers.it'); }
/* The Variable, get the element you want to do it on */
var elem = document.getElementById("bim.rootiers");
/* The Event Listener, set up something to listen for the event you want, then execute the function */
elem.addEventListener("click", BimRootiers, false);
you can see that the contents of "script.js" are the same as the last code.
Gio, 12/02/2015 - 22:03