 Stefano Gilardi
Mer, 19/02/2025 - 16:24
L’area di progetto è situata nel quartiere di Torre Vecchia.
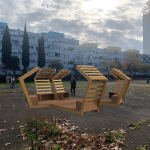
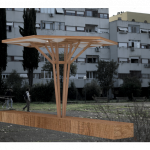
Il nostro progetto, intitolato “Isole d'Ombra”, è nato da un pensiero avuto durante il corso del primo sopralluogo, ci è stato segnalato lo stato di abbandono che provano i residenti di questo quartiere e la loro grande volontà di lavorare per rendere il loro quartiere migliore. Pensando a questa comunità che lavora, non solo per i singolo individuo, ma per tutti abbiamo subito pensato alle api nei loro alveari che lavorano insieme per il bene comune e della propria Casa.
"Come le api che collaborano per il benessere dell’alveare, anche gli abitanti di Torrevecchia si uniscono per costruire un quartiere più solidale e
accogliente affinchè nessuno venga lasciato indietro e ogni diritto sia preservato.
Uniti come le api nell’alveare rendiamo Torrevecchia un luogo dove la cooperazione e la soledarietà sono la vera forza della comunità."
Grazie a questa idea siamo riusciti a sviluppare delle strutture dalla copertura esagonale (la stessa forma delle cellette negli alveari);
Quando gli abitanti dei palazzi intorno al lotto si affaccieranno verso questo grande cortile vedranno questa serie di esagoni dall'alto,e rimembreranno fieri la loro identita' di comunita'.


 Elisa Esposito
Mer, 19/02/2025 - 10:45
L’area di progetto è situata nel quartiere di Torre Vecchia.
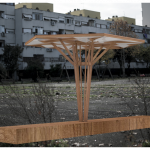
Il nostro progetto, intitolato “Isole d'Ombra”, è nato da un pensiero avuto durante il corso del primo sopralluogo, ci è stato segnalato lo stato di abbandono che provano i residenti di questo quartiere e la loro grande volontà di lavorare per rendere il loro quartiere migliore. Pensando a questa comunità che lavora, non solo per i singolo individuo, ma per tutti abbiamo subito pensato alle api nei loro alveari che lavorano insieme per il bene comune e della propria Casa.
"Come le api che collaborano per il benessere dell’alveare, anche gli abitanti di Torrevecchia si uniscono per costruire un quartiere più solidale e
accogliente affinchè nessuno venga lasciato indietro e ogni diritto sia preservato.
Uniti come le api nell’alveare rendiamo Torrevecchia un luogo dove la cooperazione e la soledarietà sono la vera forza della comunità."
Grazie a questa idea siamo riusciti a sviluppare delle strutture dalla copertura esagonale (la stessa forma delle cellette negli alveari);
Quando gli abitanti dei palazzi intorno al lotto si affaccieranno verso questo grande cortile vedranno questa serie di esagoni dall'alto,e rimembreranno fieri la loro identita' di comunita'.


 Elisa Esposito
Mar, 18/02/2025 - 19:55
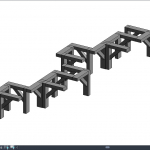
1) Creo una nuova famiglia selezionando Metric Curtain Wall Panel
 2) Inserisco una famiglia già creata allineandola come si vede nell'immagine.
 3) Carico le famiglie precedentemente create nella facebased

 4) Creo una composizione architettonica che fungerà da modulo con i diversi tipi di famiglia e salvo
 5) Apro un nuovo file progetto e creo un muro modificando griglia orizzontale e verticale
6) Seleziono la categoria "Curtain Wall" con edit type
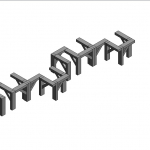
7) Inserisco la famiglia del modulo singolo e modifico le griglie per ottenere il risultato desiderato 8) copio e sposto l'oggetto fino ad ottenere la forma desiderata
 Stefano Gilardi
Mar, 18/02/2025 - 19:47
1) Creo una nuova famiglia e seleziono "Metric Curtain Wall Panel"
 2) Inserisco una famiglia già creata allineandola come si vede nell'immagine.
 3) Carico le famiglie precedentemente create nella facebased

 4) Creo una composizione architettonica che fungerà da modulo con i diversi tipi di famiglia e salvo
 5) Apro un nuovo file progetto e creo un muro modificando griglia orizzontale e verticale
6) Seleziono la categoria "Curtain Wall" con edit type
7) Inserisco la famiglia del modulo singolo e modifico le griglie per ottenere il risultato desiderato 8) copio e sposto l'oggetto fino ad ottenere la forma desiderata


