


 Giovanna Maria M.
Mar, 27/01/2015 - 19:08
Giovanna Maria M.
Mar, 27/01/2015 - 19:08
ANALISI E CONSIDERAZIONI
“SHoP Works” è un saggio che introduce lo sviluppo di una nuova società, come quella di SHoP, che pone la ricerca su un livello molto moderno ed interessante di come la professione, le competenze e soprattutto il modo di fare l’architettura stanno cambiando molto rapidamente. Il fattore importante che lo studio SHoP mette in primo piano è avviare un processo come mezzo di conoscenza del progetto, oltre il fatto che l’elemento parametrico non deve essere solo pensato in carta ma si deve sapere come andrà costruttivo o assemblato realmente.
Questo libro, scritto dal Prof. S. Converso, analizza lo studio SHoP soprattutto per la specifica evoluzione e le relative ricerche di ogni singolo progetto da sviluppare; attraverso questi elementi si può comprendere qual è stato il motivo rilevante di questi architetti, cioè quello di sperimentare una logica digitale di progettazione e di esecuzione. Come riportato nel libro “Rappresentazione : Modellazione = Modellazione : VERSIONING” – questa proporzione ci conduce in un percorso diverso dai soliti software vettoriali che rappresentano le immagini solo su pixel, adesso dobbiamo iniziare ad intraprendere un nuovo tipo di geometria di ricombinazione che ci permetterà risultati vettoriali, immediati e chiari, che possano essere “adattati in corso d’opera”.
Questa concezione si sintetizza con un'unica parola “sartorializzazione” cioè la produzione di un materiale che viene tagliato, lavorato e poi sagomato su misura secondo forme differenti che dipendono dal progetto. Questa sarà la punta di diamante dei progetti SHoP, sia per facilitare il processo automatico dei componenti, sia per ottenere una progettazione accurata dei sistemi di assemblaggio.
Ritengo doveroso notare l’importanza del secondo capitolo “Il digitale da SHoP Architects”; esso pone l’attenzione ai diversi software che la società utilizza, capaci di realizzare i progetti, a creare modellazione di vario tipo, a interagire con i costruttori e con gli stessi operai.
La società si concentra a rafforzare il valore dei componenti e di interagire con chi collabora con i diversi processi edilizi. Un fattore predominante che ha caratterizzato il corso di “BIM - Tecniche Parametriche di Progettazione”, ripreso molto bene nei lavori svolti da SHoP, è la presenza ininterrotta della ricerca figurativa che ci ha condotto, come per i componenti di ShoP Architects, a concentrarci sul tema delle VARIAZIONI e delle MODIFICHE DEI COMPONENTI, il tutto sviluppato in campo digitale.
Ciò viene tradotto con il termine“Parametrizzazione” degli elementi che ci consente di controllare tutte le fasi di progetto con un’alta precisione, dando vita a molte soluzioni diverse fra loro riguardanti il tipo di funzione (non STANDARD), di dimensione, di materiale o di qualsiasi altra caratteristica variabile, sempre con costi contenuti.
Quindi, la società SHoP cerca di esplorare e migliorare l’architettura attraverso le nuove tecnologie che possano essere esportate nella sfera del costruito, cercando di ottenere una produzione che permetta di raggiungere una grande capacità del controllo e della precisione di ogni singolo elemento realizzato con ulteriore verifica di assemblaggio.
Per concludere, questo saggio può essere visto come la guida per seguire una corretta progettazione, cercando di sviluppare concetti non standard e quindi parametrizzarli, così da renderli applicabili in diversi progetti e costruzioni digitali.
Bibliografia:
- S. Converso, SHoP Works - Collaborazioni costruttive in Digitale, 2008
Giovanna Maria Marino
Mar, 27/01/2015 - 19:49
 Mabel Sorrentino
Mar, 27/01/2015 - 17:52
Mabel Sorrentino
Mar, 27/01/2015 - 17:52
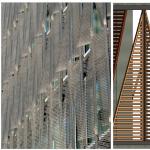
The inspiration for the shading system used for the floor 3A of the Ligini’s tower comes from a JSWD Architekten project for the Thyssenkrupp Quarter in Essen. The main feature that impressed me was the possibility of the facade to change according to the sun.
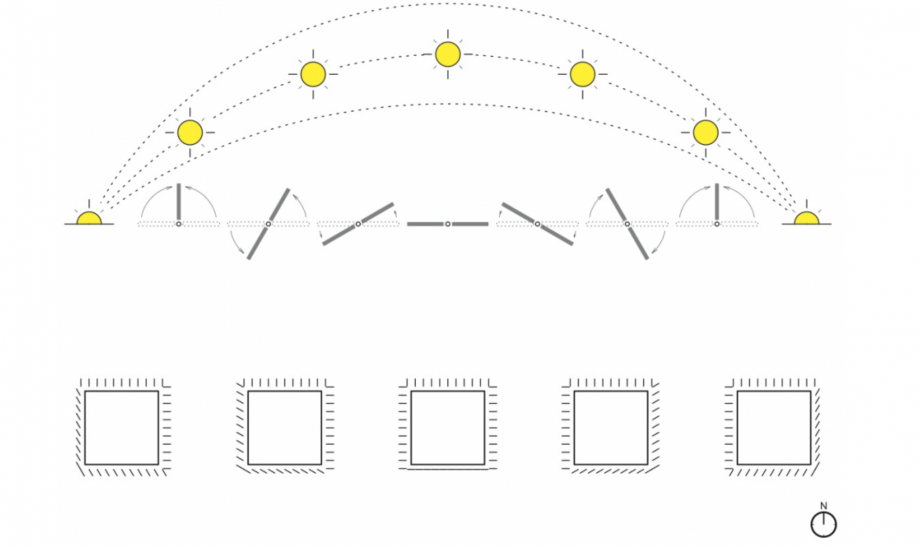 So, even if in that case this was an office building, I tought I could adapt this idea to my residential plan project for the Ligini’s tower.
In my mind the triangular shading panel should be moved across the rail and rotate around the mullions manually, so this could be suitable with the residential use better than an automatic system.
So, in order to show which the final effect was, I shaped several families. These families could be gathered into three main groups.
Each group is differentiated from the others for the material used for panel. Furthermore each group of panels consists of four families and each family represent the maximum or minimum rotation of the panel’s group.
In particular:
The first group of panels was the less darkening one. This group of panel is made of white oak wood and each panel of the group can rotate 90° from the closed position to the open position.

The second group is made of red oak wood, each panel can rotate 60° from the closed position to the open position. This group is the medium darkening one.

The third and last group is made of teak wood, the panels can rotate 45° and they are the most darkening type.

Then, in order to make it clear that the panels were movable, I shaped three different mullions which each panel was joined to.

To shape each panel and mullion I started from an extrusion. For the panels I drawn the holes and I assigned to each one a reference plane in order to control the gap with a parameter.


At last I shaped the main mullion which have to join to the main structure of the Ligini’s tower and that one every family of the shading system was connected to.

Then I loaded all the elements into the project and I obtained the final result.


P.S. I attached all the file .rfa for the shading system facade in the previous post
FIRST ATTEMPT_BUTTERFLIES FACADE_WORK IN PROGRESS_LIGINI'S TOWER
Mar, 27/01/2015 - 18:07
 StefanoConverso
Mar, 27/01/2015 - 15:53
StefanoConverso
Mar, 27/01/2015 - 15:53
cari ragazzi,
la lezione di Giovedì 29 Gennaio sarà dedicata alla revisione
dei vostri lavori. Potrete porre domande sulla modellazione e
sulla distribuzione e l'architettura della torre che ci va componendo.
Durante la lezione sarà presentato un ulteriore tutorial sul raffinamento
delle famiglie di arredo e componenti, con la divisione e la precisazione
di dettagli tra 3D e 2D, e la gestione della grafica e dei livelli di dettaglio.
Vi leggiamo con piacere online, e vi aspettiamo giovedì.
Buon lavoro,
S.C.
Mar, 27/01/2015 - 15:55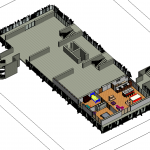 Mabel Sorrentino
Mar, 27/01/2015 - 13:58
Mabel Sorrentino
Mar, 27/01/2015 - 13:58
In this post I’ll try to explain how I faced the residential project for the Ligini’s tower.
I was assigned to the third floor of the Ligini’s tower A.
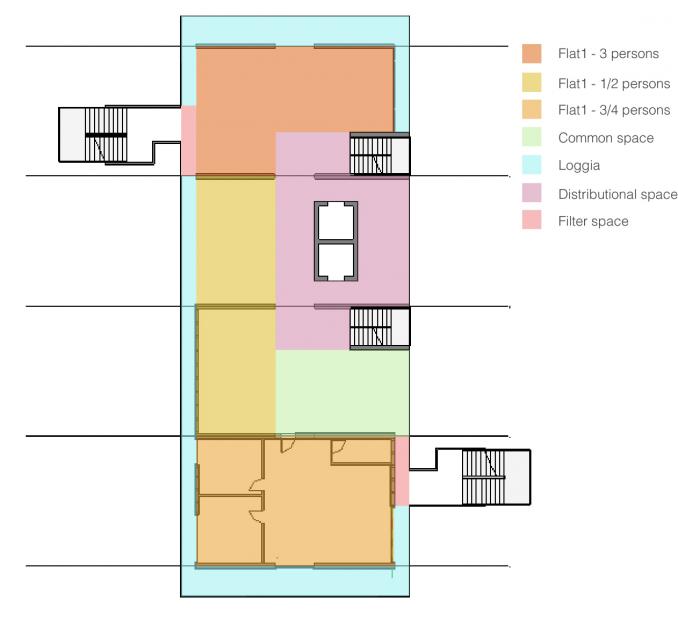
The main issue for me was to divide the floor in order to obtain apartments suitable for the real estate market. So the apartments I tried to obtained are not too big and not too small.
There are three main flat typologies. One flat, the bigger one, is about 110 square meters big, and is designed for 3/4 persons. The second flat typology is the medium one, about 88 square meters big, for 3 persons. The last one is the smaller and it is about 44 square meters, for 1/2 persons.
The existing structure suggests from the beginning the presence of a loggia that runs around the floor and offers to each one of the apartments an open air space where staying in.
Furthermore, there is a distributional space near the main stairs and the lifts. Beside this space there is a common space usable by all the lodgers.
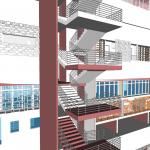
The design reckon with the emergency stairs on the two bigger sides of the rectangular plan.
In fact, two filter spaces were thought to divide the loggia from the space in front of the emergency stairs in order to isolate these stairs from the flat’s space.

The first completed flat was the bigger one with the main side, south exposed and with the other two side, east and west exposed. In fact it is for this reason that the glazing surfaces are designed in order to offer the right balance between the light and the heat inside. Moreover, the loggia’s boundary is provided with a shading system to contain the sun radiation trough the windows. (in the following post I’ll explain how was the workflow to create the family component for the shading system).
Furthermore, the design of the flat tries to use wood prefabricated component provided with insulating panels. (In the following post I’ll explain the workflow to create this curtain walls).
At last I created a family component in order to create several types useful for furnish the flat. So I used these families for the kitchen, the living room and the dining room, the bathroom and the wardrobes in the bedroom. As I said before in the following post I explain how I created these families.
Mar, 27/01/2015 - 14:03 MARIA IURESCIA
Mar, 27/01/2015 - 09:53
MARIA IURESCIA
Mar, 27/01/2015 - 09:53
Salve,
scusate la mia domanda un pò banale... non riesco ad inserire gli arredi su revit, o meglio: per le porte e le finestre riesco e me ne sono create anche di mie personalizzate. Per l'arredo interno invece su revit è come se non avessi nulla, non ho una libreria revit sul pc a cui far riferimento. Sto cercando su internet su diversi siti che offrono materiale per la progettazione bim ma spesso sono modelli in dwg.
C'è forse un modo più "veloce" per selezionare l'arredo direttamente dal "mio" revit, così come faccio per la porta per esempio..?
Grazie!