


 BONANNO_CARLETTI
Dom, 29/03/2015 - 18:09
BONANNO_CARLETTI
Dom, 29/03/2015 - 18:09
1) Start Autodesk"Vasari Beta 3
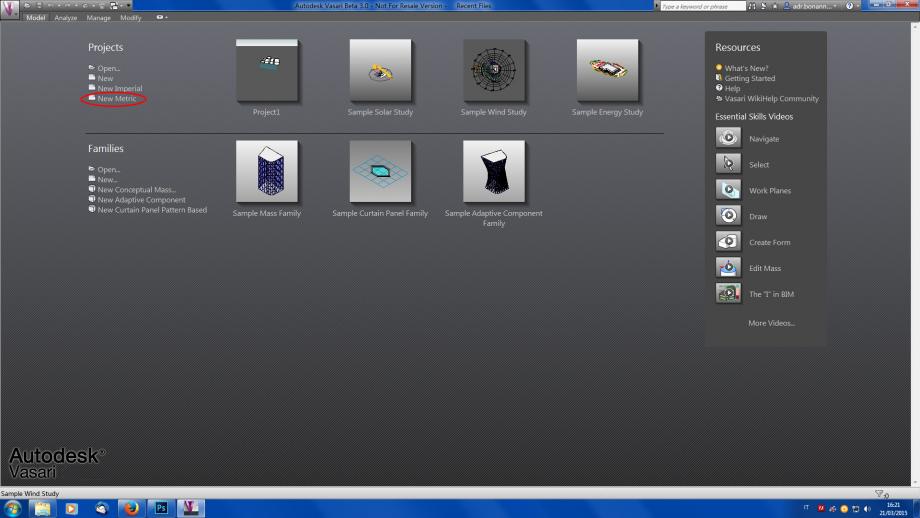
2)On the program introduction page select "New Metric"
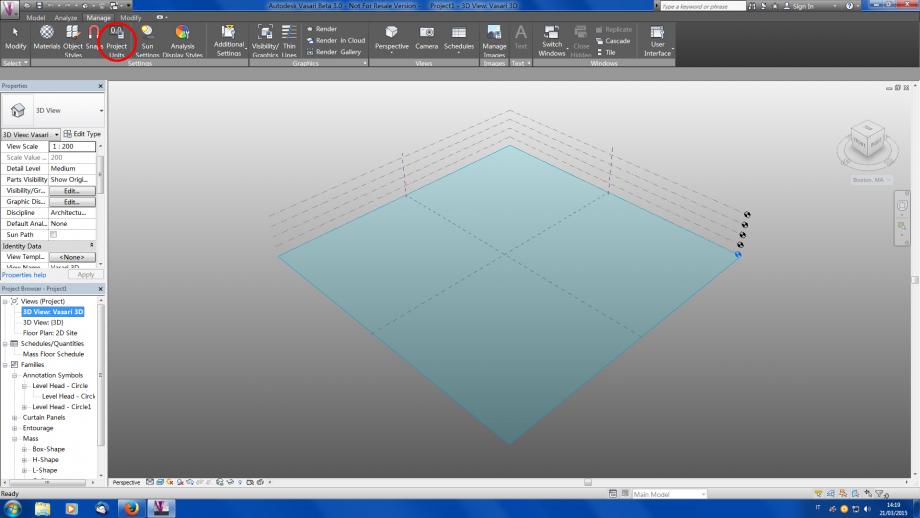
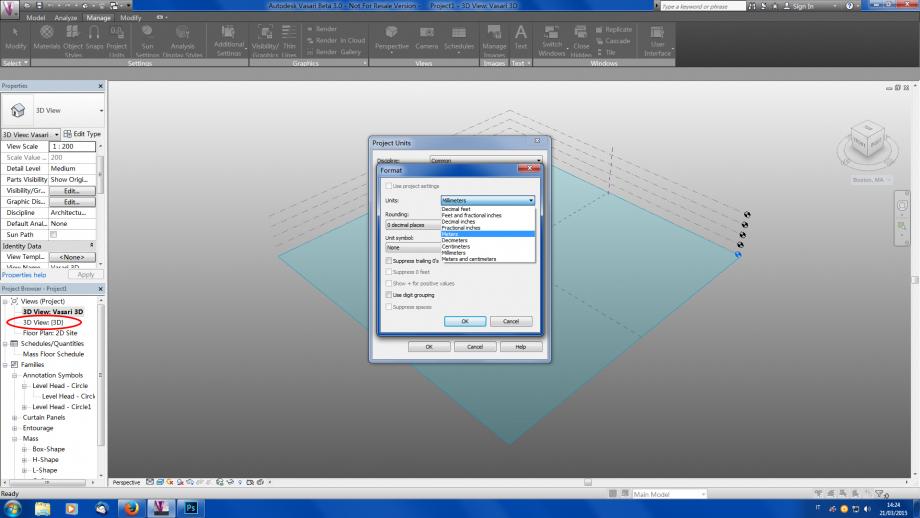
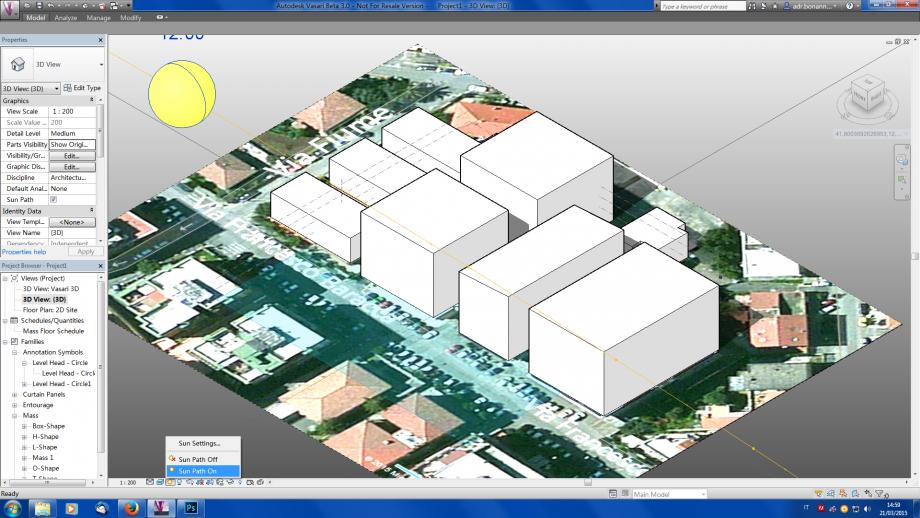
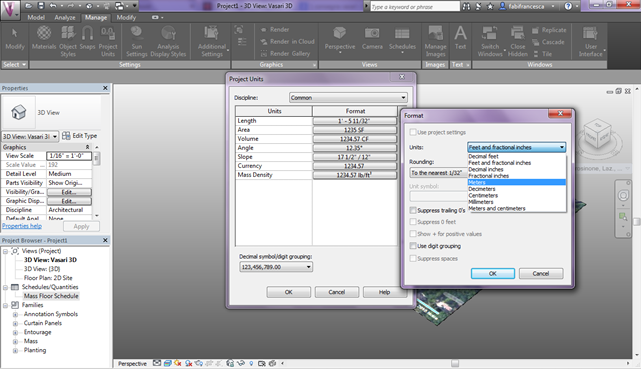
3)Now you can work on the project space,but first set the units of rappresentation in meters (Vasari set by default the millimetric units): Manage>Project Units>Format.And also set "3D View 3D" on the left of the screen.
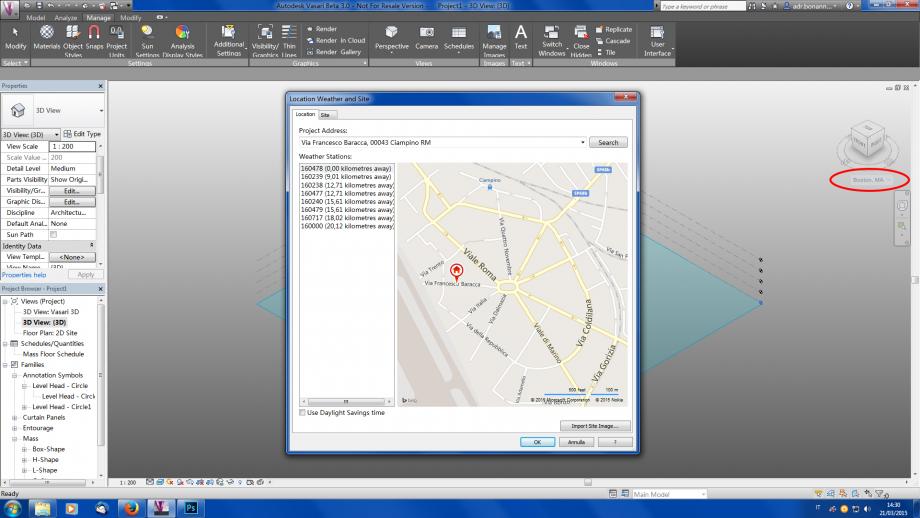
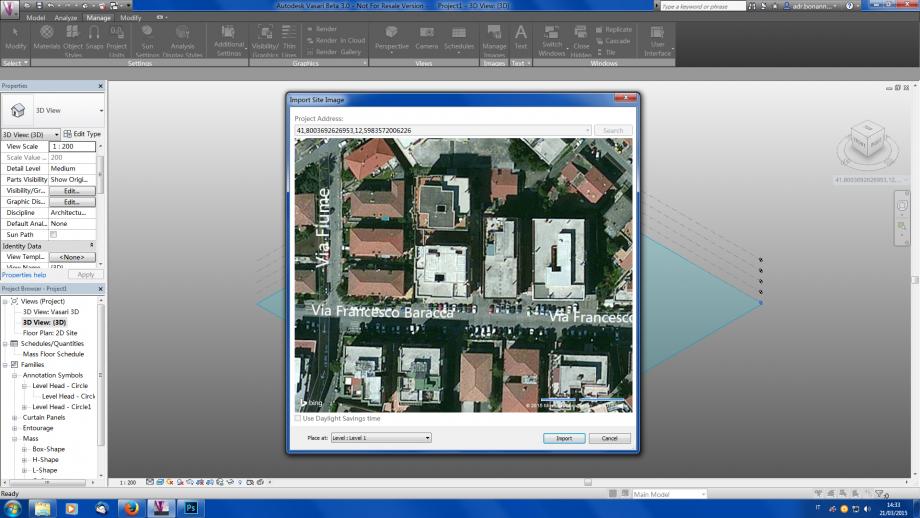
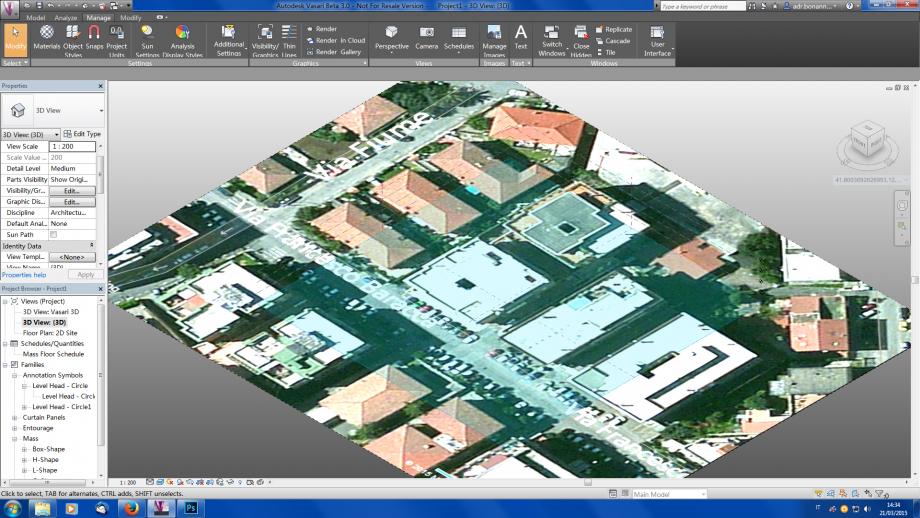
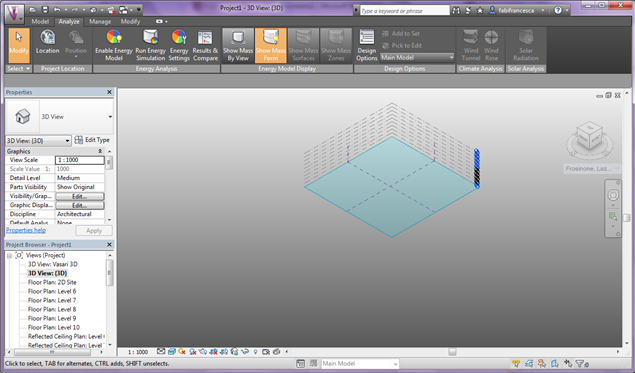
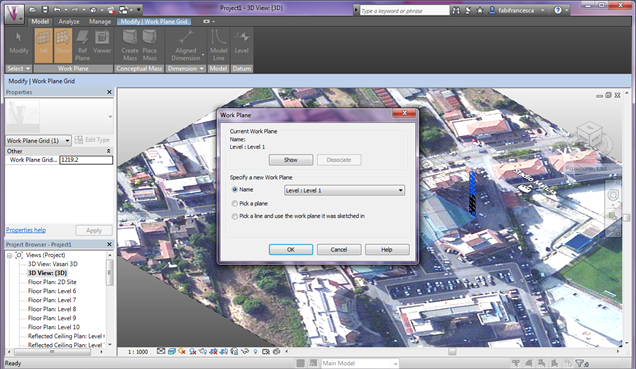
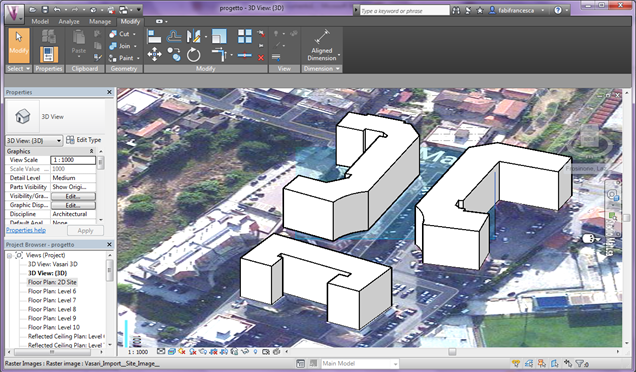
4) Now select the location of your project ("Vasari"set the location in Boston by default):you have to click unther the "orientation cube" on the right of the screen and after on "Set Location",now insert the location that you need,click on "Import site image" and after "import"
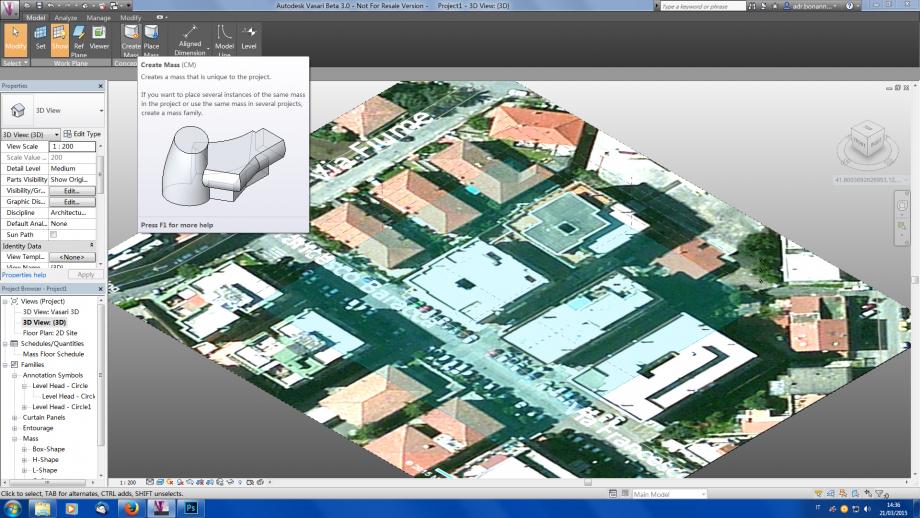
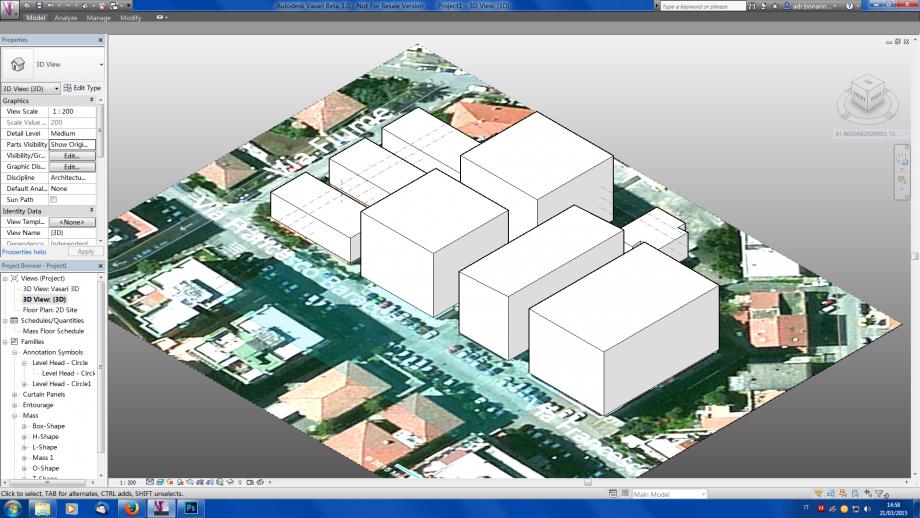
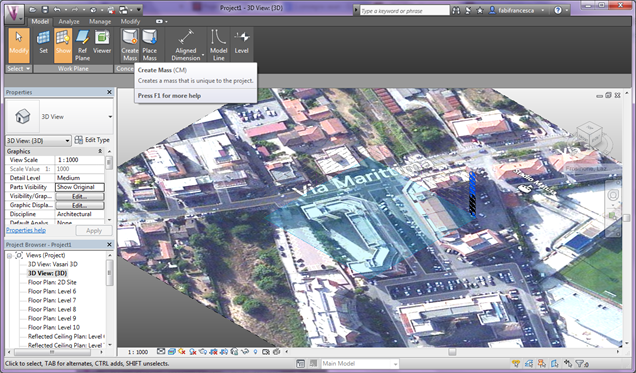
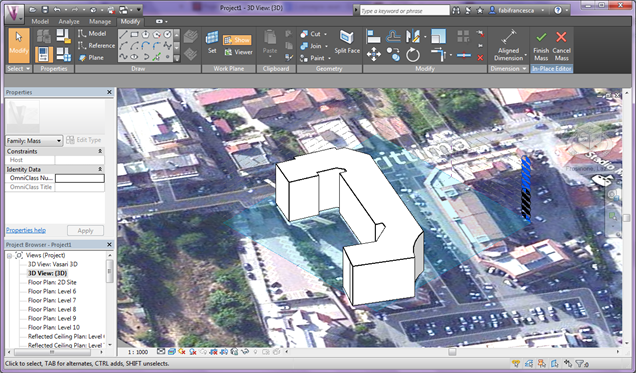
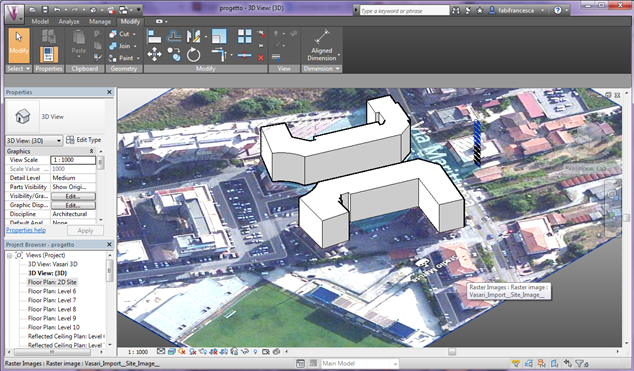
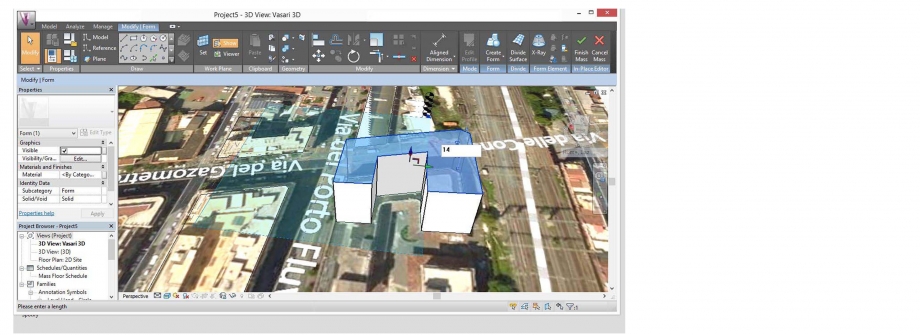
5) Click on Model>Create Mass>Line and draw the contours of the buildings after that exit the command line and select the contours of the building and drag the "z axis" to create the height of the building (you can modify this option by clicking on the mesaurement that appears after the extrusion)
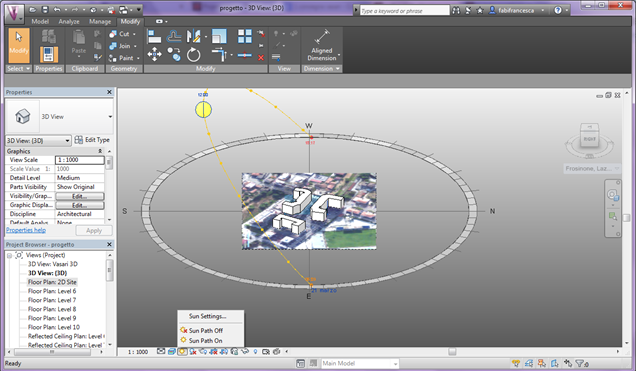
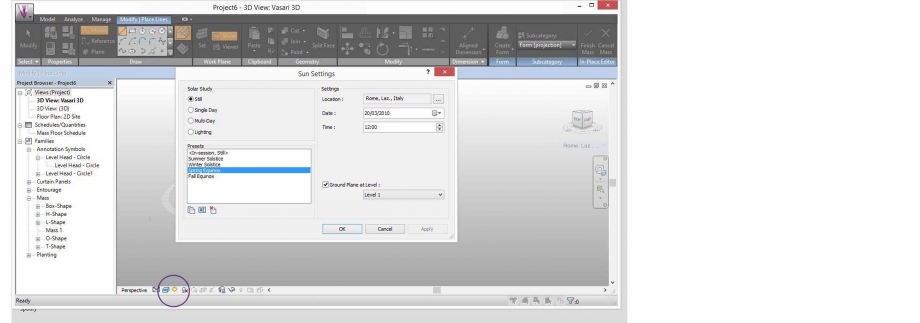
6)Now you have to set the sun and the shadows:click on "Sun Path On" on the bottom of the screen to activate the sunshine and on "Shadows On" to activate the shading
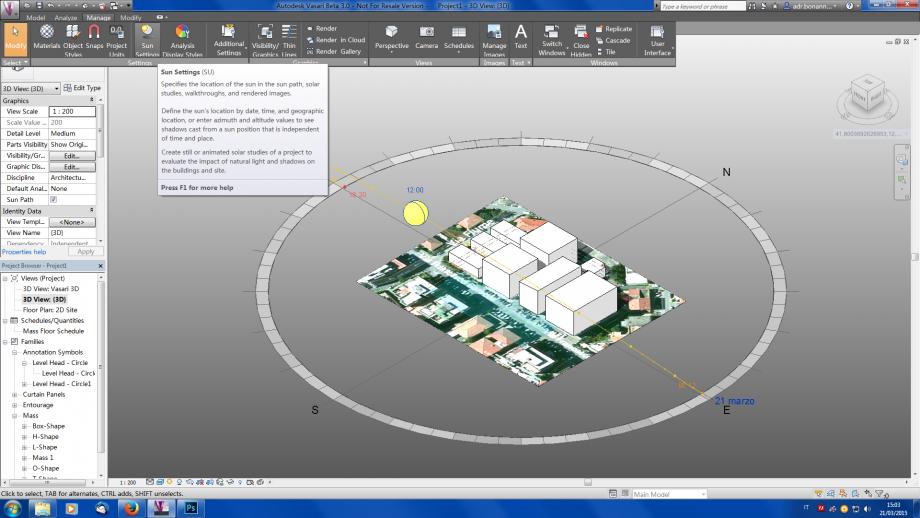
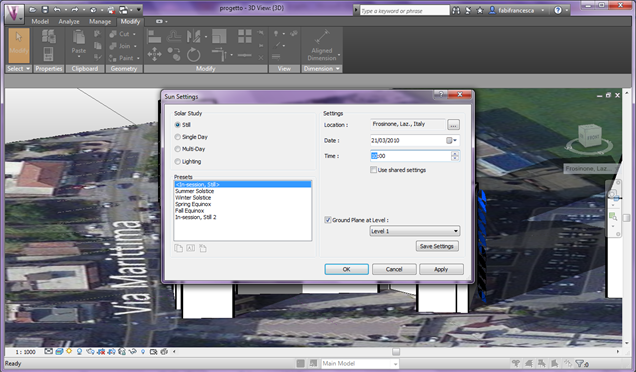
7) Go to Manage>Sun Setting to set date and time you need
8) To take pictures of the area that you've create click on Manage>Camera and set the point of view where you need (you have to activate the "Sun Path" and "Shadows On" every time you fix the camera)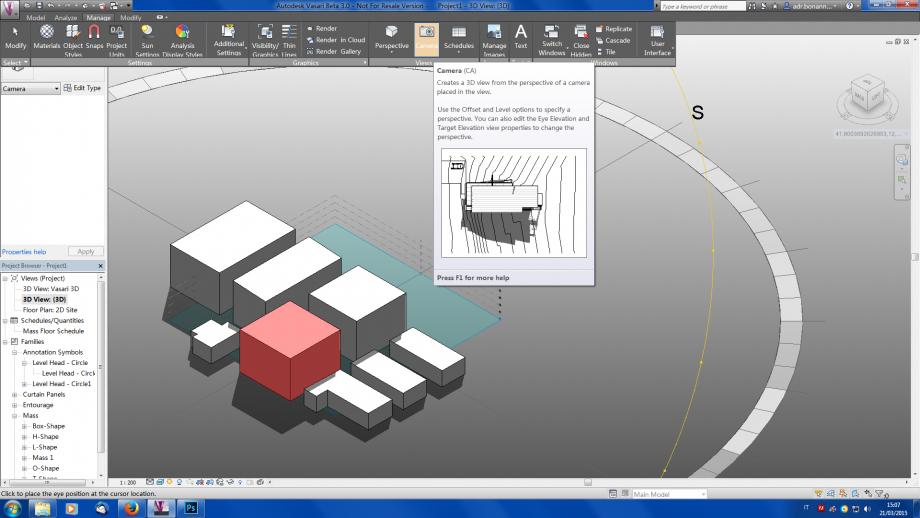
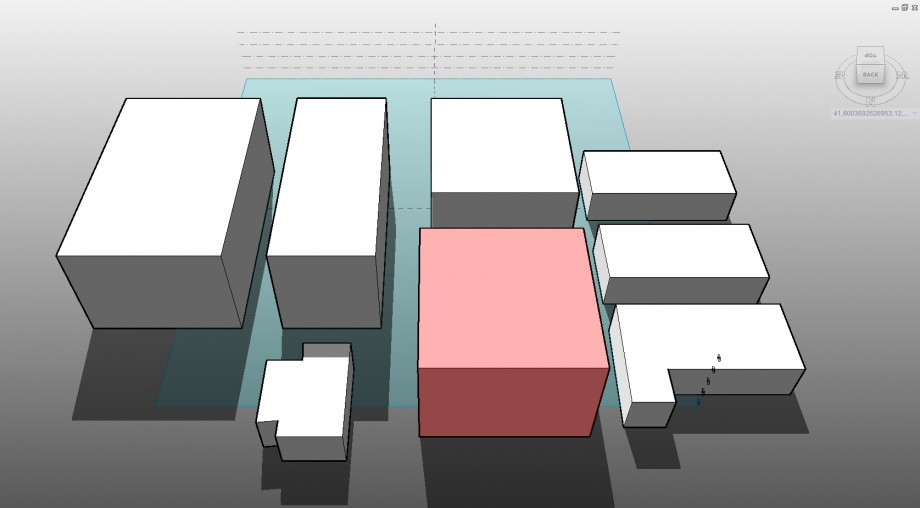
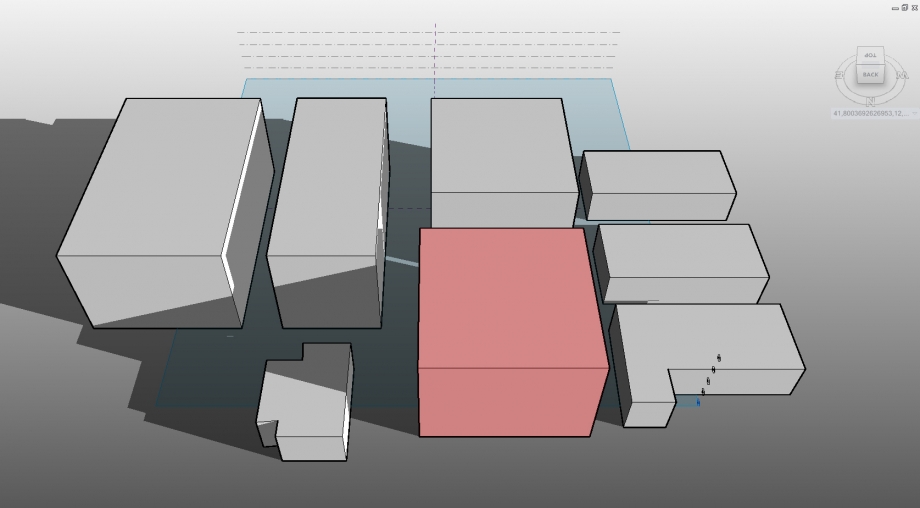
Now we can start with some considerations about the area and the shading that we can observe here.
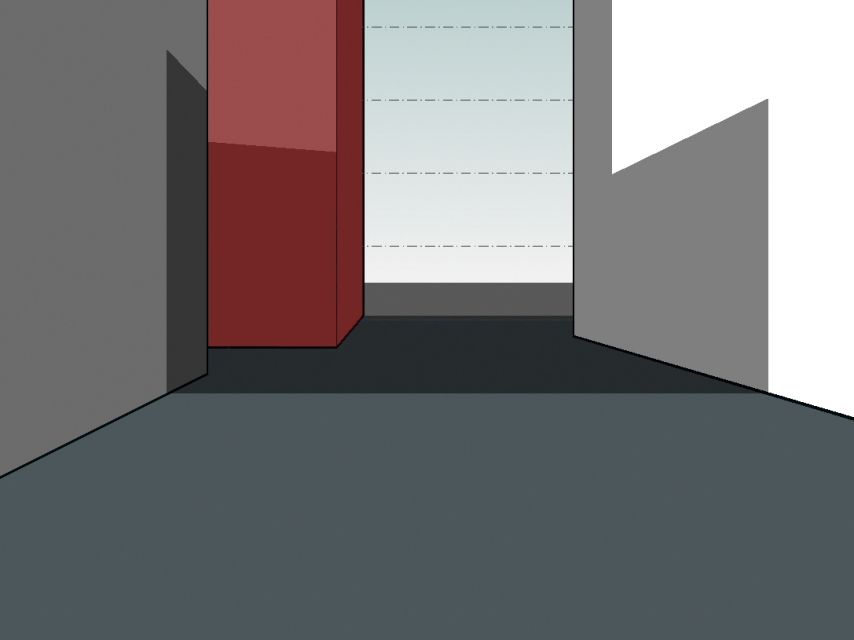
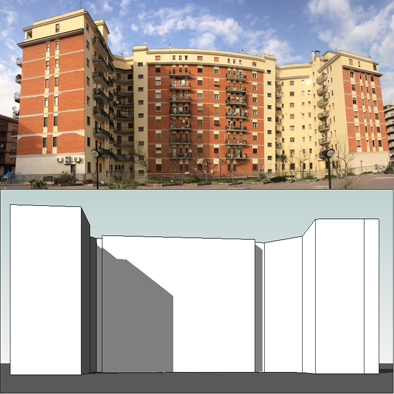
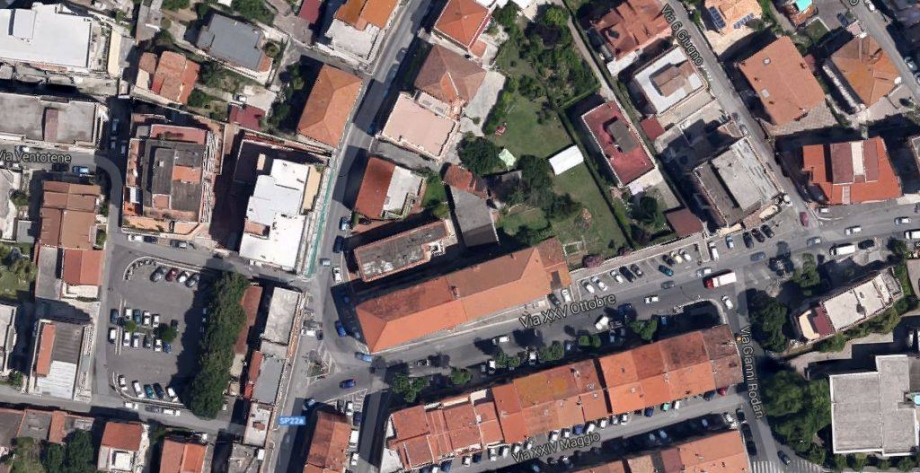
The area is set on Via Francesco Baracca (Ciampino,RM Italy)the area is really close to the airport and was built in the 80's near the center of the town,it's characterized by the prevalence of buildings with 3/4 plans with a commercial basament plan,like almost in all the town,but we've also the presence of some small row house near the end of the road.
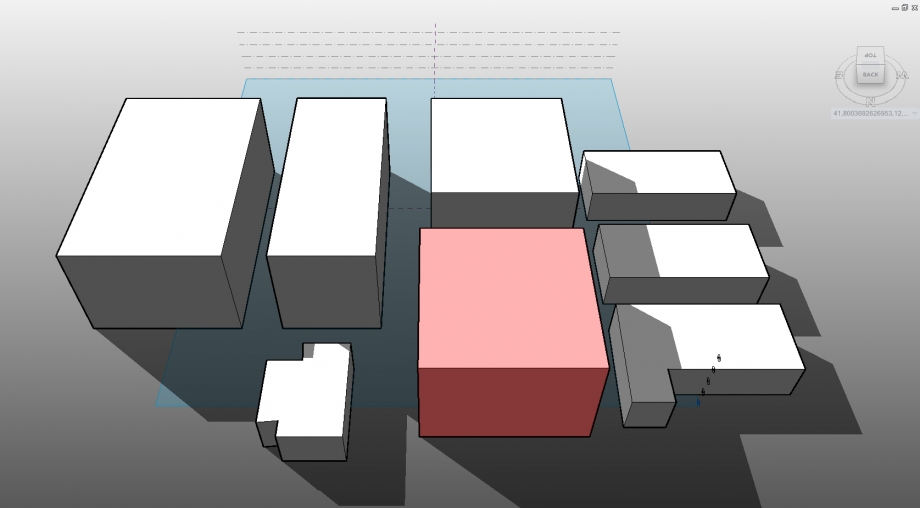
This situation matched with the closeness of the taller building create a particular situation of shading in the different part of the day.
(The red building is the one that we analyze because of his position).

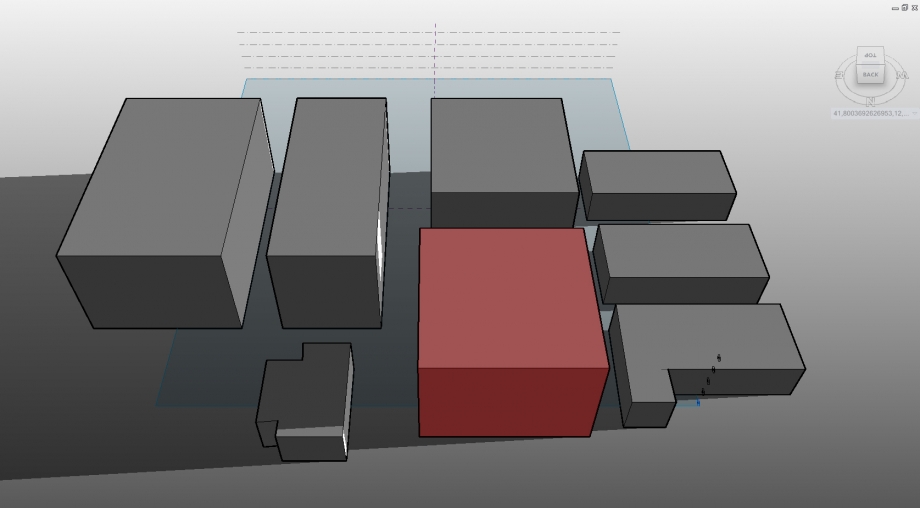
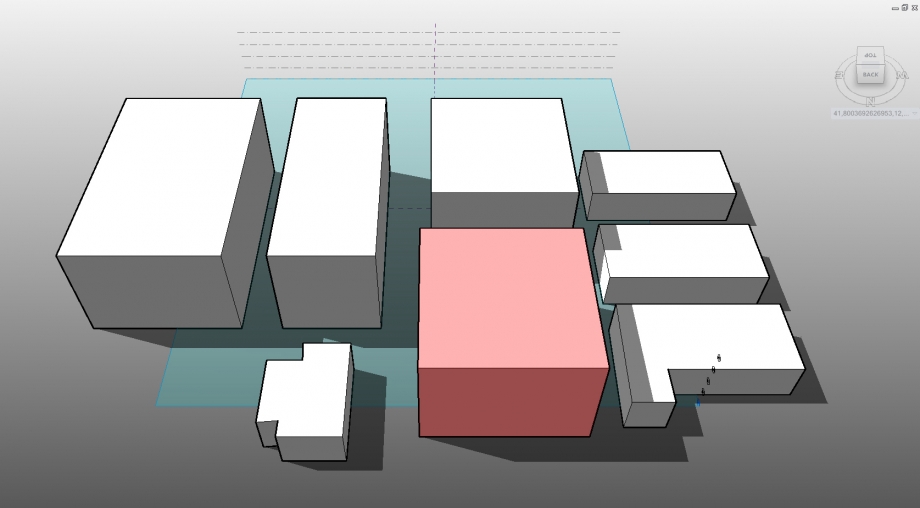
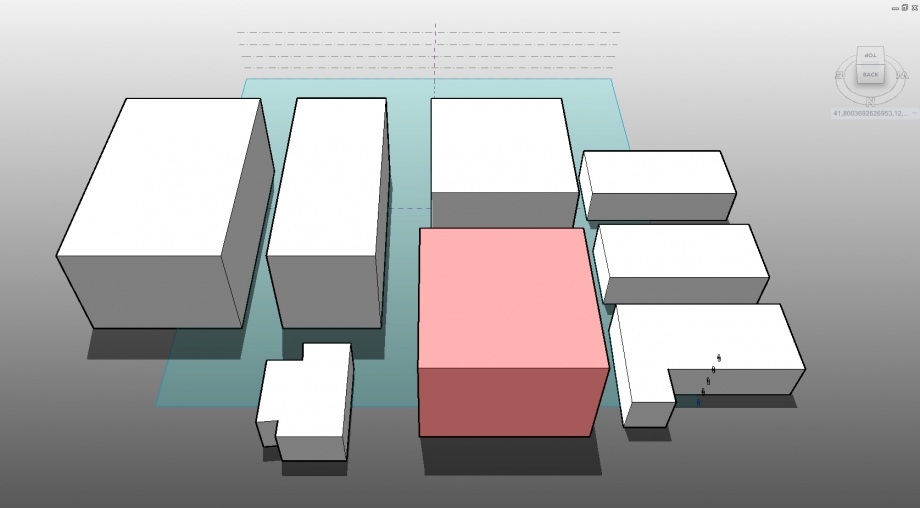
First of all we can analyze an simulate the impact of sunshine in the area during 2 important moment of the year: on the spring equinoxes and on the summer solstice and winter solstice we analize three different hours of the day: 9:30,12:00,18:00
-Equinoxes 9:30
-Equinoxes 12:00
-Equinoxes 18:00
-Summer Solstice 9:30
-Summer Solstice 12:00
-Summer Solstice 18:00
-Winter Solstice 9:30
-Winter Solstice 12:00
-Winter Solstice 18:00
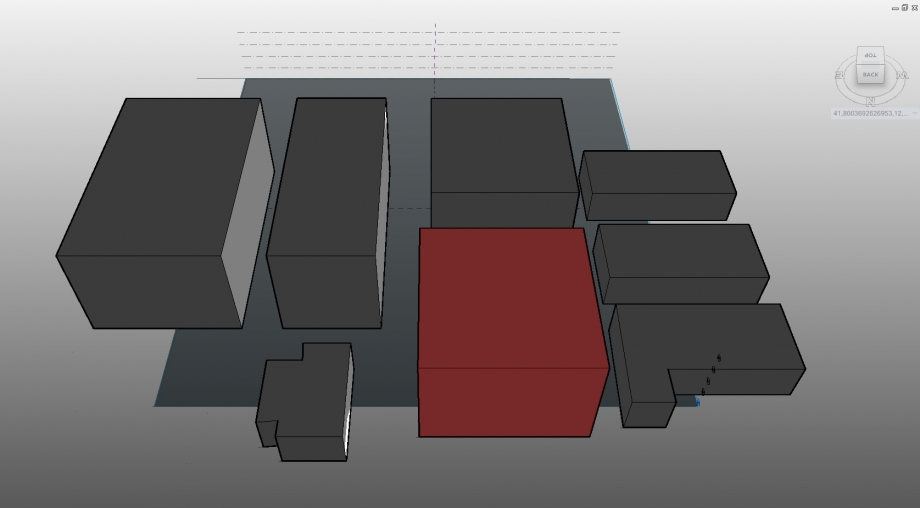
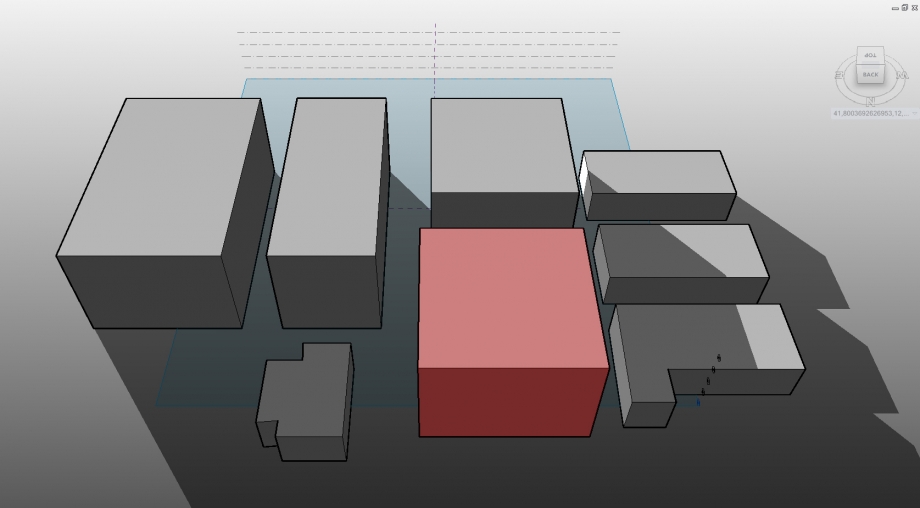
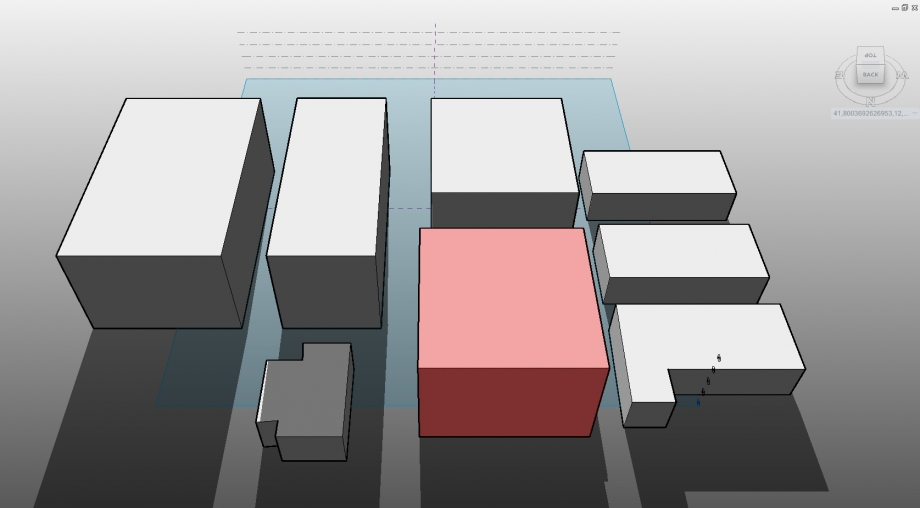
By the observation of this four moment of the year (we can consider only three because the shadow and the sun path for the spring and fall equinoxes are the same) we can say that both in summer soltice and equinoxes we've at 9:30 a deep shading that reverberates on the lower buildings but the deepest shading is visible on the equinox,in this moment in fact we can observe that all the area is overshadowed by the shadow that buildings create to each other.At 12:00 the north facathes're shaded,but,while during the summer soltices the shading is not very marked and the the taller buildings didn't create a consistent shading on the smaller edifices contrariwise on the equinoxes all the buildings in the area create a bigger shadow that is reflected on close edifices.At 18:00 it's important to notice that while on the equinox the shade is lower and is reflected on the left part of the area with a partial obscuring of the lower edifices but with an almost total overshading of the eastern facades otherwise on the solstice the shading falls on the opposite part (west) and cover in part the small edifices on the right but a notable thing is that,like on the equinox the eastern facades and also on the nord one are overshaded by their own shadows.The winter solstice is contrarwise really different because the position of the sun that's lower,this situation create a deeper shadind on the area,at 9:30 we can see a compact and long shade made by the taller building over each other and also over the lower edifices on the right,at 14 we can see a sunshine of the south facade of all the edifices on the area,contrarwise at 18:00 we've the deeper shading of the day,all the area is shading and we haven't sunshine at all.
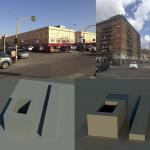
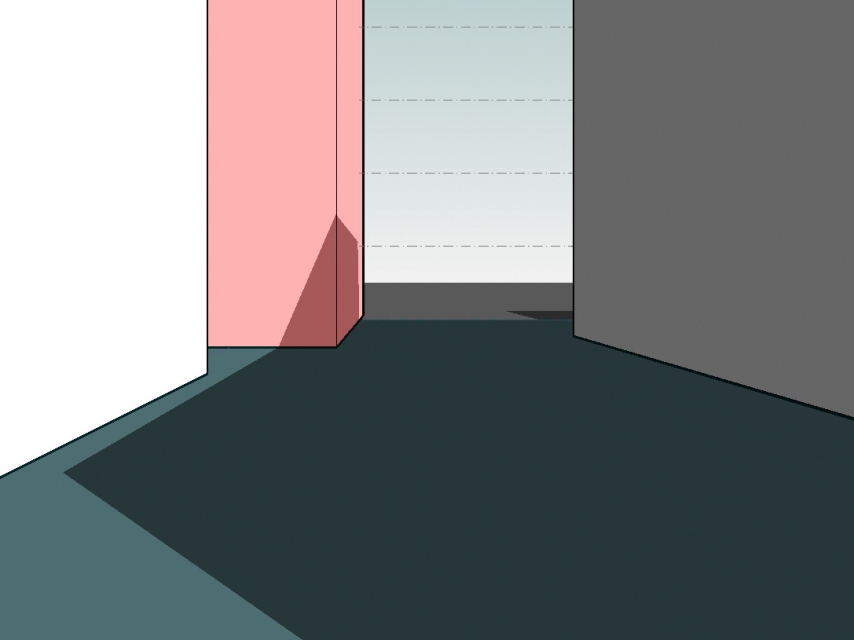
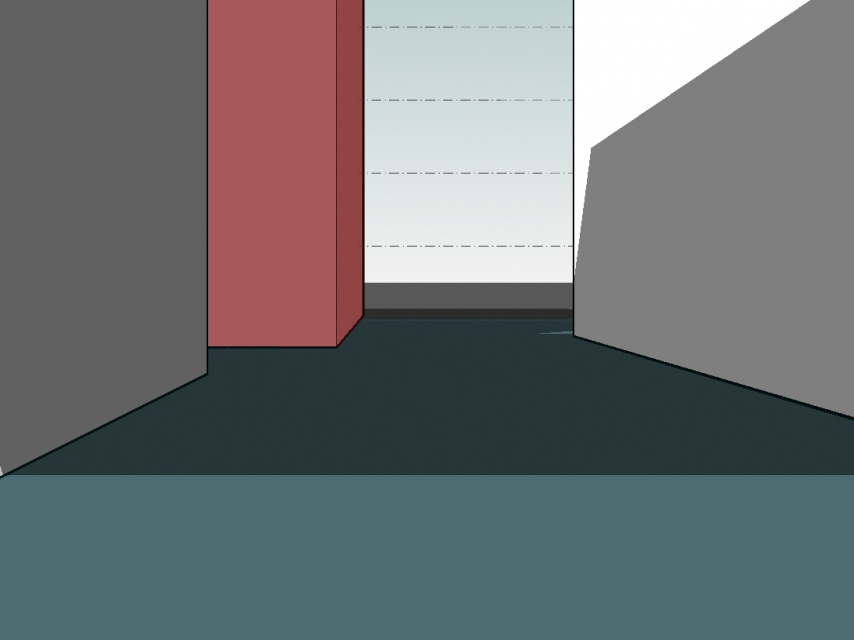
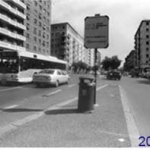
We've also observed the area in detail,and in particular the access road to the red building in three different point of vew of the camera (west-east,east-west,south-north)during the day of 03/21/2015 and in three different phases of the day (11:00,14:00,18:00)

1) Orientation West-East 11:00
2) Orientation West-East 14:00
3) Orientation West-East 18:00
By the observation of this point of view we may say that: first of all the access road close to the red building is always shadowed,the red building is stricken by the sun only on the first hours of the day,for the rest of the daylight hours it's overshaded by a drop shadow made by the others building close to it and by its own shadow.It's possible to see a similar effect on the edifice ahead (on the left of the pictures).
4) Orientation East-West 11:00
5) Orientation East-West 14:00
6) Orientation East-West 18:00
By the observation of this point of view we may say that the access road close to the red building is always shadowed like on the other view,the red building is stricken by the sun by the morning until the first hours of the afternoon( at 14:00 we've a partial radiation of the sun on the top of the edifices),after the 14:00 all the area is deep shadowed on the bottom,we've only a pale radiation on the top of the red building
7) Orientation South-North 11:00
8) Orientation South-North 14:00
9) Orientation South-North 18:00
This prospective give us a more complete view of the area,in fact, we can observe that the building shade each other in the different moment of the day but the more penalized building is the one that is ahead of the red one,in fact that one is shaded on his western front for all the afternoon and evening,but this front is caracterized by the presence of balconies and windows,this thing suggest us that in the projectual phase the architects haven't given enough attention to the rapport between the buildings and the solar path,that create an ineffective sunshine situation in some part of the area
Sab, 21/03/2015 - 18:15L’area da me analizzata si trova a Frosinone in Via Marittima. Si tratta di una zona residenziale, dove possiamo trovare in prevalenza edifici in linea. L’edificio che andrò ad analizzare è costituito da 9 piani di altezza.
Andreamo ad analizzare il comportamento dell’edificio in diverse ore della stessa giornata, attraverso un’analisi delle ombre che verrano a crearsi sull’edificio stesso.
Prima di iniziare a creare il modello ho cambiato le unità di misura:
MANAGE à PROJECT UNITS.
Ho poi selezionato FORMAT e dal menù a tendina e ho selezionato METERS
Successivamente dalla finestra MODEL , tramite il pulsante LEVEL ho voluto realizzare un livello per ogni piano del mio edificio. Il programma di default ne ha impostati 5; quindi ne ho aggiunti altri 5, distanziati di 3 metri, per ottenere i 9 piani dell’edificio in esame.
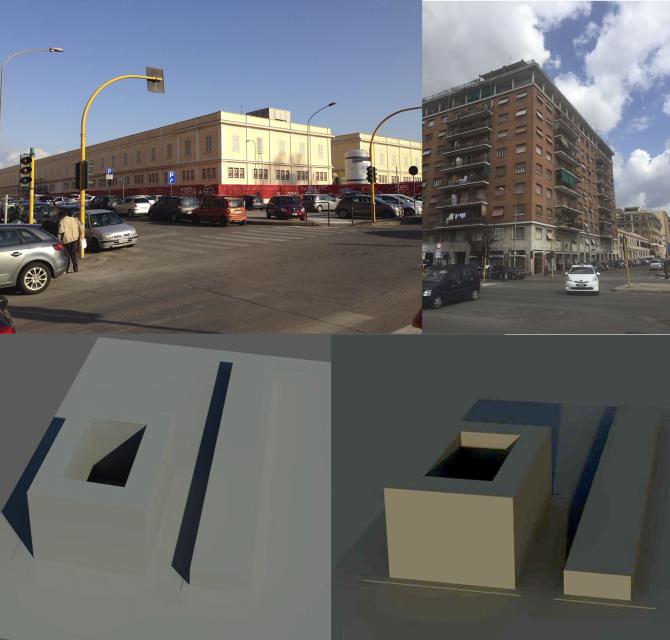
Succesivamente ho importato l’immagine satellitare dell’area da me analizzata premendo dal menù in alto, nella finestra ANALYZE, il comando LOCATION. Ho inserito l’indirizzo nella barra e premuto SEARCH. Una volta individuata l’area del mio edificio ho importato l’immagine.

Impostiamo il primo livello come piano di lavoro per poter procedere al disegno della pianta dell’edificio. Dalla finestra MODIFY, WORK PLANE ho selezionato Level 1
Procediamo ora a creare il volume degli edifici interessati. Dalla finestra MODEL, selezioniamo CREATE MASS
Il programma aprirà automaticamente una finestra di comandi di modellazione. Utilizzando il comando LINE andiamo a contornare sull’immagine satellitare, gli edifici dei quali vogliamo realizzare il modello 3D. Una volta individuato il perimetro dell’intero edificio selezioniamo il comando FINISH MASS in alto a destra.

Ora procediamo alla creazione del modello 3D del nostro edificio. Clicchiamo all’interno della linea chiusa che rappresenta la pianta dell’edificio e compariranno due frecce per l’estrusione dello stesso. Trascinando la freccia verso l’alto estrudiamo la nostra forma (edificio). Indichiamo nella casella che compare vicino alla quota il valore dell’altezza del nostro edificio premendo invio.
Ripetiamo lo stesso procedimento per la realizzazione degli altri edifici adiacenti che vogliamo inserire nel nostro modello di studio.
Per effettuare l’analisi si utilizza il comando SUN PATH ON e successivamente SUN SETTINGS dove si possono inserire l’orario e la data per i quali vogliamo studiare gli ombreggiamenti.
Impostiamo lo stesso orario in cui è state scattate le fotografie, ovvero alle 10:00 e alle 16:00.
Vedremo così generare le simulazioni di ombreggiatura sul modello 3D che andremo a confrontare con le fotografie scattate nelle medesime condizioni.
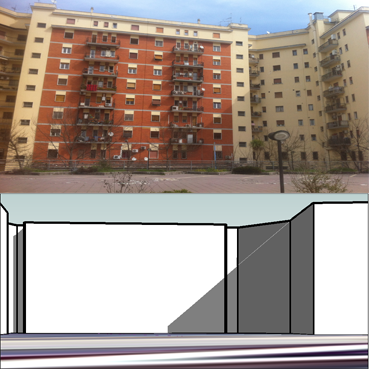
ORE 10:00 ORE 16:00
Si nota come la simulazione corrisponda alla realtà, in quanto le ombre risultano simili in entrambe le condizioni di luce.
Grazie a questa analisi si può notare come le zone di ombra e di luce colpiscano in maniera diversa l'edificio, in base alla geometria dell'edificio stesso e al suo orientamento.
Questo deve condizionare le scelte distributive e tecniche nella fase progettuale dell'edificio.
Sab, 21/03/2015 - 18:06
 BARBARA PARIS
Sab, 21/03/2015 - 17:02
BARBARA PARIS
Sab, 21/03/2015 - 17:02
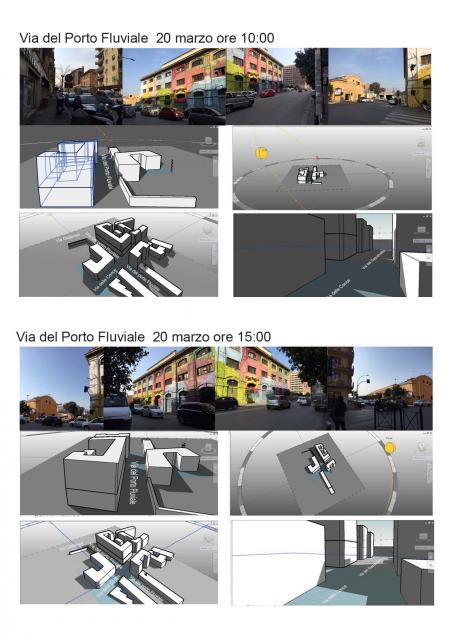
In merito all'analisi delle ombre fatta sugli edifici modellati con il software Vasari, occorre fare alcune considerazioni relative al contesto. Gli edifici sono infatti situati nel Q. X ovvero nel quartiere Ostiense e precisamente lungo Via del Porto Fluviale, Via del Gazometro e Via Ostiense. Come noto si tratta di un quartiere che ha subìto diversi sviluppi nel corso del tempo a partire dagli anni '10, anni in cui questo quartiere è nato a seguito delle decisioni prese dal Piano regolatore di Ernesto Nathan. Il quartiere infatti in questi anni vede il nascere di numerose importanti strutture quali il Gazometro, la centrale elettrica Montemartini, i Mercati e i Magazzini Generali e il Ponte Ferroviario. Questi interventi hanno fatto in modo che venisse per lungo tempo considerata area industriale e periferica adibita alla produzione del settore secondario. Questo ha contribuito a rendere necessaria l'edificazione di molti edifici nelle immediate vicinanze nell'arco di 30 anni da destinare ad un ceto basso, di operai attraverso lo sviluppo di tipologie edilizie ad alta intensità. Oggi infatti è ancora possibile notare appunto come il quartiere sia caratterizzato da palazzi che il più delle volte superano i 6 o 7 piani , situati a distanze gli uni dagli altri poco superiori ai 15 metri. Questo inevitabilmente genera delle grandi zone di ombra durante quasi tutto l'arco del giorno. Questa zona tuttavia attualmente, in seguito al ripristino delle struttura che ospita Eataly ed in seguito ad alcune iniziative che prevedono la realizzazione dela città dei Giovani all'interno degli Ex Mercati Generali e del Campidoglio 2 , è stata riconsiderata e rivalutata dal punto di vista commerciale e sociale, infatti gode ogni giorno di una grande affluenza di persone che frequentano i diversi locali e ristoranti aperti proprio lungo le strade prese in analisi. Va però detto che la natura degli edifici non sempre si presta a tale scopo, infatti nessuno dei locali e ristoranti presenti ha la possibilità di sfruttare gli spazi all'esterno. Difatti sono da ritenere poco adeguati a tale scopo a causa del poco spazio sul fronte stradale, e a causa della costante ombra generata dai palazzi e dell'eccessivo traffico che rende l'aria poco salubre e fortemente inquinata dal punto di vista acustico.
Tutorial Vasari
Impostazioni inziali e creazione di un volume
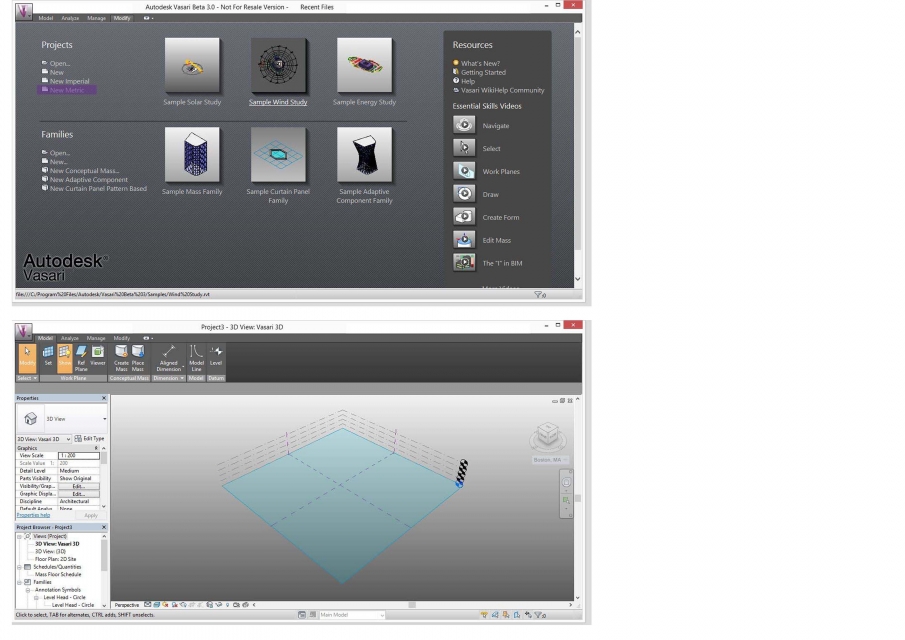 1. Aprire il software Vasari e selezionare all'interno dall'elenco Projects la voce New Metrics come evidenziato per iniziare un nuovo lavoro. Si aprirà automaticamente l'area di lavoro come visualizzato dall'immagine.
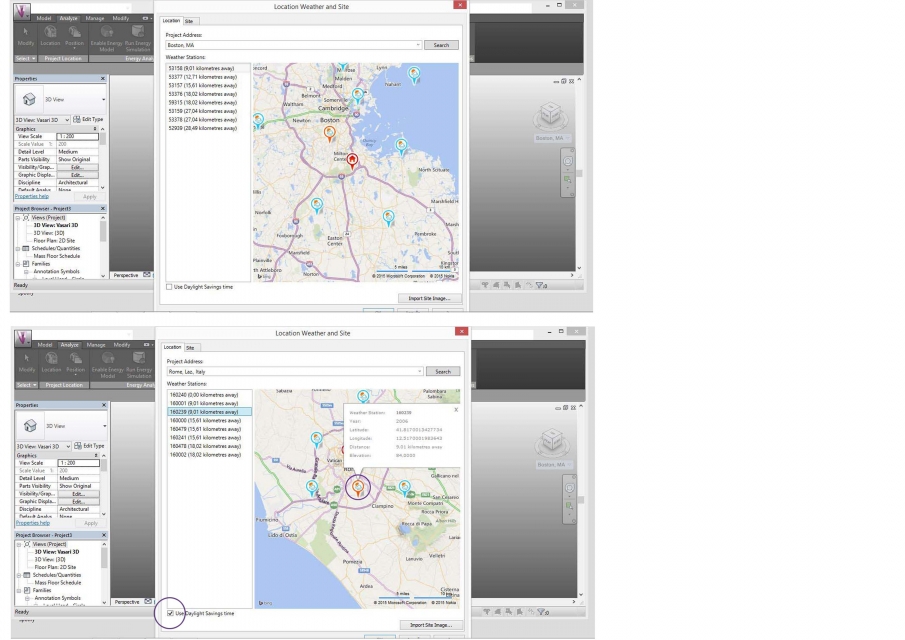
2. Impostare la stazione metereologica più vicina al sito in cui è collocato l'edificio per ottenere i dati più attendibili. Per fare questo, selezionare Analyze > Location. Da qui uscire dall'impostazione di Default Boston e inserire il luogo prescelto. In questo caso Roma.
Note: spuntare l'opzione "Use Delight Saving Time" in basso a sinistra per i luoghi in cui vige l'ora.
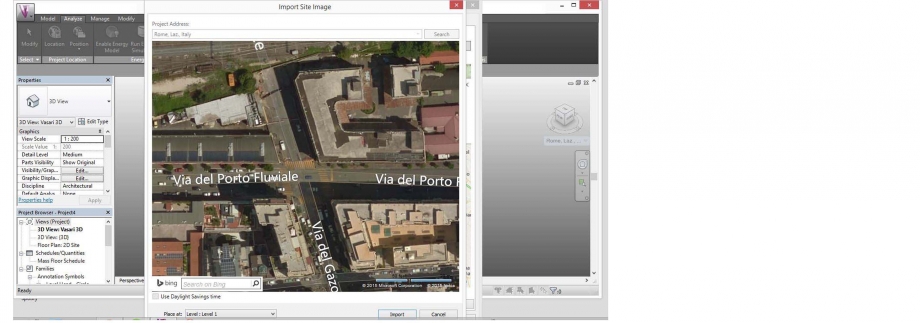
3. Ora è possibile visualizzare l'area su cui lavorare, per cui cliccare Import.
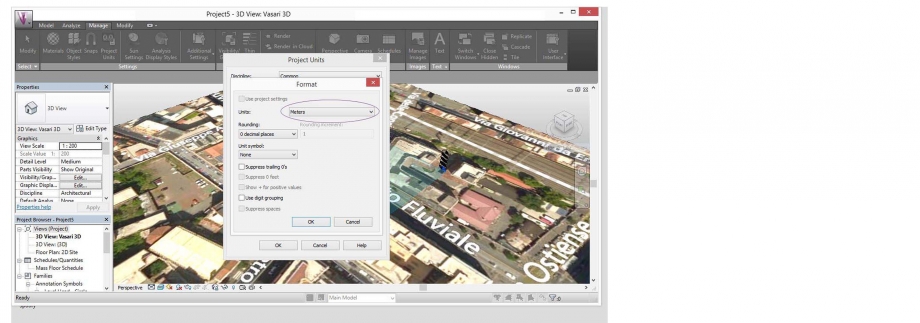
4. Per impostare l'unità di misura cliccare Manage > Poject Unit e impostare l'unità meters.

5. Ora è possibile iniziare a modellare l'edificio. Utilizzare la visualizzazione top per lavorare sull'immagine in pianta. Selezionare Model > Create Mass per avere gli strumenti di disegno Draw. Dopo aver ottenuto il disegno Create Form > Solid Form per ottenere il volume.
6. Una volta ottenuto il volume sarà possibile impostare le misure lavorando in scala 1:1
7. Infine impostare la data e l'ora in cui si vogliono visualizzare le ombre. Per farlo, cliccare Manage > Sun Settings. In alternetiva cliccare sull'icona del sole evidenziata in basso a sinistra, da cui si potrà accendere o spegnere il Sun Path.
Sab, 21/03/2015 - 18:03 ENEA_CERVONE
Lun, 23/03/2015 - 13:55
ENEA_CERVONE
Lun, 23/03/2015 - 13:55
In this first exercise we will study the behavior of the sun and of shadows on the facede of the house taken in exam.
The area analysed is found on Via XXV Aprile, in the muncipal of Rome.
The building taken in consideration is a single home with two levels. It is in between two taller buildings.
The front facade of the building is orientated towards west.
We hope to be clear in the following steps and helpful to anyone that wants to use this program.
INSTRUCTION FOR USE VASARI PROGRAM
1- Open Vasari, starting a new file.
2-From the menu "manage" click on "project units". 3- Then select the metric unit preferred, in this case "meters", and select "ok".

4- From the menu "manage" click on "sun settings" to set up the geographic coordinates, which the program will use as a reference to calculate the shadows.

5- Don't forget to select the nearest weather station, and with the altimetry characteristics more similar to the place chosen, it is also possible to load the images from Google maps directly in our Vasari file, clicking on "import site image".

6- In alternative, it is possible to import a Cad file in which we have previosly traced the buildings that we will then study using Vasari. It is important to remember to previously put in scale the file also on Autocad.

7- Specify the scale and the level on which the file will be positioned.

8- From the menu "model" click on "create mass" to trace the Cad file and extrude it .

9- Click on "line" and create a closed outline following the lines from the Cad file.

10- Select the plan that has been created and drag it upwards to extrude it. Specify its height, then click on " finish mass".

11-Select the element created.

12- To color, once you have selected the element, click on "brush" on top of the menu "modify", and select the color and type of material from the menu "surface patterns".

13- In this way, the building we are studying outstands next to the others.

14- To activate the shadows click on "shadows on" (lower screen), then on "sun path" and "sun settings" to select the day and the time, and in consequence the position of the sun and the shadows. Click "ok".

15- To create a render of specific part of the building taken into consideration , click on " camera" from the menu " menage" select the level and the offset ( the height from which we have taken the photo). Move the mouse to select the direction of the photo and click.

16- If the photo is in the right position, we can procede and create a rendering, click on "render" on top of the screen, select the option defaulted from the menu, and click on "render".

17- When we are through with the render, we can save it or export it in various forms.

SUMMER AND WINTER SOLSTICES
We can see how the walls facing east, south and west are sufficiently illuminated in the summer. In the winter it is the opposite, there isn't sufficient radiation anytime during the day.

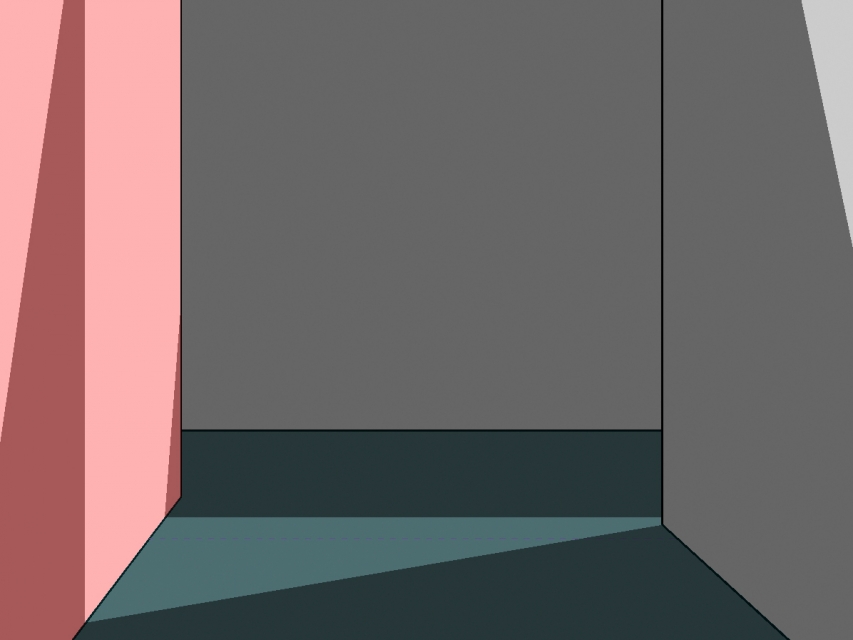
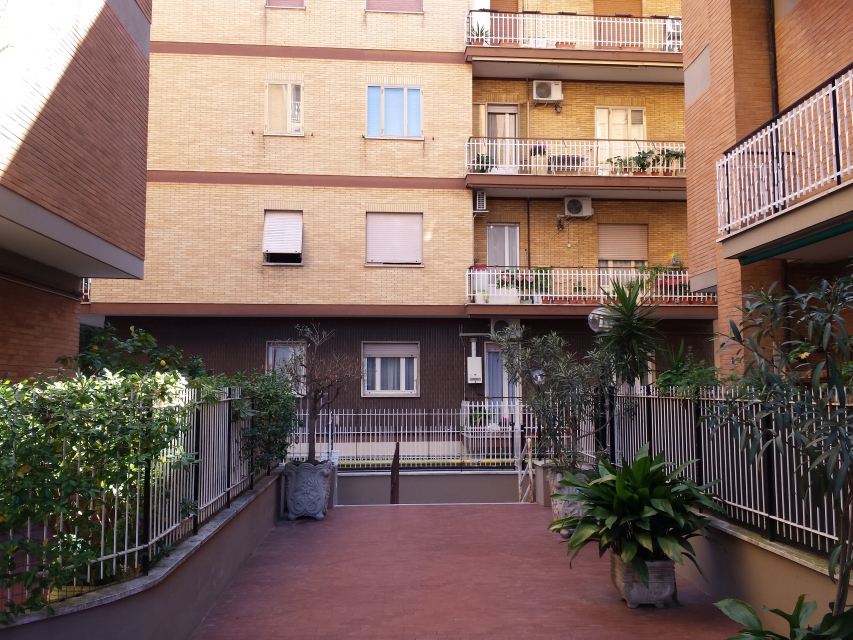
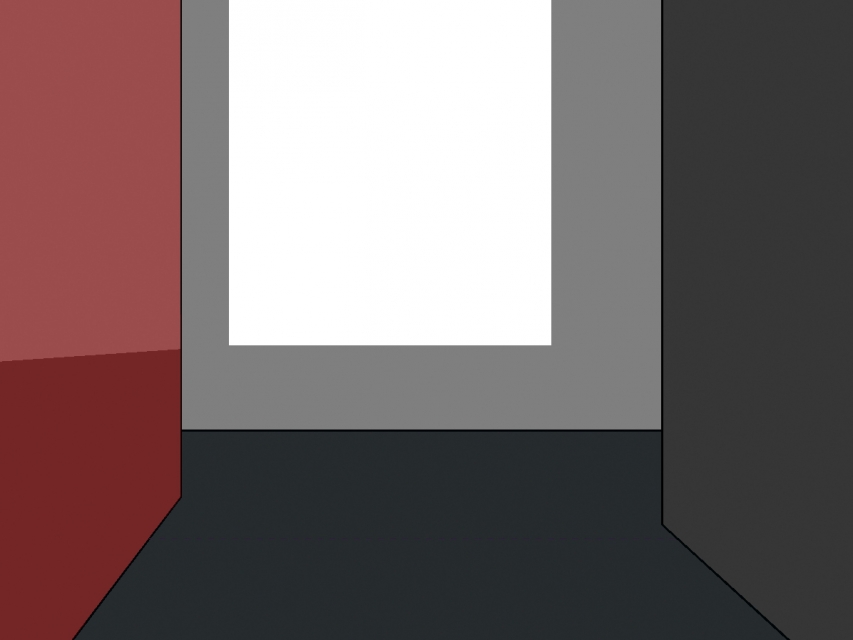
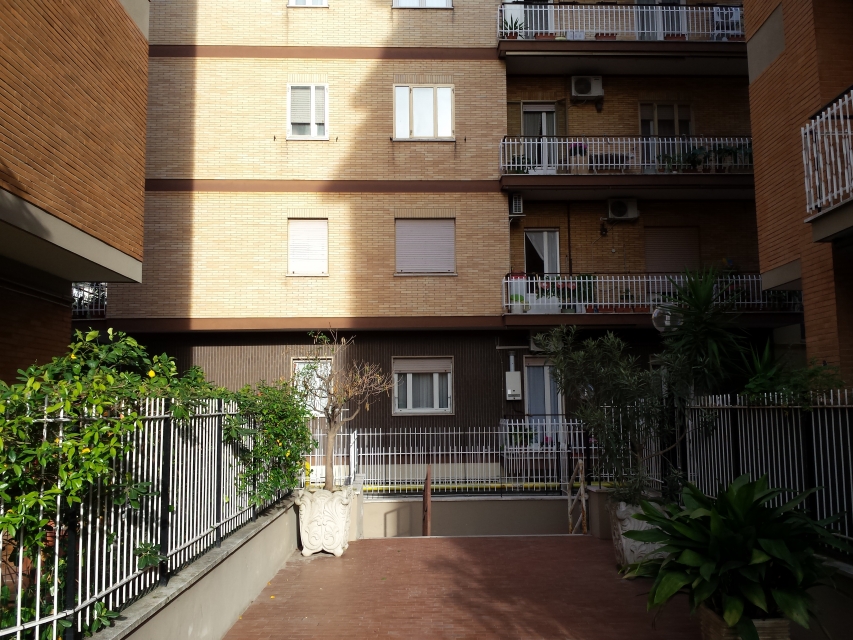
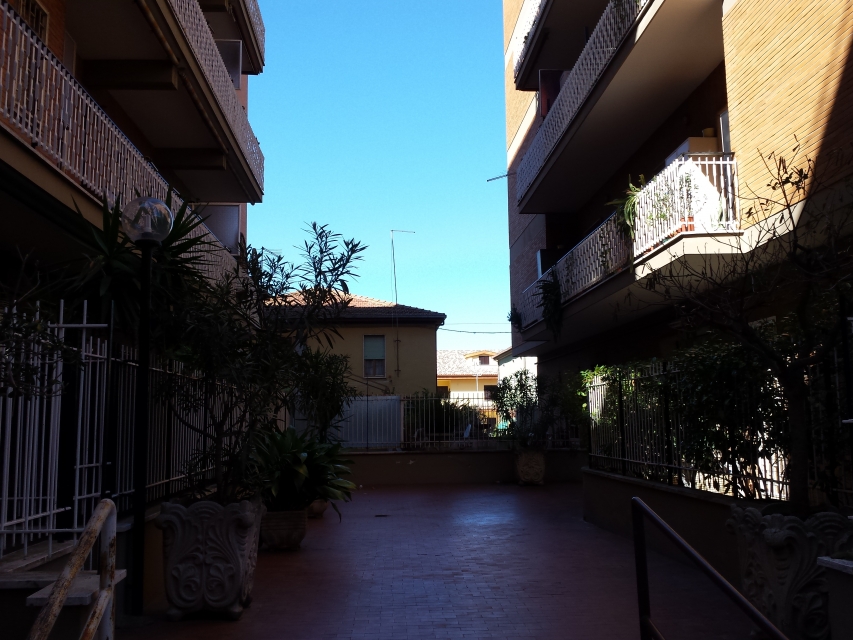
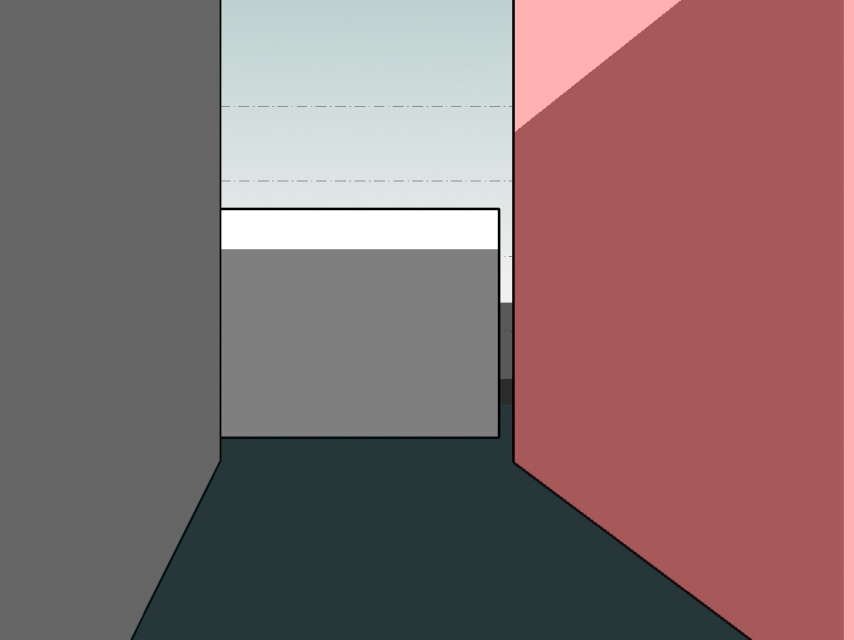
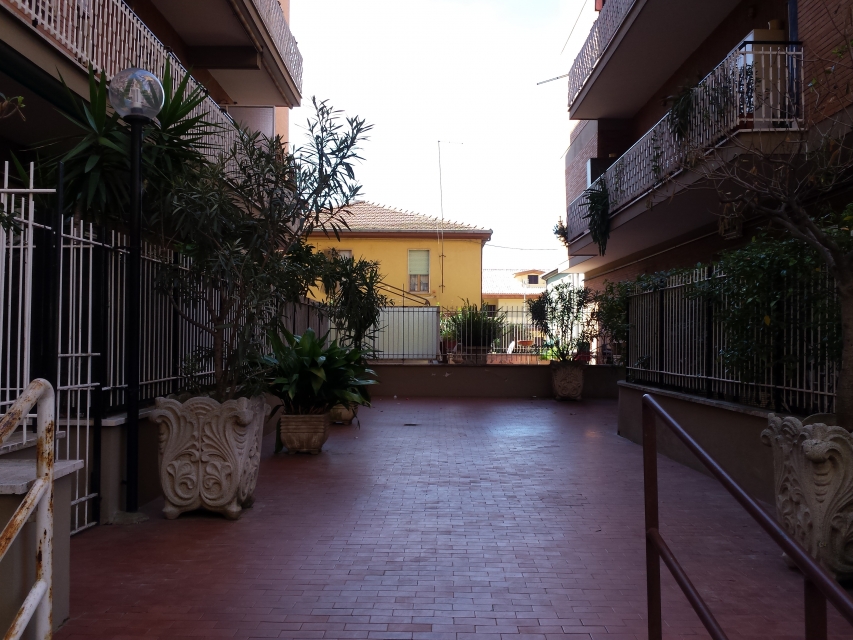
This photo represents our building at 2.30 p.m. on March 20, 2015.

And this image represents the corresponding shawow created with the Vasari program.

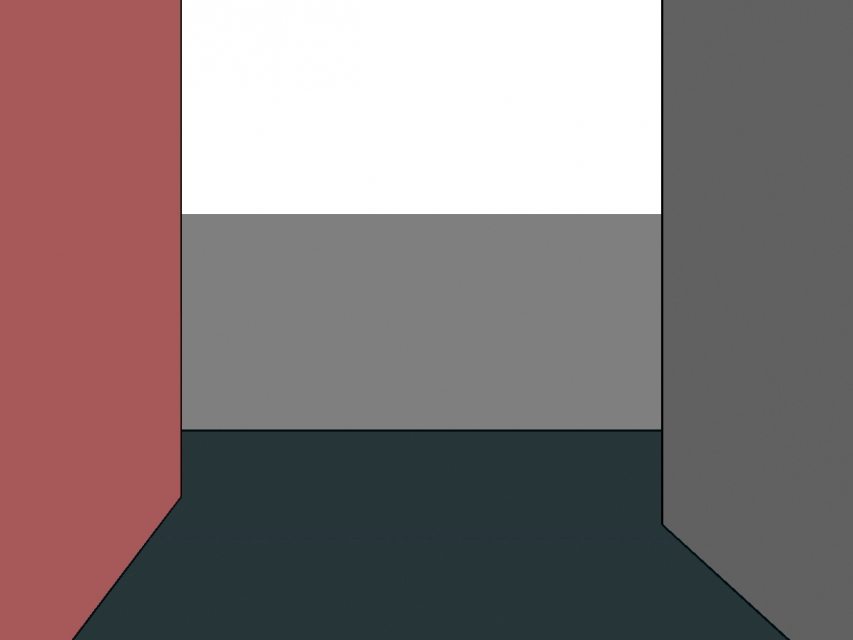
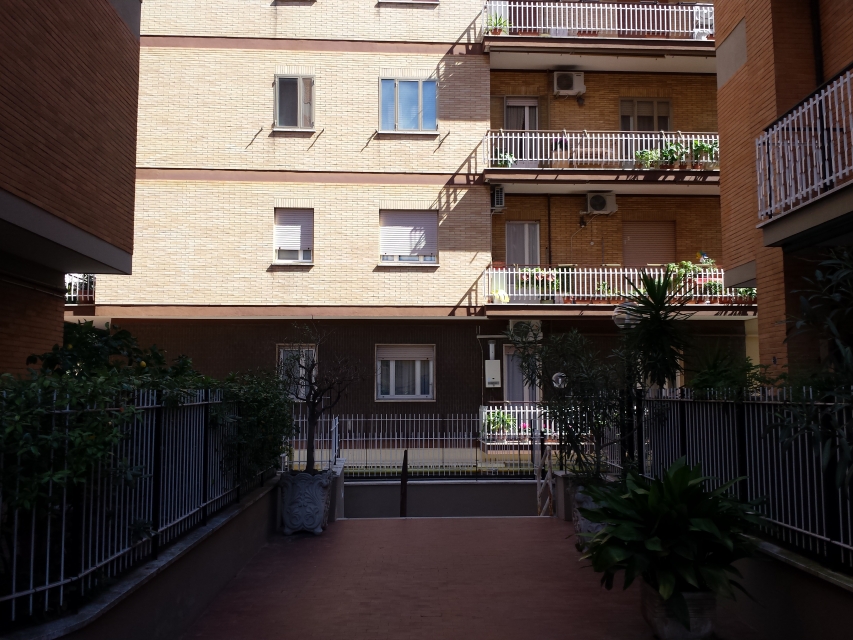
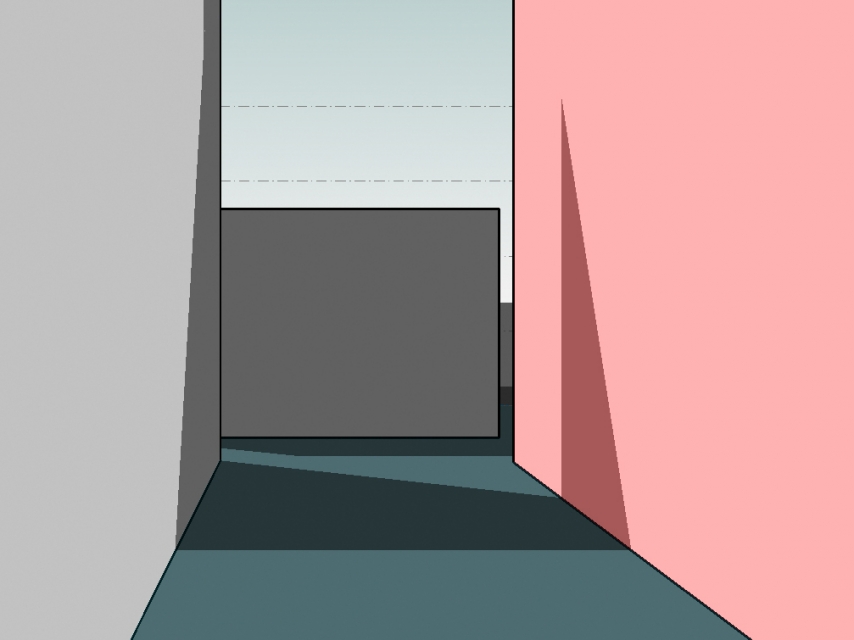
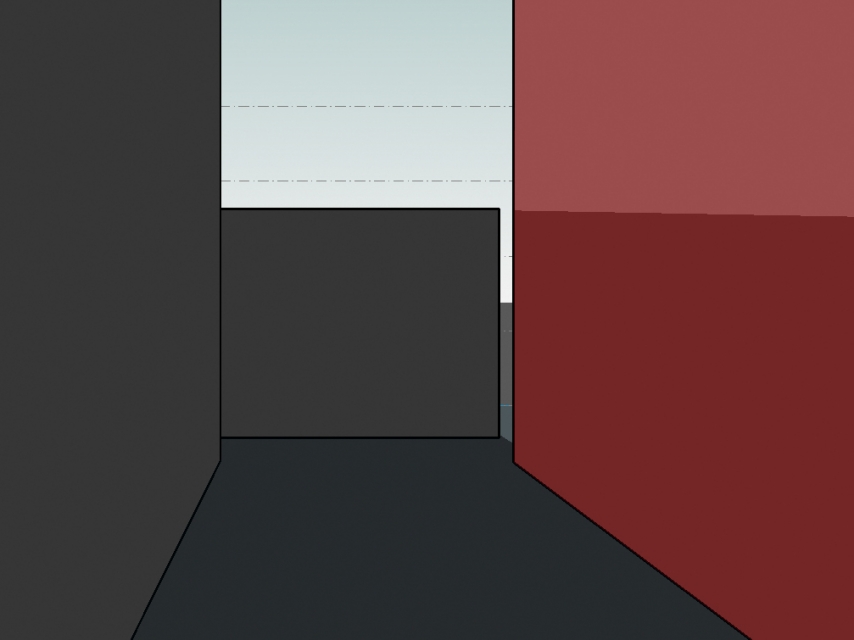
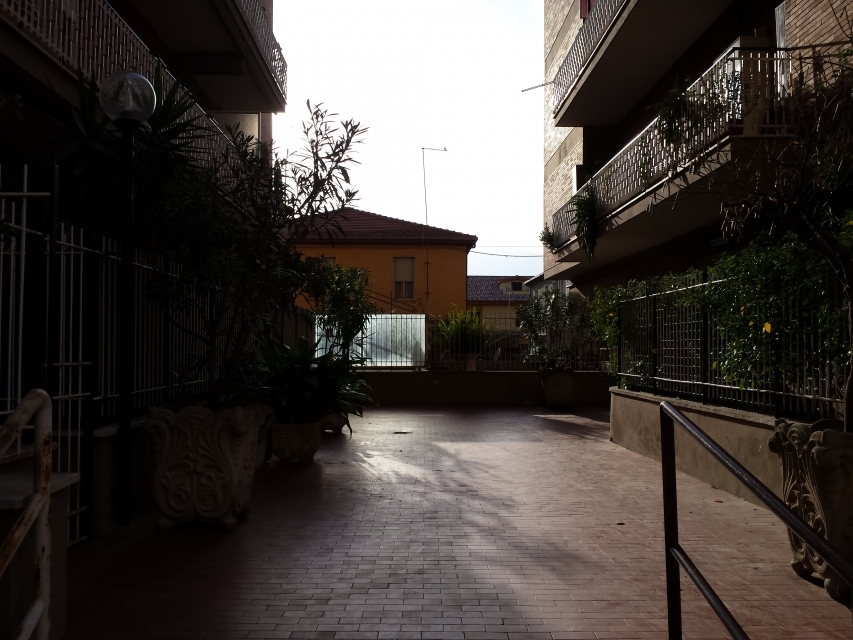
This photo represents our building at 4.30 p.m. on March 20, 2015.
 Finally, this image represents the corresponding shawow created with the Vasari program too.

We hope we did a good job, and exspecially that we simplified the work for anyone who wants to use this program in the future!
Sab, 21/03/2015 - 17:13