


 Roberta Cervelloni
Ven, 20/03/2015 - 18:39
Roberta Cervelloni
Ven, 20/03/2015 - 18:39
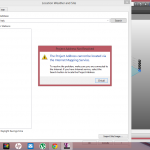
il programma non carica le mappe con la mia zona,pare che rilevi dei problemi di connessione. in realtà la connessione è perfetta,il pc si collega regolarmente sia a casa che in università. non so come risolvere il problema, sono due giorni che faccio ogni tentativo possibile...
Ven, 20/03/2015 - 18:46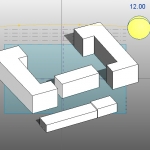 Melia_Minozzi
Ven, 20/03/2015 - 14:47
Melia_Minozzi
Ven, 20/03/2015 - 14:47
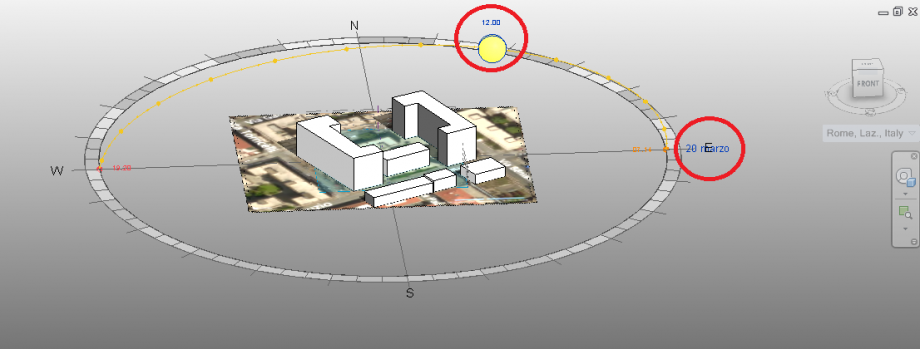
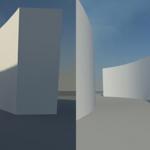
Vasari is the right software to analize how the sun path can effect shadows on fronts of buildings during a day time and all the year. It's possible to recreate the situation you are studing with 3D figures. In this way you can get a close representation of reality.
PROCEEDINGS
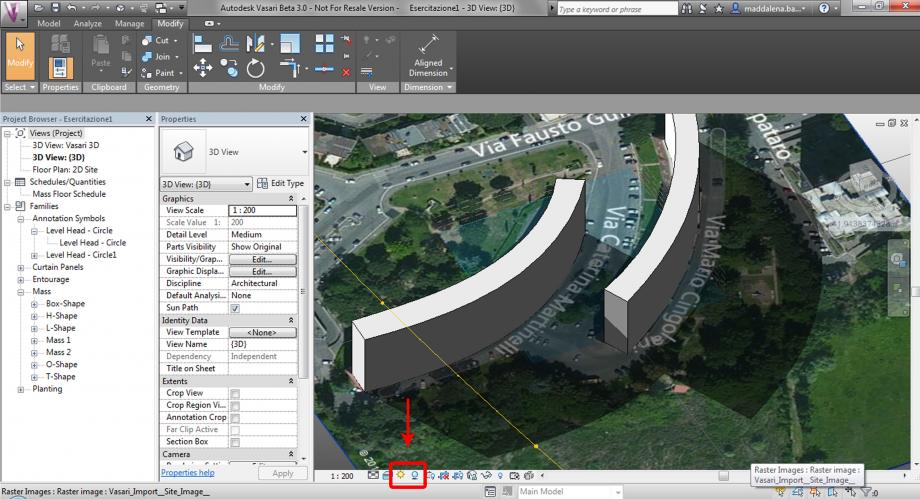
1. Start Vasari software

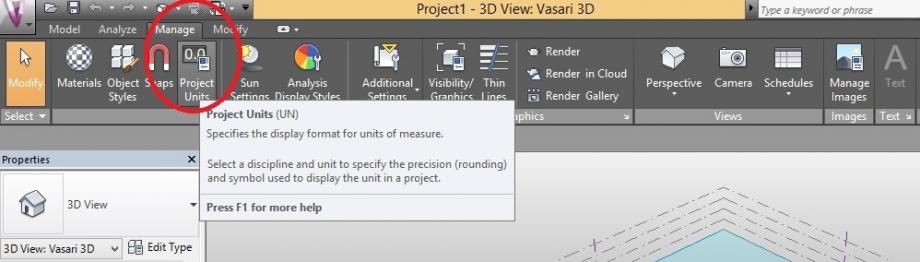
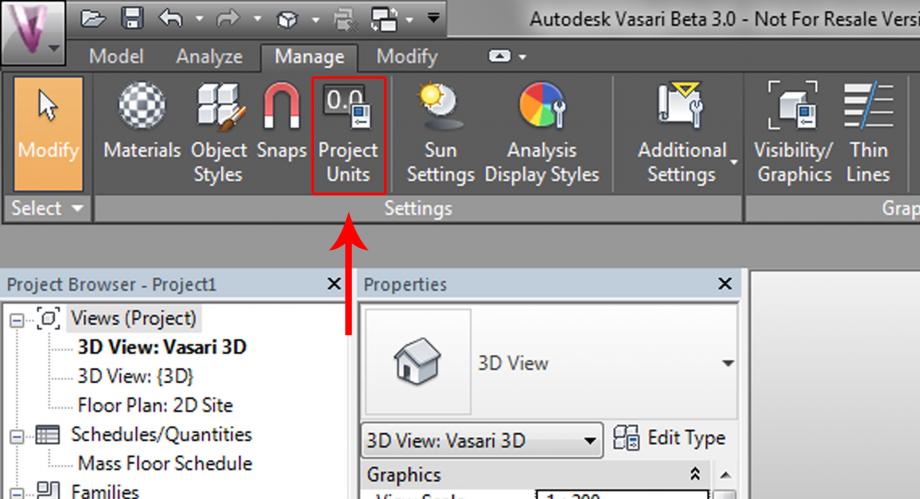
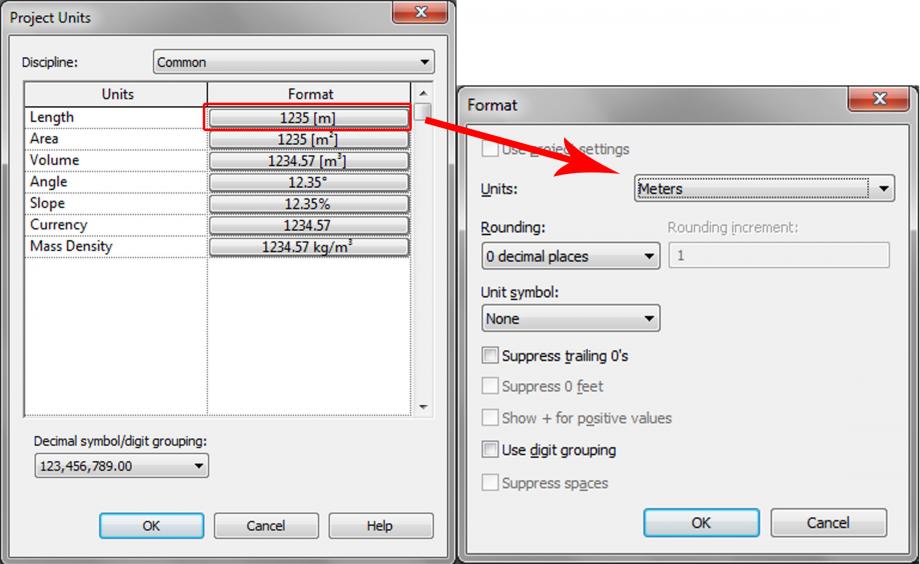
2. Select ''Manage'', then ''Project Units'' to set the units of measure you prefer to recreate the buildings. Click twice ''Ok.''

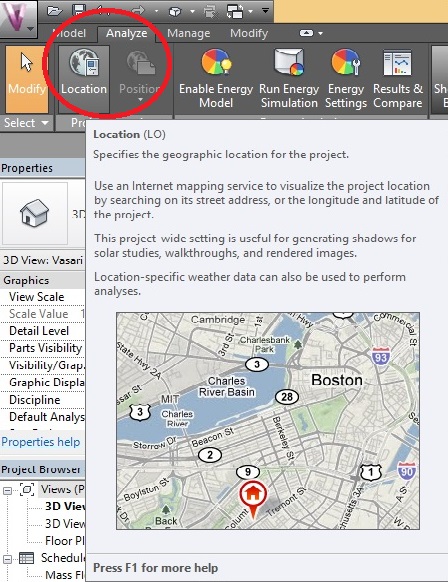
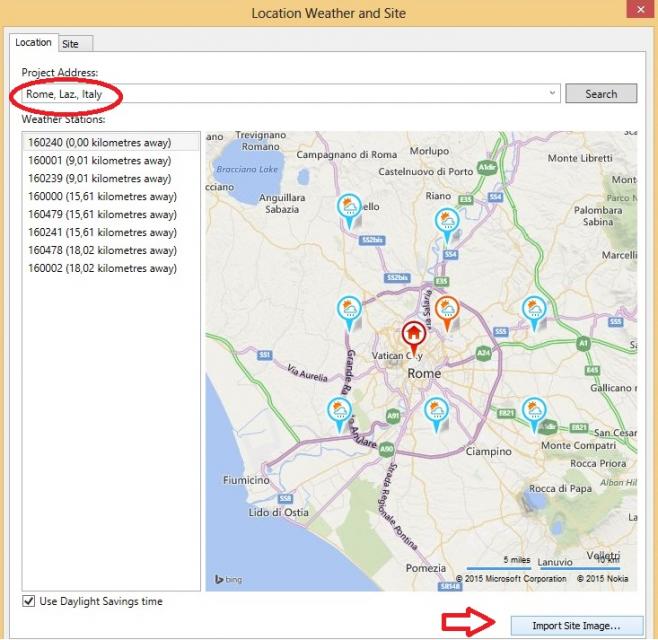
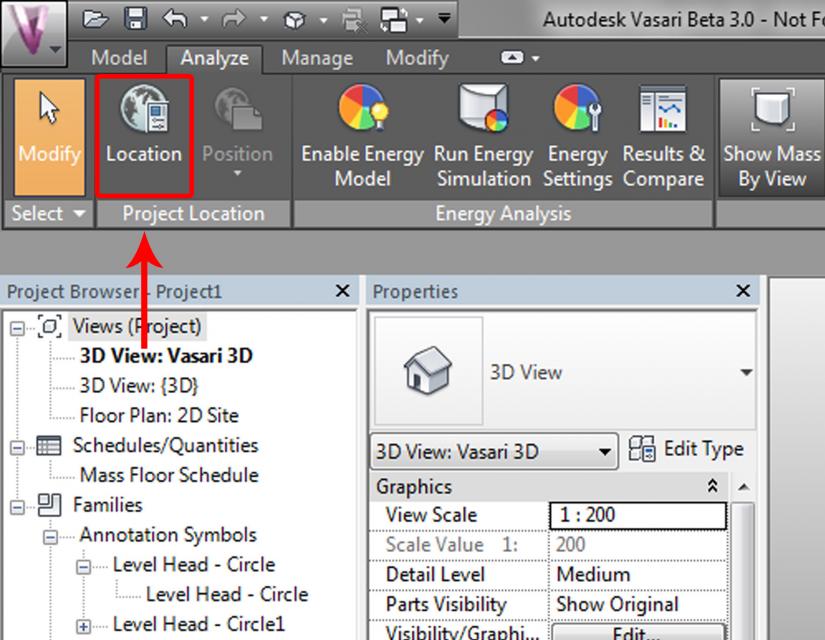
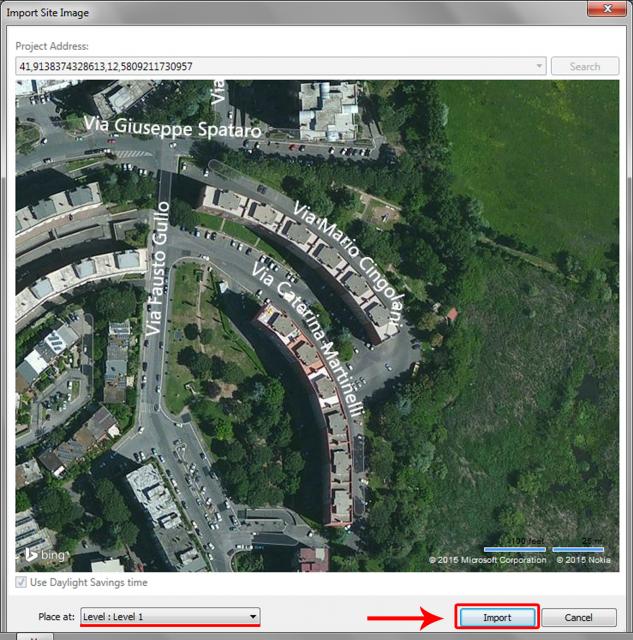
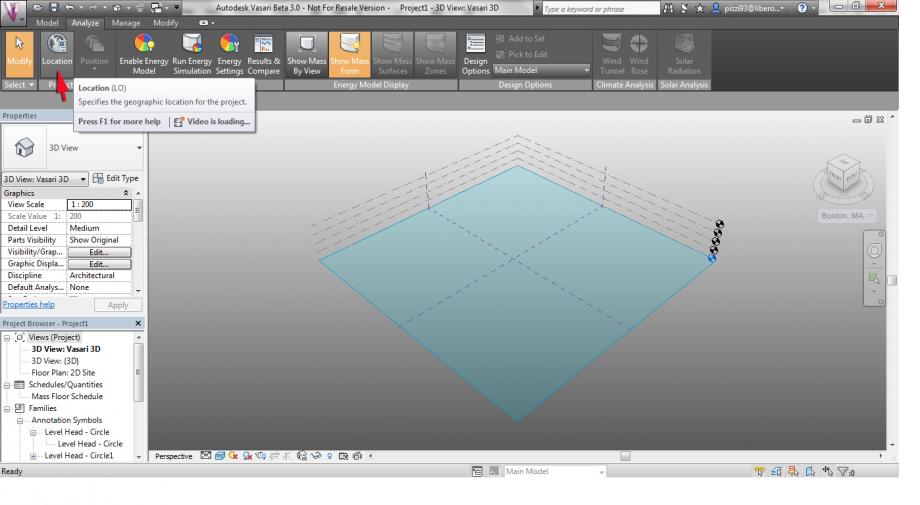
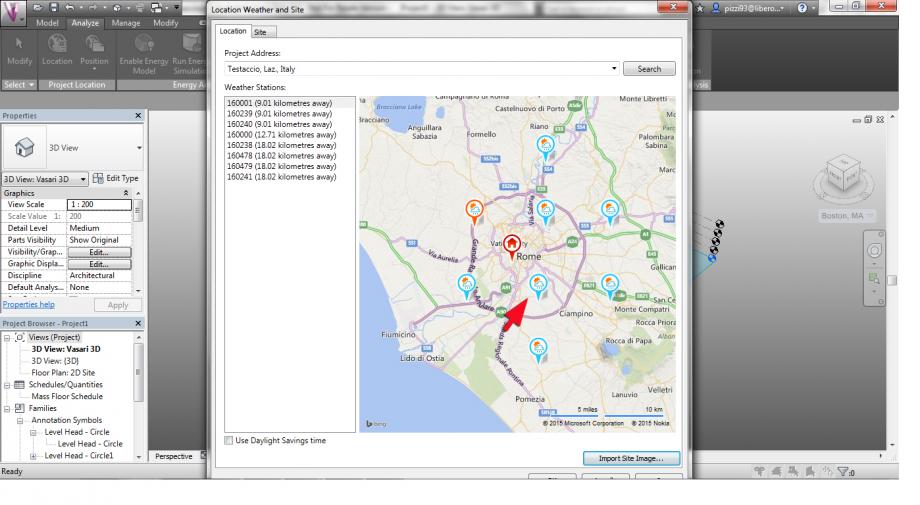
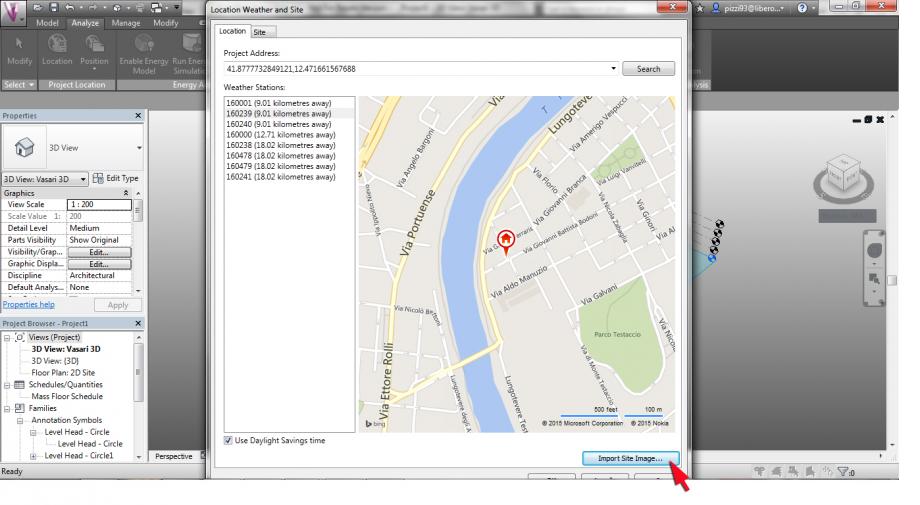
3. Select ''Analize'' then ''Location'' to set the site where your buildings are placed. Write the location and import the map of the place selecting ''Import Site Image''.
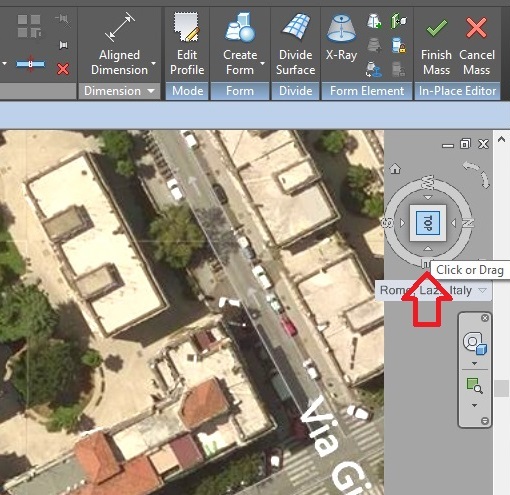
4. Set the view from the top to draw on the map easily.
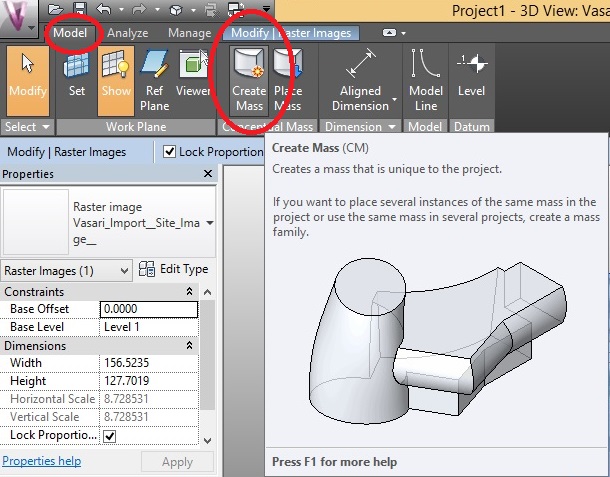
5. Select ''Model'', ''Create Mass' to start shaping buildings. Chose a tool and start drawing on the map.
6. Set the 3D view clicking on the topbar.

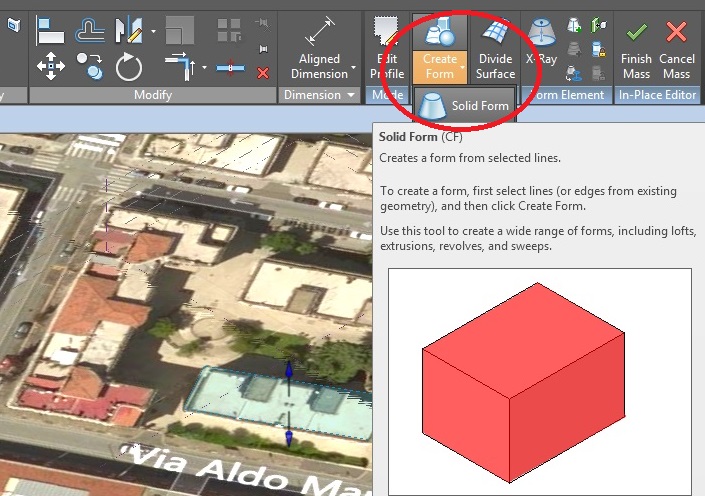
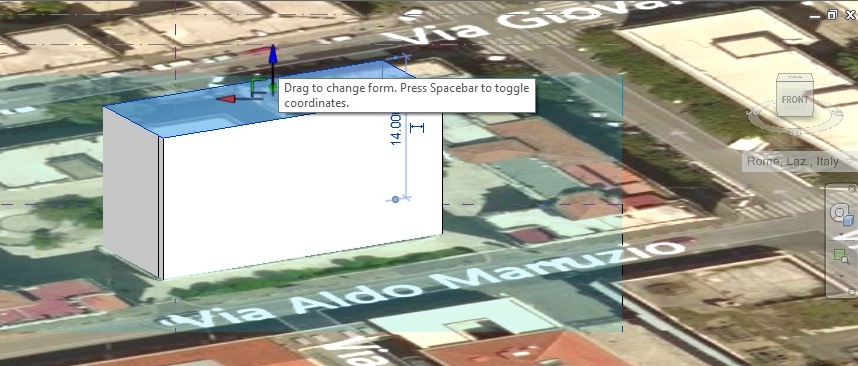
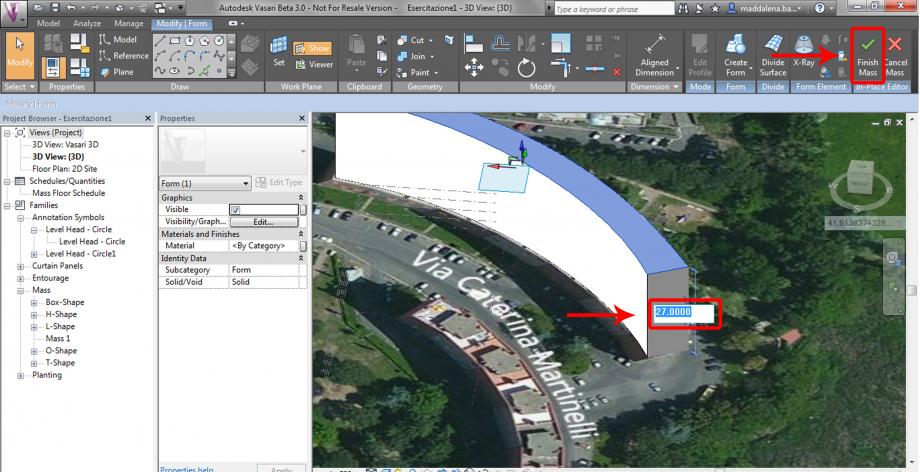
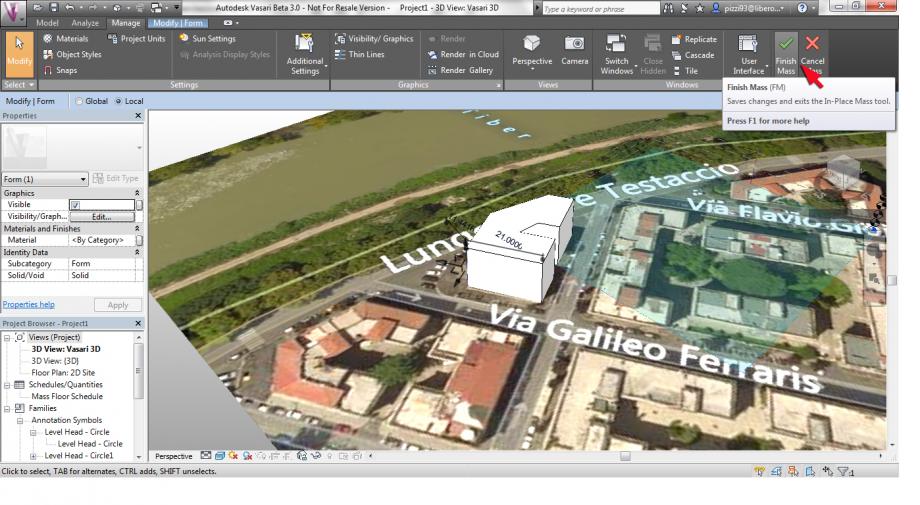
7. Select the design you want to extrude, then select ''Create Form'', ''Solid Form''. Once the mass is done, it's possible to change its dimensions dragging on the arrows. For a precise representation type the values of length , width and thickness on the numbers you have close to the mass.
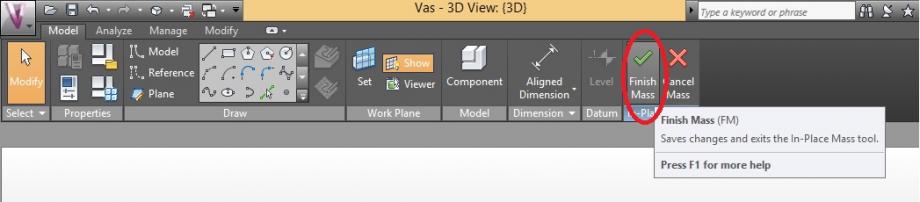
8. When you have set the mass, select ''Finish Mass'' to confirm.
9. Draw all the surrounding buildings with the same proceedings.

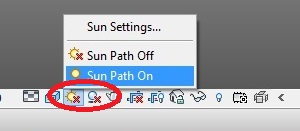
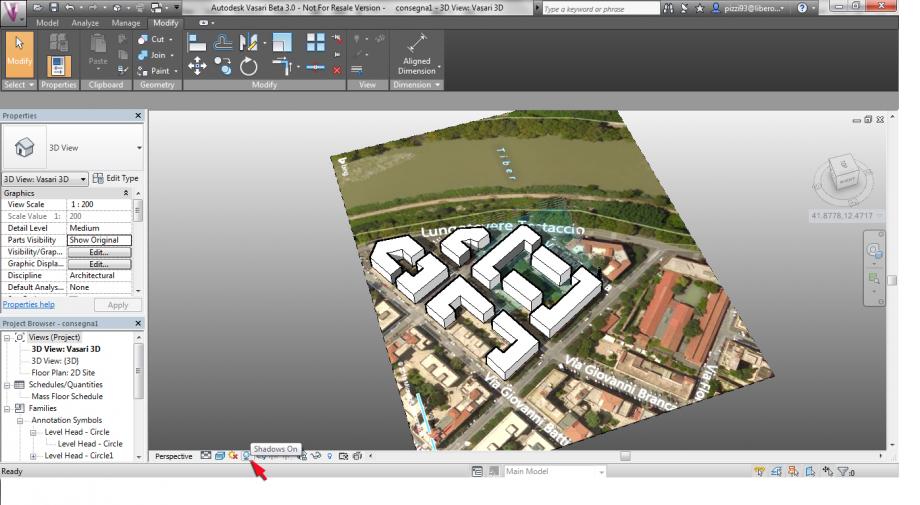
10. Turn Sun Path and Shadows on in the taskbar below.
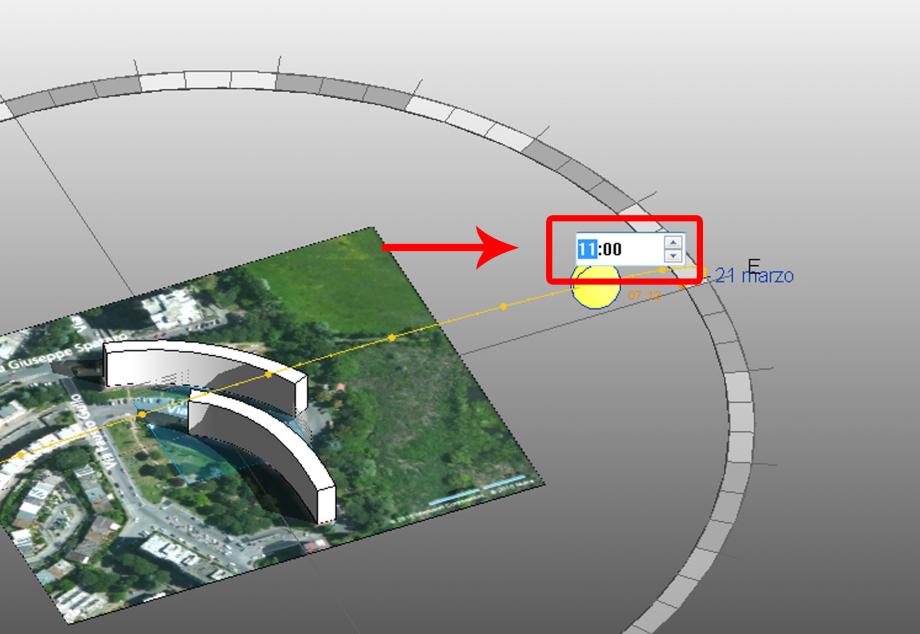
11. Set the right day and hour. In this way you get a simulating picture of lights and shadows on the fronts.
VASARI/REALITY
20/03/2015 12:00 am

20/03/2015 4:45 pm
Ven, 20/03/2015 - 16:56
 Manuel Andrè Bo...
Ven, 20/03/2015 - 16:04
Manuel Andrè Bo...
Ven, 20/03/2015 - 16:04
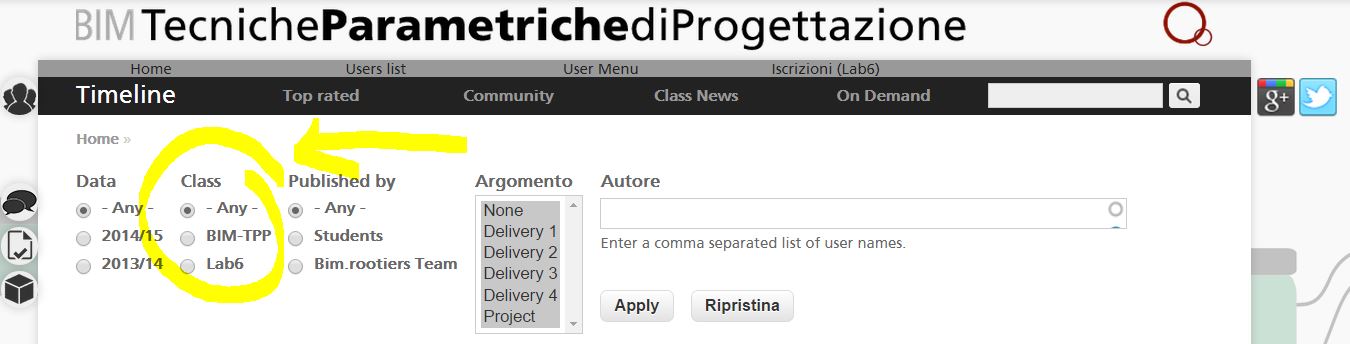
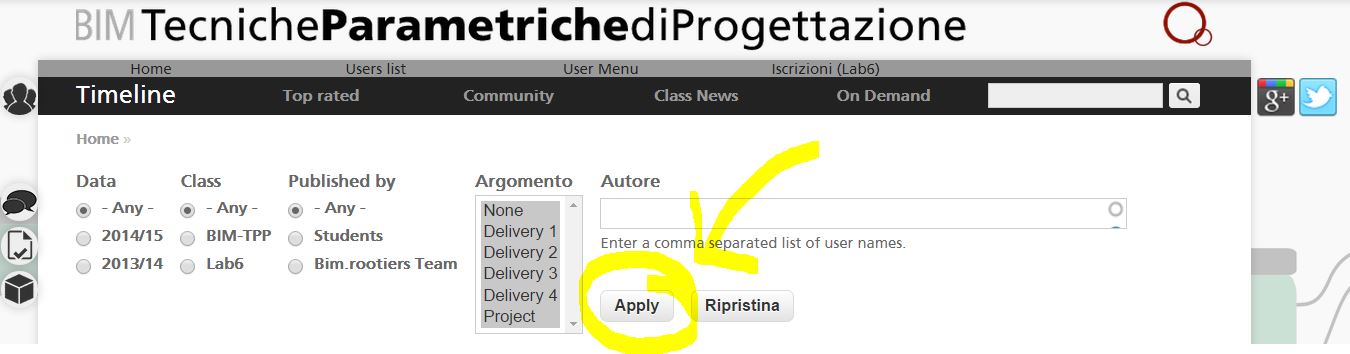
now the filters on the DeliveryStatus page were upgraded to improve the research on contents:
- First of All choose the Data filter

- Here you can choose content from "BIM - Techine Parametriche di Progettazione" or "Laboratorio di Progettazine 6"
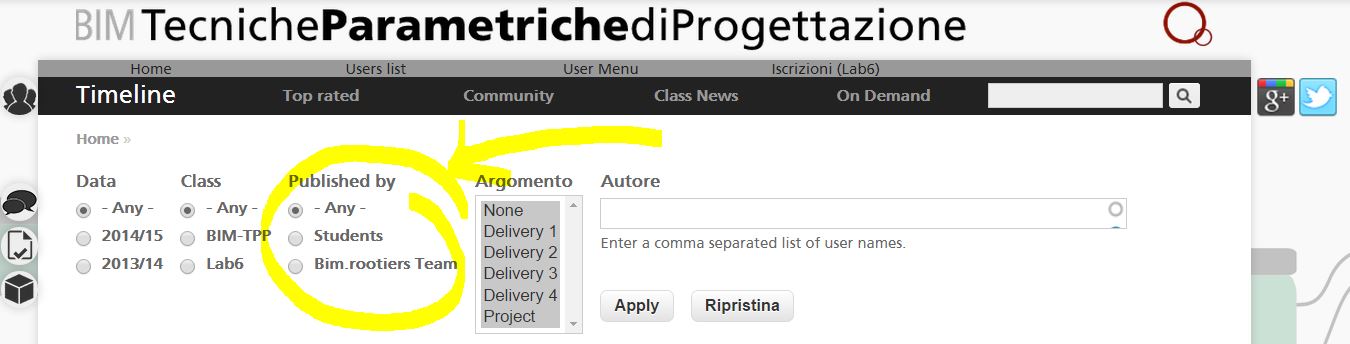
- Then the possibility to focus the filter on contents created by "Students" or "Bim.rootiers Team"
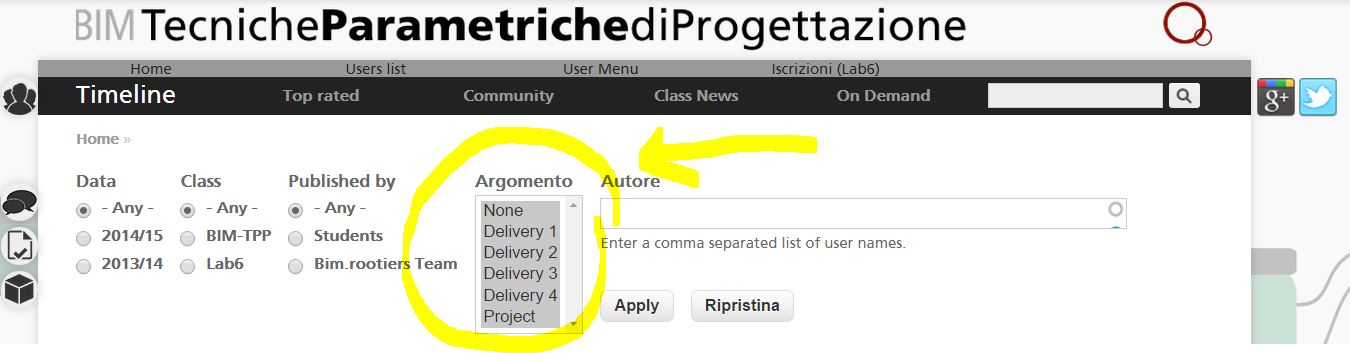
- Here you can choos the kind of content by Deliveries or Projects
- The last one is an optional filter about a detailed research by Author
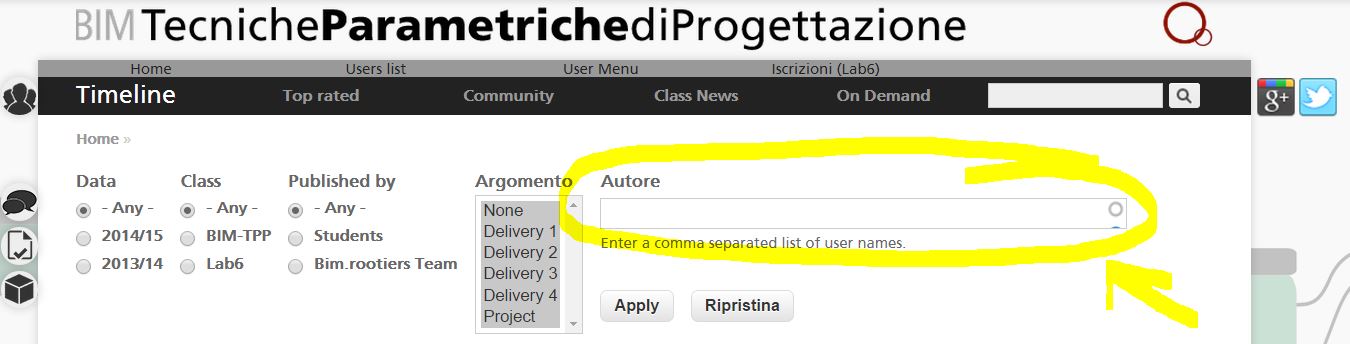
- Here the "Apply/Reset" buttons to run filter configurations
 Bacchetta_
Dom, 22/03/2015 - 19:23
Bacchetta_
Dom, 22/03/2015 - 19:23
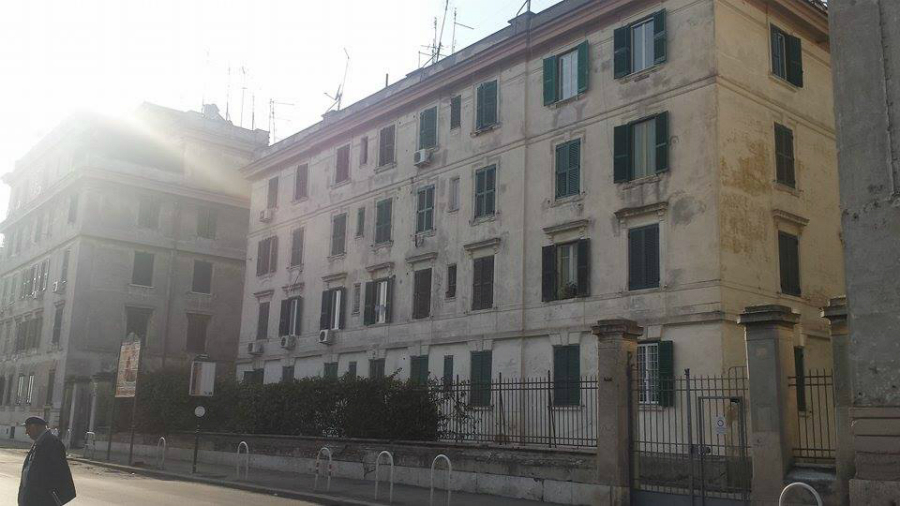
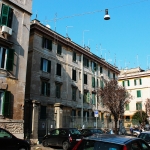
The building is in the neighborhood of Colli Aniene,Rome. Although it is mainly residential, there are many green spaces. In fact, there is a park " La Cervelletta" in the eastbound.
Part 1: Opening and Setting
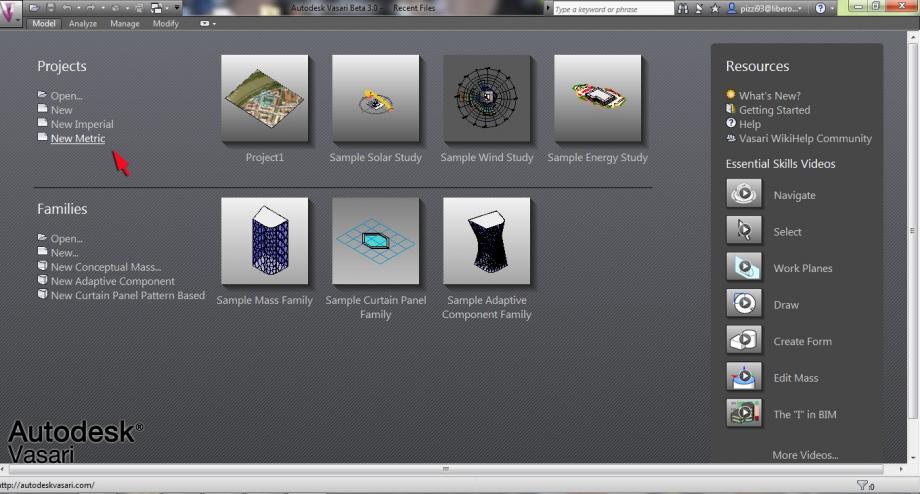
Start Vasari
On the Homepage select "New Metric"
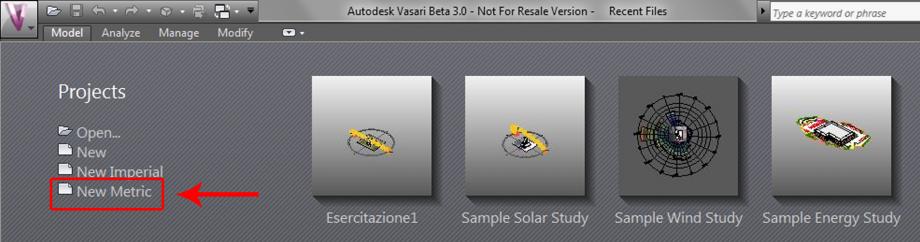
This will open an empty paper with metric system units, this paper uses millimeters as default measure of the lenght.
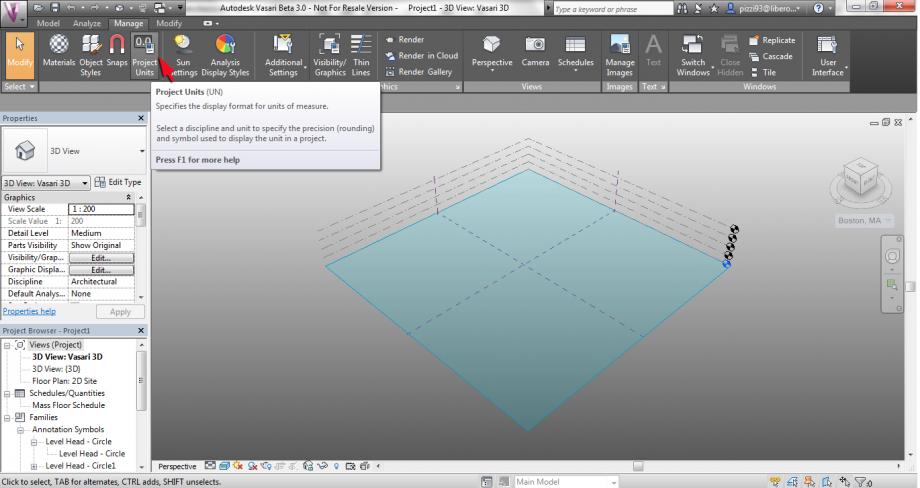
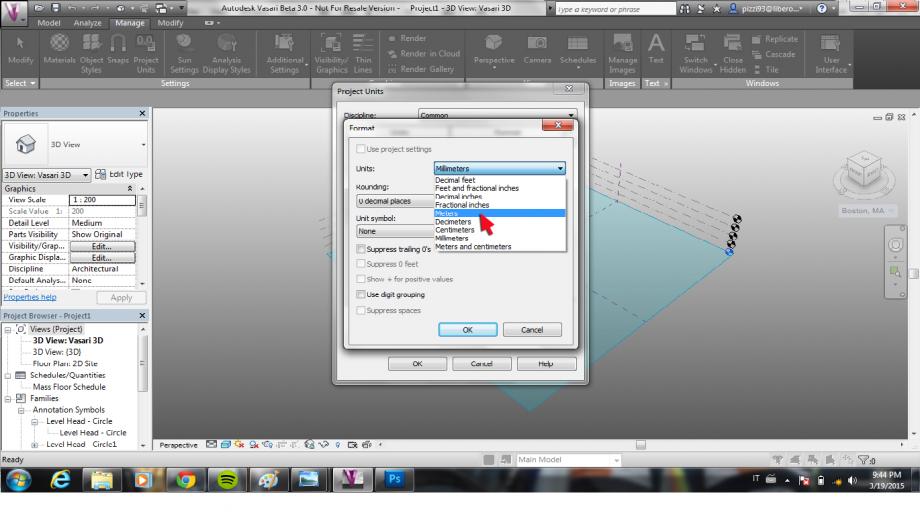
You can change it by clicking on "Project Units" in "Manage" menu.
You can change anything you want by clicking on the box "Format"
Part 2: Setting a Location
Click on "Location" in the "Analyze" menu.
You can look for the address, and you can move on the exact site.
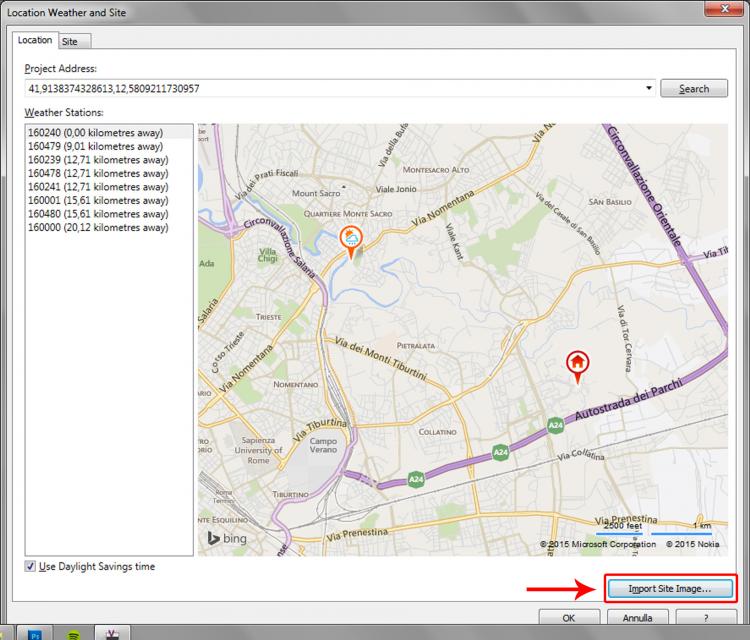
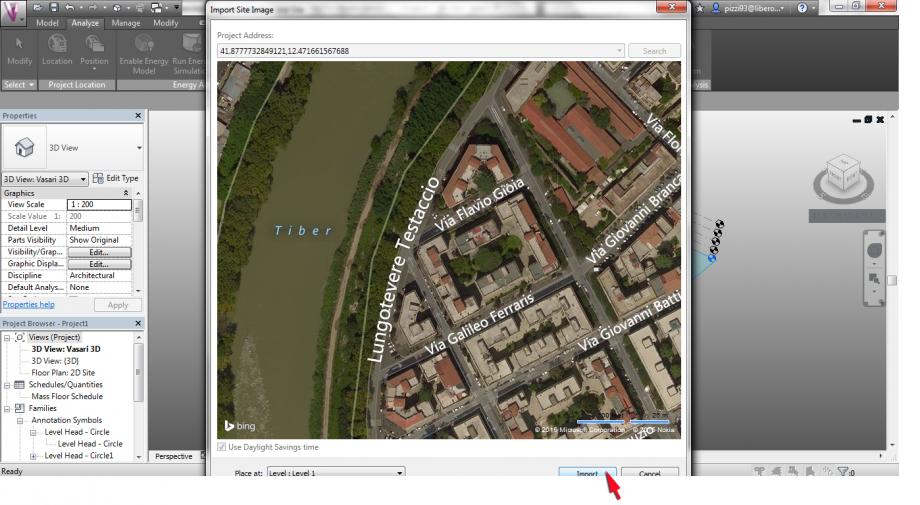
Now you can import an image of the site. Attention to import the image on the ground level.
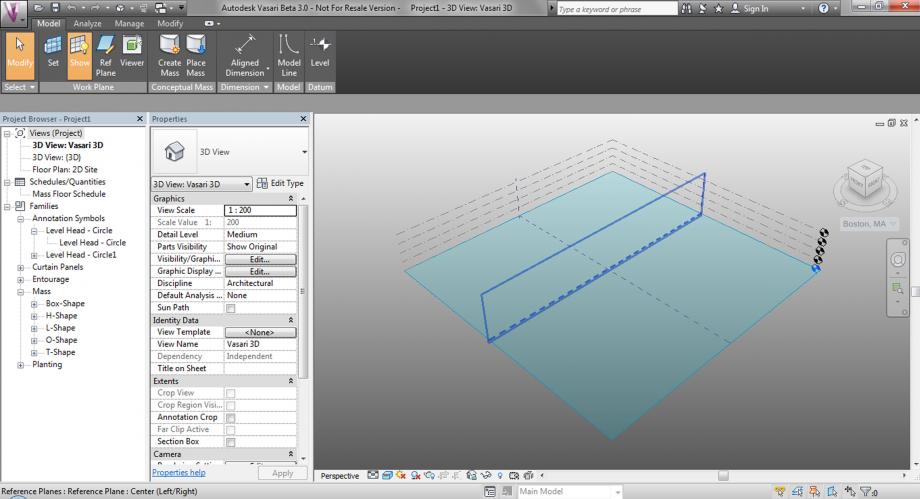
Part 3: Drawing
Now you can see your site on the ground level. To create your building click "Create Mass" in "Model" menu.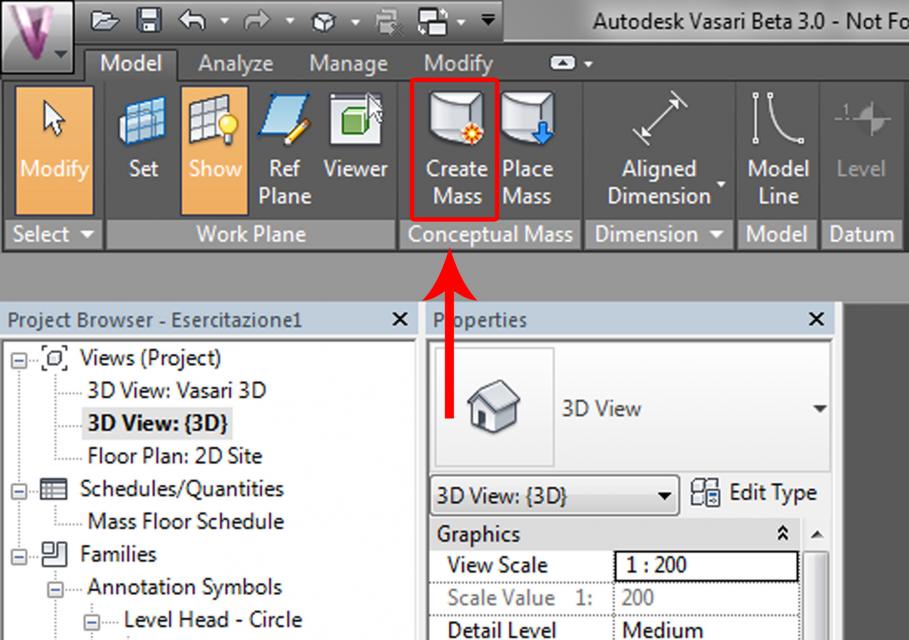
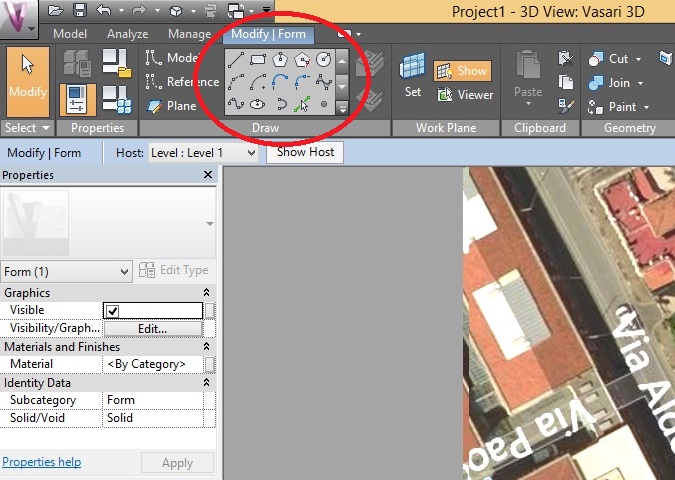
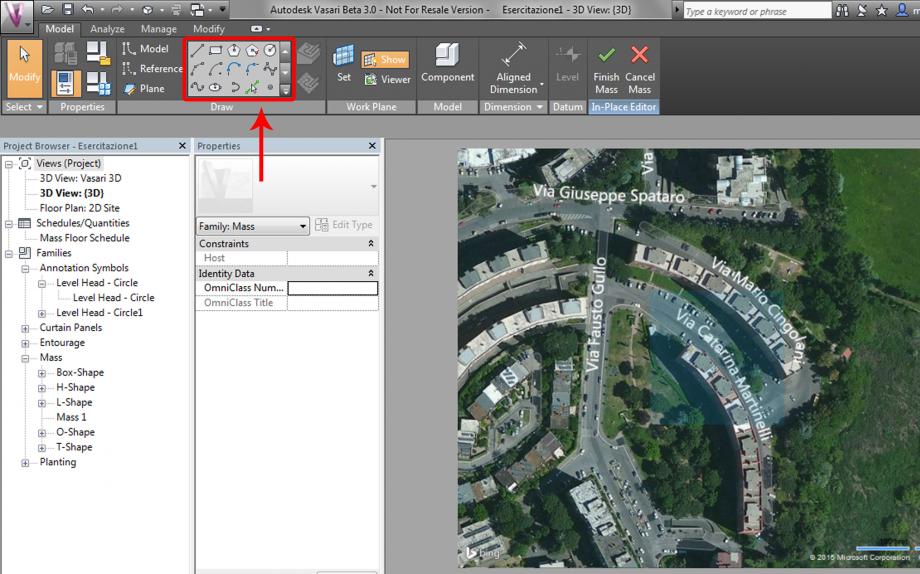
Here with the Tools "Draw" in "Model" menu you can create the plan of your building.
Now select the plant of your buliding and with "Create Form" and "Solid Form" in "Model" menu you can extrude the shape.

Clicking on the dimension you can change and write the exact measure. Then click "Finish Mass" in "Modify Form" menu to close the object.
Part 4: Set Solar Analysis
Activating "Sun Path On" and "Shadows On" you can see the solar path and its shadows.
Now you can define date and time of your analysis.
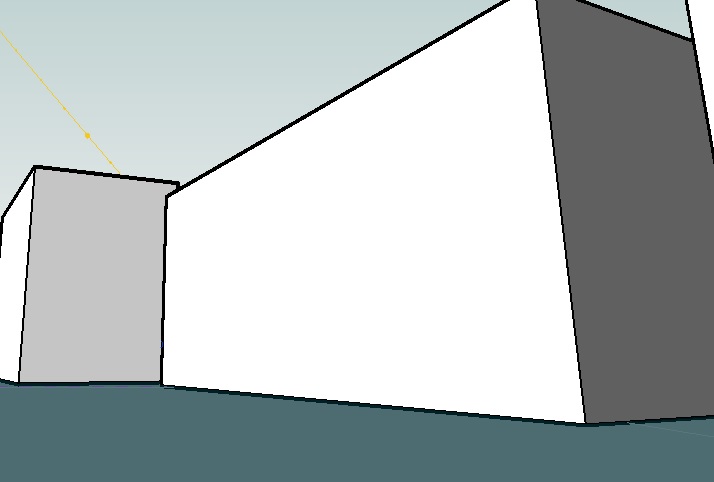
Part 5: Solar Analysis
H 10:35 March, 28 2015
![IMG_2571[1].JPG](/sites/default/files/users/Bacchetta_/IMG_2571[1].JPG?549)
![IMG_2573[1].JPG](/sites/default/files/users/Bacchetta_/IMG_2573[1].JPG?647)
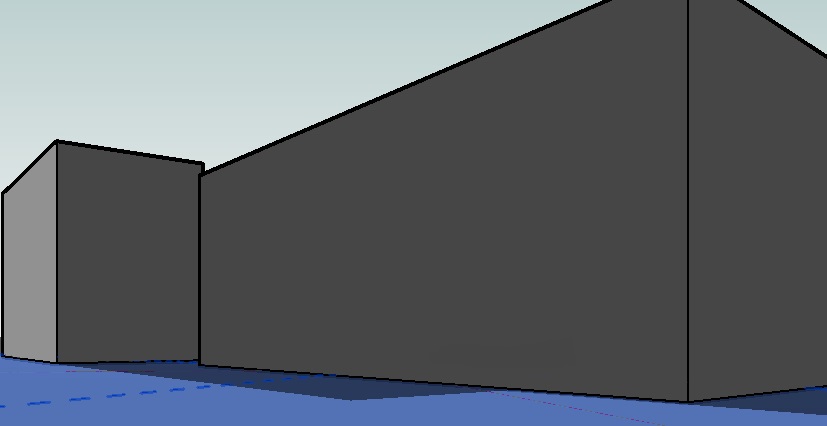
H 17:20 March,28 2015
![IMG_2574[1].JPG](/sites/default/files/users/Bacchetta_/IMG_2574[1].JPG?811)
The apartment, on the third floor, and specifically bedrooms and services, on the east facade enjoys the sun until about 11:00. On the west facade, living room and one bedroom, enjoys the sun between 12:00 and 16:00. The shadows is given by the shape of the entire buliding and by the influence of the building opposite. The north facade, without windows, enjoy the sun until 16:00.
Overall the apartment, having windows on the opposite sides, has a good ventilation. In the period examined spaces on the east side enjoys a good natural light only in the early hours of the day. While the spaces on the west side are well lit in the middle of the day, but although this can be an advantage in winter, in the summer period the spaces are too hot.
Ven, 20/03/2015 - 15:44
 Avenali_Pizzi
Ven, 20/03/2015 - 11:37
Avenali_Pizzi
Ven, 20/03/2015 - 11:37
Tutorial Vasari
Dopo aver avviato il programma, nel menù iniziale seleziono "Projects-New Metric"
Seleziono il comando "Manage-Project Units" per modificare le unità di misura
Imposto tutte le unità di misura in metri
Vasari lavora basandosi sulle coordinate geografiche, per cui bisogna posizionarci nel luogo esatto in cui dobbiamo lavorare. Per fare ciò seleziono il comando "Analyze-Location"
Cerco la località in cui devo lavorare e seleziono la stazione meteo più vicina, facendo però attenzione all'altitudine
Dopo aver scelto la stazione meteo mi posiziono esattamente sopra l'area di studio e seleziono il comando "Import Site Image..."
Definisco l'area che voglio importare nel modello e seleziono il comando "Import" facendo attenzione che venga importata nel livello 1
Per modellare gli edifici seleziono il comando "Model-Create Mass"
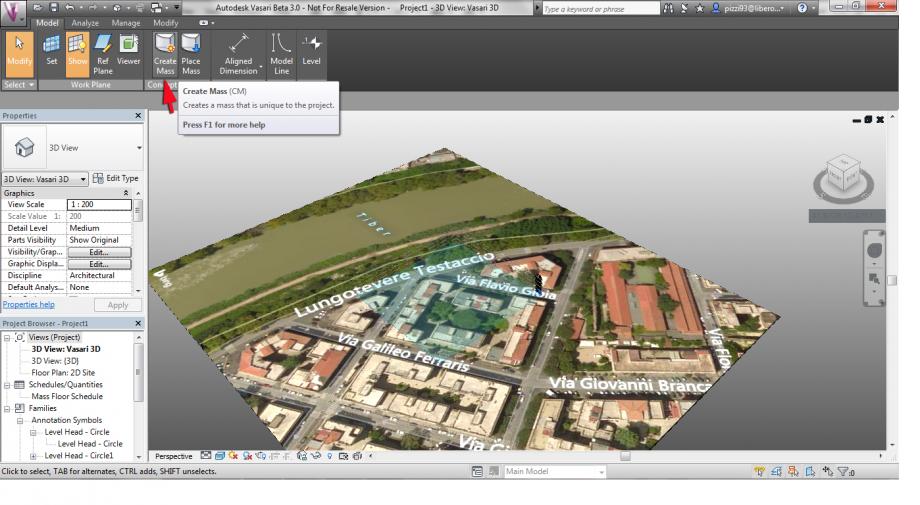
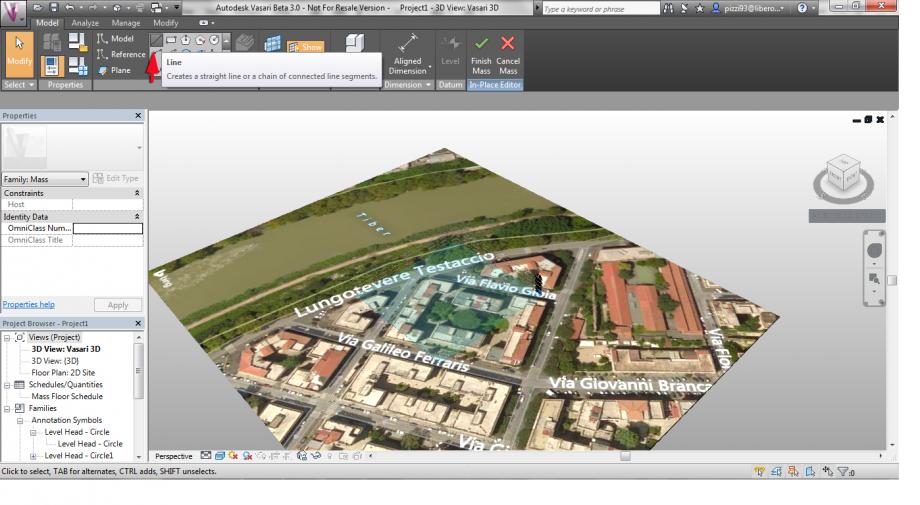
Mantenendomi sul livello 1 seleziono il comando "Line" per disegnare la base di un edificio (nel caso di edifici a pianta rettangolare posso utilizzare direttamente il comando "Rectangle")
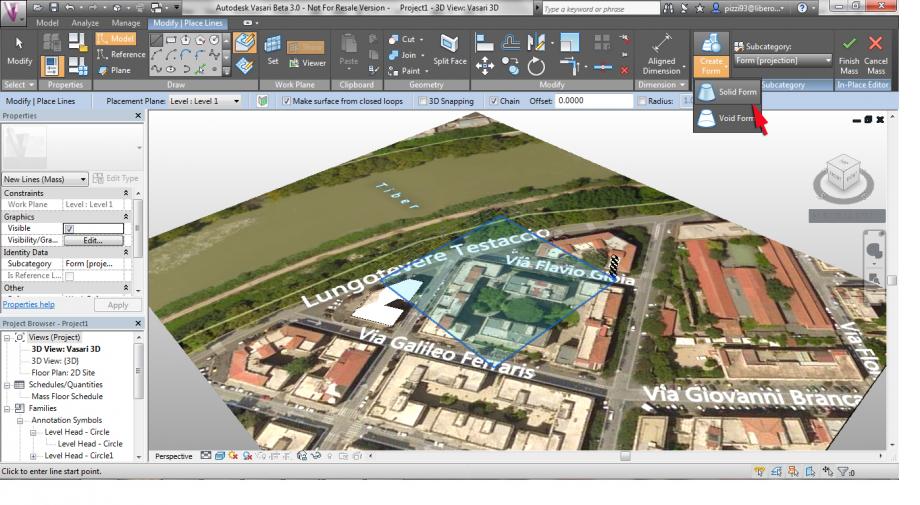
Per estrudere la base ed ottenere il volume dell'edificio seleziono il comando "Create Form-Solid Form"
Imposto la corretta altezza dell'edificio
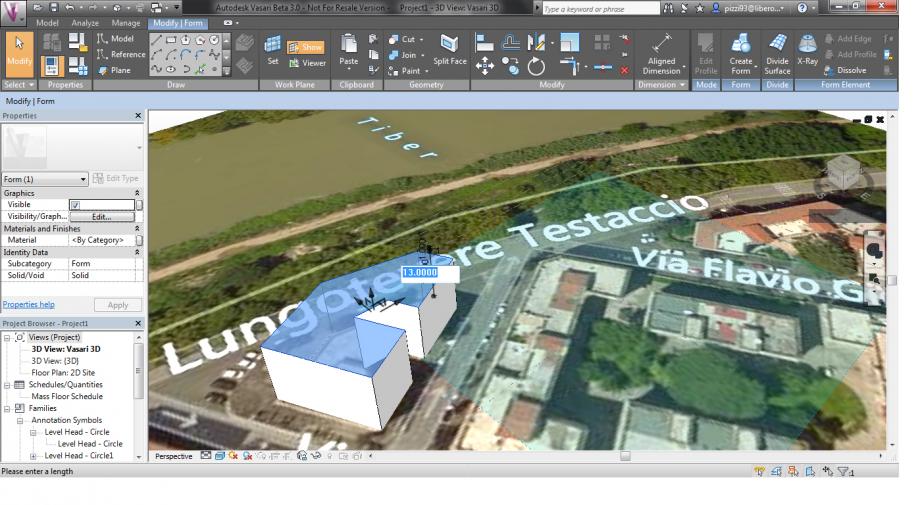
Per salvare i modelli creati seleziono il comando "Finish Mass"
 Per visualizzare le ombre proiettate dagli edifici modellati seleziono il comando "Shadows On"
Per visualizzare il percorso del sole, invece, seleziono il comando "Sun Path On"
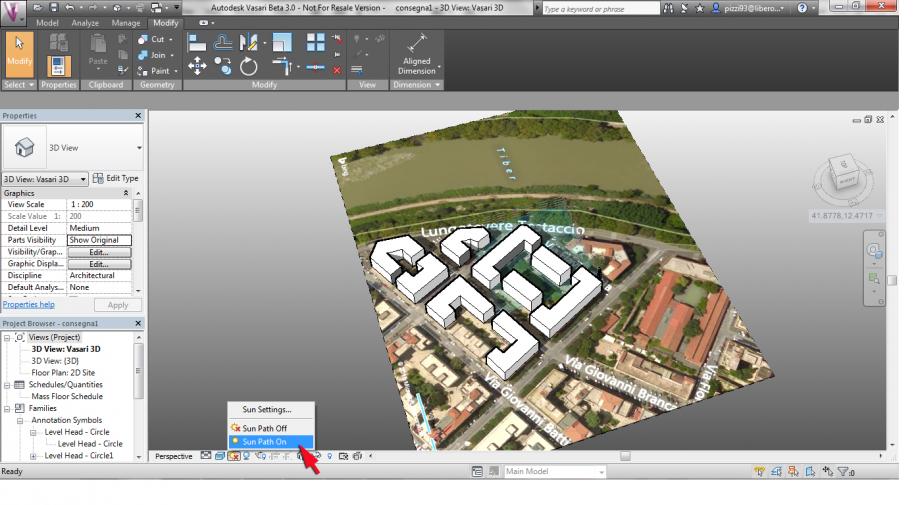
Modifico la data e l'ora, e di conseguenza la posizione del sole e le ombre, in modo da studiare il soleggiamento nelle diverse situazioni

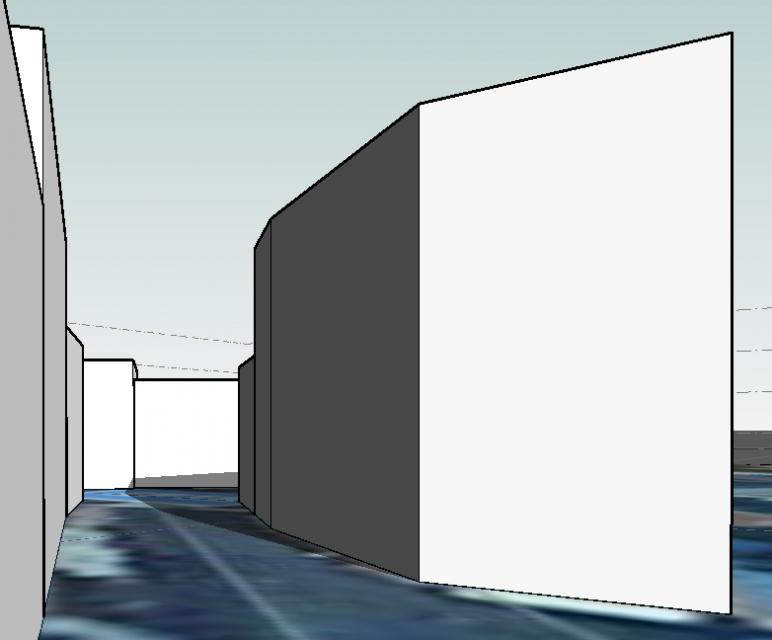
Esercitazione 1: l'obiettivo dell'esercitazione è quello di rappresentare, all'interno del programma, un modello semplificato di una piccola parte di città per studiarne il soleggiamento. Facendo delle foto in orari diversi (e quindi in condizioni di soleggiamento differenti) e impostando gli stessi dati nel programma possiamo effettuare un confronto tra realtà e modello. Verifichiamo se le ombre sono proiettate nello stesso modo.
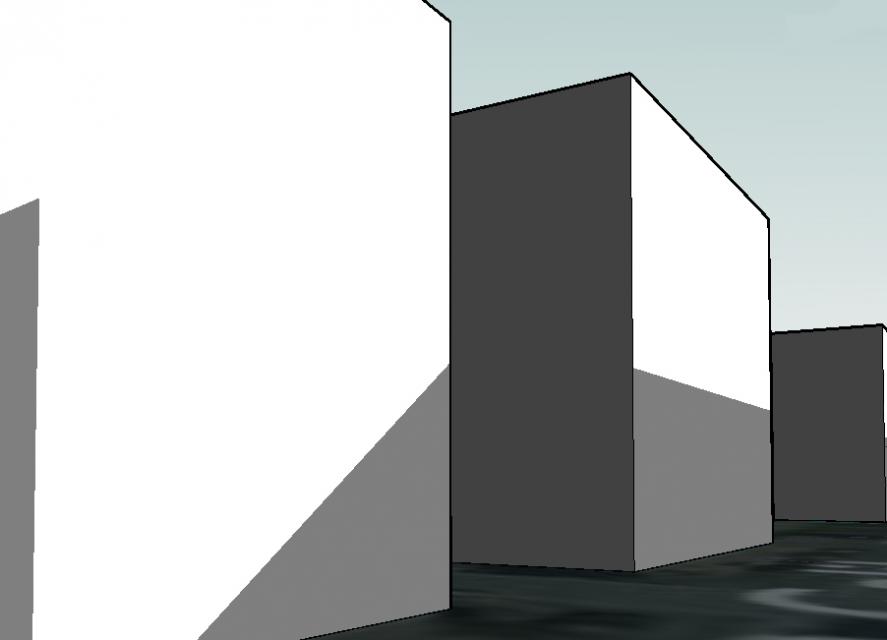
La prima area che abbiamo analizzato è situata nel quartiere Testaccio, a Roma. Entrambe le foto sono state scattate in Via Galileo Ferraris guardando verso Nord/Nord-Est.
La prima foto è stata scattata il 19 Marzo alle ore 08:21. Il sole è sorto da qualche ora e quindi si sta spostando da Est a Sud-Est. Le facciate a Sud-Ovest non sono illuminate e gli edifici alle spalle della macchina fotografica proiettano le proprie ombre sulle facciate esposte a Sud-Est degli edifici di fronte
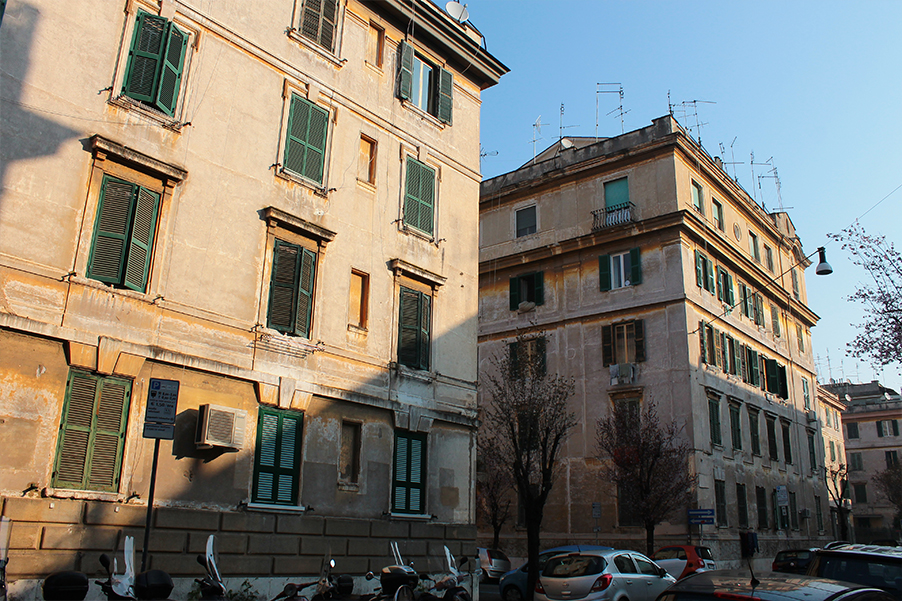
Il modello rispecchia piuttosto fedelmente la stuazione reale
La seconda foto è stata scattata lo stesso giorno, il 19 Marzo, alle ore 14:58. Il sole si trova a Sud-Ovest e quindi stavolta le facciate esposte in quella direzione sono illuminate, ma anche le facciate esposte a Sud-Est ricevono ancora luce. L'edificio sulla sinistra proietta la propria ombra sull'edificio al centro che, a sua volta, proietta la sua ombra sull'edificio a destra
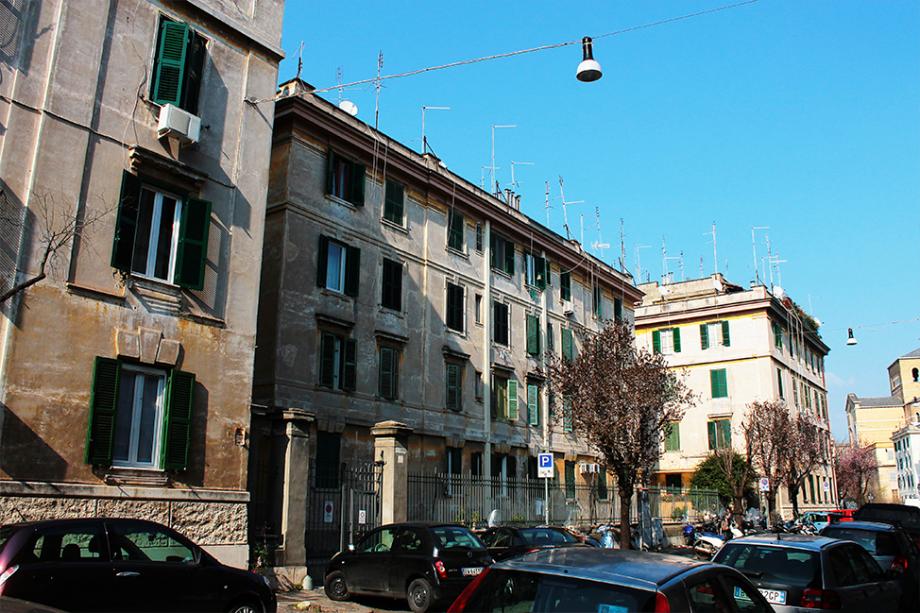
Il modello rispecchia piuttosto fedelmente la stuazione reale
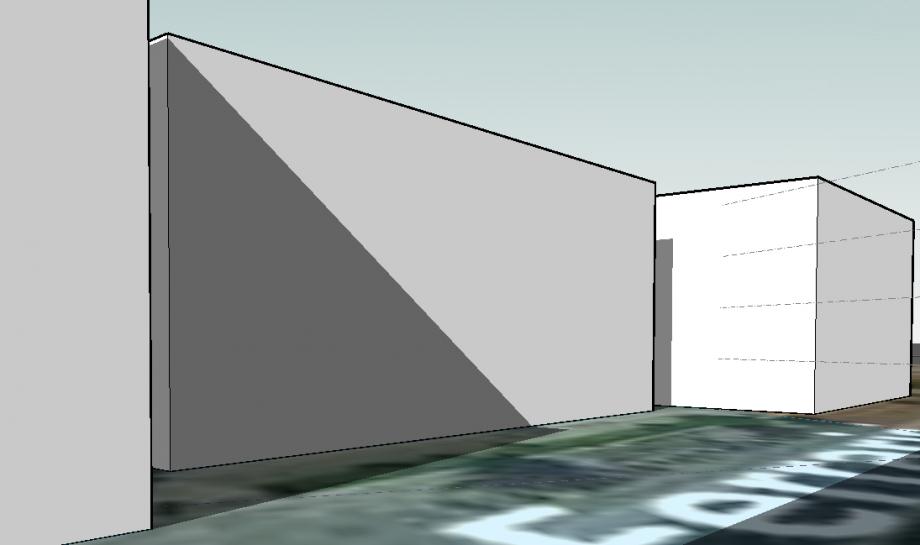
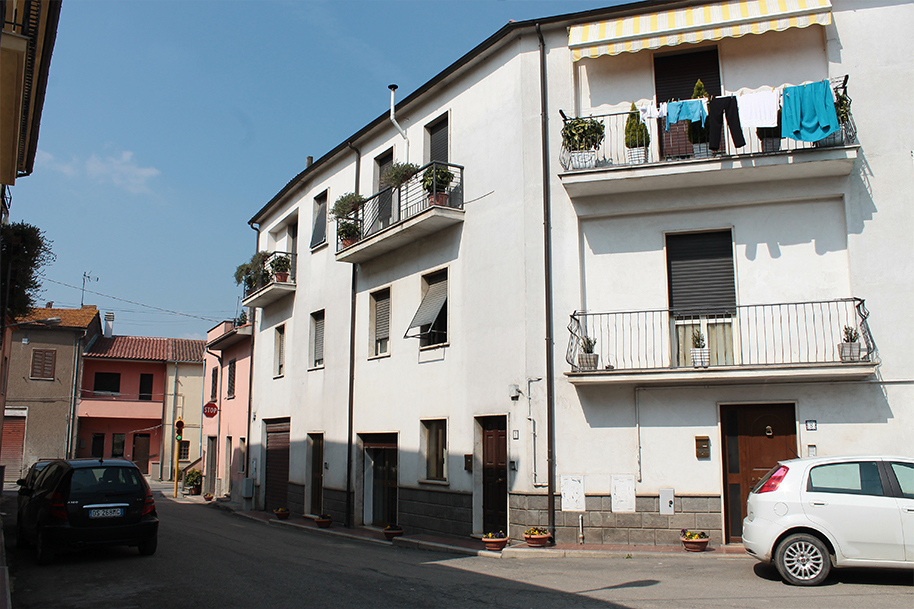
La seconda area che abbiamo analizzato è situata a Grotte Santo Stefano, un paese in provincia di Viterbo. Entrambe le foto sono state scattate in Piazza del Centarello guardando verso Nord/Nord-Ovest.
La prima foto è stata scattata il 20 Marzo alle ore 13:13. Il sole si trova molto in alto, sta andando da Sud a Sud-Ovest, quindi gli edifici sulla sinistra proiettano delle ombre che raggiungono per poco quelli sulla destra
Il modello rispecchia piuttosto fedelmente la stuazione reale

La seconda foto è stata scattata il giorno successivo, il 21 Marzo, alle ore 08:56. Questa volta il sole è sorto da qualche ora e quindi si sta spostando da Est a Sud-Est. I fronti degli edifici sulla destra sono completamente in ombra, ad eccezione di una facciata illuminata poiché ruotata verso Sud. Le ombre proiettate da questi edifici raggiungono quelli che si trovano in ultimo piano, oltre la strada

Il modello rispecchia piuttosto fedelmente la situazione reale
Essendo il modello affidabile, possiamo utilizzarlo per studiare il soleggiamento delle facciate rivolte sulla piazza dell'edificio in foto.
Negli equinozi di Primavera (21 Marzo) e d'Autunno (23 Settembre) la facciata rivolta a Sud inizia a ricevere luce dalle 07:00, mentre quelle a Sud-Ovest dalle 10:15. A partire dalle 12:15 le facciate (progredendo da quelle a Sud-Ovest a quella a Sud) iniziano ad essere raggiunte dalle ombre degli edifici di fronte, raggiungendo la metà (in altezza) della facciata alle 15:30.
Nel solstizio d'Estate (21 Giugno) la facciata Sud riceve luce dalle 08:15 e quelle a Sud-Ovest dalle 11:00. A partire dalle 15.30 le facciate iniziano ad essere raggiunte dalle ombre degli edifici di fronte, raggiungendo la metà della facciata alle 19:00.
Nel solstizio d'Inverno (22 Dicembre), infine, la facciata Sud riceve luce dalle 07:45 e quelle a Sud-Ovest dalle 09:00. A partire dalle 10:30 le facciate iniziano ad essere raggiunte dalle ombre degli edifici di fronte, raggiungendo la metà della facciata alle 12:00.
Possiamo quindi notare che la facciata Sud (come ci aspetteremmo, dato anche che si affaccia su una piazza) è ben illuminata durante tutto l'anno per l'intera mattinata e buona parte del pomeriggio. Le facciate Sud-Ovest chiaramente iniziano a ricevere luce in orari variabili della mattinata (a secodna della stagione) ma non riescono a sfruttare l'illuminazione pomeridiana a causa della presenza degli edifici di fronte: basti notare che negli equinozi, già alle 13:30 il piano terra si trova in ombra.
Ven, 20/03/2015 - 15:02